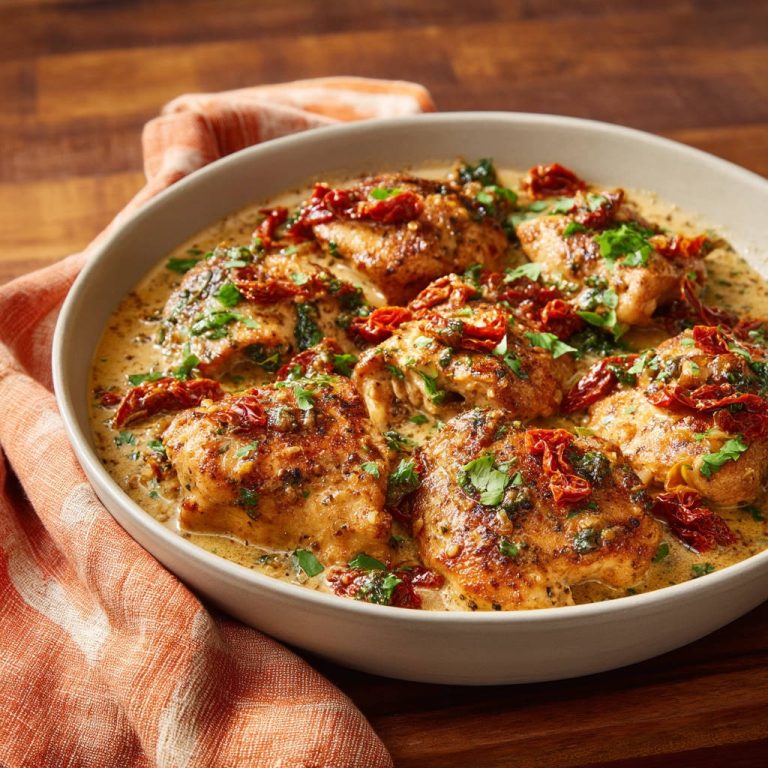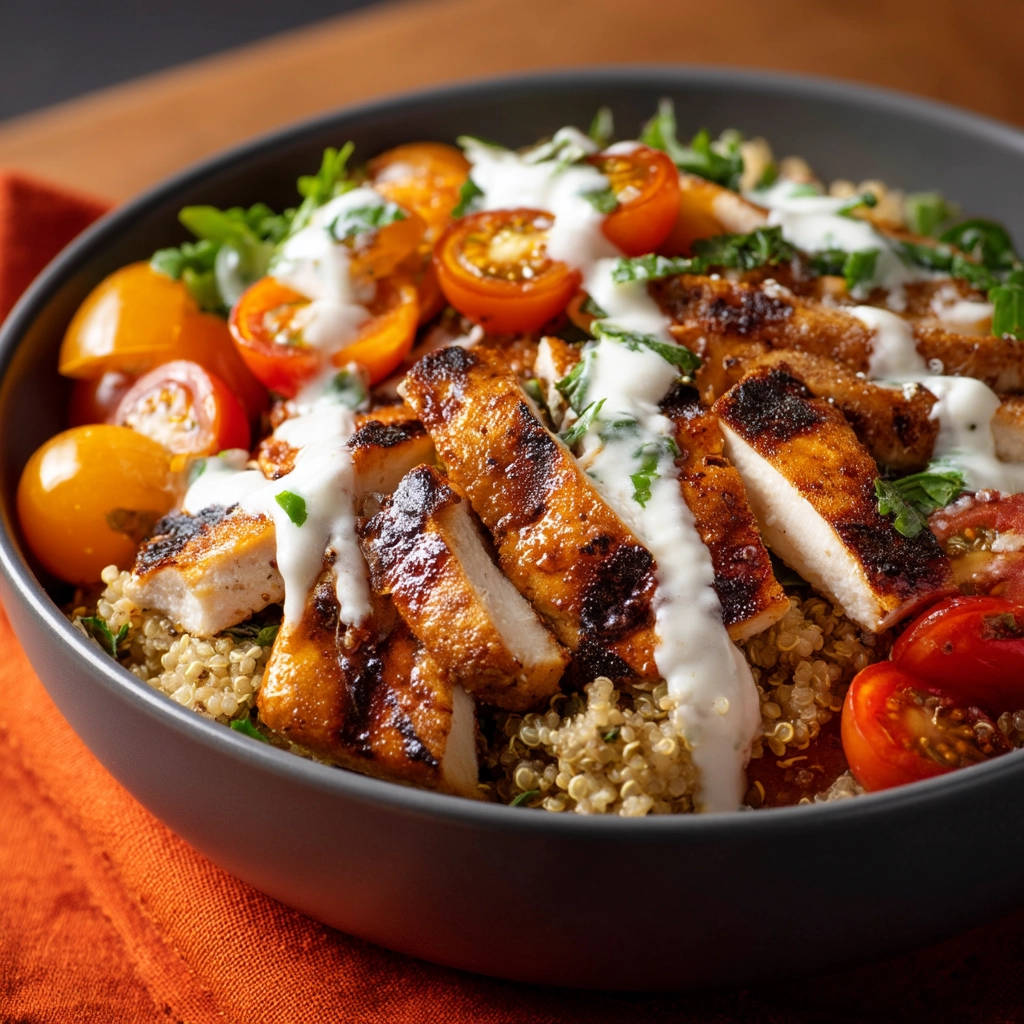
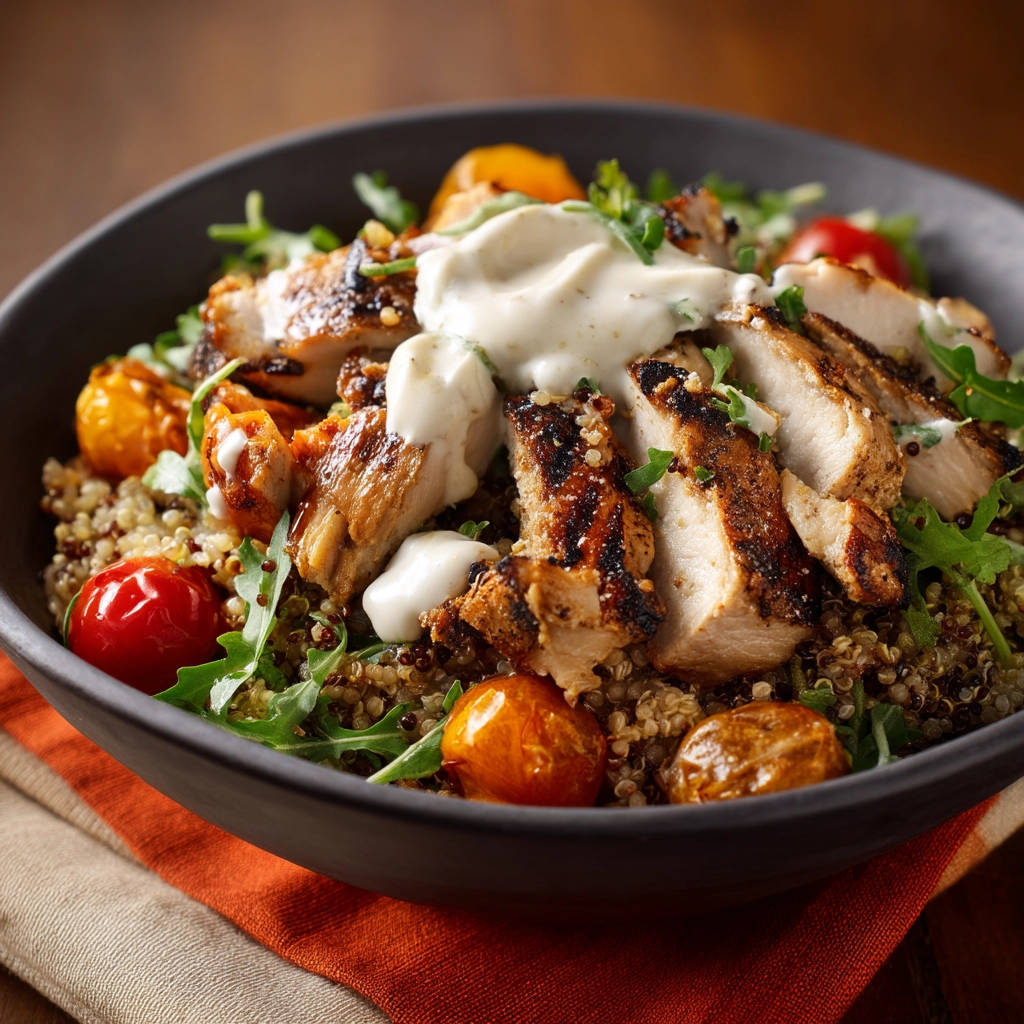
Craving a healthy and delicious meal that’s both satisfying and easy to prepare? Look no further than this Juicy Chicken & Quinoa Bowl! It’s packed with protein, fiber, and vibrant flavors, making it the perfect lunch or dinner option. Forget dry, boring chicken – we’re sharing the ultimate trick to achieving perfectly juicy chicken every single time!
Why You’ll Love This Chicken & Quinoa Bowl
This recipe isn’t just another healthy bowl; it’s a game-changer. Here’s why you’ll be making it again and again:
- Juicy Chicken, Guaranteed: Say goodbye to dry, tough chicken forever!
- Quick & Easy: Ready in under 45 minutes, perfect for busy weeknights.
- Packed with Nutrients: A balanced meal with protein, complex carbs, and healthy fats.
- Customizable: Easily adapt the ingredients to your preferences and dietary needs.
- Delicious Flavor: The combination of spices, fresh tomatoes, and creamy yogurt sauce is irresistible.
Gathering Your Ingredients for Juicy Chicken & Quinoa Bowls
The key to a truly standout chicken and quinoa bowl lies in the quality and freshness of your ingredients. The foundation of this bowl is a powerhouse of nutrients and flavor, starting with perfectly cooked quinoa and ending with a flavorful, juicy chicken. Let’s break down what you’ll need and why each ingredient plays a vital role.
For the Base and Grain:
- 1 cup Quinoa: This ancient grain is a complete protein and a fantastic source of fiber. Be sure to rinse it thoroughly before cooking to remove any bitterness.
- 2 cups Water or Low-Sodium Chicken Broth: Cooking the quinoa in broth adds an extra layer of flavor. Using low-sodium allows you to control the salt level.
The Juicy Chicken and Flavor Builders:
- 1 pound Boneless Skinless Chicken Breasts: The star of the show! We’ll show you how to make them incredibly juicy.
- 1 tablespoon Olive Oil, plus more for chicken: Olive oil adds richness and helps the chicken brown beautifully.
- 1 teaspoon Paprika: Adds a smoky sweetness to the chicken.
- 1/2 teaspoon Garlic Powder: A classic flavor enhancer.
- 1/2 teaspoon Cumin: Provides warmth and earthy notes.
- Salt to taste: Enhances all the flavors.
- Black pepper to taste: Adds a touch of spice.
The Fresh & Zesty Toppings:
- 2 cups Cherry Tomatoes, halved: These add a burst of sweetness and acidity.
- 1/2 cup Plain Yogurt (or non-dairy alternative): Creates a creamy and tangy sauce. Greek yogurt will give you a thicker consistency.
- 1 tablespoon Lemon Juice: Brightens the sauce and complements the yogurt.
- 2 tablespoons Fresh Parsley, chopped: Adds freshness and a pop of color.
- Fresh greens (like arugula or spinach), optional: Adds extra nutrients and a pleasant bitterness.
Crafting Your Juicy Chicken & Quinoa Bowl: Step-by-Step
Now, let’s get cooking! Follow these simple steps to create a delicious and satisfying quinoa bowl. The secret to unbelievably juicy chicken lies in a simple technique, so pay close attention!
- Rinse the Quinoa: Place the quinoa in a fine-mesh sieve and rinse it under cold water for about a minute. This removes any natural coating called saponin, which can give the quinoa a bitter taste.
- Cook the Quinoa: In a medium saucepan, combine the rinsed quinoa and water or broth. Bring the mixture to a boil over high heat. Once boiling, reduce the heat to low, cover the saucepan, and simmer for 15 minutes, or until all the liquid is absorbed and the quinoa is fluffy. Then, remove the saucepan from the heat and let it stand, covered, for 5 minutes. This allows the quinoa to fully steam and become even more tender. Finally, fluff it with a fork to separate the grains. Fluffing prevents the quinoa from clumping together.
- Prepare the Chicken: Place each chicken breast on a cutting board. The key here is even cooking! Using a sharp knife, carefully slice horizontally through the thickest part of each breast to create two thinner, even cutlets. This reduces the cooking time and helps the chicken cook more evenly, preventing dry spots. Pat the cutlets completely dry with paper towels. Removing excess moisture allows the spices to adhere better and promotes better browning.
- Season the Chicken: In a small bowl, combine the paprika, garlic powder, cumin, salt, and pepper. Drizzle the chicken cutlets with a little olive oil (this helps the spices stick) and then rub the spice mixture all over both sides, ensuring an even coating. Don’t be shy – make sure every part of the chicken is covered in the flavorful spice blend.
- Heat the Skillet: Heat 1 tablespoon of olive oil in a large skillet over medium-high heat. It’s important to get the skillet nice and hot before adding the chicken. Wait until the oil is shimmering hot but not smoking. This ensures a good sear and prevents the chicken from sticking.
- Cook the Chicken: Carefully place the seasoned chicken cutlets in the hot skillet, making sure not to overcrowd the pan. If you overcrowd the pan, the chicken will steam instead of sear, resulting in less browning. Cook for 3-4 minutes per side, or until the chicken is cooked through and golden brown with some nice char marks. The thinner cutlets cook quickly, so keep a close eye on them! The internal temperature should reach 165°F (74°C).
- The Juicy Chicken Secret: Rest the Chicken! Once cooked, immediately remove the chicken from the skillet and place it on a clean plate. Now, here’s the crucial step: let the chicken rest for at least 5 minutes before slicing. This allows the juices to redistribute throughout the meat, keeping it incredibly moist and preventing them from running out when you slice it. Trust us, this makes all the difference!
- Prepare the Sauce: While the chicken rests, prepare the yogurt sauce. In a small bowl, whisk together the yogurt, lemon juice, and chopped parsley. Season with a pinch of salt if desired, to taste. Taste and adjust the seasoning as needed.
- Slice the Chicken: Slice the rested chicken against the grain into strips. Cutting against the grain shortens the muscle fibers, making the chicken even more tender and easier to chew.
- Assemble the Bowls: Divide the cooked quinoa among bowls. Top with the sliced chicken, halved cherry tomatoes, and fresh greens (if using). Drizzle generously with the yogurt sauce. Now, dig in and enjoy your delicious and juicy chicken and quinoa bowl!
Tips for Perfect Chicken & Quinoa Bowls Every Time
Want to take your chicken and quinoa bowl to the next level? Here are a few pro tips and variations to ensure perfection every time:
- Don’t skip the resting step! This is the key to truly juicy chicken. The resting time allows the juices to redistribute throughout the meat, resulting in a more tender and flavorful bite.
- Spice it up! Add a pinch of red pepper flakes to the chicken spice mix for a little heat.
- Get creative with the toppings! Avocado, cucumber, bell peppers, or even a sprinkle of cheese would be delicious additions.
- Make it a meal prep masterpiece! Cook the quinoa and chicken ahead of time and store them separately in the refrigerator. Assemble the bowls just before serving. This will save you time during the week.
- Non-dairy option: Use a plant-based yogurt alternative, like soy or coconut yogurt, for the sauce to make this recipe dairy-free.
What to Serve With Juicy Chicken & Quinoa Bowls
While this chicken and quinoa bowl is a complete meal on its own, here are a few side dishes that would complement it beautifully:
- Roasted vegetables like broccoli or sweet potatoes. Or, for a unique spin, try our Roasted Sweet Potato Chicken Power Bowl recipe.
Your Chicken & Quinoa Bowl Questions Answered (FAQ)
Can I use frozen chicken breasts?
Yes, you can use frozen chicken breasts, but be sure to thaw them completely before cooking. Pat them dry with paper towels to remove any excess moisture. For another great chicken recipe, try our Cheesy Chicken and Broccoli Casserole.
Can I substitute the quinoa with another grain?
Absolutely! Brown rice, couscous, or farro would all work well in this recipe. Adjust the cooking time and liquid accordingly. If you’re looking for another quinoa recipe, consider trying our Creamy Paneer Rice Bowl and simply substitute the rice for quinoa!
How long will leftovers last?
Leftovers can be stored in an airtight container in the refrigerator for up to 3-4 days. Reheat gently in the microwave or on the stovetop.
Can I make this recipe ahead of time?
Yes, this recipe is great for meal prepping! Cook the quinoa and chicken in advance and store them separately. Prepare the yogurt sauce just before serving to maintain its freshness. Assemble the bowls when you’re ready to eat.
Enjoy Your Homemade Juicy Chicken & Quinoa Bowl!
There you have it – a healthy, flavorful, and incredibly satisfying Juicy Chicken & Quinoa Bowl that’s perfect for any occasion. With this simple recipe and our secret to juicy chicken, you’ll be enjoying delicious bowls for days to come! Don’t forget to leave a comment below and let us know what you think. Rate the recipe if you loved it, and share it with your friends and family!