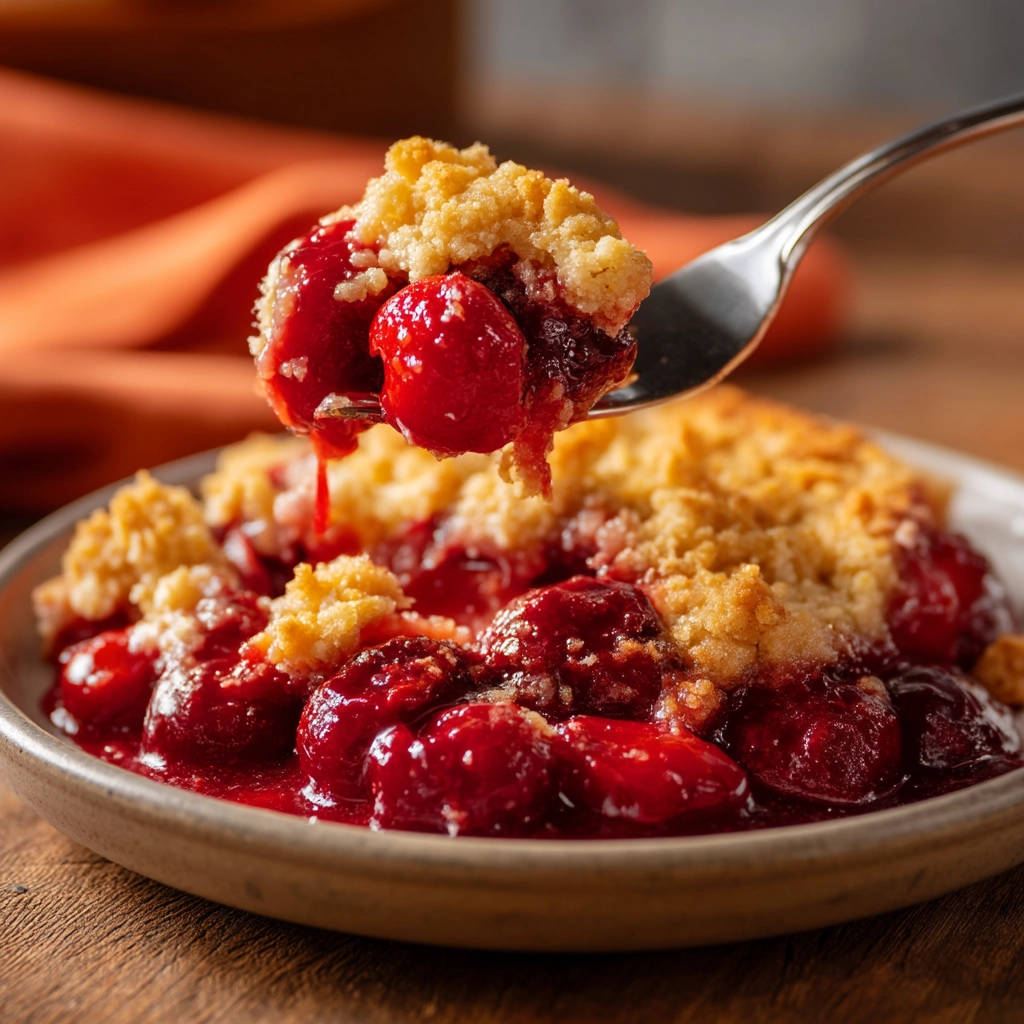
Oh, friends! If there’s one dessert that screams comfort and simple joy, it’s a warm fruit crumble. That sweet, bubbling fruit underneath a golden, crispy, crumbly topping… pure bliss! But if you’ve ever pulled a beautiful-looking crumble out of the oven only to find the top is soft and disappointingly damp, you know the heartbreak. I used to struggle with soggy crumble topping myself! After much trial and error, I finally unlocked the secret to achieving that perfect, crunchy texture every single time. And guess what? It’s probably much simpler than you think. This Classic Cherry Crumble recipe is the result, delivering a delightful contrast of sweet-tart cherries and a truly glorious crumble topping.
Get ready to ditch those soggy topping woes forever and bake a dessert that will disappear faster than you can say “seconds.” This cherry crumble recipe is easy enough for a weeknight treat but impressive enough for guests.
Why This Classic Cherry Crumble Recipe is a Keeper
Beyond solving the dreaded soggy topping issue, this recipe has so many reasons to become your go-to:
- It uses simple, common pantry ingredients.
- You can use fresh or frozen cherries, making it a year-round dessert.
- The filling is perfectly thickened, creating a luscious layer without excess liquid.
- The topping stays wonderfully crisp, offering that essential textural contrast.
- It’s incredibly versatile – while cherries are classic, you can easily adapt it for other fruits.
- It’s a crowd-pleaser, evoking cozy, nostalgic feelings with every bite.
Gathering Your Ingredients for the Perfect Cherry Crumble
Creating this delightful Classic Cherry Crumble starts with selecting the right components. Each ingredient plays a specific role in ensuring a balanced flavor profile and, most importantly, that irresistibly crunchy topping and thick, glossy filling.
For the vibrant cherry filling, you’ll need:
- 4 cups fresh or frozen cherries, pitted: The star of the show! Cherries provide that wonderful sweet-tart flavor. Using pitted cherries is key for ease of eating. Frozen cherries are a fantastic option and often available year-round; just be sure to thaw them slightly if they’re frozen solid.
- 1/2 cup granulated sugar: This sweetens the cherries just enough, balancing their natural tartness.
- 2 tablespoons cornstarch or all-purpose flour: This is your thickening agent for the fruit filling. It binds with the cherry juices as they heat, preventing a watery mess under your crumble. Cornstarch tends to give a slightly clearer, glossier finish, while flour provides a more opaque thickness.
- 1 tablespoon fresh lemon juice: A little acidity brightens the flavor of the cherries and enhances their natural sweetness. It’s a small amount but makes a noticeable difference.
Now, for that game-changing crispy crumble topping, gather these:
- 1 cup all-purpose flour: The base for your dry crumble mixture.
- 1/2 cup packed light brown sugar: Brown sugar adds moisture and a lovely caramel note to the topping. Packing it ensures you get the correct amount for the texture.
- 1/2 cup rolled oats: These provide extra texture and a slightly nutty flavor, contributing to the rustic charm and crispness of the topping. Ensure you use rolled oats, not instant oats, for the best texture.
- 1 teaspoon cinnamon: The perfect warm spice to complement the cherries. Feel free to adjust this amount based on your preference.
- 1/4 teaspoon salt: Just a pinch of salt helps to balance the sweetness and enhances all the other flavors.
- 1/2 cup cold unsalted butter, cut into small cubes: This is arguably the most critical ingredient for topping texture! Using cold butter and cutting it in properly is the secret to crispness. Unsalted butter allows you to control the saltiness.
Having all your ingredients prepped and ready before you start makes the process smooth and enjoyable.
Crafting Your Classic Cherry Crumble: Step-by-Step to Crispy Perfection
Ready to transform these simple ingredients into a spectacular dessert? Follow these steps carefully, paying attention to the little details that make all the difference, especially for that glorious, non-soggy topping!
-
Set the stage: Preheat your oven to 375 degrees F (190 degrees C). Getting the oven to the correct temperature before the crumble goes in ensures even baking from the start. While the oven heats, take a moment to lightly grease an 8×8 inch baking dish. A little butter or non-stick spray will help prevent the bubbly cherry filling from sticking to the sides.
-
Prepare the luscious cherry filling: In a large mixing bowl, combine your pitted cherries (whether fresh or slightly thawed frozen), the granulated sugar, your chosen thickener (cornstarch or flour), and the fresh lemon juice. Use a spoon or spatula to gently toss everything together until the cherries are evenly coated. You’ll see the sugar and thickener start to cling to the fruit. This step is absolutely vital because it ensures the cherry juices thicken properly during baking, creating that lovely, slightly saucy filling and, crucially, preventing excess liquid from making your topping soggy. Once mixed, pour this vibrant cherry mixture into the prepared baking dish, spreading it out into an even layer.
-
Mix the dry crumble topping ingredients: Grab a separate, medium-sized bowl. Add the all-purpose flour, packed light brown sugar, rolled oats, cinnamon, and salt to the bowl. Use a whisk or a fork to thoroughly combine these dry ingredients. Whisking helps distribute the brown sugar and spices evenly throughout the mixture.
-
Incorporate the cold butter: This is where the magic happens for crispiness! Add the small cubes of cold unsalted butter to the dry ingredients in the bowl. Now, using your fingertips, a pastry blender, or even a fork (though hands work best for control!), work the cold butter into the dry mixture. You’re not trying to create a smooth dough here. The goal is to break down the butter until the mixture resembles coarse crumbs, similar to beach sand, but with some larger pieces of butter still visible – think pea-sized or slightly larger. The key here is to not overmix. Those little pockets of cold butter will melt in the oven, creating steam that puffs up the surrounding flour mixture, resulting in that coveted light and crisp texture.
-
Assemble the crumble: Take your beautiful crumbly mixture and sprinkle it evenly over the cherry filling in the baking dish. Make sure you cover the cherries edge-to-edge to get that perfect golden crust over the whole dessert. Don’t pack it down; keep it loose and crumbly!
-
Bake to golden perfection: Carefully place the baking dish into your preheated oven. Bake for 35 to 45 minutes. You’ll know it’s ready when the crumble topping is a lovely golden brown color and you can see the cherry filling bubbling enthusiastically around the edges of the dish. The bubbling indicates the fruit juices have thickened properly. Baking time can vary depending on your oven, so keep an eye on it! Once baked, carefully remove the crumble from the oven and place it on a wire rack. Allow it to cool slightly before serving. Letting it cool for 10-15 minutes helps the filling set slightly, making it easier to serve and enjoy.
See? Achieving that perfect crispy topping isn’t complicated at all! It’s all in the cold butter and how you incorporate it.
Tips for Perfect Cherry Crumble Every Time
Want to make sure your cherry crumble is absolutely show-stopping? Here are a few extra tips and ideas:
- Don’t Overmix the Topping: We can’t stress this enough! Overmixing develops gluten in the flour, leading to a tougher, less crisp topping. Stop mixing as soon as it looks like coarse crumbs with visible butter pieces.
- Keep Ingredients Cold: Ensure your butter is very cold before you start, and work quickly when cutting it into the flour mixture. This preserves those crucial cold butter pockets.
- Adjust Sweetness: The amount of sugar in the filling can be adjusted based on the sweetness of your cherries. Taste a cherry before adding sugar. If they’re very tart, you might add a touch more sugar, maybe up to 3/4 cup.
- Check for Doneness: Look for both the golden brown topping AND the bubbly filling. If the topping browns too quickly but the filling isn’t bubbling, loosely tent the crumble with foil for the rest of the baking time.
- Vary the Fruit: While this is a Classic Cherry Crumble, you can easily swap out half or all of the cherries for other fruits. Apples, peaches (like in our Classic Peach Crumble Tart), berries (try mixing them for a Fruity Crumble Bowl), or even rhubarb work beautifully. Just note that some fruits might require slight adjustments to the thickener amount.
- Add Nuts: For extra crunch and flavor, add about 1/4 to 1/2 cup of chopped nuts like almonds, walnuts, or pecans to the dry crumble mixture along with the oats.
- Spice It Up: Beyond cinnamon, consider adding a pinch of nutmeg, cardamom, or even a tiny bit of ground ginger for a different flavor profile.
Serving Suggestions for Your Homemade Cherry Crumble
A warm, bubbly cherry crumble is delicious all on its own, but pairing it with a few extras takes it to the next level. A scoop of vanilla ice cream is a classic choice, the cold creaminess melting into the warm fruit. A dollop of fresh whipped cream is equally wonderful. For something a little lighter, a spoonful of plain yogurt or créme fraîche adds a tangy contrast.
Thinking about a full meal? Start with a hearty main course like Creamy Steak Pasta or Grilled Chicken Pasta Salad, then finish with this delightful dessert.
Your Classic Cherry Crumble Questions Answered (FAQ)
Got questions about making the best cherry crumble? Here are some common ones:
Can I use frozen cherries?
Absolutely! Frozen cherries work wonderfully in this recipe. They might release a little more juice than fresh cherries, so ensuring you use the full 2 tablespoons of cornstarch or flour is important for proper thickening. You don’t need to fully thaw them before mixing, just enough so they aren’t one solid block.
What’s the difference between a crumble and a crisp?
Generally, a crumble topping is made primarily with flour, sugar, butter, and sometimes oats, like this recipe. A crisp topping typically includes oats more prominently, sometimes in place of some of the flour, and often contains nuts.
Why is my crumble topping soggy?
The main culprits are usually not enough thickener in the fruit filling, causing it to release too much liquid, or the butter in the topping wasn’t cold enough or wasn’t properly cut into the dry ingredients. Ensuring cold butter pieces remain helps create that crucial crisp texture as they melt.
Can I make this cherry crumble ahead of time?
You can prepare the crumble topping mixture and store it in an airtight container in the refrigerator for up to 3 days. You can also prepare the cherry filling and keep it covered in the fridge for up to 24 hours. Assemble and bake just before serving for the freshest, crispiest result.
How do I store leftover cherry crumble?
Let the crumble cool completely, then cover the baking dish tightly with plastic wrap or foil. Store leftovers in the refrigerator for 3-4 days. To reheat, scoop individual portions into a bowl and microwave briefly, or warm the entire dish (loosely covered) in a 300°F (150°C) oven until heated through. Reheating in the oven helps the topping crisp up again slightly.
Can I make this in a different size dish?
Yes, you could use a slightly larger or smaller dish. An 8×8 inch dish yields a good fruit-to-topping ratio and bake time. If using a larger dish (like a 9×13, you’d need to double the recipe quantities), or a smaller dish, adjust baking time accordingly. A wider dish might mean a slightly faster bake time, while a deeper, smaller dish might take longer.
Enjoy Your Homemade Classic Cherry Crumble!
There you have it – the secret to a perfect, crispy-topped Classic Cherry Crumble. No more soggy disappointments, just bubbly, sweet-tart cherry goodness under a golden, crunchy blanket. It’s the kind of dessert that warms you from the inside out and brings smiles to everyone’s faces.
Give this recipe a try and share the delicious results with your loved ones. We’d love to hear how yours turned out! Leave a comment below and let us know what you thought, or if you tried any fun variations. Happy baking!
Classic Cherry Crumble

Ingredients
- 4 cups fresh or frozen cherries pitted
- 1/2 cup granulated sugar for filling
- 2 tablespoons cornstarch or all purpose flour
- 1 tablespoon fresh lemon juice
- 1 cup all purpose flour for topping
- 1/2 cup packed light brown sugar
- 1/2 cup rolled oats
- 1 teaspoon cinnamon
- 1/4 teaspoon salt
- 1/2 cup cold unsalted butter cut into small cubes
Directions
- Preheat your oven to 375 degrees F (190 degrees C). Lightly grease an 8×8 inch baking dish.
- In a large bowl, combine the pitted cherries, granulated sugar, cornstarch (or flour), and lemon juice. Gently toss to coat the cherries evenly. This step is crucial for thickening the fruit juices and preventing the topping from getting soggy. Pour the mixture into the prepared baking dish.
- In a separate medium bowl, whisk together the all purpose flour, brown sugar, rolled oats, cinnamon, and salt for the topping.
- Add the cold butter cubes to the dry ingredients. Use your fingertips or a pastry blender to cut the butter into the dry ingredients until the mixture resembles coarse crumbs with some pea sized pieces of butter still visible. Do not overmix; leaving some butter pieces helps create that coveted crisp texture.
- Sprinkle the crumble mixture evenly over the cherry filling in the baking dish.
- Bake for 35 to 45 minutes, or until the topping is golden brown and the fruit filling is bubbly around the edges. Let it cool slightly before serving.