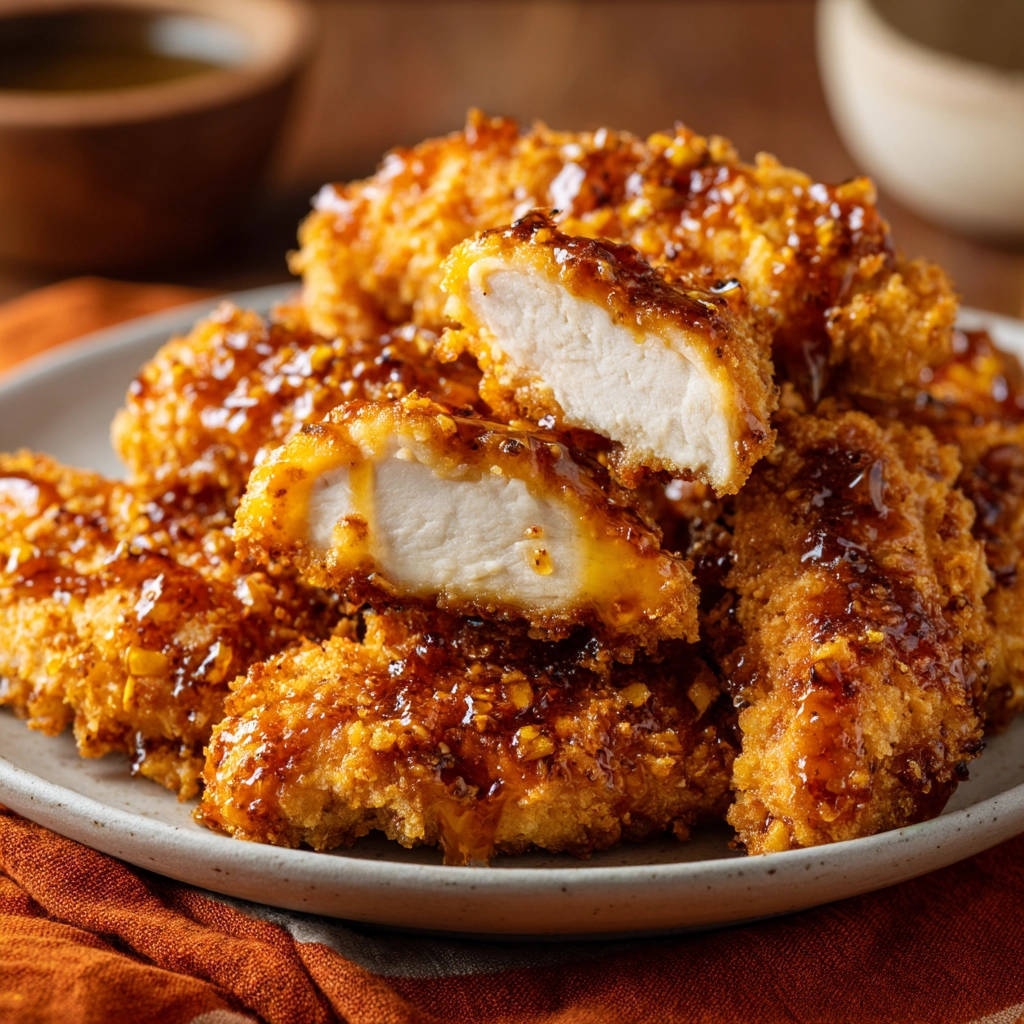
Oh, honey garlic chicken tenders. They sound so simple, right? Sweet, savory, sticky goodness coating perfectly cooked chicken. The kind of comfort food that makes you feel like a kid again, but with a grown-up flavor twist. Except, if you’re anything like I used to be, your homemade versions ended up… well, let’s just say “soggy” and “disappointing.” Instead of that satisfying crunch you crave, you got a sad, limp coating that just peeled right off. Ugh, the worst!
I struggled with achieving truly crispy honey garlic chicken tenders for years. I tried different breadings, different cooking times, everything. But they just never had that perfect, golden, shatteringly crispy exterior that makes this dish so incredible. That is, until I discovered one simple, slightly unconventional trick that changed everything. Now, I can guarantee perfectly crispy tenders every single time, coated in that irresistible sticky honey garlic sauce. And the best part? It’s incredibly easy!
Forget those past soggy failures. This recipe is your ticket to chicken tender redemption. Get ready for a dinner that the whole family will devour, demanding seconds. Seriously, you won’t believe the crunch!
Why These Crispy Honey Garlic Chicken Tenders Are a Keeper
Beyond just banishing sogginess forever, this recipe has become a staple in my kitchen for a few key reasons:
- Guaranteed Crispiness: That simple trick really works! You’ll achieve an incredibly satisfying crunch that holds up beautifully, even after being coated in sauce (for a little while, anyway – they disappear too fast to get truly soggy!).
- Irresistible Flavor: The sweet and tangy honey garlic sauce is the perfect counterpoint to the crispy chicken. It’s sticky, savory, and packed with aromatic garlic and ginger.
- Quick & Easy: With only about 25 minutes from start to finish, this is a perfect weeknight meal. The steps are straightforward and don’t require any fancy equipment.
- Family Favorite: Kids and adults alike absolutely adore these. They’re perfect for dipping, serving over rice, or just eating straight off the plate.
Gathering Your Ingredients for Crispy Honey Garlic Chicken Tenders
Making these delightful crispy honey garlic chicken tenders starts with selecting the right components. We’re building layers of flavor and texture, from the tender chicken center to the crunchy coating and the glossy, sticky sauce. Most of these items are likely already in your pantry or easily found at your local grocery store.
We begin with boneless, skinless chicken tenders. These are naturally portioned and cook quickly and evenly, making them ideal for this recipe. For the dredging station, we’ll need all-purpose flour seasoned with salt and black pepper to create the initial dry layer that helps the egg wash adhere. The egg wash itself is just large eggs whisked with a touch of water – this acts as the essential “glue” for our crispy coating.
Now, for the secret weapon behind the crispiness: crispy breadcrumbs or crushed crispy cereal flakes. While traditional breadcrumbs work okay, using a crispier type of breadcrumb or even plain crispy cereal that’s been crushed finely makes a dramatic difference in achieving that ultimate crunch. Trust me on this one!
For frying, you’ll need a neutral-flavored oil with a high smoke point, like vegetable or canola oil. This allows us to get the oil hot enough for quick, effective frying without burning.
Finally, the star of the show: the honey garlic sauce. We combine sweet honey with savory soy sauce, pungent minced garlic, warm ginger paste (or freshly grated ginger for extra zing), and a splash of apple cider vinegar for a touch of tanginess to balance the sweetness. This simple mix simmers into a glorious, sticky glaze.
Here’s everything you’ll need:
- 1 pound boneless skinless chicken tenders
- 1/2 cup all purpose flour
- 1 teaspoon salt
- 1/2 teaspoon black pepper
- 2 large eggs
- 1 tablespoon water
- 2 cups crispy breadcrumbs or crushed crispy cereal flakes
- Vegetable oil or canola oil for frying
- 1/2 cup honey
- 2 tablespoons soy sauce
- 1 clove garlic, minced
- 1 teaspoon ginger paste or grated fresh ginger
- 1 teaspoon apple cider vinegar
Crafting Your Crispy Honey Garlic Chicken Tenders: Step-by-Step
Now for the fun part – bringing it all together! This process is straightforward, but paying attention to a few key details will ensure your chicken tenders are truly crispy and delicious.
-
Prepare the Chicken: Your first mission is to make sure the chicken is as dry as possible. Pat each chicken tender thoroughly dry with paper towels. Any excess moisture on the surface will create steam when it hits the hot oil, and steam is the enemy of crispiness! Think of it as giving your chicken a little pre-frying spa treatment.
-
Set Up Your Breading Station: Organization is key for a smooth breading process. Grab three shallow dishes or plates. In the first, whisk together the all-purpose flour, salt, and black pepper. In the second, whisk the two large eggs with the tablespoon of water until well combined – this is your sticky layer. In the third dish, spread out your crispy breadcrumbs or crushed crispy cereal flakes. Having everything ready in a line makes dredging efficient.
-
Dredge the Chicken: Take one chicken tender at a time and first dredge it in the flour mixture, making sure it’s lightly coated on all sides. Gently shake off any excess flour – you want a thin, even layer, not clumps. Next, dip the flour-coated tender into the egg wash, letting any excess drip back into the dish. Finally, carefully place the egg-washed tender into the breadcrumbs or cereal flakes. Coat it generously, pressing lightly with your fingers to help the crumbs really adhere to the chicken. Set the fully coated tender aside and repeat with the remaining chicken.
-
Heat the Oil: Pour your vegetable or canola oil into a large, heavy skillet or pot. You need enough oil to reach about 1/2 inch in depth – this allows the tenders to be partially submerged and cook evenly. Place the skillet over medium-high heat and let the oil heat up. The ideal temperature for frying these is 350 degrees Fahrenheit. If you have a kitchen thermometer, use it! If not, you can test the oil by dropping a tiny pinch of the breadcrumbs into it. If they immediately sizzle and float to the top, the oil is ready. Be patient and let the oil get hot enough before adding the chicken; this is crucial for crispness and preventing greasiness.
-
Fry the Chicken: Carefully, and I mean carefully, add the breaded chicken tenders to the hot oil. It’s really important not to overcrowd the pan. Frying in batches is your friend here! Putting too many tenders in at once will drastically lower the oil temperature, leading to soggy, unevenly cooked chicken. Cook for about 3 to 4 minutes per side, or until the chicken is golden brown and cooked through. The internal temperature should reach 165 degrees Fahrenheit. Use tongs to gently flip them halfway through. This careful frying technique ensures they get that beautiful golden color and cook properly while developing that satisfying crunch.
-
Drain the Excess Oil: As each batch of chicken finishes cooking, remove them from the hot oil using a slotted spoon or tongs. Immediately transfer them to a wire rack set over a baking sheet. Letting them drain on a wire rack is essential because it allows air to circulate around the entire tender, preventing the bottom from sitting in residual oil and becoming soggy. Don’t place them directly on paper towels unless it’s just for a quick blot after the wire rack drain.
-
Prepare the Honey Garlic Sauce: While the chicken is frying (or even while you’re breading, if you’re efficient!), make the quick sauce. In a small saucepan, combine the honey, soy sauce, minced garlic, ginger paste, and apple cider vinegar. Place the saucepan over medium heat and bring the mixture to a gentle simmer, stirring occasionally to combine the ingredients. Once simmering, reduce the heat to low and let it bubble gently for about 2-3 minutes. The goal is for it to thicken slightly into a glossy, pourable glaze. Be careful not to over-thicken, as it will get stickier as it cools.
-
Sauce and Serve: Arrange the beautiful, crispy chicken tenders on a serving plate or in a serving dish. Just before you’re ready to serve, generously drizzle the warm honey garlic sauce over the top. Coating them right at the last minute helps maintain that wonderful crispiness for as long as possible. Get ready for applause!
Tips for Perfect Crispy Honey Garlic Chicken Tenders Every Time
While the recipe instructions are pretty foolproof, here are a few extra tips and tricks to elevate your crispy chicken tender game:
- The Crispy Breading Secret: As mentioned, using extra crispy breadcrumbs (like Panko) or crushed plain crispy cereal flakes is the real game-changer for ultimate crunch. Some people even swear by crushing certain potato chips! Experiment to find your favorite.
- Double Fry for Extra Crunch: For restaurant-level crispiness, you can try double frying. Fry the chicken for about 2-3 minutes per side, remove to the wire rack, let them rest for 5-10 minutes, then return them to the hot oil for another 1-2 minutes per side until deeply golden and crispy.
- Don’t Rush the Oil: Heating the oil to the correct temperature (350°F) is critical. If it’s too cool, the breading will absorb too much oil and be greasy and soggy. If it’s too hot, the outside will burn before the inside cooks.
- Cooking Temperature Check: While time is a guide, using an instant-read thermometer to check that the chicken reaches an internal temperature of 165°F is the best way to ensure they are safely cooked without being overdone and dry.
- Sauce Consistency: If your sauce gets too thick while simmering, you can whisk in a tiny splash of water or more soy sauce to thin it out slightly. If it’s too thin, simmer for another minute or two.
- Making Ahead: You can bread the chicken ahead of time and store it on a wire rack set over a baking sheet in the refrigerator for a few hours before frying. Reheat leftover chicken in an air fryer or oven to regain some crispness, though it won’t be quite the same as fresh.
What to Serve With Your Crispy Honey Garlic Chicken Tenders
These crispy chicken tenders are incredibly versatile and pair well with a variety of sides. For a classic pairing, serve them over a bed of fluffy rice, perhaps something like our Easy Mexican Rice or simple steamed rice. Another great option is roasted vegetables like our Crispy Roasted Brussels Sprouts or some Easy Crispy Oven Potato Wedges.
Looking for something lighter? A fresh green salad, maybe with a light vinaigrette, provides a nice contrast. Or, if you’re feeling indulgent, serve them alongside waffles for a fun twist on chicken and waffles!
Your Crispy Honey Garlic Chicken Tenders Questions Answered (FAQ)
Got questions? I’ve got answers! Here are some common inquiries about making these delicious chicken tenders.
Can I use chicken breasts instead of tenders?
Yes, you absolutely can! Simply cut boneless, skinless chicken breasts into similarly sized strips or ‘tenders’. Make sure they are uniform in size so they cook evenly. Pound thicker parts slightly if necessary to ensure they are about the same thickness.
What’s the secret trick to guaranteed crispiness?
The main trick here is twofold: first, thoroughly patting the chicken dry before breading, and second, using a truly crispy breading material like Panko breadcrumbs or crushed crispy cereal flakes. Also, frying at the correct oil temperature and not overcrowding the pan are absolutely crucial steps that support that crisp texture.
My sauce is too thin/too thick. How can I fix it?
If your honey garlic sauce is too thin after simmering for a few minutes, let it simmer gently for another minute or two, stirring, to allow more water to evaporate. If it becomes too thick and sticky, simply whisk in a teaspoon or two of hot water or soy sauce until it reaches your desired drizzling consistency.
Can I bake or air fry these instead of frying?
While frying yields the absolute best, most consistent crispiness for this specific recipe method, you can adapt it. To bake, place the breaded tenders on a wire rack over a baking sheet and bake at 400°F (200°C) for 20-25 minutes, flipping halfway, until cooked through and golden. For air frying, preheat your air fryer to 400°F (200°C), spray the basket and tenders lightly with oil, and air fry for 8-12 minutes, flipping halfway, until golden and cooked. The crispiness will be good, but often not quite the same as traditional frying.
Why did my chicken turn out soggy?
Sogginess usually comes down to a few factors: 1) Not drying the chicken thoroughly before breading, 2) The oil wasn’t hot enough, causing the breading to soak up oil instead of crisping, 3) Overcrowding the pan, which lowers the oil temperature, or 4) Letting the cooked chicken sit on a flat surface (like paper towels) instead of on a wire rack, trapping steam and oil underneath.
Enjoy Your Homemade Crispy Honey Garlic Chicken Tenders!
There you have it! The secrets to achieving those perfectly crispy, sweet, and savory honey garlic chicken tenders you’ve been dreaming of. No more soggy disappointments, just pure crunchy, flavorful joy. This recipe is proof that with a couple of simple techniques, you can elevate classic comfort food to new heights.
Give this recipe a try tonight and prepare to be amazed by the crunch! If you make them, please come back and leave a comment below to let me know how they turned out. Happy cooking!
Crispy Honey Garlic Chicken Tenders

Ingredients
- 1 pound boneless skinless chicken tenders
- 1/2 cup all purpose flour
- 1 teaspoon salt
- 1/2 teaspoon black pepper
- 2 large eggs
- 1 tablespoon water
- 2 cups crispy breadcrumbs or crushed crispy cereal flakes
- Vegetable oil or canola oil for frying
- 1/2 cup honey
- 2 tablespoons soy sauce
- 1 clove garlic minced
- 1 teaspoon ginger paste or grated fresh ginger
- 1 teaspoon apple cider vinegar
Directions
- Pat the chicken tenders thoroughly dry with paper towels. This step is crucial for achieving a crispy coating.
- Set up a breading station. In a shallow dish, mix the flour, salt, and pepper. In a second shallow dish, whisk the eggs with the water. In a third shallow dish, add the crispy breadcrumbs or crushed cereal flakes.
- Dredge each chicken tender first in the flour mixture, shaking off excess. Then dip in the egg wash, letting excess drip off. Finally, coat generously with the breadcrumbs or cereal, pressing lightly to help them adhere.
- Pour enough oil into a large heavy skillet or pot to reach about 1/2 inch depth. Heat the oil over medium high heat until it reaches 350 degrees Fahrenheit. You can test the oil by dropping a small pinch of breadcrumbs in it, if it sizzles immediately, it’s ready.
- Carefully add the chicken tenders to the hot oil in batches. Do not overcrowd the pan, as this will lower the oil temperature and result in soggy chicken. Cook 3 to 4 minutes per side, until golden brown and the internal temperature reaches 165 degrees Fahrenheit. This careful frying technique is key to the crispness.
- As the chicken finishes cooking, remove them from the oil with a slotted spoon and place them on a wire rack set over a baking sheet to drain. This allows air to circulate, keeping the coating crispy.
- While the chicken cooks, prepare the sauce. In a small saucepan, combine the honey, soy sauce, minced garlic, ginger paste, and apple cider vinegar. Bring to a simmer over medium heat, stirring occasionally, then reduce heat and let it thicken slightly, about 2-3 minutes.
- Arrange the crispy chicken tenders on a serving plate and drizzle generously with the warm honey garlic sauce just before serving.