There’s something incredibly comforting about a slice of homemade loaf cake. It’s perfect with a morning cup of coffee, a cozy afternoon tea, or even as a simple dessert after dinner. We’ve all been there, though – eagerly slicing into what you hoped would be a tender treat, only to find a disappointingly dense, heavy texture staring back at you. If you’ve ever struggled with quick breads that come out more like a brick than a fluffy cake, you know the feeling!
For years, I tinkered and tested, determined to crack the code on how to bake a perfectly moist and tender loaf cake every single time. And guess what? I found the secret! It involves understanding just a few key techniques that make all the difference. This Pistachio Loaf Cake recipe isn’t just about the delightful flavor of those vibrant green nuts; it’s a showcase for that tender crumb I chased for so long. Get ready to bake a loaf that’s wonderfully light, moist, and utterly delicious.
Why You’ll Absolutely Adore This Pistachio Loaf Cake
Beyond the gorgeous color and distinct nutty flavor of pistachios, this particular loaf cake recipe holds a special place in my heart. Here’s why I think it will quickly become a favorite in your baking repertoire:
- Say Goodbye to Density: This recipe is specifically designed to prevent that heavy, tough texture. It focuses on techniques that ensure a light and airy crumb.
- Incredible Moisture: Thanks to a special ingredient we’ll talk about, this loaf stays wonderfully moist for days (if it even lasts that long!).
- Simple & Straightforward: Loaf cakes are often much less fussy than layer cakes, and this recipe is no exception. It uses basic techniques you can easily master.
- Elegant Flavor: The subtle, earthy sweetness of pistachios paired with a bright glaze is simply divine. It feels a little bit fancy, but it’s incredibly approachable.
- Versatile Treat: Perfect for breakfast, brunch, a snack, or dessert. It pairs beautifully with hot beverages or a scoop of something creamy.
Essential Ingredients for Your Moist Pistachio Loaf Cake
Creating a beautifully moist and tender loaf cake starts with gathering the right components and understanding the role each one plays. For our delightful pistachio creation, we’re using a mix of pantry staples and key players that contribute to both flavor and texture. Let’s look at what you’ll need:
Our fat source is unsalted butter, which should be nicely softened at room temperature. Creaming softened butter with sugar is the crucial first step in building structure and incorporating air, which is vital for a light crumb. Using unsalted butter gives you control over the saltiness of the final cake.
Granulated sugar provides sweetness and also helps tenderize the cake by interfering with gluten development. We use a generous amount, which is standard for quick breads and contributes to moisture.
Large eggs bind everything together, add richness, and contribute to structure and moisture. Make sure your eggs are at room temperature – this helps them emulsify better with the butter and sugar, leading to a smoother, more uniform batter.
Vanilla extract is a classic flavor enhancer that complements the nutty pistachios beautifully. A good quality extract will make a noticeable difference.
For our dry foundation, we use all-purpose flour. When combined with liquid and mixed, flour develops gluten, which gives structure. The trick, as you’ll see in the steps, is controlling how much gluten develops to keep the cake tender, not tough.
Baking powder and baking soda are our leavening agents. Baking powder provides lift throughout the baking process, while baking soda reacts with an acidic ingredient (spoiler: it’s the yogurt or sour cream!) to create extra lift and contribute to that tender crumb.
A touch of salt balances the sweetness and enhances all the other flavors in the cake.
Now for one of the secrets to that incredible moisture: plain yogurt or sour cream. This acidic dairy product works with the baking soda for lift and adds significant moisture and tenderness without making the cake greasy. The slight tang also beautifully complements the sweetness.
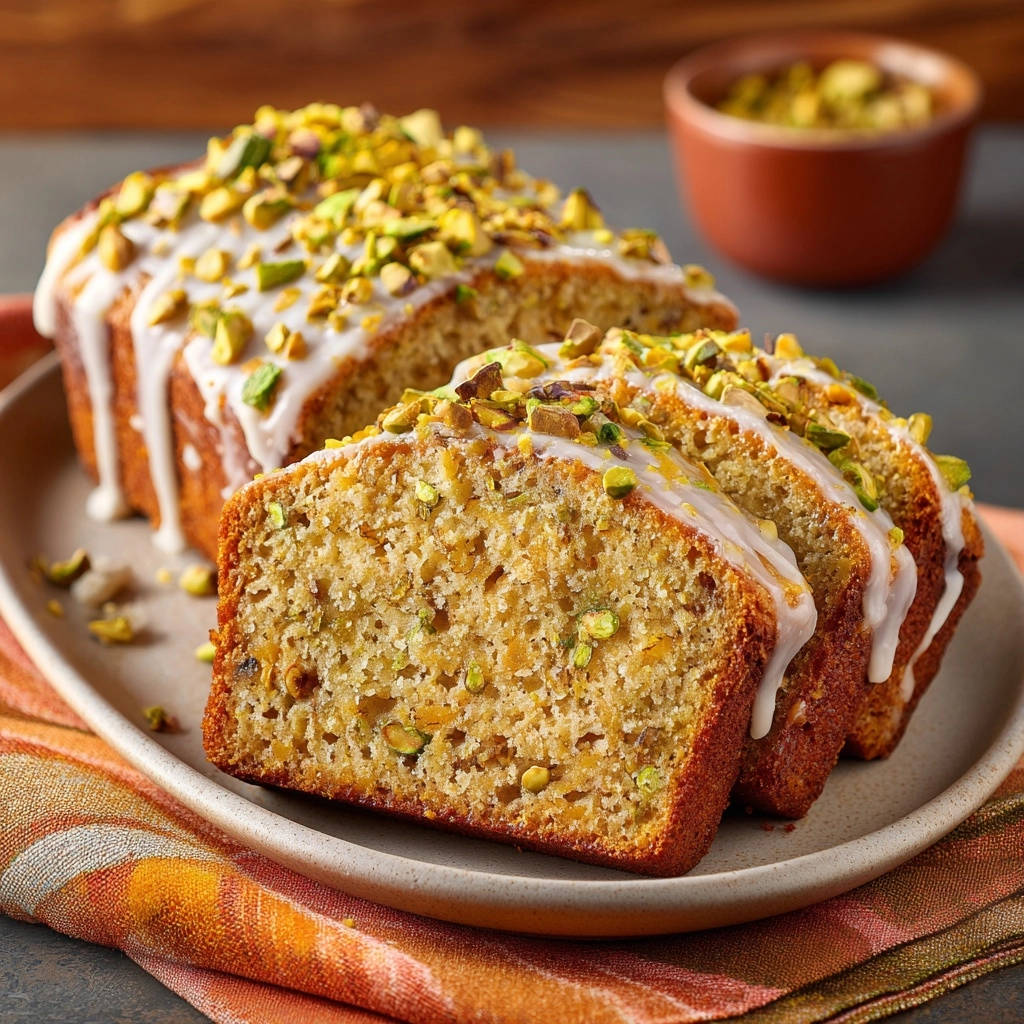
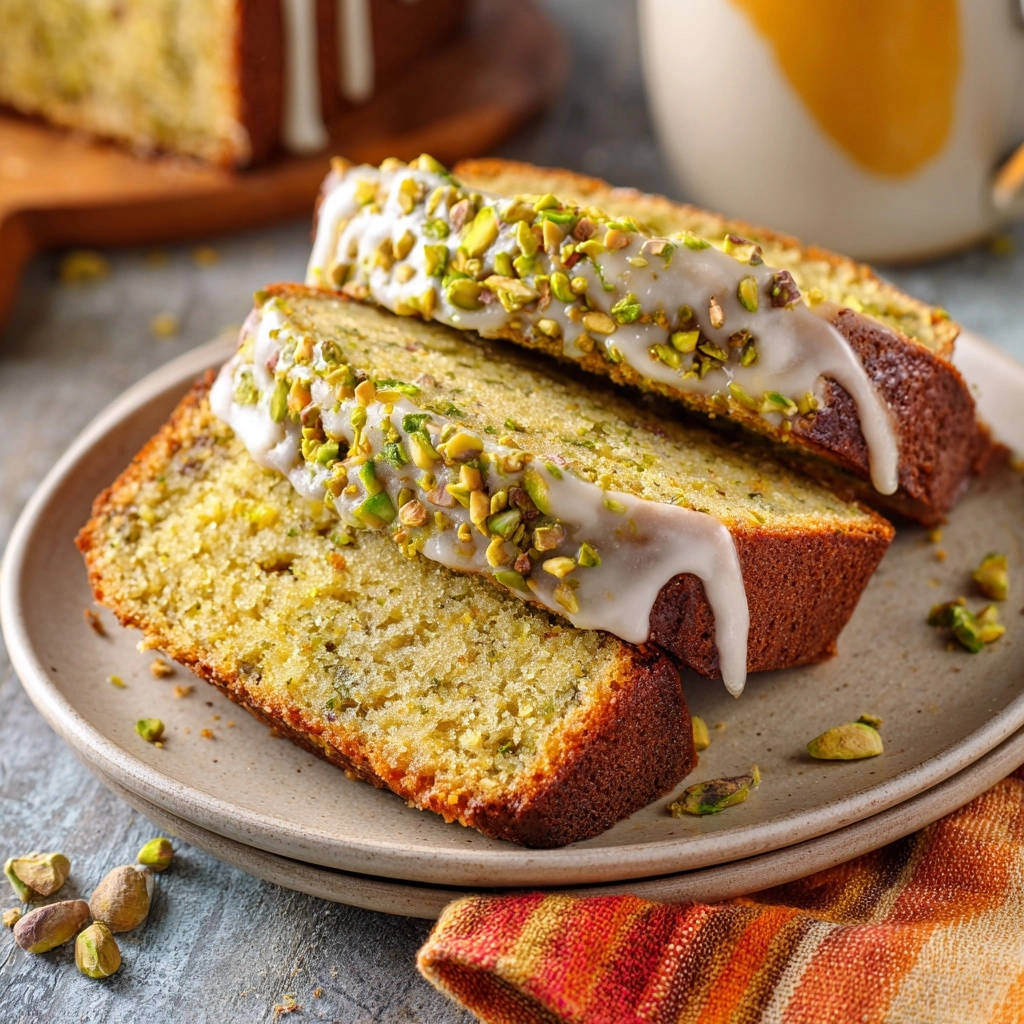
Of course, we can’t forget the star: chopped pistachios! Using about half a cup folded into the batter provides wonderful texture and bursts of nutty flavor throughout. You’ll also want a little extra for sprinkling on top of the glaze for decoration and added crunch.
Finally, the simple yet essential ingredients for our luscious glaze: powdered sugar and a splash of milk or lemon juice. Powdered sugar creates a smooth glaze, and the liquid helps you achieve the perfect pourable consistency. Using milk results in a classic sweet glaze, while lemon juice adds a bright, tart contrast that is absolutely delightful with pistachios.
Here’s the full list to get ready:
- 1/2 cup (1 stick) unsalted butter, softened
- 1 1/2 cups granulated sugar
- 2 large eggs, room temperature
- 1 teaspoon vanilla extract
- 1 1/2 cups all purpose flour
- 1 teaspoon baking powder
- 1/4 teaspoon baking soda
- 1/2 teaspoon salt
- 1 cup plain yogurt or sour cream
- 1/2 cup chopped pistachios, plus more for topping
- 1 cup powdered sugar
- 2-3 tablespoons milk or lemon juice
Baking Your Perfect Pistachio Loaf: Step-by-Step Guide
Alright, you’ve got your ingredients ready to go! Now let’s walk through the process of bringing this beautiful Pistachio Loaf Cake to life. Remember, attention to a few key details, particularly how you mix the batter, is what will ensure that wonderfully light and tender result.
- Get Started by Preheating: First things first, turn on your oven. Preheat it to 350 degrees F (175 degrees C). Allowing your oven to come to full temperature before you put the cake in is important for consistent baking and helps the leavening agents work effectively right from the start, contributing to a good rise. While the oven heats, prepare your baking pan. Take a 9×5 inch loaf pan and grease it generously with butter or baking spray, then lightly flour it, tapping out any excess. This helps prevent the cake from sticking and ensures it releases easily after baking.
- Creaming for Lightness: In a large mixing bowl, combine the softened butter and granulated sugar. Using an electric mixer (handheld or stand mixer), beat them together on medium-high speed until the mixture is light and fluffy. This process, known as creaming, is crucial because it incorporates tiny air pockets into the butter. These air pockets expand as the cake bakes, creating a tender and airy texture. Don’t rush this step; it should take a few minutes until the mixture is pale yellow and significantly increased in volume.
- Adding Wet Ingredients: Reduce the mixer speed to low and beat in the eggs one at a time. Make sure each egg is fully incorporated before adding the next. Adding them gradually helps maintain the emulsification of the batter. Once the eggs are mixed in, stir in the vanilla extract. Scrape down the sides of the bowl occasionally to ensure everything is evenly combined.
- Combine the Dry Elements: In a separate, medium-sized bowl, whisk together the all-purpose flour, baking powder, baking soda, and salt. Whisking serves a couple of purposes: it breaks up any lumps in the flour and, more importantly, it evenly distributes the leavening agents (baking powder and soda) and salt throughout the flour. This ensures your cake rises uniformly and has balanced flavor.
- Alternating Wet and Dry: The First Addition: This is where we start combining the wet and dry mixtures. Add about half of the dry ingredients (the flour mixture) to the large bowl with the wet ingredients. Mix on the lowest speed of your electric mixer, or even by hand with a spatula, just until the flour is just combined. Don’t worry about mixing it smooth yet! Immediately after that first dry addition is mostly incorporated, add all of the plain yogurt or sour cream to the bowl and mix on low speed just until it’s incorporated into the batter. The yogurt/sour cream adds crucial moisture and tang.
- The Crucial Second Addition (Avoid Overmixing!): Now, add the remaining dry ingredients to the bowl. This next step is the single most important technique for preventing a dense quick bread: Mix on the absolute lowest speed only until you no longer see visible streaks of dry flour. Stop mixing as soon as those streaks disappear. A few small lumps in the batter are perfectly fine – in fact, they’re a good sign you haven’t overmixed! Overmixing the flour once it’s wet develops gluten, which is what makes bread chewy, but makes cakes tough and dense.
- Folding in the Flavor & Texture: Remove the bowl from the mixer stand (if using one). Gently fold in the 1/2 cup of chopped pistachios using a rubber spatula. Use an under-and-over motion to distribute the nuts evenly without deflating the batter you’ve worked so hard to keep light.
- Filling the Pan: Pour the finished batter into your prepared 9×5 inch loaf pan. Use the spatula to gently spread the top evenly.
- Bake to Perfection: Place the loaf pan in your preheated oven. Bake for 55-65 minutes. The baking time can vary quite a bit depending on your specific oven, so it’s best to start checking around the 50-55 minute mark. To test for doneness, insert a toothpick or thin skewer into the very center of the loaf. If it comes out clean with no wet batter attached (a few moist crumbs are okay), your cake is done. If the top of the cake starts to brown too quickly before the center is cooked, you can loosely tent the pan with aluminum foil to shield the top.
- Cooling Stages: Once baked, remove the cake from the oven and let it cool in the loaf pan on a wire rack for 10-15 minutes. This allows the cake to set up properly before you attempt to move it. After this initial cooling time, carefully invert the pan to release the cake onto the wire rack. Let it cool completely on the wire rack before glazing. Trying to glaze a warm cake will just result in a melted, messy glaze.
- Whip Up the Glaze: While the cake is cooling completely, prepare the simple glaze. In a small bowl, whisk together the powdered sugar with 2-3 tablespoons of either milk (for a sweet, classic finish) or lemon juice (for a bright, tangy contrast). Start with 2 tablespoons of liquid and add the third only if needed to reach a smooth, pourable consistency. You want it thick enough to coat the back of a spoon but thin enough to drizzle easily.
- The Finishing Touch: Once the loaf is completely cool, transfer it to a serving plate or keep it on the wire rack with parchment or wax paper underneath to catch drips. Drizzle the prepared glaze evenly over the top of the cake, allowing it to drip down the sides. Immediately sprinkle with additional chopped pistachios before the glaze has a chance to set.
Now, all that’s left to do is slice into your perfectly light, moist, and flavorful Pistachio Loaf Cake and enjoy!
Tips for Baking the Best Pistachio Loaf Cake Every Time
Achieving that ideal tender crumb isn’t just about following the steps; a few simple tips can elevate your baking from good to absolutely fantastic. Here are some pro pointers for your Pistachio Loaf Cake:
- Room Temperature Ingredients: We mentioned it in the ingredients, but it bears repeating! Ensure your butter, eggs, and yogurt or sour cream are at room temperature. Cold ingredients don’t emulsify properly, leading to a less smooth batter and potentially affecting the cake’s texture and rise.
- Measure Flour Accurately: Too much flour is a common culprit for dense cakes. Avoid scooping directly from the bag with your measuring cup. Instead, spoon the flour lightly into the measuring cup until it’s overflowing, then level it off with a straight edge (like the back of a knife). This “spoon and level” method prevents compacting the flour.
- Do NOT Overmix the Batter: This is the golden rule for quick breads like loaf cakes! Once you add the dry ingredients to the wet, mix only until you see no more dry flour streaks. Even a few seconds too long can develop too much gluten, resulting in a tough, dense cake. Embrace the lumps!
- Check Your Oven Temperature: Oven thermostats can be notoriously inaccurate. If your cakes consistently bake differently than expected, consider using an inexpensive oven thermometer to check the true temperature.
- Cool Properly: Resist the urge to move the cake too soon or glaze it while warm. Cooling in the pan for the initial 10-15 minutes allows the internal structure to firm up, and cooling completely on a wire rack prevents condensation from making the bottom soggy and ensures your glaze sets beautifully.
- Pistachio Prep: Use shelled, unsalted pistachios for the best flavor control. Roughly chop them – you want some texture, but not huge pieces that will sink to the bottom.
Serving Suggestions for Pistachio Loaf Cake
This versatile Pistachio Loaf Cake is wonderful on its own, but it also pairs beautifully with a few simple accompaniments. Enjoy a slice with a hot beverage like a classic coffee or tea. For a special treat, serve it alongside a scoop of vanilla ice cream or a dollop of whipped cream. A fresh berry compote or a light citrus salad also makes a lovely pairing, adding brightness to the rich, nutty flavor of the cake.
If you’re looking for other delightful baked goods to enjoy with a cup of coffee, why not try our recipe for moist banana bread or a slice of lemon glazed loaf? And if you’re craving a sweet drink alongside your cake, our guide to a homemade pumpkin spice latte or a refreshing mocha frappe might hit the spot!
Your Pistachio Loaf Cake Questions Answered (FAQ)
It’s natural to have questions when trying a new recipe, especially one that promises to solve common baking woes! Here are some answers to frequently asked questions about making this Pistachio Loaf Cake:
Can I use a different type of nut?
Yes, absolutely! While the recipe is optimized for pistachios, you can substitute other chopped nuts like almonds, walnuts, or pecans. Keep in mind that each nut will lend a different flavor profile to the cake. Ensure they are unsalted if possible, or adjust the added salt in the recipe slightly if using salted nuts.
Why is my loaf cake dense?
The most common reason for a dense quick bread is overmixing the batter once the dry ingredients have been added. Flour contains gluten, which develops when mixed with liquid. While gluten provides structure (good for bread!), too much gluten makes cakes tough and heavy. Make sure to mix only until the flour streaks disappear. Other factors can include incorrect ingredient measurements (especially too much flour), using cold ingredients, or incorrect leavening amounts.
How do I store Pistachio Loaf Cake?
Once completely cooled, store the cake in an airtight container at room temperature for up to 3-4 days. If your kitchen is very warm or humid, or if the cake is heavily glazed, you might consider storing it in the refrigerator to help the glaze set and prevent spoilage, although this can sometimes slightly dry out the cake. You can also freeze slices or the whole cooled, unglazed loaf, wrapped tightly in plastic wrap and then foil, for up to 2-3 months. Thaw at room temperature.
Can I make this dairy-free?
Yes, you can likely adapt this recipe to be dairy-free. Substitute the unsalted butter with a good quality vegan butter stick (not margarine from a tub). Replace the plain yogurt or sour cream with a plain, unsweetened dairy-free yogurt alternative, such as soy, almond, or coconut yogurt. Ensure all other ingredients, like the chocolate if adding, are also dairy-free. Note that the texture and flavor may vary slightly depending on the dairy-free products you use.
Enjoy Your Homemade Pistachio Loaf Cake!
Baking should be a joyous experience, and achieving a perfectly moist and tender loaf cake is incredibly rewarding. This Pistachio Loaf Cake recipe, with its focus on simple techniques and delicious flavor, is designed to give you that success every time. The beautiful green pistachios, the soft crumb, and the sweet or tangy glaze make each slice a little moment of happiness.
So, gather your ingredients, follow these steps, paying special attention to that all-important mixing stage, and bake yourself a treat. We’d love to hear how your Pistachio Loaf Cake turns out! Leave a comment below, or share a photo with us. Happy baking!
Pistachio Loaf Cake

Ingredients
- 1/2 cup unsalted butter, softened
- 1 1/2 cups granulated sugar
- 2 large eggs, room temperature
- 1 teaspoon vanilla extract
- 1 1/2 cups all purpose flour
- 1 teaspoon baking powder
- 1/4 teaspoon baking soda
- 1/2 teaspoon salt
- 1 cup plain yogurt or sour cream
- 1/2 cup chopped pistachios, plus more for topping
- 1 cup powdered sugar
- 2-3 tablespoons milk or lemon juice
Directions
- Preheat your oven to 350 degrees F (175 degrees C). Grease and flour a 9×5 inch loaf pan.
- In a large bowl, cream together the softened butter and granulated sugar until light and fluffy. This step is important for incorporating air, which helps with lightness.
- Beat in the eggs one at a time, mixing well after each addition. Stir in the vanilla extract.
- In a separate medium bowl, whisk together the flour, baking powder, baking soda, and salt.
- Add half of the dry ingredients to the wet ingredients and mix on low speed just until combined. Add the yogurt or sour cream and mix until just incorporated.
- Add the remaining dry ingredients. This is the crucial step for avoiding density: Mix on low speed only until the flour streaks have just disappeared. Do not overmix the batter once the dry ingredients are added, as this develops gluten and makes the cake tough and dense. A few small lumps are okay.
- Gently fold in the 1/2 cup of chopped pistachios using a spatula.
- Pour the batter into the prepared loaf pan and spread evenly.
- Bake for 55-65 minutes, or until a toothpick inserted into the center comes out clean. If the top starts to brown too quickly, tent loosely with foil.
- Let the cake cool in the pan for 10-15 minutes before transferring it to a wire rack to cool completely.
- While the cake cools, prepare the glaze: Whisk together the powdered sugar with 2-3 tablespoons of milk or lemon juice, adding just enough liquid until you have a smooth, pourable consistency.
- Once the cake is completely cool, drizzle the glaze over the top. Sprinkle with additional chopped pistachios before the glaze sets. Slice and enjoy your perfectly light and moist loaf!