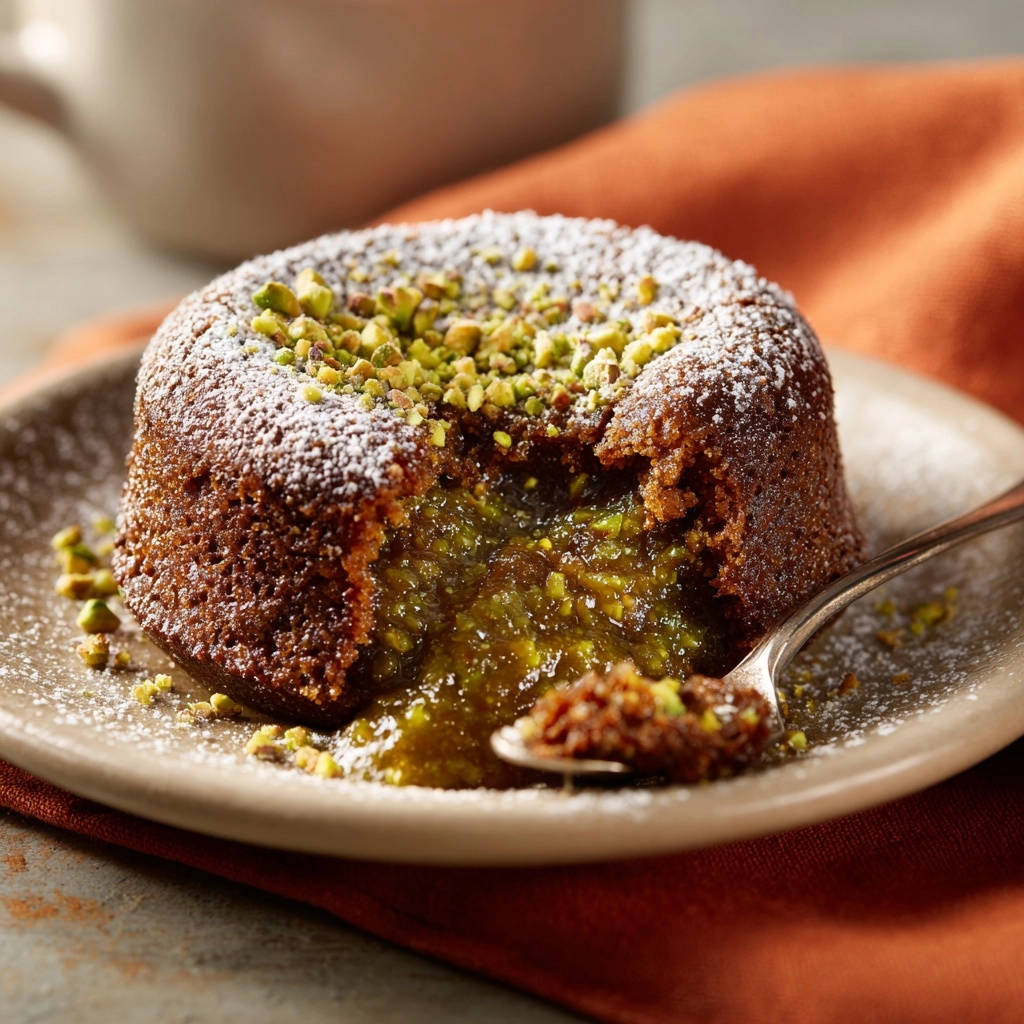
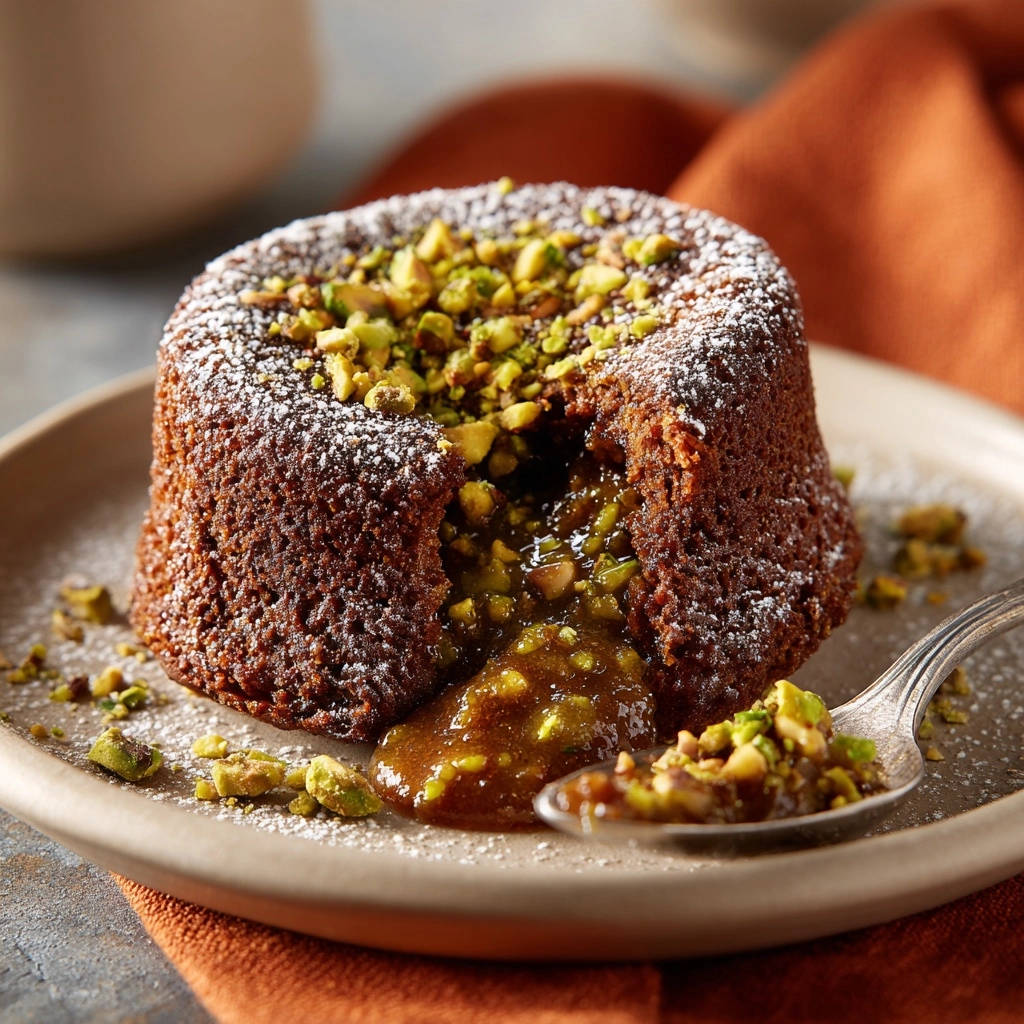
Imagine this: you gently pierce the delicate crust of a warm chocolate cake, and a river of rich, molten chocolate spills out onto the plate. Pure dessert heaven, right?
For the longest time, I thought achieving that perfect, guaranteed molten center at home was some kind of advanced pastry chef secret. I had a few tries that resulted in delicious but decidedly non-lava chocolate cakes.
But after some experimentation, I discovered the simple trick, and let me tell you, it’s a game-changer! This easy chocolate lava cake recipe delivers that dreamy, decadent flow every single time, without any fuss or guesswork. It’s perfect for a special treat for two or when you just need an impressive dessert in a flash.
Why This Easy Chocolate Lava Cake is a Keeper
If you’ve ever been intimidated by molten chocolate cakes, prepare to have your mind changed. This recipe takes all the stress out of it and leaves you with pure joy.
- Crazy Fast: We’re talking under 30 minutes from start to molten finish. Perfect for a spontaneous date night or when a chocolate craving strikes hard and fast.
- Simple Ingredients: You likely have most of these pantry staples on hand right now. Nothing fancy needed!
- Guaranteed Lava: I’ll share the absolute key step that ensures that gooey center every single time, taking the mystery out of baking.
- Impressive Results: Despite being easy, these look and taste incredibly sophisticated. They’re sure to impress anyone you serve them to.
- Portion Perfect: This recipe is scaled for two, making it ideal for couples or a single serving with a little extra indulgence.
Gathering Your Ingredients for Gooey Chocolate Lava Cakes
The magic of these molten cakes comes from a simple combination of classic baking ingredients. Choosing quality here will really elevate the final flavor, especially when it comes to the chocolate.
You’ll start with the base of rich, smooth chocolate and butter. High-quality bittersweet chocolate is really key here. It provides that deep, intense chocolate flavor without being overly sweet, which balances the richness of the molten center. Pairing it with unsalted butter creates the foundation for the luxurious texture.
For structure and tenderness, we use a combination of a large egg and an extra large egg yolk. The whole egg helps bind everything together, while the extra yolk adds richness and contributes significantly to that desirable gooey, molten consistency.
A touch of granulated sugar sweetens the cakes just right, complementing the bittersweet chocolate. Vanilla extract is essential for enhancing the chocolate flavor and adding a warm, aromatic note.
Just a tiny amount of all-purpose flour provides the necessary structure to hold the cake together while allowing the center to remain fluid. A pinch of salt brightens all the flavors and prevents the chocolate from tasting flat.
And finally, for those delightful finishing touches, we use powdered sugar for a classic dusting and chopped pistachios (or your favorite nut!) for a bit of crunch and visual appeal. You could also serve these alongside creamy chocolate chip ice cream for an extra special treat.
Here’s the complete list of what you’ll need:
- 1/2 cup unsalted butter, plus extra for ramekins
- 4 ounces bittersweet chocolate, chopped
- 1 large egg
- 1 large egg yolk
- 1/4 cup granulated sugar
- 1 teaspoon vanilla extract
- 2 tablespoons all purpose flour
- Pinch of salt
- Powdered sugar, for dusting
- Chopped pistachios, for topping
Crafting Your Easy Chocolate Lava Cakes: Step-by-Step
Ready to unlock the secret to that perfect molten center? The process is surprisingly straightforward, and the key is all in the timing and temperature. Let’s walk through it together!
- Prepare Your Stage: Start by preheating your oven to a hot 400 degrees F (200 degrees C). This high temperature helps set the outside of the cake quickly while keeping the inside molten. Next, grab two small ramekins, ideally around 6-ounce capacity. Butter them thoroughly! Don’t be shy here; generous buttering is crucial for easy release. After buttering, add a tablespoon or two of flour to each ramekin, swirl it around to coat the buttered surfaces completely, then tap out any excess. This butter-and-flour coating is your insurance policy against sticking. Place these prepared ramekins on a small baking sheet – this makes them easy to move in and out of the hot oven safely.
- Melt the Chocolate & Butter: In a medium microwave-safe bowl, combine the measured 1/2 cup of unsalted butter (cut into chunks helps it melt evenly) and your chopped bittersweet chocolate. Microwave this mixture in short bursts, about 30 seconds at a time, stirring well after each interval. Chocolate can seize or scorch if overheated, so low and slow is the way to go here. Keep going until the mixture is completely melted and wonderfully smooth. Once melted, set the bowl aside for a few minutes to cool down slightly. You don’t want to add piping hot chocolate to your egg mixture!
- Whisk the Wet Ingredients: While the chocolate cools, grab a separate bowl. Add the whole large egg, the extra large egg yolk (that’s our molten-center secret weapon!), the granulated sugar, and the vanilla extract. Whisk these together vigorously until they are well combined and the mixture looks slightly thickened and perhaps a little lighter in color.
- Combine the Mixtures: Now, pour the slightly cooled, smooth chocolate and butter mixture directly into the bowl with the whisked egg mixture. Whisk them together gently but thoroughly until you have a silky smooth, homogenous chocolate batter.
- Add the Dry Ingredients: Sift or whisk the 2 tablespoons of all-purpose flour and the pinch of salt together before adding them to the chocolate batter. Fold or whisk them in just until you no longer see streaks of dry flour. The key here is to avoid overmixing; overdeveloping the gluten in the flour can lead to a tougher cake texture, and we want tenderness!
- Fill the Ramekins: Carefully divide the batter evenly between your two prepared ramekins. They should be fairly full, but leave a little room at the top for expansion.
- Bake to Molten Perfection: This is the most crucial step for achieving that guaranteed molten center! Place the baking sheet with the filled ramekins into your preheated 400°F oven. Bake for just 10 to 12 minutes. You need to watch them closely. The edges should look set and maybe slightly pulled away from the sides, and the top should appear mostly dry, perhaps with a few small cracks around the perimeter. However, the very center of the cake should still look visibly soft, undercooked, and quite jiggly when you gently shake the baking sheet. That jiggly center is your lava!
- Rest Briefly: Carefully remove the baking sheet from the oven. Let the cakes rest in their ramekins for exactly 1 minute. This short rest allows the outer edges to firm up just enough to help the cake hold its shape when you invert it.
- Invert and Release: Working quickly but carefully (they will be hot!), place a small dessert plate upside down over the top of one ramekin. Holding the plate and ramekin together firmly, swiftly flip them over. Set the plate down and lift the ramekin straight up. The cake should slide out beautifully thanks to your proper buttering and flouring! Repeat with the second cake. If a cake doesn’t release immediately, gently tap the bottom of the ramekin.
- Finish and Serve Immediately: Dust the tops of the warm, freshly inverted cakes generously with powdered sugar. Sprinkle with chopped pistachios (or your preferred topping). Serve them immediately! The magic is in cutting into them while that center is still hot and perfectly molten. Enjoy every glorious bite!
Tips for Perfect Easy Chocolate Lava Cakes Every Time
While this recipe is designed to be foolproof, keeping these extra tips in mind will ensure your success and maybe even inspire a few variations!
- Don’t Fear the Jiggle: The most common mistake is overbaking because you’re afraid the center looks “undercooked.” Trust the process! That jiggly, unset center IS the lava. As the cake rests briefly, residual heat continues to cook the edges slightly, but the middle remains wonderfully molten.
- Quality Chocolate Matters: Using good quality bittersweet chocolate (around 60-70% cacao) will make a significant difference in the depth of flavor. Chocolate chips can sometimes contain stabilizers that prevent them from melting into a smooth lava. Chopped bar chocolate is best.
- Room Temperature Eggs: Eggs at room temperature emulsify better with the other ingredients, leading to a smoother batter and more consistent results. If you forget to take them out, you can quickly warm them by placing them in a bowl of warm (not hot) water for a few minutes.
- Know Your Oven: Oven temperatures can vary. If your cakes seem to bake faster or slower than the specified time, consider using an oven thermometer to check for accuracy. Once you make the recipe a couple of times, you’ll know the exact timing for your oven.
- Scaling Up? Be Mindful: This recipe is perfect for two. If you need to make more, you can double or triple the recipe, but bake only two cakes at a time on the same baking sheet to ensure even baking and consistent results.
- Fun Variations: While the classic is amazing, feel free to get creative! Stir a little instant espresso powder into the melted chocolate for a mocha kick. Add a teaspoon of orange zest to the batter for a citrusy twist. For toppings, swap pistachios for toasted hazelnuts, shaved chocolate, fresh raspberries, or a dollop of whipped cream. Thinking about other quick desserts? You might enjoy making easy chocolate clusters or a no-bake chocolate cream loaf too!
What to Serve With Chocolate Lava Cakes
Honestly, these easy chocolate lava cakes are stars on their own, requiring very little adornment. However, a few simple additions can make the experience even more spectacular.
A scoop of cold vanilla bean ice cream is a classic pairing for a reason – the contrast between the warm cake and cold ice cream is divine. Fresh berries, like raspberries or strawberries, add a bright, slightly tart counterpoint to the rich chocolate. A simple dusting of powdered sugar and the chopped pistachios (as suggested in the recipe) provide just enough elegance and texture.
Your Easy Chocolate Lava Cake Questions Answered (FAQ)
Let’s address some common questions that might pop up when you’re making these molten marvels.
Why didn’t my chocolate lava cake have a molten center?
The most likely culprit is overbaking. The center needs to look visibly undercooked and jiggly when it comes out of the oven. Every oven is different, so the bake time is a guideline. Start checking at the lower end of the time range (10 minutes) and look for those visual cues: set edges, dry-looking top, and a distinctly wobbly center. It’s better to pull them out a minute too early than a minute too late!
Can I make the batter ahead of time?
Yes, you can! You can make the batter up to a day in advance. Store it covered in the refrigerator. When you’re ready to bake, give the batter a quick whisk to combine any separated ingredients, pour it into the prepared ramekins, and let them sit at room temperature for about 15-20 minutes while your oven preheats. This helps ensure more even baking.
Can I use milk chocolate or dark chocolate instead of bittersweet?
You can, but it will change the result. Milk chocolate is sweeter and doesn’t have the same depth of flavor, and the lava might be thinner. Dark chocolate (70%+) would give an even more intense chocolate flavor, which some people prefer, but ensure it’s a good quality chocolate that melts smoothly. Bittersweet is the traditional choice for balancing sweetness and richness.
What size ramekins should I use?
This recipe is designed for two standard small ramekins, typically holding around 6 ounces (about 3/4 cup). Using significantly larger or smaller ramekins will require adjusting the baking time. Larger ones will need longer, smaller ones less time. Always rely on the visual cues for doneness.
I don’t have ramekins. Can I use something else?
Yes, you can try using a standard muffin tin. Butter and flour two muffin cups very well. The cakes will likely be smaller and might bake a little faster, so watch them closely, checking for the set edges and jiggly center starting around 8-9 minutes. The lava effect might be less dramatic than in deeper ramekins, but you’ll still get a delicious molten center.
Is the middle supposed to be raw?
No, it’s not raw egg batter. The combination of rich ingredients and minimal flour means the center doesn’t fully set at the temperature and time the edges do. The residual heat continues to cook it partially, but it remains liquid and ‘molten’ rather than solid cake. It’s cooked enough to be safe, just not firm.
Enjoy Your Homemade Chocolate Lava Cakes!
There you have it – the secret to effortless, show-stopping easy chocolate lava cakes. With minimal effort and maximum reward, this recipe is bound to become a favorite in your dessert repertoire.
Whip them up for a special occasion, a cozy night in, or just because you deserve a little chocolate decadence. The moment you cut into that warm cake and witness the molten chocolate flow is pure edible joy.
Give this recipe a try and let me know what you think! Leave a comment below and share your experience (and maybe your favorite topping!). Happy baking!
Easy Chocolate Lava Cake

Ingredients
- 1/2 cup unsalted butter, plus extra for ramekins
- 4 ounces bittersweet chocolate, chopped
- 1 large egg
- 1 large egg yolk
- 1/4 cup granulated sugar
- 1 teaspoon vanilla extract
- 2 tablespoons all purpose flour
- Pinch of salt
- Powdered sugar, for dusting
- Chopped pistachios, for topping
Directions
- Preheat your oven to 400 degrees F (200 degrees C). Thoroughly butter two small ramekins (about 6-ounce size). Dust the inside of the buttered ramekins with flour, tapping out any excess. Place the prepared ramekins on a small baking sheet.
- In a medium microwave-safe bowl, combine the 1/2 cup butter and chopped chocolate. Microwave in 30 second intervals, stirring after each, until completely melted and smooth. Be careful not to scorch the chocolate. Let cool slightly for a few minutes.
- In a separate bowl, whisk together the egg, egg yolk, granulated sugar, and vanilla extract until well combined and slightly thickened.
- Pour the slightly cooled chocolate mixture into the egg mixture and whisk until smooth.
- Add the flour and salt to the bowl and whisk until just combined. Do not overmix.
- Divide the batter evenly between the two prepared ramekins.
- This is the key to the molten center: Place the baking sheet with the ramekins in the preheated oven. Bake for 10 to 12 minutes. You are looking for the cakes to be set around the edges but still significantly soft and jiggly in the very center. The top will look dry and maybe cracked slightly at the edges, but the middle should look visibly undercooked.
- Carefully remove from the oven. Let the cakes rest in their ramekins for just 1 minute. This short rest helps them hold their shape slightly before inverting.
- Working quickly, carefully invert each ramekin onto a small dessert plate. If they don’t release immediately, gently tap the bottom of the ramekin.
- Dust the tops of the warm cakes generously with powdered sugar and sprinkle with chopped pistachios before serving immediately. Enjoy that perfect molten middle!