There’s nothing quite as disappointing as slicing into a beautiful chocolate cake, only to find the layers dry and crumbly. I’ve been there, and it’s why I perfected this Decadent Four-Layer Chocolate Dream Cake recipe, ensuring every bite is moist, rich, and utterly luxurious.
My secret? A clever trick that infuses the cake base with incredible moisture, perfectly complementing the creamy vanilla, velvety chocolate pudding, and luscious ganache layers. Get ready to create a showstopper that will impress everyone and become your go-to for special occasions.
Beyond Basic: Why This Chocolate Dream Cake Truly Shines
This isn’t just another layered dessert; it’s a meticulously crafted experience designed for maximum flavor and ease. We’re transforming a simple start into an extraordinary finish.
The “Never Dry” Secret: Unlocking Unbeatable Moisture
The foundation of this Decadent Four-Layer Chocolate Dream Cake is its unparalleled moistness. My key technique involves pouring sweetened condensed milk over a warm, freshly poked chocolate cake.
This allows the rich, milky goodness to seep into every crevice, creating an incredibly tender crumb that defies typical cake mix results.
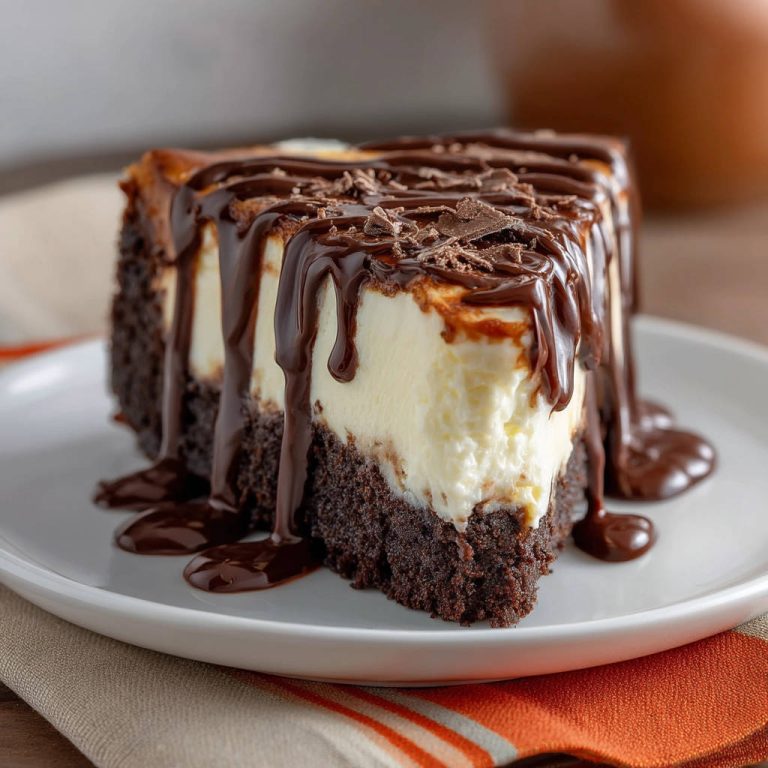
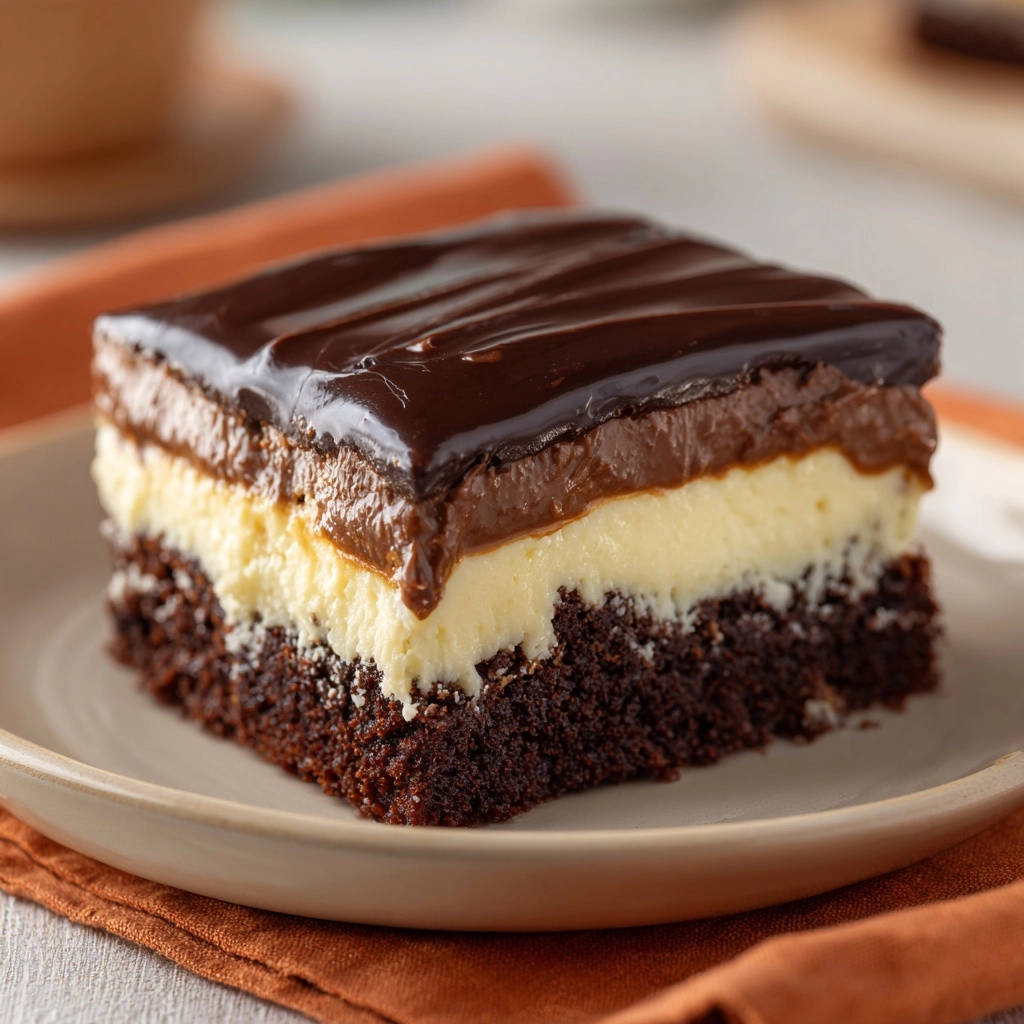
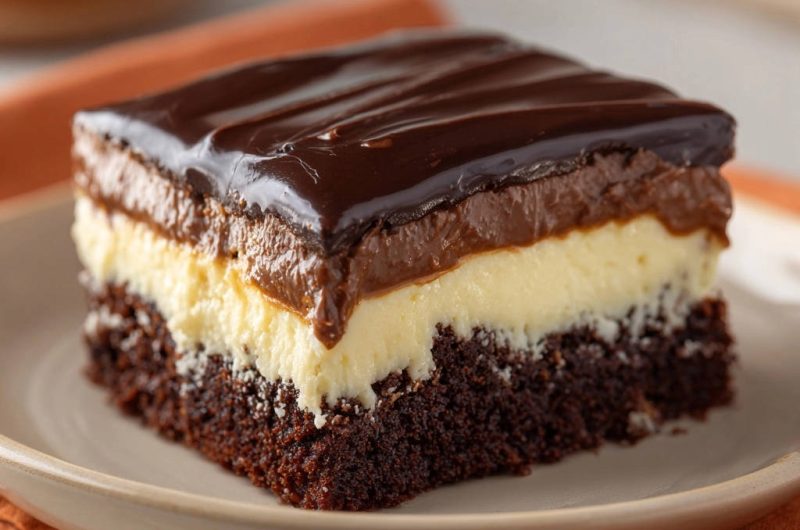
Four Layers of Bliss: A Symphony of Textures and Flavors
Each component plays a vital role in the overall sensory experience. You get the deep chocolate cake, followed by a light, tangy vanilla cream, a rich, smooth chocolate pudding, and a silky, intense chocolate ganache.
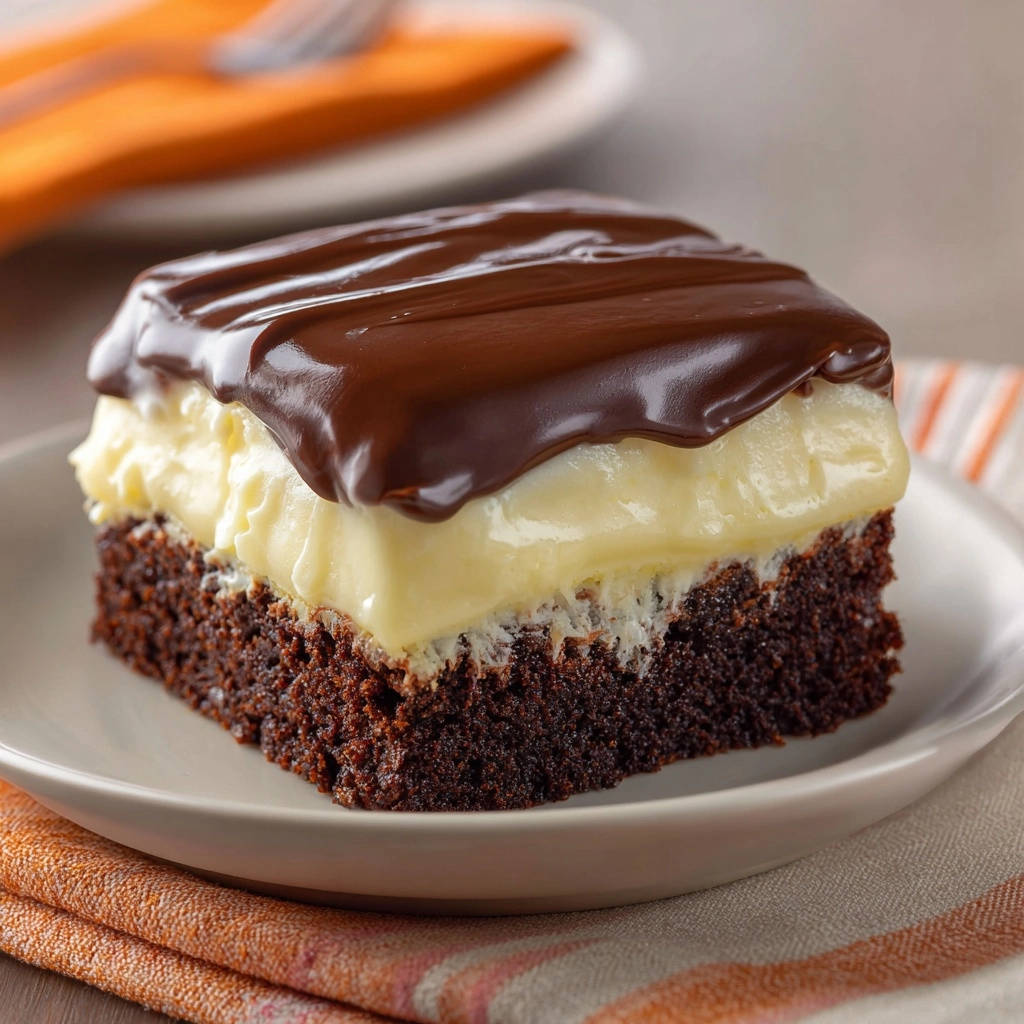
This interplay of textures, from tender cake to smooth cream and firm pudding, makes every forkful exciting and satisfying.
Effortless Elegance: Box Mix Brilliance Elevated
Starting with a quality chocolate cake mix is a fantastic shortcut that doesn’t sacrifice decadence. This approach streamlines the baking process, making a complex-looking dessert achievable for any home baker.
It allows you to focus on the layering and finishing touches, ensuring a truly impressive result with less fuss.
Gather Your Dream Team: Essential Ingredients for Layered Perfection
Selecting the right ingredients is the first step towards a truly exceptional cake. Quality matters, even with convenience products.
For the Irresistibly Moist Chocolate Cake Base
Chocolate Fudge Cake Mix: Choose a reputable brand for a consistent, rich chocolate flavor. Follow the package directions for water, vegetable oil, and eggs.
Sweetened Condensed Milk: This is our secret weapon for moisture. Its thickness and sweetness transform the cake into something truly ethereal.
Building the Creamy Vanilla Dream Layer
Vanilla Instant Pudding Mix: Ensure it’s “instant” for quick setting. It provides classic vanilla flavor and structure.
Cold Milk: Essential for activating and thickening the instant pudding properly.
Cream Cheese, Softened: A crucial ingredient for the tangy, creamy texture of this layer. Softening it ensures a lump-free, smooth blend.
Whipped Topping (Thawed): Brands like Cool Whip add lightness and volume without the fuss of whipping fresh cream.
Crafting the Rich Chocolate Pudding Layer
Chocolate Instant Pudding Mix: Again, “instant” is key. This layer offers a pure, smooth chocolate intensity.
Cold Milk: Vital for achieving the correct pudding consistency.
The Grand Finale: Decadent Ganache Topping
Heavy Cream: Provides the luxurious richness and smooth base for the ganache. Full-fat heavy cream is essential here.
Semi-Sweet Chocolate Chips: A good quality brand will yield the best flavor and a smooth, glossy ganache.
Optional Enhancements for Extra Depth
Vanilla Extract (for layers): A touch of vanilla can deepen the flavor of both pudding layers, enhancing their sweetness and aroma.
Your Baking Arsenal: Tools for Decadent Four-Layer Chocolate Dream Cake Success
Having the right tools makes the baking process smooth and enjoyable, leading to a perfect result.
Mixing & Baking Essentials
9×13 Inch Baking Pan: The ideal size for this layered cake, ensuring proper thickness for all four layers.
Large and Medium Mixing Bowls: Necessary for preparing the cake batter and the separate pudding and cream cheese mixtures.
Whisk: Essential for smoothly combining pudding mixes with milk and for preparing the ganache.
Wooden Spoon or Fork: Used for creating the crucial holes in the warm cake, allowing for optimal moisture absorption.
Measuring & Finishing Touches
Measuring Cups and Spoons: Accuracy in measurements ensures the right consistency and flavor for each component.
Spatulas: Perfect for spreading the creamy layers evenly and gently over the cake.
Baking Your Decadent Four-Layer Chocolate Dream Cake: A Step-by-Step Journey
Follow these steps carefully to ensure each layer of your Decadent Four-Layer Chocolate Dream Cake comes together flawlessly.
Prepare Your Canvas: Cake Base Foundation
Preheat your oven to 350 degrees F (175 degrees C). Take a 9×13 inch baking pan and lightly grease and flour it thoroughly.
This critical first step ensures your cake doesn’t stick, allowing for easy removal and an intact base for the subsequent layers.
Mixing Magic: Cake Batter Perfection
In a large mixing bowl, prepare the chocolate cake mix exactly according to the package directions, adding water, vegetable oil, and eggs as specified.
Mix until just combined; avoid overmixing, which can lead to a tough cake.
Bake to Golden: The Initial Transformation
Pour the prepared batter evenly into your greased and floured baking pan. Bake for 30-35 minutes, or until a wooden skewer inserted into the center comes out clean.
Properly baking the cake base is key for its structure and ability to absorb the moisture in the next step.
The Ultimate Moisture Secret: Poke and Pour
Once baked, remove the cake from the oven and let it cool in the pan for about 10-15 minutes. While still warm, use the handle of a wooden spoon or a fork to poke holes all over the top of the cake.
Ensure you go almost to the bottom but not through it. The more holes you create, the better the absorption of the next ingredient. Slowly and evenly pour the entire can of sweetened condensed milk over the warm cake, allowing it to seep into all the poked holes.
This is the game-changing step for an incredibly moist base. Let the cake cool completely to room temperature, which takes about 1-2 hours.
Layer One Unveiled: Creamy Vanilla Bliss
While the cake cools, prepare the vanilla layer. In a medium bowl, whisk together the vanilla instant pudding mix and 1 cup cold milk until it thickens, which usually takes about 2 minutes.
In a separate large bowl, beat the softened cream cheese until it’s smooth and creamy. Gently fold the thawed whipped topping into the cream cheese until well combined, then carefully fold in the thickened vanilla pudding.
If desired, add 1/2 teaspoon vanilla extract for extra depth.
Setting the Stage: Chill for Firmness
Once the chocolate cake is completely cool, spread the creamy vanilla cream cheese mixture evenly over its top. Place the pan in the refrigerator for at least 30 minutes to allow this layer to chill and set firmly.
This chilling time is crucial for building stable layers and preventing them from mixing.
Layer Two Emerges: Velvety Chocolate Dream
Now, prepare the chocolate pudding layer. In a medium bowl, whisk together the chocolate instant pudding mix and 1 cup cold milk until it thickens, again about 2 minutes.
If using, stir in 1/2 teaspoon vanilla extract. Carefully spread this chocolate pudding mixture evenly over the chilled vanilla layer.
Another Chill: Building Stability
Return the pan to the refrigerator for another 30 minutes to chill the chocolate pudding layer. This second chill ensures each layer is distinct and firm, contributing to the beautiful multi-layered appearance of your Decadent Four-Layer Chocolate Dream Cake.
The Grand Finale: Whipping Up Your Ganache
For the chocolate ganache topping, heat the heavy cream in a small saucepan over medium heat until it just begins to simmer around the edges; do not bring it to a rolling boil. Remove the saucepan from the heat immediately and add the semi-sweet chocolate chips.
Let the mixture stand undisturbed for 5 minutes to allow the chocolate to melt, then whisk until it is smooth, glossy, and perfectly luscious.
Topping It Off: Pouring the Ganache
Carefully pour the warm ganache evenly over the top chocolate pudding layer. Gently spread it with a spatula to ensure the entire surface is covered in a uniform, glistening chocolate coating.
The Patience Payoff: Final Chilling for Perfection
Return the entire cake to the refrigerator for at least 2-3 hours, or preferably overnight. This final, crucial chilling period allows all four layers to set completely and meld flavors.
The result is a structurally sound cake that slices beautifully and tastes even better. For a truly amazing experience, you might also enjoy making an easy chocolate lava cake for a quicker chocolate fix.
Unlock Cake Mastery: Pro Tips for Your Decadent Four-Layer Chocolate Dream Cake
Achieving a truly exceptional layered cake involves a few expert insights. These tips will elevate your results.
The Perfect Poke: Maximizing Moisture Absorption
When poking holes, use a wooden spoon handle, which creates wider, deeper holes than a fork. Aim for about half an inch apart and almost to the bottom of the cake, ensuring maximum surface area for the condensed milk to penetrate.
This uniform distribution of holes is critical for an evenly moist cake, preventing dry spots.
Temperature Matters: The Role of Warm Cake & Cool Layers
The cake must be warm when you pour the condensed milk; warmth helps the milk seep into every pore. Conversely, each pudding layer must be completely cool before spreading, and then thoroughly chilled to set firmly.
This strict temperature control prevents layers from running together and ensures clean, distinct lines in your finished cake.
Whipped Topping Wisdom: Gentle Folding is Key
When incorporating whipped topping into your cream cheese and pudding mixtures, use a gentle folding motion with a spatula, rather than beating. This preserves the airiness of the whipped topping, ensuring light and fluffy layers.
Over-mixing will deflate the whipped topping, leading to a denser texture.
Ganache Glory: Preventing a Grainy or Separated Topping
For a perfectly smooth, glossy ganache, heat the cream until it just barely simmers around the edges, then immediately remove it from the heat. Pour it over the chocolate chips and let it sit undisturbed for 5 minutes before whisking.
If your ganache appears oily or separated, try adding a tiny bit of cold milk or water, just a drop at a time, while continuously whisking to emulsify it back together.
The Art of Chilling: Why Patience is Your Best Ingredient
Adequate chilling time is the most overlooked but crucial step for any layered cake. Each layer needs time to set firmly before the next is added, preventing a “slide” effect. The final overnight chill is non-negotiable for stability, clean slices, and flavor development.
For other fantastic dessert ideas that benefit from proper setting, consider trying a mini caramel cheesecake.
Common Cake Quandaries & Simple Solutions
Even expert bakers encounter challenges. Here are solutions to common issues you might face with this Decadent Four-Layer Chocolate Dream Cake.
My Cake Base Still Feels Dry!
Solution: This often happens if not enough holes were poked, or they weren’t deep enough. Ensure you make plenty of holes, going almost to the bottom of the cake. Also, verify that the cake was still warm when the condensed milk was poured, as warmth aids absorption.
Pudding Layers Aren’t Setting Firmly
Solution: Double-check that you used instant pudding mix, not the “cook-and-serve” variety. Always use cold milk, as specified on the pudding box, and allow ample chilling time (at least 30 minutes) for each layer to set before adding the next.
Ganache Looks Oily or Separated
Solution: An oily or separated ganache can occur if the cream was too hot, or if it was whisked too vigorously from the start. To fix it, try whisking in a teaspoon of cold milk or water, one drop at a time, very slowly, until it comes back together. Ensure your chocolate chips are fully melted before you begin whisking.
Cake Crumbles When Slicing
Solution: Crumbly slices are a clear sign the cake wasn’t chilled long enough. The full 2-3 hours (or overnight) chilling period is essential for the layers to firm up and integrate. For clean cuts, use a long, sharp knife dipped in hot water and wiped clean between each slice.
Presenting Your Masterpiece: Serving & Storing Your Dream Cake
After all your effort, ensure your Decadent Four-Layer Chocolate Dream Cake is served and stored to perfection.
Elegant Slices: Tips for Picture-Perfect Portions
To achieve those beautiful, clean slices, always use a sharp, thin knife. For best results, dip the knife in hot water and wipe it clean with a towel between each cut; this prevents sticking and smudging. Garnish each slice with a sprinkle of cocoa powder, fresh berries, or a dollop of whipped cream for an added touch of elegance.
Keeping It Fresh: Optimal Storage Solutions
This cake must be stored in the refrigerator due to its dairy-based layers. Keep it in an airtight container to prevent it from drying out or absorbing refrigerator odors. When properly stored, the Decadent Four-Layer Chocolate Dream Cake will remain fresh and delicious for 3-4 days.
Can I Make This Decadent Four-Layer Chocolate Dream Cake Ahead?
Absolutely! This cake is an excellent make-ahead dessert. It actually benefits from chilling overnight, as the flavors meld and the layers set even more firmly. You can bake the cake base a day in advance, then assemble the layers the following day, allowing for ample chilling time before serving.
Your Decadent Four-Layer Chocolate Dream Cake Questions Answered
Let’s address some common questions to help you master this incredible dessert.
Can I Use Homemade Cake Instead of Box Mix?
Yes, you certainly can! While the recipe is designed for the convenience of a box mix, a homemade chocolate cake will also work beautifully. Just ensure it’s a moist, sturdy recipe, and remember to still poke holes and pour the condensed milk over it for that signature moisture. For another amazing chocolate cake, you can’t go wrong with this decadent chocolate cake recipe that’s never dry.
What If I Don’t Have Sweetened Condensed Milk? Are There Substitutions?
Sweetened condensed milk is truly integral to the unique moistness of this recipe, and a direct substitute that yields the exact same results is difficult to find. While some recipes might suggest milk and sugar, it won’t give the same dense, rich absorption. For best results, it’s highly recommended to stick to the condensed milk.
Can I Make This Cake Gluten-Free or Dairy-Free?
You can adapt this recipe for dietary needs with some adjustments. For gluten-free, use a gluten-free chocolate cake mix. For dairy-free, look for dairy-free instant pudding mixes, plant-based milks (almond or oat milk work well), dairy-free cream cheese alternatives, and coconut whipped topping. Note that the texture and flavor may vary slightly from the original recipe.
How Long Does This Cake Last in the Refrigerator?
When stored properly in an airtight container in the refrigerator, your Decadent Four-Layer Chocolate Dream Cake will stay fresh and delicious for 3 to 4 days.
Can I Freeze This Decadent Four-Layer Chocolate Dream Cake?
Freezing is possible, but be aware that the texture of the pudding and whipped topping layers might change slightly upon thawing, potentially becoming a bit softer. To freeze, wrap individual slices or the whole cake tightly in plastic wrap, then in foil. It can be frozen for up to 1 month. Thaw in the refrigerator overnight before serving.
Your Decadent Four-Layer Chocolate Dream Cake Awaits!
You now have all the tools and expertise to create the most incredible Decadent Four-Layer Chocolate Dream Cake. It’s more than just a dessert; it’s a statement, a centerpiece, and a testament to truly satisfying baking.
Don’t let the layers intimidate you; each step is straightforward, leading you to a truly rewarding result. Gather your ingredients, embark on this delicious journey, and prepare to delight everyone with your magnificent creation!
Decadent Four-Layer Chocolate Dream Cake
Course: DessertCuisine: American CuisineDifficulty: easy12
servings30
minutes30
minutes60
minutesAmerican Cuisine
Ingredients
1 box (15.25 ounces) chocolate fudge cake mix (plus ingredients called for on box: water, vegetable oil, eggs)
1 (14 ounce) can sweetened condensed milk
1 (3.4 ounce) box vanilla instant pudding mix
1 cup cold milk (for vanilla pudding)
8 ounces cream cheese, softened
1 (8 ounce) container whipped topping, thawed (like Cool Whip)
1 (3.4 ounce) box chocolate instant pudding mix
1 cup cold milk (for chocolate pudding)
1/2 cup heavy cream
1 cup semi-sweet chocolate chips
1 teaspoon vanilla extract (optional, for layers)
Directions
- Preheat your oven to 350 degrees F (175 degrees C). Lightly grease and flour a 9×13 inch baking pan.
- Prepare the chocolate cake mix according to package directions in a large bowl. Pour the batter evenly into the prepared baking pan.
- Bake for 30-35 minutes, or until a wooden skewer inserted into the center comes out clean.
- Remove the cake from the oven and let it cool in the pan for about 10-15 minutes. While still warm, use the handle of a wooden spoon or a fork to poke holes all over the top of the cake, making sure to go almost to the bottom but not through it. The more holes, the better the absorption!
- Slowly and evenly pour the entire can of sweetened condensed milk over the warm cake, allowing it to seep into all the poked holes. This is the secret to a super moist base. Let the cake cool completely to room temperature, about 1-2 hours.
- While the cake cools, prepare the vanilla layer: In a medium bowl, whisk together the vanilla instant pudding mix and 1 cup cold milk until thickened, about 2 minutes. In a separate large bowl, beat the softened cream cheese until smooth and creamy. Gently fold the prepared whipped topping into the cream cheese until well combined. Then, gently fold in the thickened vanilla pudding. If using, add 1/2 teaspoon vanilla extract.
- Once the cake is completely cool, spread the vanilla cream cheese mixture evenly over the top of the cake. Place the pan in the refrigerator for at least 30 minutes to chill and set.
- Prepare the chocolate pudding layer: In a medium bowl, whisk together the chocolate instant pudding mix and 1 cup cold milk until thickened, about 2 minutes. If using, add 1/2 teaspoon vanilla extract.
- Carefully spread the chocolate pudding mixture evenly over the vanilla layer. Return the pan to the refrigerator for another 30 minutes to chill.
- For the chocolate ganache topping: In a small saucepan, heat the heavy cream over medium heat until it just begins to simmer around the edges (do not boil). Remove from heat and immediately add the semi-sweet chocolate chips. Let stand for 5 minutes, then whisk until smooth and glossy.
- Pour the warm ganache evenly over the top chocolate pudding layer, spreading gently to cover.
- Return the cake to the refrigerator for at least 2-3 hours, or preferably overnight, to allow all the layers to set completely before slicing and serving. Enjoy your perfectly moist and decadent dessert!