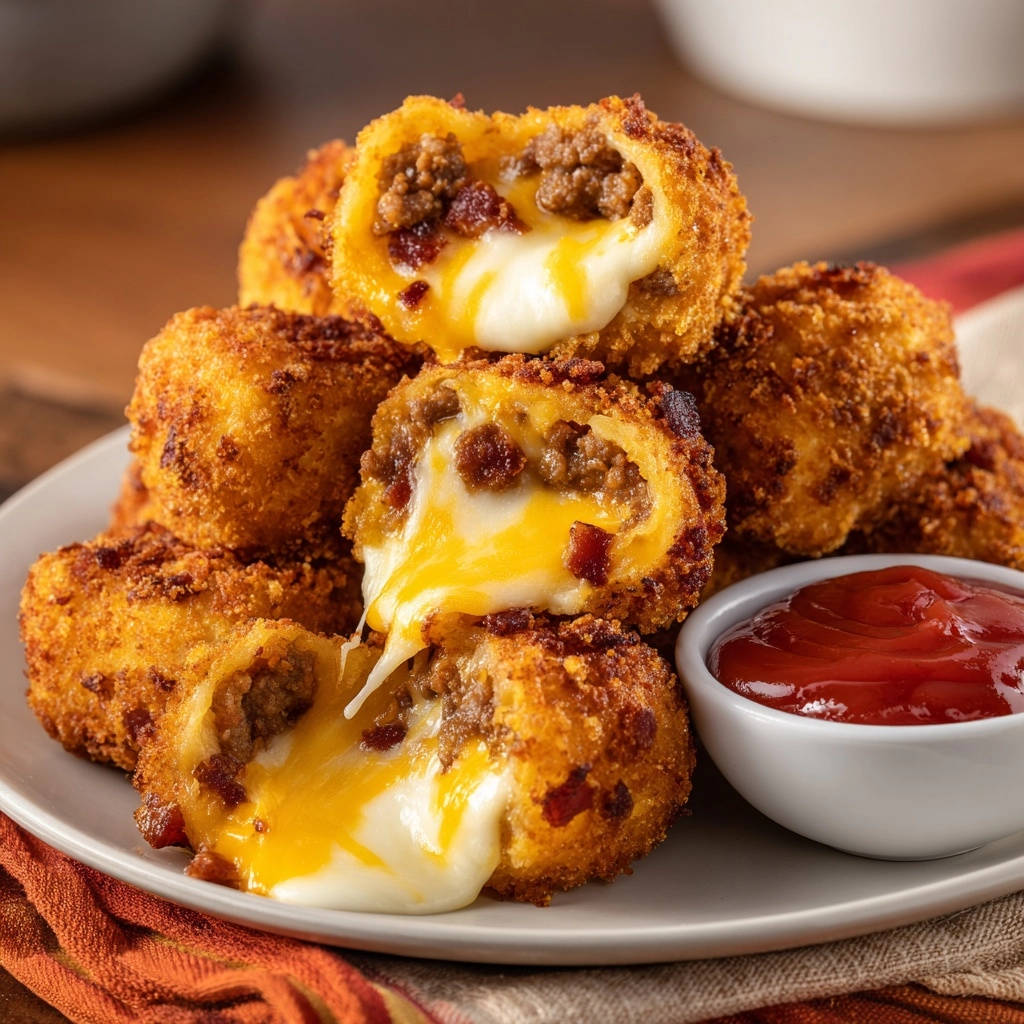
There’s nothing more frustrating than trying to achieve that perfect crispy exterior and gooey cheese center, only to have your delightful meat bites burst open in the fryer. I’ve been there, and I know the disappointment. This recipe for Crispy Cheesy Meat Bites is my perfected solution, guaranteeing every bite is a triumph of texture and flavor.
Get ready for an appetizer that delivers on its promise: a remarkably crispy crust that gives way to a savory, cheesy filling, all without any embarrassing leaks. These irresistible treats are perfect for game day, parties, or simply elevating a casual family dinner.
Why These Crispy Cheesy Meat Bites Are Your New Go-To Appetizer
This isn’t just another fried meatball recipe. We’ve honed every detail to ensure these bites are consistently spectacular, making them an instant crowd-pleaser that’s surprisingly easy to execute.
Say Goodbye to Cheese Meltdowns! The Secret to Perfectly Contained Gooeyness
The primary challenge with cheese-filled bites is preventing leakage. Our method addresses this head-on by meticulously sealing the filling and employing a crucial double-chill technique. This ensures the cheese remains perfectly encased, melting only when you bite into it.
Achieving That Irresistible Golden Crisp, Every Single Time
The secret to their incredible crunch lies in the panko breadcrumbs and strategic chilling. Panko creates a lighter, airier crisp compared to standard breadcrumbs. Chilling firmly adheres the coating, promoting even browning and preventing a soggy exterior.
A Burst of Savory Flavor: Beyond Basic Meat Bites
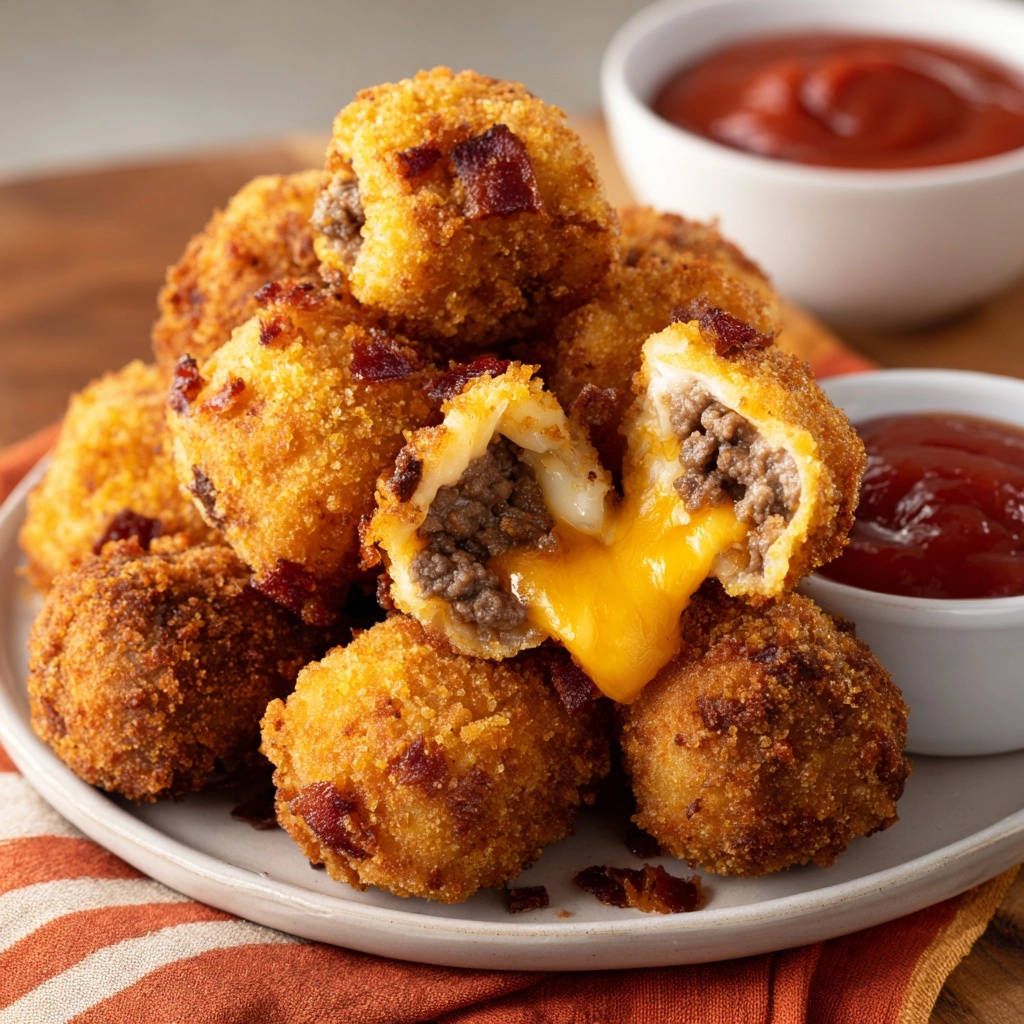
These aren’t just cheesy. The combination of lean ground beef, savory crispy bacon bits, and a blend of mozzarella and cheddar creates a deeply satisfying flavor profile. Thoughtful seasoning enhances the meaty base, providing a rich, savory experience that keeps you coming back for more.
Essential Ingredients for Crispy Cheesy Meat Bites Success
Quality ingredients are the foundation for exceptional flavor and texture. Choosing the right components ensures your Crispy Cheesy Meat Bites are nothing short of phenomenal.
The Heart of the Bites: Lean Ground Beef & Savory Bacon
Opt for lean ground beef to minimize excess fat, which can make the bites greasy. Cooked, crumbled crispy bacon bits add a smoky depth and salty counterpoint that elevates the overall flavor. Ensure bacon is finely crumbled for even distribution.
Dual Cheese Power: The Melt and Mellow of Mozzarella & Cheddar
Mozzarella provides that quintessential, satisfying cheese pull and smooth melt. Cheddar adds a sharper, more complex cheese flavor. Using both creates a balanced, irresistible cheesy core.
The Crispy Coat: Panko Breadcrumbs and Breading Basics
Panko breadcrumbs are non-negotiable for superior crispness; their flaky texture absorbs less oil and fries up much crunchier. All-purpose flour helps the egg adhere, and whisked eggs create a crucial binder for the panko. These elements work in harmony for a golden, stable crust.
Flavor Foundations: Spices and Oil Selection for Frying
Salt, black pepper, garlic powder, and onion powder are the essential seasonings for the meat, building a savory foundation. For frying, a neutral oil with a high smoke point like vegetable or canola oil is best, ensuring clean flavor and consistent browning.
Your Path to Flawless Crispy Cheesy Meat Bites: A Detailed Guide
Follow these steps carefully to master your Crispy Cheesy Meat Bites, ensuring perfect results every time. Attention to detail, especially with shaping and chilling, is key.
Preparing the Savory Filling
Begin by browning the lean ground beef in a large skillet over medium heat. Break it up thoroughly as it cooks, then drain off any accumulated fat to prevent a greasy final product. Season the hot beef with salt, black pepper, garlic powder, and onion powder for a robust flavor base. Stir in your crumbled crispy bacon bits and allow the mixture to cool slightly before handling.
The “No-Leak” Secret: Expert Shaping & Sealing
Transfer the cooled beef and bacon mixture to a bowl. Add the shredded mozzarella and cheddar cheeses, mixing thoroughly to combine. This is where the magic happens: take about 2 tablespoons of the seasoned meat mixture and gently flatten it in your palm. Place a small amount of extra shredded cheese (or a small cube of cheese if preferred) right in the center. Carefully mold the meat around the cheese, shaping it into a compact ball. Ensure there are absolutely no cracks or visible cheese on the surface of the ball; a perfectly sealed seam is vital to prevent any cheese from escaping during frying.
First Chill: Structuring for Success
Arrange the perfectly formed meat and cheese balls on a baking sheet lined with parchment paper. Transfer this sheet to the freezer and chill the balls for at least 30 minutes. This initial chill is absolutely crucial, as it helps solidify the cheese and the overall structure of the meatball, significantly reducing the risk of premature oozing during cooking.
Building the Perfect Crispy Crust
While the bites chill, set up your breading station. Prepare three shallow dishes: one with all-purpose flour, one with whisked large eggs, and the third with panko breadcrumbs. Working with one chilled ball at a time, first roll it in the flour, shaking off any excess. Next, dip it into the whisked eggs, allowing any excess to drip off. Finally, thoroughly coat it in the panko breadcrumbs, pressing gently to ensure a thick, even layer. Double-check for any bare spots where the meat mixture might still be visible.
The Double Chill Advantage: Ensuring Adhesion & Integrity
For an extra layer of protection against leaks and to ensure maximum crispness, return all the breaded balls to the freezer for another 15 minutes. This second chill serves two important purposes: it firmly adheres the panko breading, and it ensures the cheese stays cold until it hits the hot oil, leading to a perfectly contained, molten center.
Achieving Golden Perfection Through Frying
In a large, heavy-bottomed pot or Dutch oven, heat 4-6 cups of vegetable or canola oil to 350-375°F (175-190°C). Use a reliable kitchen thermometer to accurately monitor the oil temperature, as consistency is key. Carefully add the chilled, breaded meat balls to the hot oil in batches, taking care not to overcrowd the pot. Overcrowding will drastically lower the oil temperature, leading to greasy, less crispy results. Fry for 2-4 minutes, turning occasionally, until they are beautifully golden brown and irresistibly crispy on all sides. Using a slotted spoon, remove the fried bites from the oil and place them on a plate lined with paper towels to drain any excess oil. Serve these incredible crispy, cheesy bites immediately while hot, with ketchup or your favorite dipping sauce.
Chef’s Tips for Unbeatable Crispy Cheesy Meat Bites
Elevate your Crispy Cheesy Meat Bites from good to truly extraordinary with these expert insights.
Mastering the Chill: Why It’s Non-Negotiable
The two chilling steps are the most critical elements for success. They firm up the meat mixture, solidify the cheese, and ensure the breading adheres perfectly. Don’t skip or rush them; proper chilling is your shield against cheese leaks and promotes an even, golden crust.
Oil Temperature: Your Frying Partner for Perfect Texture
Maintaining the correct oil temperature (350-375°F) is paramount. Too cool, and your bites will absorb excess oil and become greasy. Too hot, and they’ll brown too quickly on the outside before the cheese has a chance to melt through. A thermometer is your best friend here.
Smart Breading for Maximum Crunch and Coverage
Ensure each bite is completely and evenly coated in panko. Press gently to help the crumbs adhere. Any exposed meat or cheese can lead to leaks or a less-than-crispy finish. This thorough coating is essential for that ultimate crunch.
The Golden Rule: Don’t Overcrowd the Pot!
Frying in small batches is vital. Overcrowding lowers the oil temperature dramatically, resulting in soggy, oil-logged bites instead of golden, crispy ones. Give each of your cheesy meatball bites ample space to fry evenly.
Serving Immediately for Peak Enjoyment
These crispy, cheesy meat bites are at their absolute best fresh from the fryer. The contrast of the hot, gooey cheese and the crunchy exterior diminishes over time. Serve them as soon as they’re ready for the ultimate experience.
Troubleshooting Your Crispy Cheesy Meat Bites: Common Issues Solved
Even with a foolproof recipe, questions can arise. Here are solutions to common challenges you might encounter.
Why Did My Cheese Leak During Frying?
Cheese leakage usually occurs due to an imperfect seal during shaping or insufficient chilling. Ensure there are absolutely no cracks in the meat mixture covering the cheese. Also, verify both chilling steps were completed for the recommended time to fully firm up the bites and cheese.
My Bites Aren’t Crispy Enough – What Went Wrong?
Lack of crispness often points to two main culprits: the oil temperature was too low, or the pot was overcrowded. Always use a thermometer to maintain the correct oil temperature (350-375°F). Fry in small batches to prevent the oil from cooling down excessively.
The Bites Taste Too Greasy – How Can I Fix This?
Greasy bites are typically a result of oil that isn’t hot enough. When the oil is too cool, the breading absorbs it instead of creating a crisp barrier. Ensure your oil is at the ideal temperature range throughout the frying process and drain finished bites on paper towels.
My Meat Bites Are Falling Apart While Frying
If your meat bites are disintegrating, it’s likely due to inadequate chilling or insufficient binding in the meat mixture. Make sure the initial and double chilling steps are followed precisely. Also, ensure the meat and cheese are thoroughly combined before shaping to create a cohesive mixture, as discussed in our tips for perfectly shaped patties that won’t fall apart.
Serving Suggestions & Perfect Pairings for Crispy Cheesy Meat Bites
These Crispy Cheesy Meat Bites are incredibly versatile. While delicious on their own, they truly shine with the right accompaniments.
Dipping Delights: Beyond Basic Ketchup
While ketchup is a classic, consider elevating your dipping game. A spicy sriracha mayo, a tangy barbecue sauce, or a creamy ranch dressing would all complement these savory bites beautifully. For a touch of sophistication, try a zesty marinara or a warm cheese sauce.
Elevating Your Appetizer Platter
Arrange these golden, crunchy party snacks on a platter with fresh parsley garnish. They pair wonderfully with other finger foods like mini sliders, vegetable sticks with dip, or a vibrant fruit salsa. These little appetizers are guaranteed to be a hit at any gathering.
Make It a Meal: Complementary Sides
To turn these bites into a satisfying meal, serve them alongside a crisp green salad with a light vinaigrette. Roasted vegetables like asparagus or broccoli, or even a side of fluffy mashed potatoes, would provide a comforting balance to the rich, fried flavors.
FAQs: All Your Crispy Cheesy Meat Bites Questions Answered
Here are answers to some frequently asked questions about making and enjoying these delightful meat and cheese bites.
Can I Bake or Air Fry These Instead of Deep Frying?
While deep-frying yields the ultimate crispness, you can air fry them at 375°F (190°C) for 12-15 minutes, flipping halfway, or bake at 400°F (200°C) for 20-25 minutes. They will be less crispy, but still delicious and a healthier alternative.
How Can I Make These Crispy Cheesy Meat Bites Gluten-Free?
To make these gluten-free, simply substitute the all-purpose flour with a gluten-free all-purpose flour blend. Crucially, use gluten-free panko breadcrumbs, which are widely available and perform just as well in terms of crispiness.
Can I Use Different Kinds of Cheese?
Absolutely! The key is to use cheeses that melt well. Provolone, Monterey Jack, or even a blend with a touch of smoked gouda could work. Avoid hard, crumbly cheeses that won’t melt smoothly or very soft cheeses that might ooze too quickly. This recipe is fantastic with a combination of firm and stretchy cheeses for the perfect gooey texture.
How Long Do Cooked Crispy Cheesy Meat Bites Last in the Fridge?
Cooked Crispy Cheesy Meat Bites are best enjoyed immediately. However, leftovers can be stored in an airtight container in the refrigerator for up to 3 days. Reheat them in an air fryer or oven for best results to restore some crispness.
Are These Crispy Cheesy Meat Bites Freezer-Friendly?
Yes, they are! You can freeze the fully breaded but uncooked bites. Place them on a parchment-lined baking sheet and freeze until solid, then transfer to a freezer-safe bag or container for up to 2-3 months. Fry them from frozen, adding a few extra minutes to the cooking time, and ensure they reach an internal temperature of 165°F (74°C).
Storing and Prepping Your Crispy Cheesy Meat Bites for Later
Proper storage ensures you can enjoy these delightful bites even beyond their immediate creation, making future snack times a breeze.
Refrigerating Leftovers and Reheating for Best Results
Once cooled, store any leftover Crispy Cheesy Meat Bites in an airtight container in the refrigerator for up to 3 days. To reheat, avoid the microwave, which will make them soggy. Instead, use an air fryer at 350°F (175°C) for 5-8 minutes or a conventional oven at 375°F (190°C) for 10-15 minutes until heated through and crisp again.
Freezing Uncooked Bites for Future Feasts
For ultimate convenience, prepare and bread the meat bites according to the recipe, stopping before the frying step. Arrange them in a single layer on a parchment-lined baking sheet and freeze until completely solid. Once frozen, transfer the solid appetizer bites to a freezer-safe bag or container, removing as much air as possible, and store for up to 3 months. When ready to cook, simply fry from frozen, adding a few extra minutes to the cooking time to ensure they are heated through.
Ready to Impress? Share Your Crispy Cheesy Meat Bites Masterpiece!
You now have all the tools and knowledge to create truly exceptional Crispy Cheesy Meat Bites that will leave everyone asking for the recipe. This reliable method tackles common frustrations, ensuring your culinary efforts are met with delicious success.
Gather your ingredients, follow these detailed instructions, and prepare to delight your taste buds and impress your guests. We’d love to see your golden, gooey creations! Share your successes and enjoy every perfectly crispy, cheesy moment.

Crispy Cheesy Meat Bites
Course: AppetizerCuisine: American CuisineDifficulty: easy4
servings30
minutes10
minutes60
minutesAmerican Cuisine
Ingredients
1 pound lean ground beef
1/2 cup cooked bacon bits, crumbled
1 cup shredded mozzarella cheese
1/2 cup shredded cheddar cheese
1/2 teaspoon salt
1/4 teaspoon black pepper
1/2 teaspoon garlic powder
1/2 teaspoon onion powder
1/2 cup all-purpose flour
2 large eggs, whisked
2 cups panko breadcrumbs
4-6 cups vegetable oil or canola oil, for frying
Ketchup, for serving
Directions
- In a large skillet over medium heat, cook the ground beef until browned, breaking it up with a spoon. Drain off any excess fat. Season the cooked beef with salt, black pepper, garlic powder, and onion powder. Stir in the crumbled bacon bits. Let the mixture cool slightly.
- Once cooled enough to handle, transfer the beef and bacon mixture to a bowl. Add the shredded mozzarella and cheddar cheeses and mix well to combine.
- This is key to preventing cheese meltdown: Take about 2 tablespoons of the meat mixture and flatten it slightly in your palm. Place a small amount of extra shredded cheese (or a small cube of cheese if you prefer) in the center. Carefully mold the meat mixture around the cheese, shaping it into a compact ball. Ensure there are absolutely no cracks or exposed cheese on the surface of the ball. A perfectly sealed seam is vital.
- Place the formed meat and cheese balls on a baking sheet lined with parchment paper. Transfer the baking sheet to the freezer and chill the balls for at least 30 minutes. This step is crucial as it helps solidify the cheese and the ball’s structure, preventing premature oozing during frying.
- Set up your breading station: Place the flour in one shallow dish, the whisked eggs in a second, and the panko breadcrumbs in a third.
- Working with one chilled ball at a time, first roll it in the flour, shaking off any excess. Then dip it into the whisked eggs, allowing any excess to drip off. Finally, thoroughly coat it in the panko breadcrumbs, pressing gently to ensure a thick, even layer. Make sure there are no bare spots where the meat mixture is visible.
- For extra insurance against leaks: Once breaded, return the balls to the freezer for another 15 minutes. This second chill helps the breading adhere firmly and ensures the cheese stays cold until it hits the hot oil.
- In a large, heavy-bottomed pot or Dutch oven, heat the vegetable or canola oil to 350-375°F (175-190°C). Use a kitchen thermometer to monitor the temperature.
- Carefully add the chilled, breaded meat balls to the hot oil in batches, being careful not to overcrowd the pot. Overcrowding can lower the oil temperature and lead to greasy, less crispy results. Fry for 2-4 minutes, turning occasionally, until they are golden brown and crispy on all sides.
- Using a slotted spoon, remove the fried bites from the oil and place them on a plate lined with paper towels to drain any excess oil.
- Serve immediately while hot, with ketchup for dipping. Enjoy that perfectly contained, gooey cheese!
Notes
- Crucial chilling steps ensure perfectly contained cheese and crispy results.