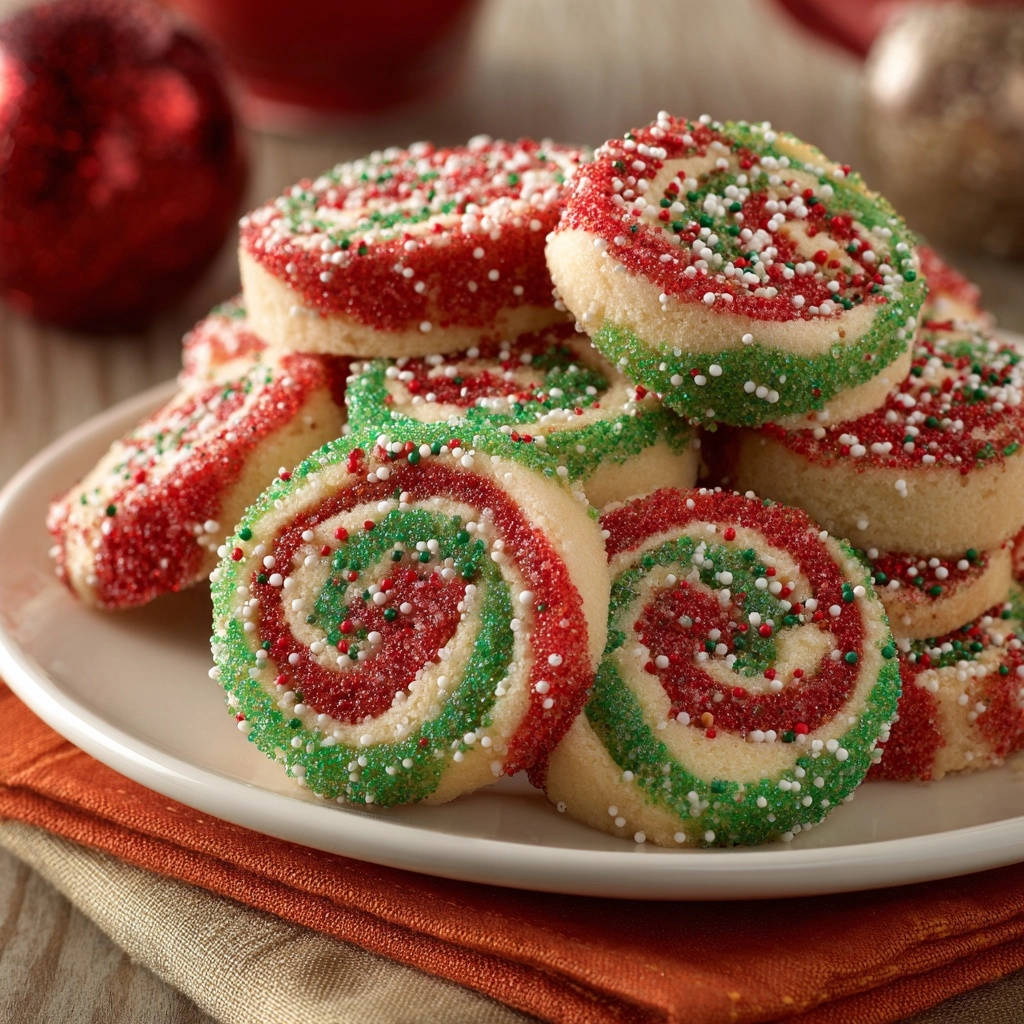
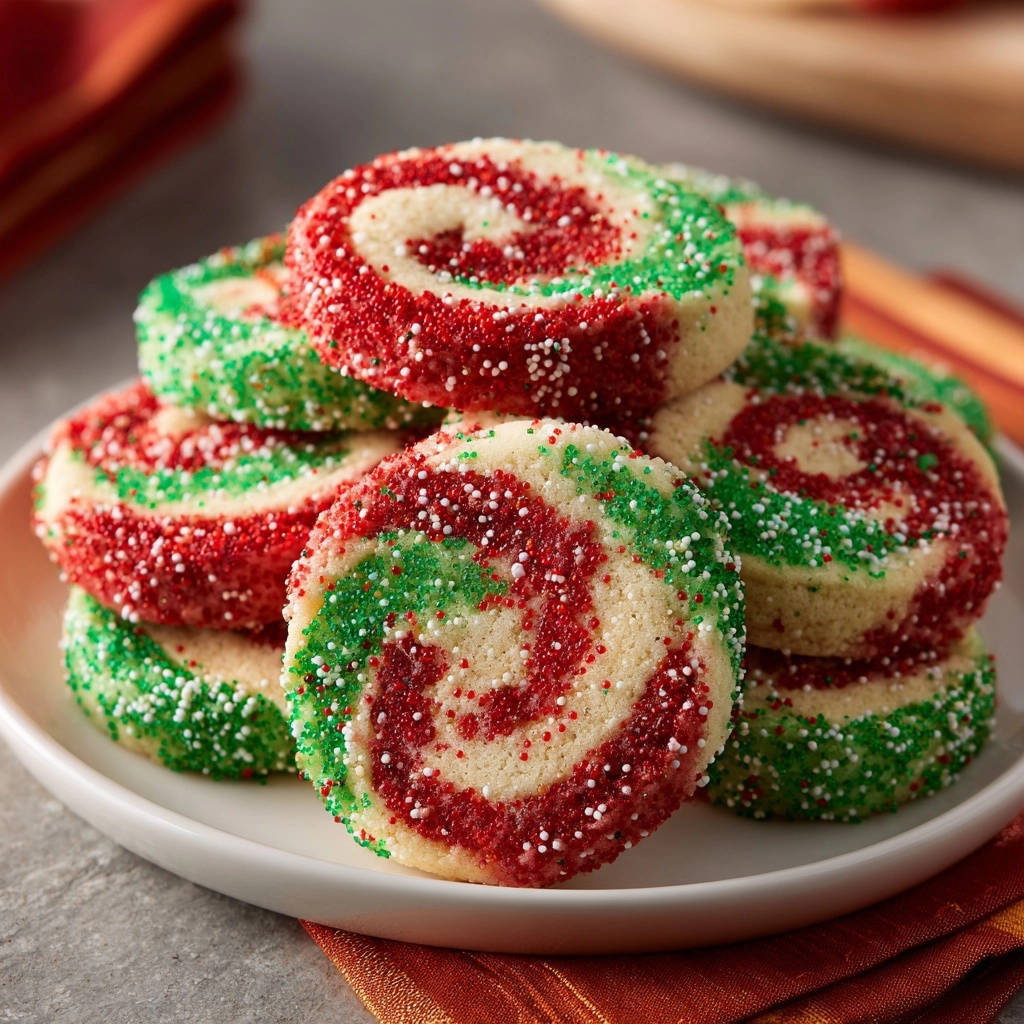
There’s nothing quite like the joy of holiday baking, but for years, my beautiful Festive Pinwheel Cookies often ended up looking less than perfect, with their vibrant swirls spreading into a muddled mess. After countless attempts and tweaks, I’ve cracked the code on how to guarantee perfectly shaped, bakery-worthy pinwheels every single time. Get ready to create stunning cookies that truly live up to their name.
Why These Festive Pinwheel Cookies Will Be Your New Tradition
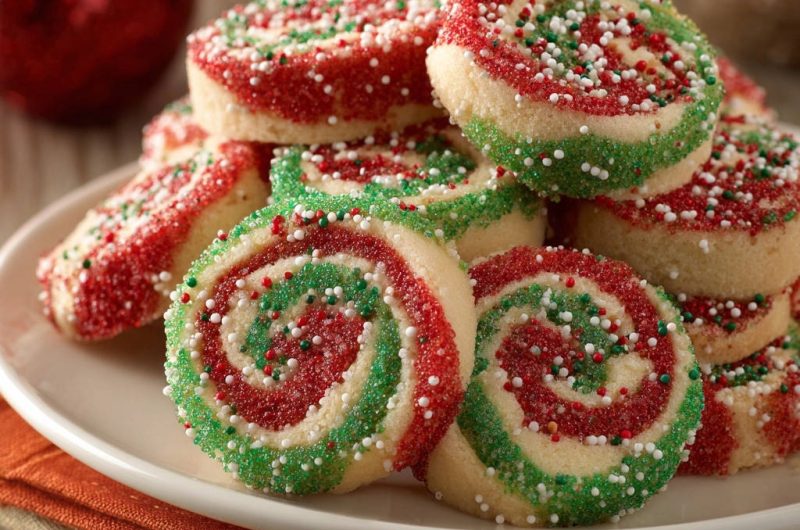
Guaranteed Perfect Swirls: No More Spreading!
The most common frustration with pinwheel cookies is their tendency to spread and lose their intricate design during baking. This recipe specifically addresses that challenge, employing crucial techniques like extended chilling and precise rolling that lock in your beautiful patterns. You’ll achieve crisp, defined swirls with every batch.
Effortless Elegance: Bakery-Quality at Home
These Festive Pinwheel Cookies boast a professional, artistic appearance without requiring complex decorating skills. Their vibrant colors and distinct patterns instantly elevate any cookie platter, making them look like they came straight from a high-end bakery. Impress your friends and family with minimal effort.
Simple Steps, Stunning Results for Every Skill Level
Despite their sophisticated look, the steps for these cookies are straightforward and easy to follow, making this recipe accessible for bakers of all experience levels. Clear instructions and helpful tips ensure that even less experienced bakers can achieve reliably beautiful and delicious results. This recipe empowers you to create holiday magic in your own kitchen.
The Essential Ingredients for Your Holiday Masterpiece
Building Blocks: Core Dough Ingredients
All-purpose flour provides the necessary structure for the cookies, ensuring they hold their shape. Softened unsalted butter is crucial for a tender crumb and rich flavor; it creams effectively with granulated sugar to create a light and airy base. Large eggs act as binders, adding richness and moisture, while vanilla extract contributes a warm, classic cookie flavor.
A Splash of Color: Food Coloring & Sprinkles
High-quality red and green food coloring are key to achieving the vibrant, distinct hues that define these Festive Pinwheel Cookies. Choose gel food coloring for concentrated color without adding excess liquid to the dough. The generous coating of red and green sanding sugar, along with optional white nonpareils, provides a beautiful, sparkling exterior and a delightful textural crunch.
Tools for Perfectly Patterned Pinwheels
-
Electric Mixer: Ideal for creaming butter and sugar to achieve that light and fluffy texture, which is crucial for tender Festive Pinwheel Cookies.
-
Parchment Paper: Essential for easy rolling of the dough without sticking and for preventing cookies from adhering to the baking sheet.
-
Sharp Knife: A critical tool for clean, crisp cuts on the chilled dough log, ensuring your pinwheel patterns remain perfectly defined.
-
Rolling Pin: For evenly rolling out the dough to the specified thickness and dimensions, which is key for uniform layers.
Crafting Your Festive Pinwheel Cookies: A Step-by-Step Guide
-
Prepare Dry Ingredients: In a medium bowl, whisk together the flour, baking powder, and salt. This ensures even distribution of leavening and seasoning for consistent cookie structure and taste.
-
Cream Wet Ingredients: In a large bowl, use an electric mixer to cream softened butter and granulated sugar until light and fluffy. Beat in eggs one at a time, followed by vanilla extract. Proper creaming incorporates air, contributing to the cookies’ final tender texture and helps prevent spreading.
-
Combine Wet and Dry: Gradually add the whisked dry mixture to the wet ingredients, mixing on low speed until just combined and a soft dough forms. Be careful not to overmix, as this develops gluten and can lead to tough cookies.
-
Color the Dough: Divide the dough into two equal portions. Mix several drops of red food coloring into one portion and green into the other until vibrant colors are achieved. Knead lightly to ensure the color is uniform throughout each portion, creating distinct layers.
-
Roll the Red Dough: On a lightly floured surface or, even better, between two sheets of parchment paper, roll the red dough into a 12×9-inch rectangle, about 1/4 inch thick. Trim the edges neatly to create sharp, defined boundaries for your pinwheels.
-
Roll the Green Dough: Repeat step 5 with the green dough, ensuring it matches the red dough’s dimensions exactly (12×9 inches and 1/4 inch thick). Consistency in size and thickness is crucial for symmetrical and attractive layering.
-
Layer the Dough: Carefully place the red dough rectangle directly on top of the green dough. Gently press down over the entire surface to remove any trapped air pockets and ensure the layers adhere well. This critical step prevents gaps in your finished pinwheel pattern.
-
Tightly Roll the Log: From one of the longer sides (the 12-inch side), tightly roll the layered dough into a log. Roll it as tightly as possible, applying gentle, even pressure throughout the roll to prevent any gaps from forming. A tight roll is the key to perfectly defined swirls.
-
Prepare Sprinkle Coating: In a shallow dish, combine the red sanding sugar, green sanding sugar, and white nonpareils (if using). This mixture creates the beautiful, glittering, and textured exterior for your Festive Pinwheel Cookies.
-
Coat the Log: Lightly brush the outside of the dough log with a little water; this helps the sprinkles stick. Roll the entire log in the sanding sugar mixture, pressing gently to ensure an even, generous coating on all sides. This adds both visual appeal and a delightful crunch.
-
Crucial Chilling Step: Wrap the sugar-coated log tightly in plastic wrap. Refrigerate for at least 3 hours, or up to overnight. This firming of the dough is absolutely essential to prevent spreading and maintain the integrity of the swirl shape during baking, ensuring sharp, crisp patterns.
-
Preheat Oven & Prep Sheets: Preheat your oven to 375°F (190°C) and line baking sheets with parchment paper. Proper oven temperature is important for even baking and prevents the cookies from flattening too quickly.
-
Slice the Cookies: Using a very sharp knife, carefully slice the chilled log into 1/4-inch thick rounds. The cold dough allows for clean, crisp cuts, beautifully preserving the swirl pattern without distortion.
-
Bake: Place the cookie rounds about 1 inch apart on the prepared baking sheets. Bake for 9-11 minutes, or until the edges are lightly golden and the cookies are set. Avoid overbaking, as this can make your Festive Pinwheel Cookies hard and dry.
-
Cool: Let the Festive Pinwheel Cookies cool on the baking sheets for a few minutes before transferring them to a wire rack to cool completely. They will firm up as they cool, achieving their final perfect texture.
Mastering the Swirl: Techniques for Pinwheel Perfection
The Art of Layering and Rolling Tightly
Achieving distinct, beautiful swirls in your Festive Pinwheel Cookies hinges on two key techniques: precise layering and an exceptionally tight roll. Ensuring your two dough rectangles are exactly the same size and thickness allows for uniform layers, preventing uneven spirals. Rolling the layered dough log as tightly as possible, applying even pressure, is paramount to eliminating air pockets and gaps. This diligent rolling ensures your vibrant colors remain separate and create a truly mesmerizing pinwheel.
The Indispensable Chilling Process
Chilling the dough log thoroughly is perhaps the most critical step to prevent your Festive Pinwheel Cookies from spreading during baking. Cold dough holds its shape better in the oven, allowing the butter to melt slowly and the structure to set before the cookie flattens. This extended chilling time also firms the dough, making it much easier to slice clean rounds without distorting the intricate swirl pattern.
Achieving Clean Cuts: The Sharp Knife Secret
Once your dough log is perfectly chilled, the key to showcasing those beautiful swirls is a very sharp knife. A dull knife will drag and distort the dough, squishing your carefully crafted pinwheel design. Using a sharp, thin-bladed knife allows you to make clean, precise cuts through the firm dough, preserving every intricate line of your two-toned masterpiece. For best results, clean your knife blade periodically between cuts if any dough sticks.
Pro Tips for Festive Pinwheel Cookies Success
-
Don’t Overmix the Dough: Overmixing develops gluten, leading to tougher cookies. Mix until just combined to ensure a tender crumb for your Festive Pinwheel Cookies, similar to the delightful texture in our perfect sugar cookies.
-
Even Dough Thickness Matters: Ensure both dough layers are rolled to the exact same 1/4-inch thickness for symmetrical and attractive swirls. Inconsistent thickness can lead to uneven baking and distorted patterns.
-
Temperature Control is Key: Make sure your butter is softened, not melted, when creaming, and that the dough is thoroughly chilled before slicing and baking. This precise temperature management prevents spreading and helps maintain the cookie’s perfect shape.
-
Watch for Golden Edges: Overbaking can result in hard, dry cookies that lack tenderness. Remove them from the oven when the edges are just lightly golden; they will continue to set and firm up as they cool on the baking sheet.
-
Experiment with Colors: While red and green are classic for Festive Pinwheel Cookies, don’t hesitate to customize! Consider other holiday color combinations like blue and silver for a winter theme, or even different shades of one color for a unique ombré look.
Troubleshooting Your Pinwheel Cookies: Common Fixes
My Pinwheels Lost Their Shape While Baking!
If your Festive Pinwheel Cookies spread too much or lost their defined swirl during baking, it’s almost always due to insufficient chilling. Ensure the dough log is thoroughly chilled for at least 3 hours, or preferably overnight, before slicing. Your butter might also have been too warm when mixed, affecting the dough’s stability.
The Dough is Too Sticky or Too Crumbly!
If your dough is too sticky to handle, try adding a tablespoon of flour at a time, mixing until it reaches a manageable, non-sticky consistency. If it’s too crumbly and won’t come together, your butter might not have been soft enough, or you might have added too much flour; try adding a teaspoon of milk or water to bring it together.
My Swirls Aren’t Defined!
Undefined swirls often result from not rolling the dough tightly enough, which creates air pockets between the layers, or from using a dull knife for slicing. Ensure you press gently but firmly when rolling the layered dough log. Always use a very sharp knife for clean, crisp cuts on the chilled dough to preserve the intricate pattern.
Storing and Enjoying Your Festive Pinwheel Cookies Longer
Keeping Fresh: Storage Best Practices
To keep your Festive Pinwheel Cookies fresh and maintain their delightful crispness and tender chew, store them in an airtight container at room temperature. They will stay fresh for up to one week. Ensure the cookies are completely cooled before storing to prevent any condensation from forming inside the container, which can lead to sogginess.
Make-Ahead Magic: Prep for Stress-Free Baking
For convenience during busy holiday seasons, you can prepare the dough log up to 2-3 days in advance and keep it tightly wrapped in plastic wrap in the refrigerator. For longer storage, the unbaked, wrapped dough log can be frozen for up to 2 months. When ready to bake, transfer it to the refrigerator to thaw overnight before slicing and proceeding with the baking instructions. Baked Festive Pinwheel Cookies also freeze well for up to a month in an airtight container; simply thaw at room temperature before serving.
Creative Ways to Serve Your Festive Pinwheel Cookies
These beautiful Festive Pinwheel Cookies are perfect on a holiday dessert platter, alongside other festive treats. Their vibrant colors make them a standout addition. Serve them with a warm mug of hot cocoa or a glass of cold milk for a comforting and delightful snack that appeals to all ages.
Consider arranging them artistically on a tiered stand for a stunning centerpiece at your holiday gathering, letting their vibrant colors truly shine. They also make wonderful homemade gifts when packaged in decorative tins or festive bags, perhaps alongside some caramel nut squares for a varied selection.
Your Festive Pinwheel Cookies Questions Answered
Can I use natural food colorings?
Yes, you can use natural food colorings, but be aware that the colors might be less vibrant than artificial ones. You may need to use more to achieve the desired intensity, and they can sometimes slightly alter the dough’s consistency, so add sparingly and adjust flour slightly if needed.
What if I don’t have an electric mixer?
While an electric mixer is recommended for creaming butter and sugar to achieve that crucial light and fluffy texture, you can cream them by hand. Use a sturdy whisk or wooden spoon, and be prepared to put in more effort and time to achieve a similar airy consistency.
Can I freeze the dough log?
Absolutely! The unbaked, wrapped dough log is excellent for freezing. It can be stored in the freezer for up to 2 months. When you’re ready to bake, simply transfer the log to the refrigerator to thaw overnight before slicing and proceeding with the baking instructions.
Are there alternative sprinkle options?
Yes, feel free to use any festive sprinkles you prefer to customize your Festive Pinwheel Cookies! Besides sanding sugars and nonpareils, you could use edible glitter, snowflake sprinkles, or even finely crushed peppermints for a different flavor and texture. Just ensure they are suitable for baking temperatures.
How can I make them gluten-free?
To make these Festive Pinwheel Cookies gluten-free, substitute the all-purpose flour with a high-quality 1:1 gluten-free baking flour blend that contains xanthan gum. The texture might be slightly different, potentially a bit more delicate, but the delicious flavor and beautiful swirls will remain.
Ready to Share Your Festive Pinwheel Cookies Masterpiece?
You’ve now mastered the art of creating perfectly swirled, bakery-worthy Festive Pinwheel Cookies that are sure to impress everyone on your holiday list. Don’t let the fear of spreading dough hold you back any longer; with these tips and techniques, success is truly guaranteed.
We’d love to see your beautiful creations! Share your Festive Pinwheel Cookies on social media and tag us, or leave a comment below with your favorite part of baking them. Happy baking, and happy holidays!
Festive Pinwheel Cookies
Course: DessertCuisine: American CuisineDifficulty: easy24
cookies45
minutes10
minutes3300
minutesAmerican Cuisine
Ingredients
2 and 1/2 cups all-purpose flour
1 teaspoon baking powder
1/2 teaspoon salt
1 cup (2 sticks) unsalted butter, softened
1 and 1/2 cups granulated sugar
2 large eggs
1 teaspoon vanilla extract
Red food coloring
Green food coloring
1/2 cup red sanding sugar or sprinkles
1/2 cup green sanding sugar or sprinkles
1/4 cup white nonpareils or sprinkles (optional, for mixture)
Directions
- In a medium bowl, whisk together the flour, baking powder, and salt. Set aside.
- In a large bowl, cream together the softened butter and granulated sugar with an electric mixer until light and fluffy. Beat in the eggs one at a time, then stir in the vanilla extract.
- Gradually add the dry ingredients to the wet ingredients, mixing on low speed until just combined and a soft dough forms. Do not overmix.
- Divide the dough into two equal portions. To one portion, add several drops of red food coloring and mix until a vibrant red color is achieved. To the second portion, add green food coloring and mix until a vibrant green color is achieved.
- On a lightly floured surface or between two sheets of parchment paper, roll out the red dough into a rectangle approximately 12×9 inches and about 1/4 inch thick. Trim the edges to make it neat.
- Repeat step 5 with the green dough, rolling it to the same dimensions (12×9 inches and 1/4 inch thick).
- Carefully place the red dough rectangle directly on top of the green dough rectangle. Gently press down to remove any air pockets and ensure they adhere well.
- This is key for perfect swirls: Tightly roll the layered dough rectangle from one of the longer sides (12-inch side) into a log. Roll it as tightly as possible, applying gentle, even pressure to prevent gaps.
- Combine the red sanding sugar, green sanding sugar, and white nonpareils (if using) in a shallow dish.
- Lightly brush the outside of the rolled dough log with a little water. Roll the entire log in the sanding sugar mixture, pressing gently to ensure the sprinkles adhere evenly and generously to all sides.
- Crucial chilling step: Wrap the sugar-coated log tightly in plastic wrap. Refrigerate for at least 3 hours, or up to overnight. This firming up of the dough is essential to prevent spreading and maintain the swirl shape during baking.
- Preheat your oven to 375°F (190°C). Line baking sheets with parchment paper.
- Using a very sharp knife, carefully slice the chilled log into 1/4 inch thick rounds. The cold dough will allow for clean, crisp cuts, maintaining the swirl pattern beautifully.
- Place the cookie rounds about 1 inch apart on the prepared baking sheets.
- Bake for 9-11 minutes, or until the edges are lightly golden and the cookies are set. Do not overbake, as this can make them hard.
- Let the cookies cool on the baking sheets for a few minutes before transferring them to a wire rack to cool completely.