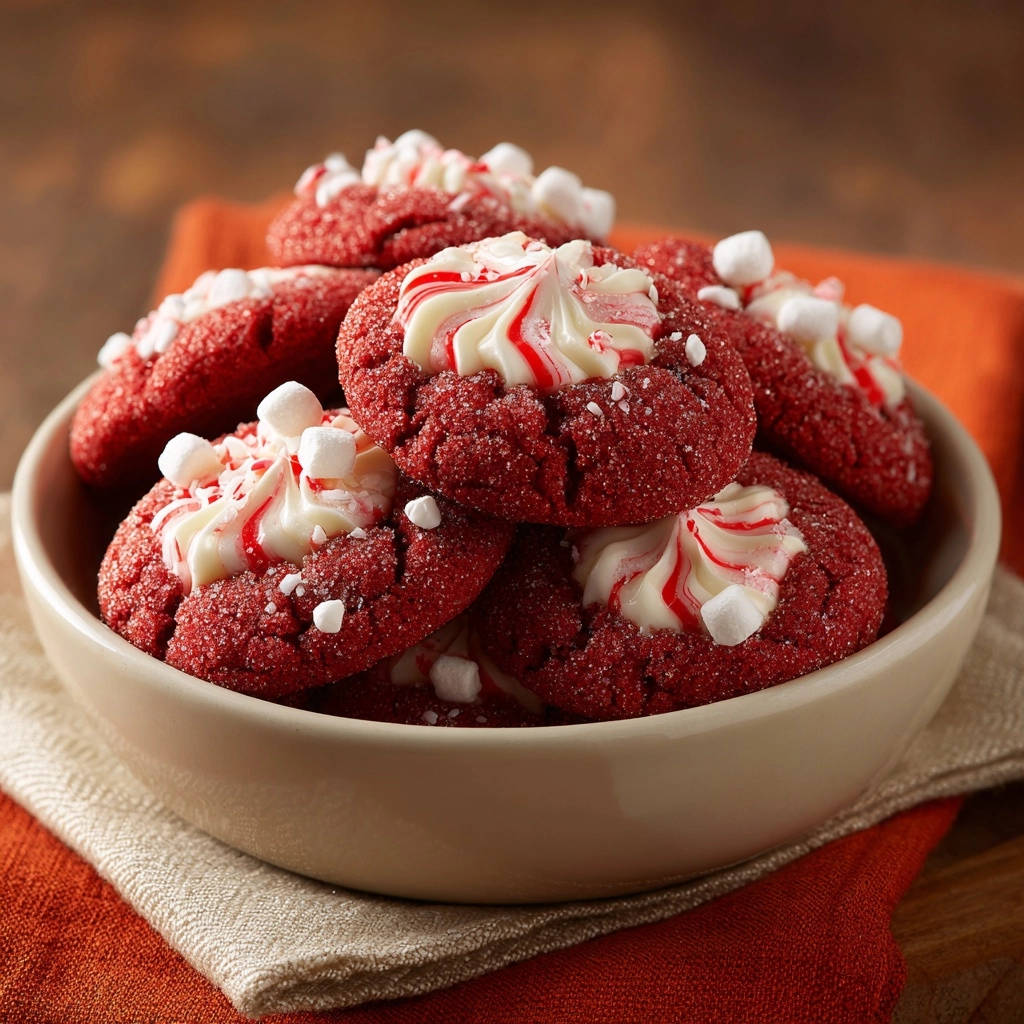
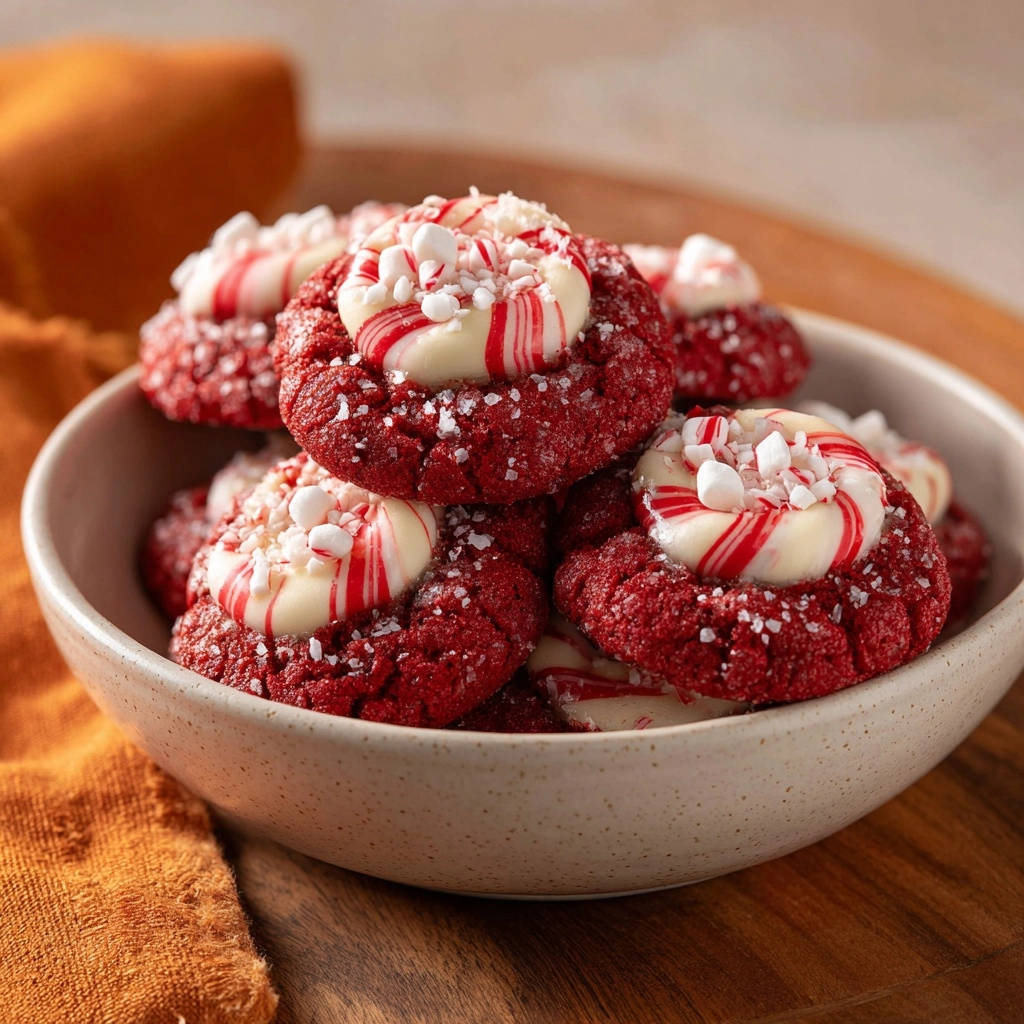
There’s nothing quite like the disappointment of a dry, hard cookie, especially when you’re dreaming of a festive treat. I’ve perfected these perfect sugar cookies and other baked delights over the years, and I promise you these Festive Red Velvet Crinkle Cookies consistently deliver a soft, chewy, melt-in-your-mouth texture, every single time. My secret to their irresistible moisture and vibrant appearance ensures they’ll be the star of any holiday gathering, bringing joy with every delightful bite.
Why These Festive Red Velvet Crinkle Cookies Will Be Your New Favorite
Unlocking the Melt-in-Your-Mouth Secret
This recipe focuses on a key ingredient and precise technique to guarantee an exceptionally soft and tender crumb. The result is a cookie that resists drying out, remaining perfectly chewy for days.
Say goodbye to crumbly, disappointing red velvet; these cookies are designed for ultimate indulgence.
The Holiday Table Showstopper
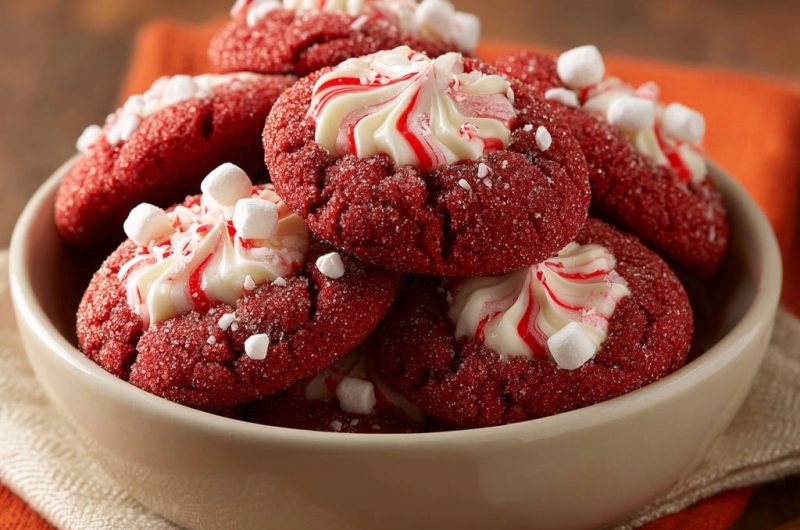
Beyond their incredible taste, these Festive Red Velvet Crinkle Cookies boast a vibrant, eye-catching appearance. The deep red hue, contrasted with the snowy white powdered sugar crinkle, makes them visually stunning.
The unique swirled peppermint cream cheese frosting adds an elegant, festive touch that elevates them from a simple cookie to a true showpiece.
Effortless Elegance: Simple Steps, Stunning Results
Despite their sophisticated look and texture, these cookies are surprisingly straightforward to make. My step-by-step guide includes crucial tips that simplify the process, ensuring success for bakers of all levels.
You’ll be amazed at the professional-looking results achieved with minimal fuss, making them perfect for holiday baking or last-minute gifts.
Gather Your Palette: Essential Ingredients for Vibrancy and Flavor
For the Cookie Base: The Foundation of Softness
Your dry ingredients – all-purpose flour, unsweetened cocoa powder, baking soda, and salt – form the essential structure and characteristic flavor of red velvet. Using unsweetened cocoa is key for the rich, nuanced chocolate base without added sweetness.
Unsalted butter and granulated sugar are creamed together to create the light, airy foundation of the cookie dough. A large egg binds everything, while vanilla extract enhances the overall flavor profile.
The star ingredient is red food coloring gel, which provides that iconic, intense red color without altering the dough’s consistency. Crucially, sour cream is the secret weapon for this recipe, contributing unparalleled moisture and tenderness to the finished cookies.
The Cream Cheese Peppermint Frosting: A Festive Crown
Cream cheese and unsalted butter, both softened, form the rich and tangy base of the luxurious frosting. Powdered sugar sweetens and thickens the frosting, ensuring a smooth, pipeable consistency.
Peppermint extract infuses the frosting with a refreshing, festive flavor, perfectly complementing the red velvet. A touch more red food coloring gel is used to create the beautiful swirled effect, while mini marshmallows and crushed candy canes provide optional, delightful toppings.
Achieving the Iconic Crinkle: Sugars for Rolling
For the signature crinkle effect, you’ll need two types of sugar for rolling. Granulated sugar provides the initial grip and a subtle sparkle.
Powdered sugar, applied heavily over the granulated layer, is what truly creates the dramatic, contrasting white “crackle” as the cookies bake and spread.
Your Baking Arsenal: Tools for Crinkle Cookie Success
Parchment Paper-Lined Baking Sheets: Essential for non-stick baking and easy cleanup. This prevents sticking and promotes even baking.
Electric Mixer (Stand or Handheld): Indispensable for creaming butter and sugar, and whipping the frosting to a smooth, airy consistency. This saves time and ensures proper aeration.
Piping Bag with Star Tip: Specifically for the decorative frosting swirl, allowing for precise and beautiful application. A good star tip creates elegant ridges.
Shallow Dishes: Ideal for efficiently rolling cookies in the granulated and powdered sugars, ensuring a thorough and even coating.
Wire Cooling Rack: Crucial for allowing air to circulate around the cookies as they cool, preventing sogginess and ensuring they maintain their texture.
Baking Brilliance: A Step-by-Step Guide to Perfect Festive Crinkle Cookies
Prep Your Workspace: Preheat your oven to 350°F (175°C) and line baking sheets with parchment paper. In a medium bowl, whisk together the all-purpose flour, cocoa powder, baking soda, and salt. This ensures even distribution of dry ingredients for consistent results throughout your cookie dough.
Cream Butter and Sugar: In a large bowl, use an electric mixer to cream together the softened unsalted butter and 1 ½ cups granulated sugar until the mixture is light and fluffy. Beat in the large egg, vanilla extract, and red food coloring gel until well combined and the dough achieves a vibrant, uniform red color. Take your time here to achieve proper aeration, which contributes to the cookie’s texture.
The Softness Secret Unveiled: Gradually add the whisked dry ingredient mixture to the wet ingredients, alternating with the sour cream. Begin and end with the dry ingredients. Mix until just combined – absolutely do not overmix. This specific blend, particularly the sour cream, is crucial for the incredible moisture and tenderness, actively preventing dry cookies.
Chill for Perfection: Cover the cookie dough tightly and chill it in the refrigerator for at least 30 minutes. This essential step is vital to prevent excessive spreading during baking and helps the cookies maintain their soft, chewy texture by promoting even baking and firmer dough.
The Double Sugar Roll: In two separate shallow dishes, place ½ cup granulated sugar in one and ¼ cup powdered sugar in the other. Roll cookie dough into uniform 1-inch balls. First, roll each ball thoroughly in the granulated sugar, then heavily in the powdered sugar, ensuring a thick, even coating for that classic, pronounced crinkle effect.
Bake to Tenderness: Place the rolled cookies about 2 inches apart on your prepared baking sheets. Bake for 9-11 minutes, or until the edges are just set but the centers still look slightly soft. This is a critical step: Do not overbake! Taking them out when they look slightly underdone is the ultimate secret to soft, chewy cookies even after cooling due to carryover cooking.
Cooling Gracefully: Let the freshly baked cookies cool on the baking sheet for 5 minutes. This allows them to firm up slightly before you transfer them to a wire rack to cool completely. Piping frosting on warm cookies will result in a melty, runny mess, so patience is key here!
Craft the Peppermint Frosting: While the cookies cool, prepare the frosting. In a medium bowl, beat softened cream cheese and ¼ cup softened butter until perfectly smooth with an electric mixer. Gradually add powdered sugar, mixing until the frosting is creamy and lump-free. Stir in the peppermint extract for that distinctive, festive kick.
Design the Swirl: Divide a small portion of the frosting (about 2 tablespoons) into a separate small bowl. Add a few drops of red food coloring gel to this small portion and mix well to create a vibrant red. Scoop the majority white frosting into a piping bag fitted with a star tip. Using a thin brush or toothpick, paint thin vertical stripes of the red colored frosting inside the piping bag before adding the white frosting. This technique creates the beautiful, eye-catching red swirl effect as you pipe.
Decorate and Delight: Once the Festive Red Velvet Crinkle Cookies are completely cool, pipe a generous swirl of frosting onto each cookie using your prepared piping bag. For an extra festive touch, sprinkle generously with mini marshmallows and crushed candy canes if desired. Serve and enjoy your beautiful, melt-in-your-mouth creations!
Beyond the Recipe: Insider Tips for Flawless Festive Red Velvet Crinkle Cookies
The Sour Cream Advantage: Why It Matters
Sour cream is not just for flavor; its acidity tenderizes the gluten in the flour, while its fat content adds richness. This combination results in a remarkably soft, moist crumb that stays fresh longer than cookies made without it.
Chill for Success: The Importance of Dough Rest
Chilling the dough isn’t just about preventing spread; it allows the flour to fully hydrate, leading to a more tender cookie. The fat also solidifies, contributing to a chewier texture and better flavor development.
The Art of Not Overbaking: Your Ultimate Softness Key
Underbaking is your best friend for chewy cookies. Remove them from the oven when the edges are set but the centers still look slightly doughy. The residual heat from the baking sheet will continue to cook them to perfection as they cool, ensuring maximum softness. This is a crucial tip for all baked goods.
Mastering the Dual Sugar Roll
The trick to a dramatic crinkle is a generous, even coating of both sugars. Roll first in granulated sugar to create a slightly abrasive surface, then roll heavily in powdered sugar. The powdered sugar cracks and fissures during baking, creating that beautiful signature look.
Piping Perfection: Crafting the Swirl Frosting
For the cleanest red swirl, ensure your red food coloring is a gel and your stripes inside the bag are distinct. Don’t overmix the colored frosting; you want vibrant lines, not a pink blend. Practice on a plate first to get your swirl technique just right.
Temperature Matters: Softened Butter and Cream Cheese
Always use butter and cream cheese that are properly softened to room temperature. This ensures they cream together smoothly with the sugar, incorporating air for a light texture and preventing lumps in both the cookie dough and the frosting.
Serving and Storing Your Festive Delights
The Perfect Presentation: Serving Suggestions
These Festive Red Velvet Crinkle Cookies are stunning on a holiday dessert platter, nestled amongst other seasonal treats. They also make an ideal homemade gift when arranged in decorative boxes or bags.
Pair them with a warm mug of cocoa or coffee for a truly comforting experience.
Keeping Them Fresh: Storage Tips
Due to the cream cheese frosting, store these cookies in an airtight container in the refrigerator for up to 3-4 days. If your home is cool, they can sit at room temperature for 1-2 days, but refrigeration is always safest for dairy-based frostings.
Make Ahead Magic: Prep for Future Festivities
You can prepare the cookie dough balls (pre-rolling in sugar) and freeze them on a baking sheet until solid. Transfer to a freezer-safe bag for up to 1 month. Bake from frozen, adding a couple of minutes to the baking time.
Baked, unfrosted cookies can also be frozen in an airtight container for 2-3 months. Thaw at room temperature before frosting and decorating.
Solving Cookie Crises: Common Issues & Quick Fixes
Why Are My Cookies Spreading Too Much?
The most common culprits are insufficient chilling of the dough, butter that was too soft, or an oven temperature that is too low. Ensure your dough chills for the full recommended time, and use an oven thermometer to verify accuracy.
My Cookies Aren’t Crinkling!
This usually happens if you didn’t apply enough powdered sugar, or if the dough was too warm when rolled, causing the sugar to absorb rather than crack. Make sure your sugar coating is very thick and the dough is well-chilled.
The Cookies Are Dry/Hard!
Overbaking is almost always the cause of dry, hard cookies. Remember to remove them from the oven when the centers still look slightly soft. Overmixing the dough can also develop too much gluten, leading to a tougher texture.
Frosting Too Runny or Stiff?
If your frosting is too runny, gradually add more powdered sugar until it reaches the desired consistency. If it’s too stiff, add a tiny amount (½ teaspoon at a time) of milk or cream until it loosens up. Always ensure your cream cheese and butter are properly softened.
Your Festive Crinkle Cookie Questions Answered
Can I make these cookies gluten-free?
Yes, you can substitute the all-purpose flour with a 1:1 gluten-free baking flour blend that contains xanthan gum. The texture might vary slightly, but they should still be delicious and crinkly.
Can I use regular food coloring instead of gel?
While liquid food coloring can be used, I highly recommend gel food coloring for these cookies. Gel coloring provides a much more vibrant and intense red color without adding excess liquid, which could alter the dough’s consistency and lead to spreading.
How long do these cookies last?
When stored properly in an airtight container in the refrigerator, these Festive Red Velvet Crinkle Cookies will stay fresh and delicious for 3-4 days. For optimal taste and texture, enjoy them within the first two days.
Can I freeze the dough or baked cookies?
Absolutely! You can freeze the dough balls (pre-rolled in sugar) for up to one month. Bake them directly from frozen, adding 2-3 minutes to the baking time. Baked, unfrosted cookies can be frozen for 2-3 months; thaw at room temperature before frosting.
What if I don’t have sour cream?
Full-fat plain Greek yogurt can be used as a direct substitute for sour cream, though it might yield a slightly denser cookie. Buttermilk can also work, but use slightly less to account for its thinner consistency and increase the baking soda by ¼ teaspoon to react with the added acidity.
Ready to Bake? Share Your Festive Red Velvet Crinkle Cookie Creations!
Now that you have all the secrets to crafting these irresistibly soft and festive cookies, it’s time to preheat your oven and spread some holiday cheer! These Festive Red Velvet Crinkle Cookies are more than just a treat; they’re a symbol of warmth and joy.
I can’t wait to see your stunning crinkle cookie creations! Be sure to share your baking successes, and if you’re looking for more delightful recipes to brighten your season, explore our collection of easy and delicious baked goods.
Festive Red Velvet Crinkle Cookies
Course: DessertCuisine: American CuisineDifficulty: easy24
cookies25
minutes10
minutes60
minutesAmerican Cuisine
Ingredients
For the Cookies:
2 ½ cups all-purpose flour
¼ cup unsweetened cocoa powder
1 teaspoon baking soda
½ teaspoon salt
½ cup (1 stick) unsalted butter, softened
1 ½ cups granulated sugar
1 large egg
1 teaspoon vanilla extract
1 teaspoon red food coloring gel
½ cup sour cream
For the Cream Cheese Peppermint Frosting:
4 oz cream cheese, softened
¼ cup (½ stick) unsalted butter, softened
2 cups powdered sugar
½ teaspoon peppermint extract
Red food coloring gel
Mini marshmallows for topping
Crushed candy canes for topping (optional)
For Rolling:
½ cup granulated sugar
¼ cup powdered sugar
Directions
- Prep: Preheat oven to 350F (175C). Line baking sheets with parchment paper. In a medium bowl, whisk together the flour, cocoa powder, baking soda, and salt.
- Cream Butter and Sugar: In a large bowl, cream together the softened butter and 1 ½ cups granulated sugar until light and fluffy. Beat in the egg, vanilla extract, and red food coloring until well combined and vibrant.
- The Softness Secret: Gradually add the dry ingredient mixture to the wet ingredients, alternating with the sour cream, beginning and ending with the dry ingredients. Mix until just combined. Do not overmix. This specific blend of ingredients, particularly the sour cream, is key to the incredible moisture and tenderness of these cookies, preventing them from drying out during baking.
- Chill: For best results and to prevent excessive spreading, cover the dough and chill for at least 30 minutes. This also helps the cookies maintain their soft texture by ensuring even baking.
- Roll: In two separate shallow dishes, place the ½ cup granulated sugar and ¼ cup powdered sugar. Roll cookie dough into 1-inch balls. First, roll each ball thoroughly in the granulated sugar, then heavily in the powdered sugar, ensuring a thick coating for that classic crinkle effect.
- Bake: Place cookies 2 inches apart on prepared baking sheets. Bake for 9-11 minutes, or until the edges are just set but the centers still look slightly soft. Crucially, do not overbake. Taking them out when they look slightly underdone is the ultimate secret to keeping them soft and chewy even after cooling.
- Cool: Let cookies cool on the baking sheet for 5 minutes before transferring to a wire rack to cool completely.
- Make Frosting: While cookies cool, prepare the frosting. In a medium bowl, beat softened cream cheese and ¼ cup butter until smooth. Gradually add powdered sugar, mixing until creamy. Stir in peppermint extract.
- Swirl Design: Divide a small portion of the frosting (about 2 tablespoons) into a separate small bowl. Add a few drops of red food coloring gel to this small portion and mix well. Scoop the majority white frosting into a piping bag fitted with a star tip. Using a thin brush or toothpick, paint thin stripes of the red colored frosting vertically inside the piping bag before adding the white frosting. This creates the beautiful red swirl effect.
- Decorate: Once cookies are completely cool, pipe a swirl of frosting onto each cookie. Sprinkle generously with mini marshmallows and crushed candy canes if desired.
Notes
- Total time includes chilling. Do not overbake to ensure soft, chewy texture.