There’s a unique joy in biting into a rich, decadent chocolate cake truffle, yet achieving that perfect, non-crumbling consistency can feel like a kitchen challenge. We’ve all faced cake balls that refuse to hold their shape or fall apart during dipping. My secret to truly flawless Chocolate Peppermint Cake Truffles lies in a simple, precise technique that guarantees every single truffle rolls beautifully and maintains its form.
This recipe transforms a common kitchen frustration into a delightful, stress-free experience. You’ll create professional-looking treats that are as easy to make as they are delicious. Prepare to impress everyone with these festive, melt-in-your-mouth bites.
The Secret to Truffles That Never Crumble (It’s Simpler Than You Think!)
The core of a perfect truffle is its texture. The common issue of crumbling or stickiness comes down to an imbalanced cake-to-frosting ratio. My method focuses on incremental additions and continuous testing to achieve a dough-like consistency that is firm yet pliable.
This careful approach ensures the cake crumbs are fully bound by the frosting without becoming oversaturated. The result is a mixture that rolls into smooth, flawless balls that resist crumbling, making the entire truffle-making process seamless and enjoyable.
Gather Your Indulgences: Essential Ingredients for Truffle Bliss
The quality and type of your ingredients significantly impact the final texture and flavor of your truffles. Choosing wisely ensures a decadent, professional result every time.
The Cake Foundation: Store-Bought vs. Homemade
Start with a cooled (13×9 inch) chocolate cake. A slightly dense, moist cake works best as it provides a sturdy base for the truffles. While homemade offers control over flavor, a good quality store-bought cake is perfectly acceptable for convenience.
Ensure your cake is completely cooled before crumbling. Warm cake will cause the mixture to become too soft and sticky, making it difficult to handle and roll.
The Bonding Agent: Chocolate Frosting or Ganache
This ingredient is crucial for binding the cake crumbs into a rollable consistency. A rich chocolate buttercream or a smooth ganache both work wonderfully.
Buttercream frosting provides a slightly firmer texture, while ganache offers a truly decadent, melt-in-your-mouth experience. The key is to add it gradually, ensuring you reach the perfect dough-like consistency that holds its shape.
The Decadent Coat: Melting Chocolate Choices
For a smooth, glossy, and crack-free coating, the right melting chocolate is essential. High-quality melting wafers or compound chocolate are excellent choices, designed for easy melting and a crisp finish.
Standard chocolate chips can be used but may require a touch of shortening or coconut oil to achieve optimal dipping consistency and prevent a thick, dull coating. For the ultimate smooth finish, properly tempered couverture chocolate will yield a superior snap and shine.
The Festive Sparkle: Crushed Peppermint Candies
Crushed peppermint candies provide the signature festive flavor and visual appeal for these Chocolate Peppermint Cake Truffles. Candy canes or classic starlight mints are ideal for this.
When crushing, aim for a consistency that’s not too fine (which can become dusty) and not too chunky (which might not stick well). A good balance ensures both texture and aesthetic appeal.
Tools for Truffle Triumph: What You’ll Need
Large Mixing Bowl: Essential for combining cake crumbs and frosting effectively without a mess, allowing ample space for mixing.
Parchment-Lined Baking Sheets: Prevents sticking during chilling and setting, making transfer effortless and clean-up minimal.
Scoop (1 Tablespoon or equivalent): Ensures uniform truffle size, which is key for even dipping, consistent chilling, and a professional, appealing presentation.
Microwave-Safe Bowl or Double Boiler: For perfectly melting your chocolate coating, this prevents scorching or seizing, ensuring a smooth, dippable consistency.
Dipping Tools or Fork: Facilitates even coating of the truffles and allows excess chocolate to drip off cleanly, preventing unsightly puddles at the base and ensuring a smooth finish.
Crafting Your Masterpiece: Step-by-Step Chocolate Peppermint Cake Truffles
- Prepare the Cake Base:
Crumble the cooled chocolate cake into a large mixing bowl, ensuring no large lumps remain. For a very smooth truffle texture, you can pulse the cake in a food processor until fine crumbs form evenly.
- The Magic Mixture: Achieving Perfect Consistency:
Gradually add the chocolate frosting or ganache, one tablespoon at a time, mixing thoroughly after each addition (by hand or with a sturdy spatula). The goal is a moist, dough-like consistency that holds together when pressed and rolls smoothly without crumbling or feeling sticky/greasy. Test by rolling a small piece in your palm; it should hold its shape perfectly.
- Roll Your Truffles:
Once the mixture reaches the perfect consistency, scoop out small portions (about 1 tablespoon each) and roll them tightly between your palms to form smooth, round balls. This firm rolling ensures dense, well-formed truffles. Place the rolled truffles neatly on a parchment-lined baking sheet.
- Chill for Firmness:
Refrigerate the rolled truffles for at least 30-60 minutes. This crucial chilling step helps them firm up significantly, preventing them from falling apart or losing shape during dipping and ensuring a crisp, uniform coating.
- Melt the Chocolate Coating:
While the truffles are chilling, prepare your coating. Melt the chocolate in a microwave-safe bowl in 30-second intervals, stirring well after each, until smooth and fully melted. Alternatively, use a double boiler on the stovetop, ensuring no water enters the chocolate to prevent seizing.
- Dip and Decorate:
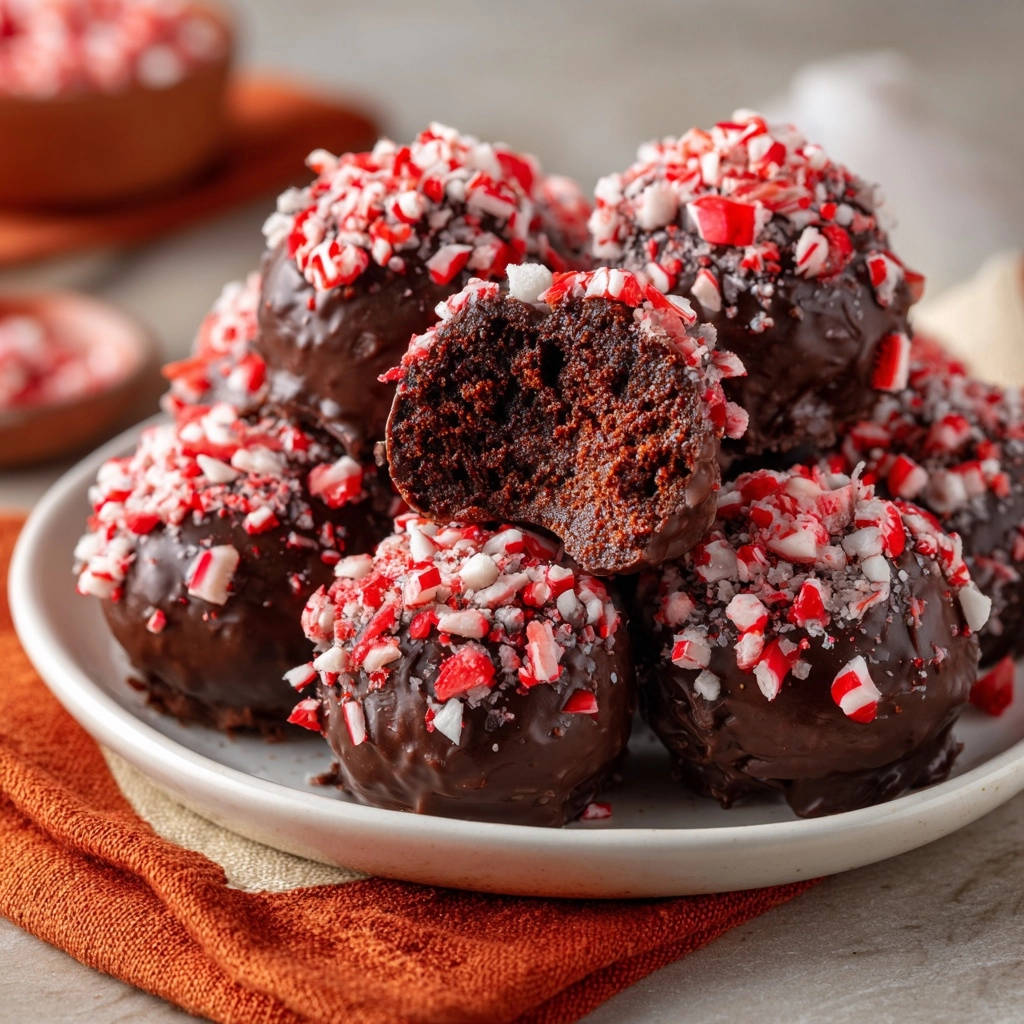
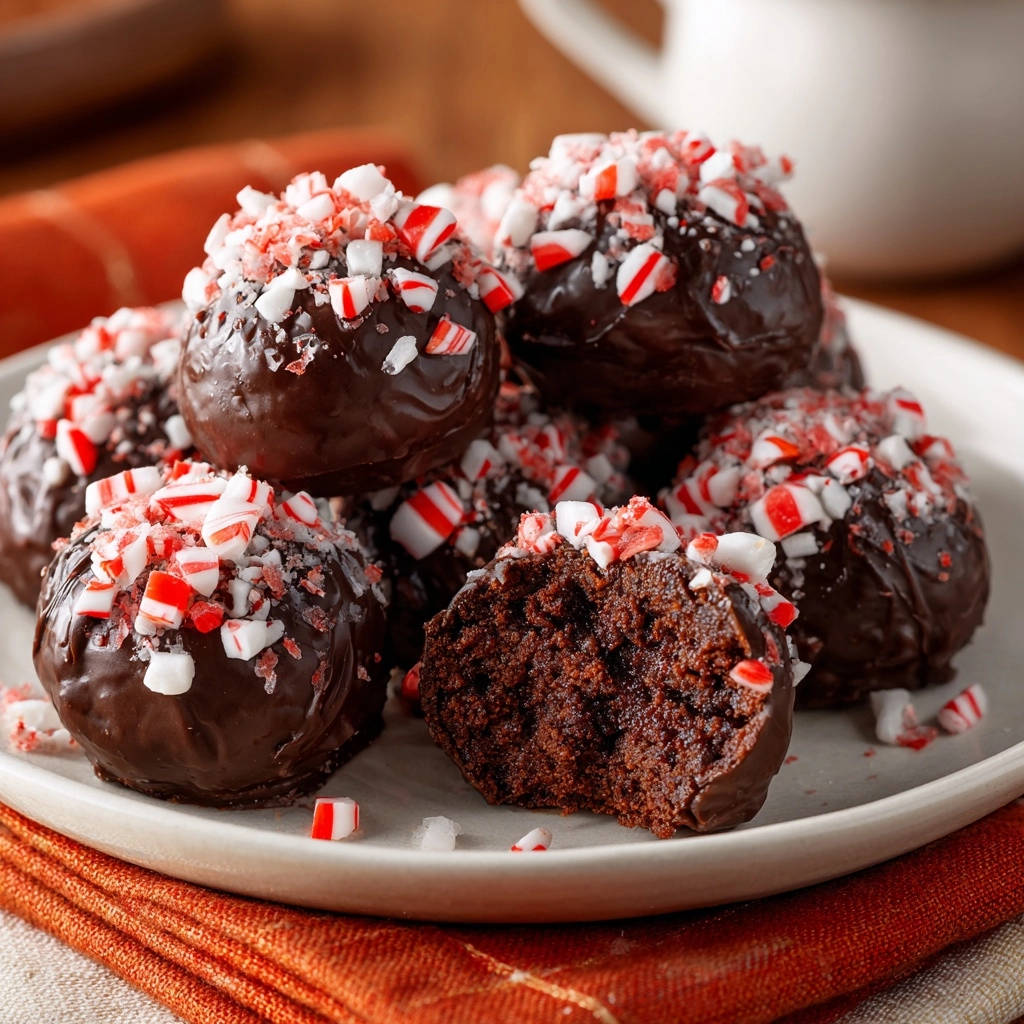
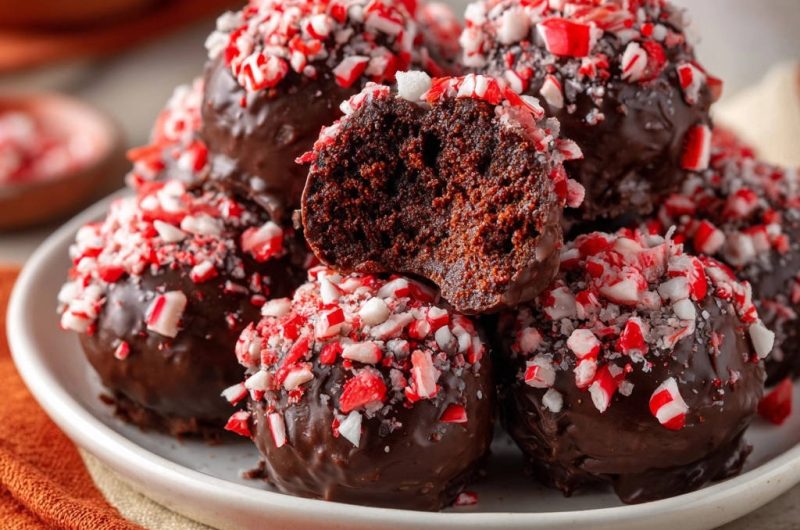
Using a fork or a specialized dipping tool, carefully immerse each chilled truffle completely into the melted chocolate. Lift it out, tapping gently against the side of the bowl to allow any excess chocolate to drip off. Immediately sprinkle the top of each dipped truffle generously with crushed peppermint candies before the chocolate sets, ensuring they adhere well for a beautiful finish.
- Set and Store:
Place the finished truffles back on the parchment-lined baking sheet. Allow the chocolate to fully set at room temperature or in the refrigerator for a quicker set. Once firm, transfer them to an airtight container and store in the refrigerator to maintain freshness and texture.
Elevate Your Truffles: Expert Tips and Troubleshooting
Mastering the Cake-to-Frosting Ratio: The Key to Success
The “no-crumble” guarantee hinges entirely on the perfect cake-to-frosting ratio. The mixture should feel like dense cookie dough, pliable but not wet. Add frosting incrementally, testing frequently until the crumbs hold together firmly when squeezed, yet aren’t sticky to the touch.
If you pick up a small amount and it forms a smooth ball without falling apart, you’ve found the sweet spot. This balance is critical for ease of rolling and the structural integrity of your Chocolate Peppermint Cake Truffles.
Chilling is Crucial: Don’t Skip This Step!
Adequate chilling time is absolutely vital for truffle success. Cold truffles are firm and less prone to melting or deforming when handled.
This also ensures the chocolate coating sets quickly and smoothly, minimizing drips and creating a crisp shell. Skipping this step can lead to messy, misshapen truffles and a frustrating dipping experience.
Perfecting Your Chocolate Dip: Smooth and Shiny Coatings
For a beautifully smooth and shiny coating, melt your chocolate gently and evenly. Overheating can cause chocolate to seize or become dull. Stir frequently while melting, whether in the microwave or a double boiler, to distribute heat.
If your melted chocolate seems too thick for dipping, stir in a tiny bit of coconut oil or vegetable shortening (about 1 teaspoon per 16 ounces of chocolate) until it reaches a fluid, dippable consistency. For more tips on working with chocolate, explore our guide on making easy white chocolate pecan clusters without seized chocolate.
Beyond Peppermint: Creative Topping Variations
While peppermint is classic, feel free to experiment with other toppings for your chocolate truffles. Consider rolling them in cocoa powder for a sophisticated finish, or finely chopped toasted nuts for added crunch and flavor.
Other popular options include colorful sprinkles, shredded toasted coconut, or a contrasting drizzle of white chocolate. For an extra festive touch, try edible glitter or a dusting of powdered sugar.
Troubleshooting Common Truffle Mishaps
Problem: Truffles are Crumbly/Falling Apart When Rolling
This indicates insufficient moisture in your cake-frosting mixture. Simply add a tiny bit more frosting or ganache, about half a tablespoon at a time. Mix thoroughly and retest until the mixture feels cohesive and rolls into a smooth ball without crumbling.
Problem: Truffles are Too Sticky/Greasy
Too much moisture is the culprit here. To correct this, you can add a small amount of extra cake crumbs, or a tablespoon of unsweetened cocoa powder or powdered sugar to absorb the excess liquid. Thoroughly mix, then chill the mixture well before attempting to roll again.
Problem: Chocolate Coating is Lumpy/Seized
Lumpy or seized chocolate is often due to overheating or exposure to moisture. Ensure your bowl and tools are completely dry. If it seizes, try stirring in a very small amount of vegetable oil or melted coconut oil (a quarter teaspoon at a time) to try and smooth it out, though sometimes it’s beyond repair.
Problem: Peppermint Doesn’t Stick to the Truffles
This happens when the chocolate coating sets too quickly before you can apply the peppermint. To avoid this, work in smaller batches when dipping, perhaps just 2-3 truffles at a time. Dip each truffle, then immediately sprinkle the peppermint before moving on to the next, ensuring maximum adhesion.
Serving and Storage Savvy: Maximizing Freshness and Enjoyment
Presentation Perfect: Creative Serving Ideas
These Chocolate Peppermint Cake Truffles are not just delicious; they’re also visually appealing. Serve them in mini cupcake liners on a decorative platter for an elegant touch. They also make a stunning addition to any dessert board or holiday cookie assortment.
For a thoughtful gift, arrange them in small, festive gift boxes lined with parchment paper. This simple presentation elevates them from a treat to a true culinary delight.
Storing Your Chocolate Peppermint Cake Truffles for Lasting Freshness
To maintain their freshness and prevent them from drying out or absorbing refrigerator odors, store your truffles in an airtight container. Layer them between sheets of parchment paper if stacking to prevent sticking.
Refrigeration is essential for optimal texture and extended shelf life. When properly stored, these delicious treats will remain fresh for up to one week in the refrigerator.
Can You Freeze Cake Truffles?
Absolutely, Chocolate Peppermint Cake Truffles freeze beautifully! To freeze, arrange the set truffles in a single layer on a parchment-lined baking sheet and freeze until solid, about 1-2 hours. Once frozen, transfer them to a freezer-safe airtight container or bag, again layering with parchment paper.
They can be stored in the freezer for up to 3 months. When ready to enjoy, simply thaw them in the refrigerator for a few hours or at room temperature for about 30 minutes for the best taste and texture.
Your Top Chocolate Peppermint Cake Truffles Questions Answered
Can I use a different flavor of cake?
Yes, you certainly can! While chocolate cake pairs perfectly with peppermint, these truffles are incredibly versatile. Try a vanilla cake for a brighter flavor profile, or a red velvet cake for an extra festive look and a hint of tang. Just ensure the cake is moist and cooled before crumbling.
What if I don’t have peppermint candies? What are other festive toppings?
If peppermint candies aren’t available or preferred, there are many delicious alternatives. Consider rolling the truffles in finely crushed Oreo cookies for a cookies-and-cream twist, or use holiday-themed sprinkles for a pop of color. A drizzle of contrasting white chocolate or a sprinkle of cocoa powder also makes for an elegant finish.
How can I make these gluten-free or dairy-free?
Making these truffles dietary-friendly is quite simple. For gluten-free truffles, use your favorite pre-baked gluten-free chocolate cake or a certified gluten-free cake mix. For dairy-free versions, opt for a dairy-free chocolate cake, dairy-free frosting, and use vegan chocolate chips or dairy-free melting chocolate for the coating. The core technique remains the same, ensuring that perfect “no-crumble” consistency.
Can I make the truffle mixture ahead of time?
Yes, you can absolutely prepare the truffle mixture ahead of time. After mixing the cake crumbs and frosting to the desired consistency, cover the bowl tightly with plastic wrap and refrigerate for up to 2-3 days. When ready to roll, you might need to let it sit at room temperature for a few minutes to soften slightly, making it easier to handle.
Ready to Impress? Share Your Chocolate Peppermint Cake Truffles Masterpiece!
With this foolproof guide, you’re now equipped to create truly spectacular Chocolate Peppermint Cake Truffles that are guaranteed to delight. The secret to their perfect, non-crumbling texture is now yours to master, ensuring effortless rolling and beautiful dipping every time.
These decadent treats are ideal for holiday gatherings, special occasions, or simply as a delightful indulgence. Don’t be shy about showing off your creations! We encourage you to explore other delightful desserts on our site, like these perfectly set mini chocolate caramel cheesecakes, for more sweet inspiration.
Chocolate Peppermint Cake Truffles
Course: DessertCuisine: American CuisineDifficulty: easy24
truffles30
minutes60
minutesAmerican Cuisine
Ingredients
1 (13×9 inch) baked chocolate cake, cooled (store-bought or homemade)
1 cup prepared chocolate frosting or ganache
16 ounces melting chocolate or chocolate chips
1/2 cup crushed peppermint candies
Directions
- Crumble the cooled chocolate cake into a large mixing bowl. Make sure there are no large lumps. You can do this by hand or pulse it in a food processor until fine crumbs form.
- Now for the key step to prevent crumbling: Begin adding the chocolate frosting or ganache to the cake crumbs, one tablespoon at a time. Mix thoroughly after each addition, either by hand or using a sturdy spatula. The goal is to reach a dough-like consistency that is moist enough to be pressed together and rolled into a ball without crumbling, but not so wet that it feels sticky or greasy. Test by taking a small amount and rolling it between your palms; if it holds its shape smoothly and doesn’t fall apart, it’s ready. You may not need all of the frosting, or you might need a tiny bit more, depending on your cake’s moisture level.
- Once the mixture reaches the perfect consistency, scoop out small portions (about 1 tablespoon each) and roll them tightly between your palms to form smooth, round balls. Place the rolled truffles on a parchment-lined baking sheet.
- Refrigerate the truffles for at least 30-60 minutes. This chilling step is important as it helps them firm up and maintain their shape when dipped.
- While the truffles are chilling, prepare your coating. Melt the chocolate in a microwave-safe bowl in 30-second intervals, stirring after each, until smooth and fully melted. Alternatively, use a double boiler on the stovetop.
- Using a fork or a dipping tool, carefully dip each chilled truffle into the melted chocolate, ensuring it’s fully coated. Lift it out, tapping gently against the side of the bowl to allow excess chocolate to drip off.
- Immediately sprinkle the top of each dipped truffle generously with crushed peppermint candies before the chocolate sets.
- Place the finished truffles back on the parchment-lined baking sheet. Allow the chocolate to fully set at room temperature or in the refrigerator for a quicker set. Store in an airtight container in the refrigerator.
Notes
- The key trick ensures perfect, non-crumbling truffles.