Have you ever excitedly pulled a batch of healthy baked oatmeal cups from the oven, only to watch them completely fall apart as you try to remove them from the tin? It’s incredibly frustrating! You picture a perfect, portable breakfast bite, and instead, you end up with a crumbly mess in the bottom of your muffin pan. We’ve all been there, and it can make you want to give up on the idea of Apple Walnut Baked Oatmeal Cups altogether.
But what if I told you there’s a simple, almost magical trick that guarantees your oatmeal cups will hold their shape beautifully every single time? No more frustrating crumbles, just perfectly formed, deliciously moist cups packed with cozy apple and nutty walnuts. This recipe isn’t just easy; it’s designed for success, ensuring your morning routine (or afternoon snack!) is filled with delightful, intact baked goodness.
Baked oatmeal cups are truly a breakfast game-changer. They’re fantastic for busy mornings because you can make a batch ahead of time and grab them as you head out the door. They offer a warm, comforting alternative to cold cereal and are incredibly versatile. Plus, when they actually hold their shape, packing them in lunchboxes or enjoying them on the go becomes a breeze.
Let’s dive into making these simple yet spectacular apple walnut baked oatmeal cups. Say goodbye to the crumble struggle and hello to your new favorite grab-and-go breakfast!
Why You’ll Love This Baked Oatmeal Cups Recipe
So, beyond the obvious benefit of not crumbling, what makes these Apple Walnut Baked Oatmeal Cups so special? Here are just a few reasons why this recipe is destined to become a favorite in your kitchen:
- Perfect Texture: Thanks to that one crucial step (more on that later!), these cups come out firm yet moist, with a satisfying chew from the oats and delightful pops of soft apple and crunchy walnuts.
- Cozy Flavor Combination: The classic pairing of sweet apple, earthy walnuts, and warm cinnamon creates a comforting taste that feels like a hug in a cup.
- Simple Ingredients: You likely have most of these pantry staples on hand already, making this a budget-friendly and accessible recipe.
- Quick Prep Time: With only 10 minutes of hands-on work, you can have these in the oven in no time.
- Ideal for Meal Prep: Bake a batch on Sunday, and you’ll have healthy, ready-to-eat breakfasts or snacks for the whole week.
- Customizable: While apple and walnut are a winning combo, the base recipe is adaptable to other fruits, nuts, and mix-ins.
Whether you’re rushing out the door, need a healthy snack option, or just want a warm, comforting bite, these baked oatmeal cups deliver on all fronts.
Gathering Your Ingredients for Perfect Baked Oatmeal Cups
Making these delightful cups starts with assembling the right team of ingredients. Each component plays a vital role in achieving that craveable flavor and, more importantly, that perfect non-crumbling structure. Forget complicated lists; we’re using simple, wholesome items that come together beautifully.
Here’s a look at what you’ll need and why these ingredients are key to your success:
- Rolled Oats (1.5 cups): The star of the show! Rolled oats (also known as old-fashioned oats) are crucial here. They provide the structure and chewiness that instant oats just can’t replicate. Their slower cooking time helps them absorb moisture evenly and bind together properly during baking. Avoid quick oats or instant oats for this recipe, as they will result in a mushier texture and be more prone to crumbling.
- Baking Powder (1 tsp): This leavening agent gives the cups a slight lift, preventing them from becoming too dense and heavy.
- Ground Cinnamon (1 tsp): Cinnamon is the perfect warming spice companion to both apples and oats, adding that signature cozy flavor.
- Salt (0.25 tsp): Just a pinch of salt helps to balance the sweetness and enhance all the other flavors.
- Large Egg (1): The egg is a critical binder. It helps hold the oatmeal mixture together as it bakes and sets, contributing significantly to the cups holding their shape. It also adds a touch of richness.
- Milk (1 cup, dairy or non-dairy): Provides the necessary liquid to hydrate the oats and create a moist texture. Feel free to use whatever milk you prefer, whether it’s cow’s milk, almond milk, soy milk, or oat milk.
- Maple Syrup or Brown Sugar (0.25 cup): Your choice for sweetness! Maple syrup adds a lovely flavor depth and liquid sweetener helps with moisture distribution. Brown sugar contributes moisture thanks to its molasses content and a slightly richer, caramel-like note. Either works wonderfully.
- Melted Butter or Oil (2 tbsp): This adds richness, moisture, and helps create a tender crumb structure. Melted butter brings a nice flavor, while a neutral oil like vegetable or canola oil is a great dairy-free alternative.
- Vanilla Extract (1 tsp): A touch of vanilla enhances all the sweet and warm flavors in the cups.
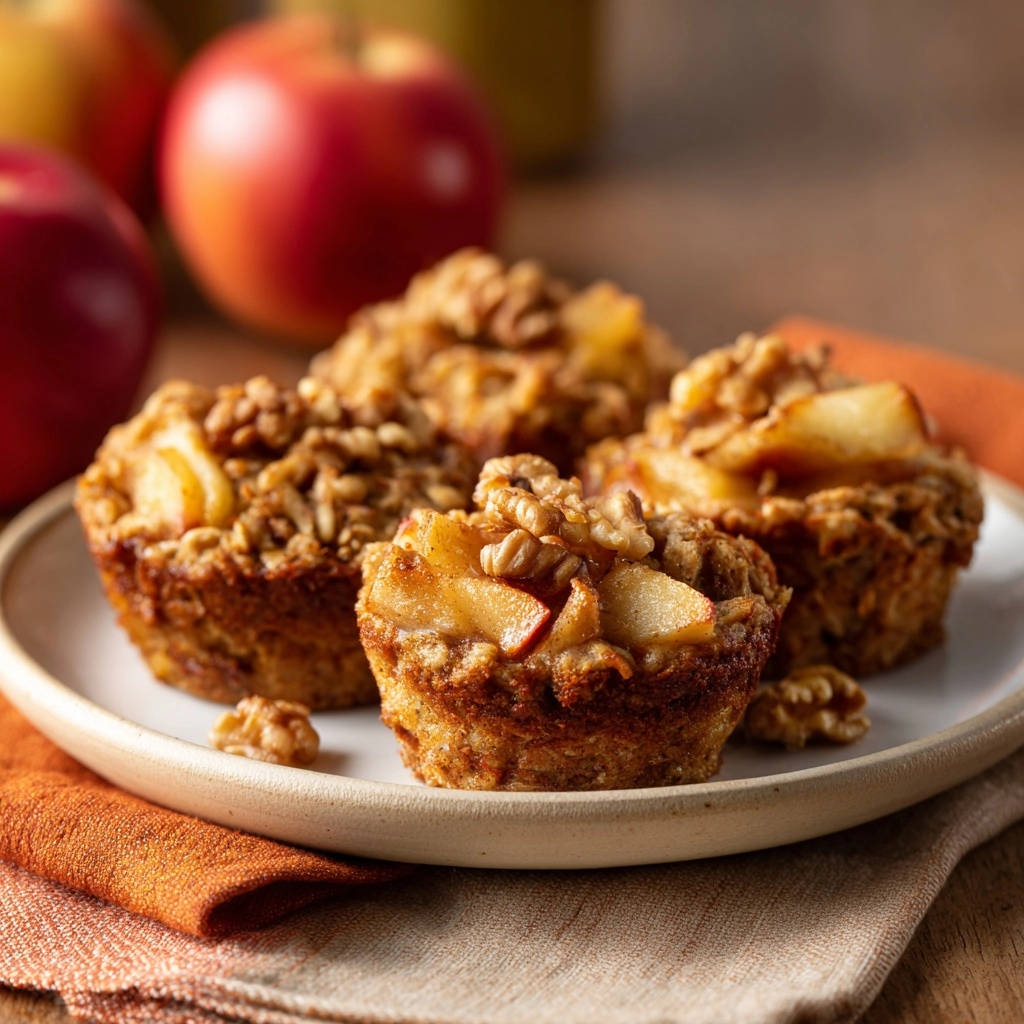
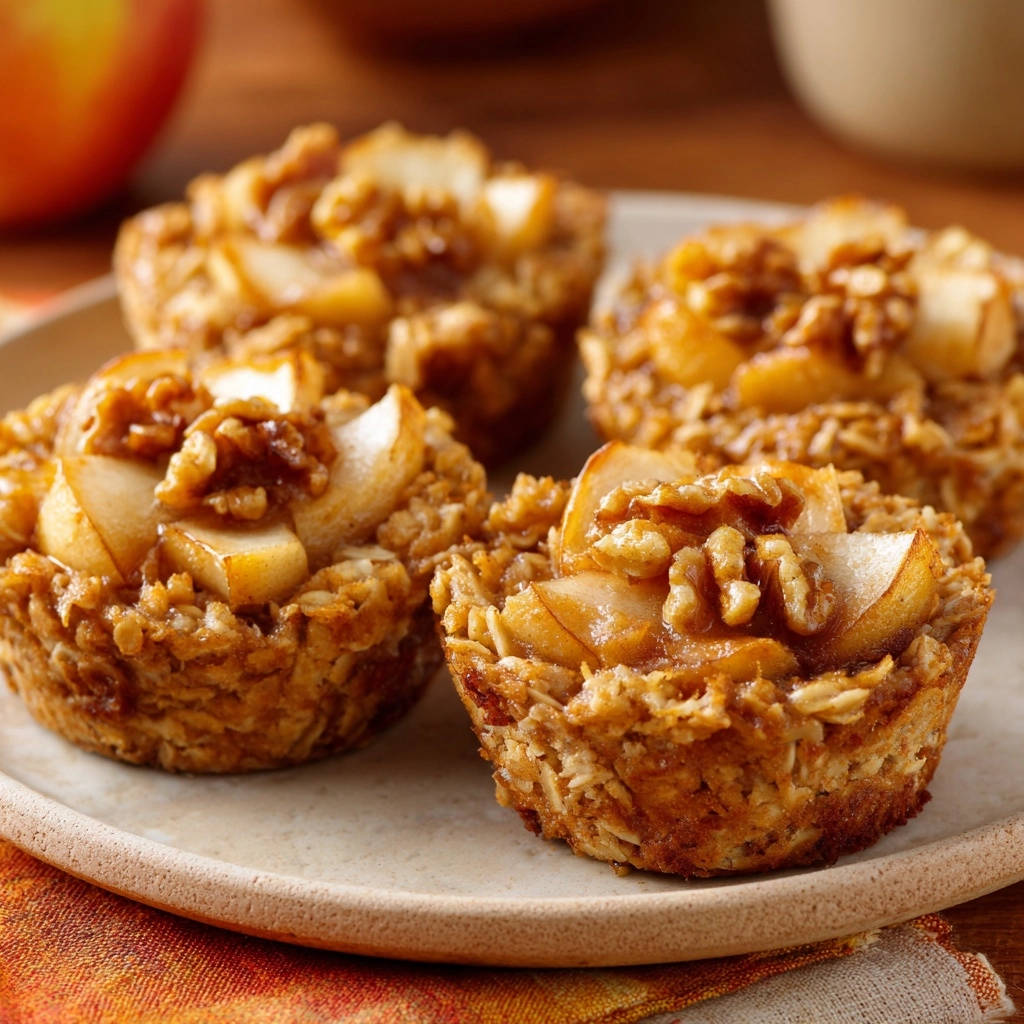
- Chopped Apple (1 cup): Fresh diced apple adds natural sweetness, moisture, and delightful soft texture pockets. Any variety works, but firm apples like Fuji, Gala, Honeycrisp, or Granny Smith (for a tarter bite) hold their shape well during baking. Dice the apple into small, uniform pieces, about 1/4 to 1/2 inch.
- Chopped Walnuts (0.5 cup): Walnuts provide a fantastic crunch and earthy flavor contrast to the sweet apple and soft oats. They toast slightly as they bake, enhancing their flavor. Ensure they are roughly chopped so they distribute evenly.
Having all your ingredients prepped and ready to go makes the assembly process incredibly fast and easy. Dicing the apple and chopping the walnuts are the most time-consuming steps, but they only take a few minutes!
Crafting Your Apple Walnut Baked Oatmeal Cups: Step-by-Step
Now for the fun part – bringing it all together! This recipe is straightforward, but paying attention to a couple of key techniques will ensure you get perfect results every time, including that coveted non-crumbling texture.
- Prepare for Baking: Start by preheating your oven to 375°F (190°C). This ensures the oven is at the correct temperature from the moment your cups go in, promoting even baking. While the oven heats, prepare your muffin tin. Greasing it very well with butter or cooking spray is essential, especially if you’re not using liners. Alternatively, use paper muffin liners – they make removal even easier, though the cooling step is still critical for structure within the liner itself. A well-prepped pan is the first line of defense against sticking.
- Combine the Wet Ingredients: In a large mixing bowl – one that’s big enough to hold all the ingredients eventually – add your wet components: the large egg, milk (dairy or non-dairy works equally well), maple syrup or brown sugar, melted butter or oil, and vanilla extract. Grab a whisk and beat these together until they are thoroughly combined and the mixture looks smooth. This step ensures the sweeteners, fat, and binders are evenly distributed before adding the dry ingredients.
- Mix in the Dry Ingredients: Now, introduce the rolled oats, baking powder, ground cinnamon, and salt to the bowl with the wet ingredients. Switch to a spoon or spatula for stirring. Gently stir everything together. The goal here is to get the oats evenly moistened by the liquid mixture. Keep stirring until there are no dry pockets left and the mixture is uniform. Properly hydrated oats are key; they swell as they bake, which is essential for creating a cohesive structure that binds the cups together, rather than falling apart.
- Fold in the Goodies: It’s time to add the stars of the show – the chopped apple and chopped walnuts! Add them to the oatmeal mixture. Using your spoon or spatula, gently fold them in. Be careful not to overmix; you just want to distribute the apple and walnut pieces evenly throughout the batter so every cup gets a fair share of the delicious mix-ins. Gentle folding prevents the apple from breaking down too much before baking.
- Portion and Compact: Spoon the prepared oatmeal mixture evenly into the cups of your greased or lined muffin tin. Fill each cup about two-thirds full. Once the mixture is portioned, use the back of your spoon or a small spatula to gently press down on the top of the mixture in each cup. This slight compaction helps the oats and mix-ins settle together, encouraging a denser, more stable structure as they bake and cool. Don’t pack it too tightly, just enough to level the top and lightly compress the contents.
- Bake to Golden: Carefully place the filled muffin tin in your preheated oven. Bake for 20-25 minutes. You’ll know they’re done when the tops look set (they won’t jiggle when you lightly shake the pan) and are lightly golden brown around the edges. The baking time helps the oats cook through, the binders set, and the flavors meld together. The wonderful aroma filling your kitchen is a good indicator you’re on the right track!
- The Essential Cooling Step (DO NOT SKIP!): This is the secret to baked oatmeal cups that hold their shape. Once baking is complete, remove the muffin tin from the oven. Crucially, do not attempt to remove the cups from the tin yet. Place the hot muffin tin on a wire rack and let the baked oatmeal cups cool completely in the tin for at least 15-20 minutes, or even longer. As the cups cool, the starches in the oats continue to absorb moisture and rearrange their structure. This process allows the cups to firm up and become sturdy enough to handle. Trying to remove them while hot or even just warm will almost certainly lead to crumbling. Patience is key here!
- Release and Serve: After the essential cooling period in the tin, your cups should be firm and ready. If you used liners, you can likely just lift them out. If you greased the tin, you might need to gently run a knife around the edge of each cup to loosen it before carefully lifting it out. They should come out easily if sufficiently cooled and the tin was well-greased. Now they are ready to enjoy! Serve them warm or at room temperature. They’re excellent on their own or with your favorite toppings.
Tips for Perfect Apple Walnut Baked Oatmeal Cups Every Time
Getting those non-crumbling cups is the goal, but here are some extra tips to ensure they are absolutely delicious and perfectly suited to your taste and needs:
- Don’t Skimp on Greasing (or Liners): Seriously, grease that muffin tin generously if you’re not using liners. Even with the cooling trick, a sticky pan will fight you. Liners are the easiest bet for clean removal.
- Use Rolled Oats: As mentioned, instant or quick oats won’t provide the necessary structure. Stick to old-fashioned rolled oats for the best results and texture.
- Ensure Apples and Walnuts are Chopped Uniformly: Aim for roughly the same size pieces (1/4 to 1/2 inch). This ensures they are evenly distributed and cook consistently within the cups.
- Variations are Welcome (No Alcohol or Pork!): Feel free to switch up the mix-ins! Replace apple with diced pear or blueberries (try our Oatmeal Blueberry Muffins for inspiration!). Swap walnuts for pecans, almonds, or even pumpkin seeds. Add a sprinkle of dried cranberries or raisins along with the fruit and nuts. You can also add other warming spices like a pinch of nutmeg or allspice along with the cinnamon. If you love apple desserts, you might also enjoy trying an Easy Apple Crumble.
- Adjust Sweetness: The 1/4 cup of maple syrup or brown sugar provides a moderate sweetness. If you prefer them less sweet, you can slightly reduce the amount. If you like them sweeter, a touch more won’t hurt, but be mindful of adding too much liquid sweetener, which can affect structure.
- Make it Gluten-Free: This recipe is naturally gluten-free if you use certified gluten-free rolled oats and ensure all other ingredients are certified GF. This is a great option for those with gluten sensitivities.
Storage and Reheating
These baked oatmeal cups are fantastic for making ahead. Once they are completely cooled, store them in an airtight container at room temperature for a day or two, or in the refrigerator for up to 5 days. To reheat, you can pop one in the microwave for 30-60 seconds or warm them gently in a toaster oven.
For longer storage, they freeze beautifully. Once completely cooled, wrap each cup individually or place them in a single layer in an airtight container or freezer bag, separated by parchment paper. Freeze for up to 3 months. Thaw overnight in the refrigerator or reheat directly from frozen in the microwave or oven, adding a few extra minutes to the reheating time.
Your Baked Oatmeal Cups Questions Answered (FAQ)
Got questions about these delicious and sturdy baked oatmeal cups? Here are answers to some common inquiries:
Can I use instant oats or quick oats?
No, it’s highly recommended to use old-fashioned rolled oats. Instant or quick oats are more processed and cook much faster. In this baked application, they tend to turn mushy and don’t provide the necessary structure and binding power that rolled oats do, making your cups much more likely to crumble.
Why did my baked oatmeal cups still crumble?
The most common reason for crumbling baked oatmeal cups is not letting them cool completely in the muffin tin. This cooling step is absolutely critical! As the cups cool, they continue to set and firm up. Removing them too early, while they are still warm, disrupts this setting process and causes them to fall apart. Make sure you leave them in the tin for the full 15-20 minutes (or longer!) on a wire rack.
Can I make these dairy-free?
Absolutely! The recipe explicitly mentions using dairy or non-dairy milk. For the melted butter, simply substitute an equal amount of melted coconut oil, vegetable oil, or another neutral-flavored plant-based oil or dairy-free butter alternative.
What kind of apples work best?
Any firm apple variety works well. Fuji, Gala, Honeycrisp, and Granny Smith (if you prefer a tart flavor) are great choices as they hold their shape and texture during baking. Softer apples might break down a bit more, but they will still contribute moisture and flavor.
Can I add other things like seeds or chocolate chips?
Yes! This recipe is very adaptable. Feel free to add a tablespoon or two of chia seeds or flax seeds to boost nutrition, or stir in a handful of chocolate chips (dark, milk, or white) along with the apple and walnuts for a more dessert-like treat.
How many cups does this recipe make?
This recipe yields approximately 6-8 standard-sized baked oatmeal cups, depending on how full you fill the muffin cavities. Filling them about two-thirds full usually results in 7-8 cups.
Enjoy Your Homemade Apple Walnut Baked Oatmeal Cups!
There you have it – a simple, reliable recipe for Apple Walnut Baked Oatmeal Cups that promises delicious flavor and, more importantly, perfect shape every single time. No more frustrating crumbles or messy breakfasts! These cups are a testament to how a single technique (the crucial cooling step!) can make all the difference.
Whip up a batch today and see how easy it is to have a healthy, hearty, and perfectly portable breakfast or snack ready to go. The combination of tender oats, sweet apple, and crunchy walnuts is simply irresistible. Give them a try, and I think you’ll agree that these are the best baked oatmeal cups you’ve ever made!
Let me know in the comments below if you tried this recipe and how much you loved the “no crumble” result! Happy baking!
Apple Walnut Baked Oatmeal Cups

Ingredients
- 1.5 cups rolled oats
- 1 tsp baking powder
- 1 tsp ground cinnamon
- 0.25 tsp salt
- 1 large egg
- 1 cup milk (dairy or non-dairy)
- 0.25 cup maple syrup or brown sugar
- 2 tbsp melted butter or oil
- 1 tsp vanilla extract
- 1 cup chopped apple
- 0.5 cup chopped walnuts
Directions
- Preheat your oven to 375 degrees F (190 C). Grease a standard muffin tin very well or use paper liners.
- In a large bowl, whisk together the egg, milk, maple syrup or brown sugar, melted butter or oil, and vanilla extract until well combined.
- Add the rolled oats, baking powder, cinnamon, and salt to the wet ingredients. Stir everything together until the oats are evenly moistened and the mixture is fully combined. This helps ensure the cups bind together properly during baking.
- Gently fold in the chopped apple and chopped walnuts, distributing them evenly throughout the mixture.
- Spoon the mixture evenly into the prepared muffin cups, filling each about two-thirds full. Gently press the top of the mixture in each cup with the back of a spoon to compact it slightly.
- Bake for 20-25 minutes, or until the tops are set and lightly golden brown.
- This is the key step: Remove the muffin tin from the oven and place it on a wire rack. Allow the baked oatmeal cups to cool completely in the muffin tin for at least 15-20 minutes. This cooling time is crucial as it allows the cups to firm up and set their structure, preventing them from crumbling when you try to remove them.
- Once cooled and set, gently run a knife around the edge of each cup if needed and carefully lift them out of the tin. Serve warm or at room temperature.