Oh, friends, let me tell you about one of my favorite little culinary victories! For the longest time, I adored the idea of a savory baked egg served in a cozy ramekin. It feels elegant, comforting, and just plain delicious. You have that warm, often creamy base, the perfectly set egg white, and that glorious, runny yolk waiting to spill out. Pure bliss!
However, there was always one frustrating hurdle: the top. Specifically, the pastry crust. I dreamt of a golden, flaky, shatteringly crisp lid contrasting beautifully with the soft filling below. What I often ended up with was… well, soggy. A pale, damp layer of disappointment that made me question everything I thought I knew about baking.
I tried different temperatures, varied bake times, messed with the filling consistency. Nothing seemed to consistently deliver that desired crispiness. It felt like the moisture from the warm egg and any filling base was determined to turn my beautiful puff pastry into a sad, floppy mess. But I refused to give up on the dream of a truly perfect baked egg ramekin. After much experimenting (and a few more soggy tops!), I finally discovered the simple secret weapon.
This trick, which you’ll see in the steps below, guarantees a glorious golden, flaky puff pastry topping every single time you make a baked egg ramekin. It’s a game-changer for anyone who loves this dish but hates the soggy struggle. So, if you’re ready for a delightful individual serving of savory goodness with a truly triumphant crust, let’s dive in!
Reasons This Baked Egg Ramekin is a Keeper
Why should this baked egg ramekin become a regular in your cooking rotation? Here are just a few irresistible reasons:
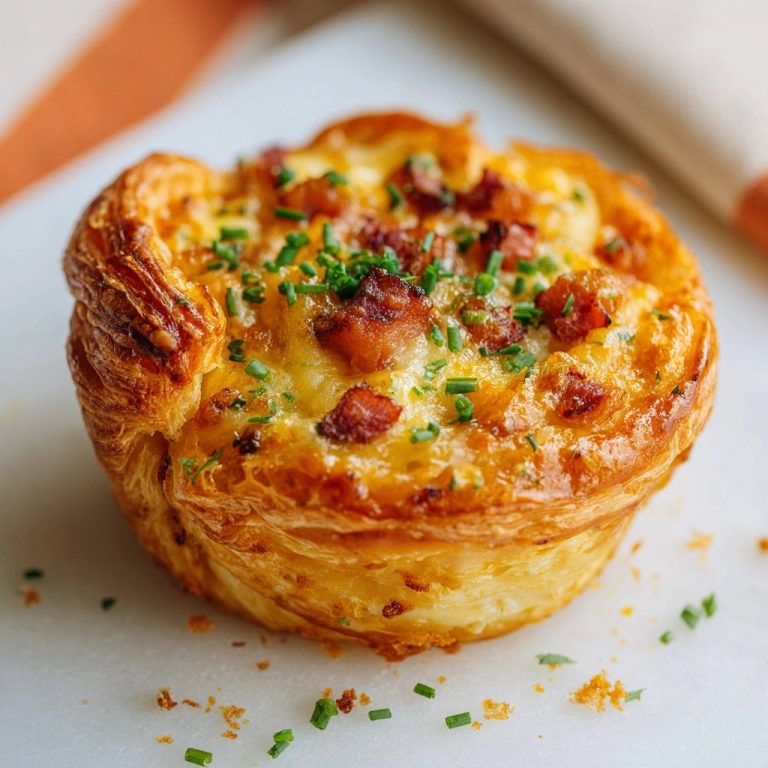
- The Texture Contrast: This recipe nails the perfect balance – a rich, soft filling and a gloriously crispy, flaky puff pastry top. It’s a textural masterpiece in every bite.
- Quick & Easy: With only about 10 minutes of prep time and a short bake, this is a fast way to enjoy a gourmet-feeling meal or snack.
- Highly Customizable: While simple and classic on its own, this baked egg ramekin is a fantastic canvas for various flavors and fillings.
- Perfectly Portioned: Designed as a single serving, it’s ideal for a satisfying solo breakfast, lunch, or light dinner.
- Impressive Yet Simple: It looks fancy served in its little ramekin with that puffed golden top, but it’s surprisingly easy to execute.
Gathering Your Ingredients for a Delicious Baked Egg Ramekin
Creating this delightful baked egg ramekin requires just a handful of simple ingredients. Don’t underestimate the power of each one; they work together to build layers of flavor and texture that are truly satisfying. The core components are incredibly versatile, allowing you to easily put your own spin on this dish once you master the basic technique.

Let’s look at what you’ll need to gather from your pantry and fridge. The star, of course, is the egg itself, baked gently until the white is set but the yolk remains wonderfully runny. We pair this with cheese for savory depth and fresh herbs for brightness. The magic, however, truly happens with the puff pastry – our key to that non-soggy, perfect lid – and the egg wash that makes it shine golden.
Here are the essentials:
- 1 sheet puff pastry, thawed
- 1 large egg
- About 1/4 cup grated cheese (cheddar or gruyere are fantastic choices)
- 1 tablespoon chopped chives, plus more for garnish
- Salt, to taste
- Black pepper, to taste
- Optional: A creamy filling base (like creamed spinach or a simple cheese sauce, about 1/4 cup)
- 1 egg, beaten (for egg wash)
Using thawed puff pastry is essential here; ensure it’s pliable but still cool before you begin. The cheese adds a lovely salty, creamy element beneath the egg. While cheddar is a classic, gruyere melts beautifully and offers a nutty complexity that pairs wonderfully with the other flavors. Fresh chives bring a delicate oniony note and a pop of vibrant color. And don’t forget the salt and pepper – simple seasonings that are crucial for bringing out the best in these ingredients. The optional creamy filling base is where you can really play; creamed spinach adds richness and nutrients, while a simple cheese sauce amplifies the cheesy goodness. Finally, that extra beaten egg is our golden ticket to a perfectly browned and crispy pastry top.
Crafting Your Baked Egg Ramekin: Step-by-Step to Success
Ready to banish the soggy pastry blues forever? Follow these steps, and you’ll be rewarded with a stunning, crispy-topped baked egg ramekin that looks and tastes like it came from a fancy cafe. Pay close attention to the details, as they are key to achieving that coveted flaky crust.
We’ll start by getting our oven ready and preparing the base in the ramekin. Then comes the careful assembly, ensuring everything is sealed and ready for its transformation in the heat. The final touches before baking are crucial for color and crispiness, and keeping an eye on it in the oven is paramount!
-
Prepare Your Oven and Ramekin: The first crucial step is getting your oven screaming hot. Preheat it to 400°F (200°C). This high temperature is part of the secret; it helps the puff pastry puff and crisp up rapidly before the moisture from the filling has a chance to make it soggy. While the oven heats, take your small ramekin (a 4-6 ounce size is perfect for a single serving) and lightly grease the inside. This helps prevent any sticking and makes serving easier.
-
Build Your Flavor Base: If you’re using an optional creamy filling base like creamed spinach or a simple cheese sauce, add a thin layer (about 1/4 cup) to the very bottom of the prepared ramekin now. This adds extra richness and flavor. If you’re keeping it simple, no worries! Next, sprinkle the grated cheese evenly over the filling base, or directly into the empty ramekin if you’re not using a base layer. The cheese creates a lovely buffer and foundation. Finish this layer with a pinch of salt and pepper for seasoning.
-
Add the Egg and Herbs: This is where the main event comes in! Carefully crack your large egg directly on top of the cheese layer (and any filling base). Take your time to keep the yolk centered and intact – a perfect runny yolk is the goal! Once the egg is in place, sprinkle the chopped chives around the egg white. Try to avoid scattering too many directly onto the yolk itself; the chives add flavor and visual appeal to the white portion.
-
Prepare the Pastry Lid: Now for the crispy magic! Take your thawed puff pastry sheet. Using a knife or pastry wheel, cut a circle or square from the pastry that is just slightly larger than the outer rim of your ramekin. You want enough overlap to securely seal the pastry to the edge. This small overhang is essential for creating a good seal.
-
Egg Wash the Rim for Sealing: Grab that separate beaten egg you prepared for the egg wash. Using a pastry brush, generously brush the entire rim of the ramekin with this egg wash. This creates a sticky surface for the puff pastry to adhere to, forming a tight seal.
-
Seal the Pastry Top: Carefully center the cut piece of puff pastry over the top of the filled ramekin. Gently press the edges of the pastry down onto the egg-washed rim, working your way all around to ensure a secure seal. It’s crucial that there are no gaps or openings where steam from the hot filling can escape and condense on the underside of the pastry. A good seal is your primary defense against a soggy top!
-
Give the Pastry a Golden Glow: With the pastry lid firmly in place, take your pastry brush again and generously brush the entire visible surface of the puff pastry top with the remaining beaten egg wash. Don’t be shy! This wash is key to developing that beautiful deep golden color and contributes significantly to the crisp texture as it bakes.
-
Prepare for Baking: To make cleanup easier and catch any potential enthusiastic puff pastry drips, place your ramekin on a small baking sheet before putting it into the oven. This is a simple step that saves you from scrubbing your oven floor later.
-
Bake to Golden Perfection: Carefully place the baking sheet with the ramekin into your preheated 400°F (200°C) oven. Bake for 15 to 20 minutes. The timing can vary depending on your oven and how well-chilled your filling was. You’re looking for the puff pastry to be dramatically puffed up and a beautiful, deep golden brown all over. Simultaneously, the egg white should appear set and opaque, but if you give the ramekin a gentle jiggle (carefully!), you should see the yolk still move freely. Baking at this high temperature ensures the pastry crisps quickly. Keep an eye on it during the last few minutes to prevent burning.
-
Rest and Serve: Once the baked egg ramekin is gloriously golden and the egg is set to your liking, carefully remove it from the oven using oven mitts. Let it rest on the baking sheet or a wire rack for just one minute before attempting to serve. This brief rest allows the filling to settle slightly. Garnish the top with a sprinkle of fresh chopped chives if you like – it adds extra freshness and a touch of elegance. The moment of truth arrives when you break through that wonderfully crispy, flaky crust to reveal the warm, flavorful filling and perfectly runny yolk inside. Enjoy!
Tips for Perfect Baked Egg Ramekin Every Time
Getting that consistently crispy top on your baked egg ramekin is all about technique and paying attention to a few key details. Here are my best tips to ensure your success:
- Chill Your Puff Pastry: Ensure your puff pastry is thawed but still cold. Cold pastry is essential for creating those distinct layers that puff up beautifully and crisp as they bake. If it gets too warm and soft, the layers can meld together, resulting in a less flaky crust.
- Master the Seal: The most critical factor is sealing the pastry firmly to the ramekin rim using the egg wash. Any gaps allow steam to escape from the moist filling below. This steam will then condense on the underside of the pastry, making it soggy. Press firmly but gently all the way around.
- Don’t Skip the Egg Wash on Top: Brushing the top of the pastry generously with egg wash isn’t just for color; it helps create a barrier and promotes even browning and crisping. Use the whole beaten egg for this purpose.
- High Heat is Your Friend: Baking at 400°F (200°C) is deliberate. The intense heat helps the pastry puff rapidly and crisp up quickly before the moisture from the egg and filling can penetrate it.
- Keep an Eye on It: Oven temperatures can vary. Watch the pastry closely, especially during the last 5-7 minutes of baking. If it’s browning too quickly but the egg isn’t set, you can lightly tent it with foil, but this might slightly compromise crispiness. Ideally, the high heat is sufficient.
- Consider Your Ramekin Size: A standard 4-6 ounce ramekin works best for a single large egg. Using a larger ramekin might require two eggs or more filling to achieve the right proportion and baking time.
- Base Layer Variations: Get creative with your optional creamy filling base! Try sauteed mushrooms, leftover mashed potatoes, a spoonful of cooked bacon (remember, just “bacon”!), or even a thick tomato sauce. Just ensure the base isn’t too watery.
- Egg Temperature: A cold egg is fine for this recipe. Cracking it directly from the fridge works well and helps keep the yolk firm while the white sets around it.
- Serving Immediately: While resting for a minute is good, baked egg ramekins are best enjoyed piping hot, right out of the oven, when the pastry is at its absolute crispiest.
What to Serve With Your Savory Baked Egg Ramekin
This lovely individual baked egg ramekin can be a complete meal in itself, especially for breakfast or a light lunch. However, it also pairs beautifully with a few simple accompaniments to make it more substantial or to add different textures and flavors. A crisp green salad with a light vinaigrette offers a refreshing contrast to the richness of the egg and pastry. You could also serve it alongside easy pan-fried potatoes or crispy roasted vegetables like crispy roasted Brussels sprouts for a heartier meal.
For a weekend brunch, consider adding a side of fresh fruit or some toasted crusty bread for dipping into that glorious runny yolk. The versatility means you can tailor the sides to whatever you’re craving!
Your Baked Egg Ramekin Questions Answered (FAQ)
Got questions about mastering this delightful baked egg ramekin? Here are some answers to common queries to help you succeed:
Can I make the baked egg ramekin ahead of time?
While you can prep some components like grating the cheese or chopping the chives in advance, assembling and baking the ramekin is best done just before serving. Puff pastry loses its crispness quickly once baked, especially when sitting over a moist filling. For the absolute best crispy top results, bake it fresh.
Can I use frozen puff pastry sheets?
Yes, absolutely! Most puff pastry available in the grocery store is frozen. Just make sure you follow the package instructions for thawing properly before use. It should be pliable but still cool.
What are other good cheese options?
Beyond cheddar and gruyere, many cheeses work well! Monterey Jack, Fontina, Swiss, or even a blend of cheeses would be delicious. Avoid overly wet cheeses like fresh mozzarella, which can release too much moisture. Harder or semi-hard cheeses tend to melt nicely without making the base too watery.
My yolk didn’t stay runny. What went wrong?
This usually means it baked for too long. Oven temperatures vary, so the timing in the recipe is a guideline. Start checking around the 12-minute mark. The egg white should be set, but the yolk should still be visibly jiggly if you gently move the ramekin. Next time, try reducing the cooking time slightly or consider if your oven runs hot.
Can I bake this in a different dish?
This recipe is specifically designed for an individual ramekin. You could potentially adapt it for a larger gratin dish or individual oven-safe bowls, but you would need to adjust the quantities of ingredients and the baking time significantly. The key to the crispy top in this recipe relies on the individual portion size and the ratio of pastry to filling.
How do I ensure the puff pastry edge seals properly?
Make sure the rim of the ramekin is clean before brushing with egg wash. Use a generous amount of egg wash on the rim. Cut the pastry slightly larger than the rim, and press firmly all the way around, ensuring the pastry makes good contact with the egg-washed surface and there are no gaps. Think of it like sealing a pie crust!
Enjoy Your Homemade Baked Egg Ramekin!
There you have it – the secret to a perfect baked egg ramekin with a triumphantly crispy, golden puff pastry top! No more soggy disappointment. This recipe is quick enough for a weekday treat yet impressive enough for a weekend brunch. The combination of the rich, savory filling and that flaky crust is truly satisfying. It’s a dish that feels comforting and a little luxurious all at once.
Give this recipe a try, and you’ll see just how easy it is to achieve bakery-quality results at home. Don’t be afraid to experiment with different cheeses or base fillings to find your perfect combination. Happy baking!
Did you try this recipe? What did you think? Let me know in the comments below! Happy cooking!
Baked Egg Ramekin

Ingredients
- 1 sheet puff pastry, thawed
- 1 large egg
- About 1/4 cup grated cheese (such as cheddar or gruyere)
- 1 tablespoon chopped chives, plus more for garnish
- Salt, to taste
- Black pepper, to taste
- Optional: A creamy filling base (like creamed spinach or a simple cheese sauce, about 1/4 cup)
- 1 egg, beaten (for egg wash)
Directions
- Preheat your oven to 400°F (200°C).
- Lightly grease the inside of a small ramekin (about 4-6 ounce size). If using a filling base, add it to the bottom of the ramekin now. Sprinkle the grated cheese over the base layer or directly into the empty ramekin if not using a base. Add a pinch of salt and pepper.
- Carefully crack the large egg directly on top of the cheese (and filling base if using). Try to keep the yolk intact in the center. Sprinkle the chopped chives around the egg white, avoiding the yolk.
- Cut a circle or square of puff pastry slightly larger than the rim of your ramekin. This is where the magic happens for a crisp crust.
- Brush the rim of the rame ramekin with some of the beaten egg wash.
- Place the puff pastry piece centered over the ramekin, pressing it gently onto the egg-washed rim to seal it securely all around. Ensure there are no gaps where steam can escape and make the pastry soggy.
- Now, generously brush the entire top surface of the puff pastry with the remaining beaten egg wash. This egg wash is key to getting that beautiful golden color and helps crisp up the pastry.
- Place the ramekin on a baking sheet to catch any potential drips.
- Bake for 15-20 minutes, or until the pastry is puffed and deeply golden brown and the egg white is set but the yolk is still delightfully runny. Baking at 400°F helps ensure the pastry crisps quickly before the filling’s moisture makes it soggy. Keep an eye on it, as oven temperatures vary.
- Carefully remove from the oven. Let it rest for a minute before serving. Garnish with more fresh chives if desired. The pastry should be beautifully crispy and flaky on top, a perfect contrast to the warm filling and runny egg yolk inside.