Oh, friends, let’s talk about a culinary heartbreak we’ve all faced, shall we? You decide to whip up a beautiful, fresh bruschetta dip, envisioning vibrant red tomatoes, fragrant basil, and creamy cheese spread across a perfectly toasted bite. You mix everything up, and it looks glorious… for about five minutes. Then, slowly but surely, a sad, watery puddle starts forming. Your perfect dip becomes a runny disappointment. Sound familiar?
Well, I’ve been there, done that, and finally cracked the code! The secret to a truly spectacular, never-watery bruschetta dip isn’t complicated at all. It comes down to one simple, crucial step that deals with the source of the problem: those lovely, juicy tomatoes. Trust me, once you try this trick, you’ll be known for serving the best, creamiest bruschetta dip at every gathering.
This recipe takes minimal effort and delivers maximum flavor. It’s the ultimate crowd-pleasing appetizer, perfect for parties, casual get-togethers, or just a delicious snack on a lazy afternoon. Forget the soggy dips of the past; get ready for pure, creamy, tomato-basil bliss.
Reasons This Bruschetta Dip is a Keeper
So, why is this specific take on a classic bruschetta dip going to become your new go-to? Here are just a few reasons:
- Say Goodbye to Wateriness: The simple yet effective method for handling the tomatoes ensures your dip stays wonderfully creamy, right down to the last scoop.
- Bursting with Fresh Flavor: Ripe tomatoes and fresh basil are a match made in heaven, creating a vibrant taste that screams summer, no matter the season.
- Surprisingly Quick & Easy: With minimal prep and bake time for the dippers, you can have this ready to impress in under 30 minutes total.
- Creamy & Indulgent Texture: The base provides a rich, smooth contrast to the fresh tomato topping, making every bite incredibly satisfying.
- Adaptable: While perfect as is, it’s easy to customize with a few simple additions or changes to suit your taste.
Gathering Your Ingredients for Perfect Bruschetta Dip
Creating this delightful dip starts with selecting the right components. Each ingredient plays a specific role in building that layered flavor and achieving the ideal creamy consistency. Think of this as your grocery list and a little guide to why each item is so important.
We start with the base, which needs to be rich and spreadable. Then we add the stars of the show – the fresh, vibrant tomato and basil topping. Finally, the finishing touches bring everything together. Choosing good quality ingredients will truly elevate the final dish.
- Creamy Base: You’ll need 1.5 cups of softened cream cheese or ricotta cheese. Cream cheese gives you a denser, tangier base, while ricotta offers a lighter, slightly sweet foundation. Either works beautifully, depending on your preference! Just make sure it’s softened to room temperature so it’s easy to mix.
- Ripe Tomatoes: Two large, ripe tomatoes are essential. Ripe tomatoes are sweeter and more flavorful, providing that classic bruschetta taste. The key is “ripe,” but not mushy. Different tomato varieties will give slightly different results; choose your favorite or whatever looks best at the market!
- Fresh Basil: A generous 1/4 cup of fresh basil leaves brings incredible aroma and herbaceousness. Do NOT substitute dried basil here – the fresh leaves are non-negotiable for that authentic bruschetta experience.
- Garlic (Optional but Recommended): One clove of minced garlic adds a lovely punch of flavor. If you’re a garlic lover, definitely include it! If you prefer a milder taste, feel free to skip it.
- Salt & Black Pepper: You’ll need 1/4 teaspoon of salt for the cheese base, plus more salt for drawing water out of the tomatoes. About 1/8 teaspoon of black pepper adds a subtle warmth and spice. Seasoning is key to making the flavors pop!
- Olive Oil: You’ll need 2 tablespoons of good quality olive oil. One tablespoon is used to crisp up the pita dippers, and the other can be incorporated into the ricotta cheese base for extra creaminess, or simply drizzled over the finished dip.
- Pita Bread Rounds: Two pita bread rounds are transformed into crispy, homemade dippers. The neutral flavor of pita makes them a perfect vehicle for the dip. You could also use baguette slices if you prefer, but pita creates fantastic crispy chips.
- Balsamic Glaze: About 2 tablespoons of balsamic glaze provides a sweet and tangy drizzle that perfectly complements the tomato and basil. You can find pre-made glaze at most grocery stores, or you can make your own by simmering balsamic vinegar until it thickens.
Crafting Your Bruschetta Dip: Step-by-Step Transformation
Now for the fun part – bringing all these wonderful ingredients together! This process is straightforward, but paying attention to a couple of key techniques will ensure your dip is absolutely perfect. Remember, the goal is vibrant flavor and that luscious, creamy texture without the dreaded watery layer.
- Prep for Perfect Pita Chips: Get your oven ready by preheating it to a warm 400°F (200°C). This temperature is ideal for getting the pita chips nice and crispy without burning. Cut each pita round into about 8 triangular wedges – aim for roughly equal sizes so they bake evenly. Toss these wedges in a medium bowl with 1 tablespoon of olive oil and a pinch of salt. The olive oil helps them crisp up beautifully, and the salt enhances the flavor. Arrange the seasoned pita wedges in a single layer on a baking sheet. It’s important they aren’t overlapping, as this allows hot air to circulate and get them truly golden brown and crispy. Bake them for 8 to 12 minutes. Keep a close eye on them as they can go from golden to burnt quickly! Once they’re done, remove them from the oven and set them aside to cool completely. They’ll crisp up even more as they cool.
- The Crucial Tomato Prep: This is the step that saves your dip from becoming a watery mess! Start by dicing your two large, ripe tomatoes into small, bite-sized pieces. The size is up to you, but aiming for about 1/4 to 1/2 inch pieces works well. Place the diced tomatoes in a fine mesh sieve. This is important – a fine mesh ensures the small tomato pieces don’t fall through. Set the sieve over a bowl. Now, generously sprinkle the diced tomatoes with salt. The salt helps draw out excess moisture from the tomatoes through osmosis. Let them sit and drain for at least 10 minutes. You’ll see water start to accumulate in the bowl below – that’s exactly what you want! This simple salting and draining step is the secret weapon against watery bruschetta dip.
- Finely Chop That Fresh Basil: While your tomatoes are on their important draining mission, turn your attention to the basil. Finely chop the fresh basil leaves. You want small pieces that distribute throughout the tomato mixture, providing little bursts of aromatic flavor in every bite.
- Prepare the Creamy Base: In a separate medium bowl, it’s time to create the smooth, delicious base for your dip. Add the softened cream cheese or ricotta cheese. Remember, using softened cheese makes it much easier to mix evenly. Stir in the minced garlic (if you’re using it – and I highly recommend it!), 1/4 teaspoon of salt, and the black pepper. Stir until the mixture is completely smooth and all the ingredients are well combined. If you opted for ricotta cheese, you can add the remaining 1 tablespoon of olive oil here and stir it in for an even creamier texture. This is your blank canvas for the vibrant tomato topping!
- Finish Draining & Combine Tomato Topping: Go back to your draining tomatoes. Gently press down on the tomatoes in the sieve with the back of a spoon or spatula. This helps push out any remaining liquid. Discard the watery liquid that has collected in the bowl below – you won’t need it. Add the well-drained tomatoes and the finely chopped basil to a small bowl. Gently stir them together just to combine. Be careful not to overmix; you want the tomatoes to hold their shape.
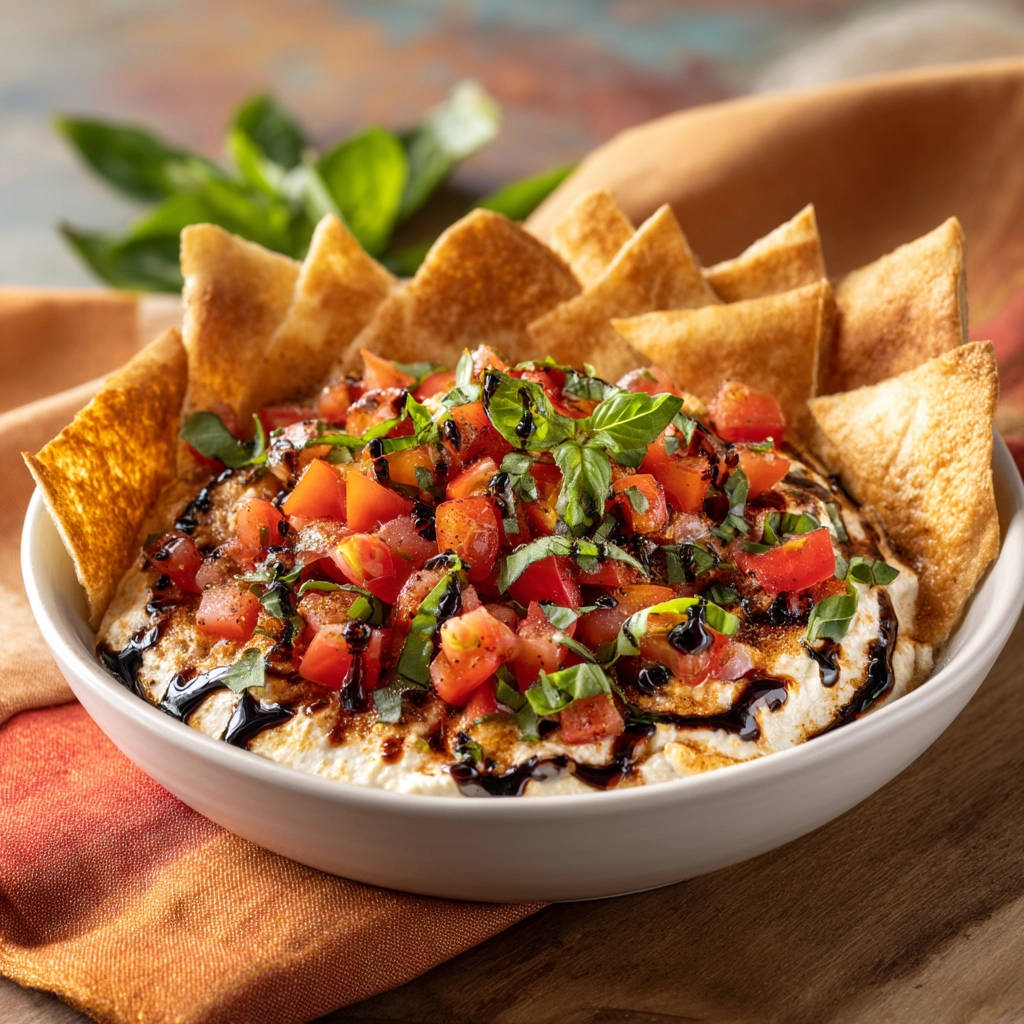
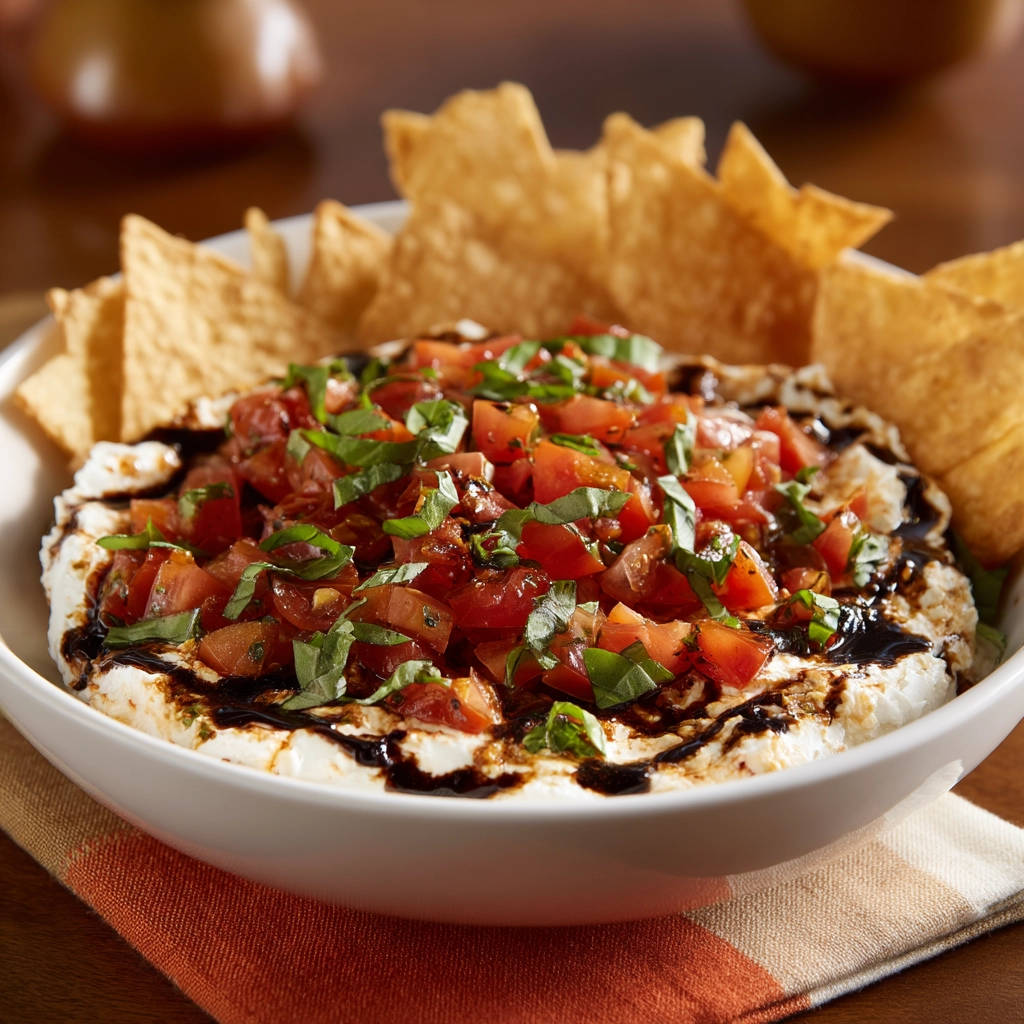
- Assemble Your Masterpiece: Now it’s time to bring it all together! Spread the creamy cheese mixture evenly in a serving bowl. Make sure it forms a nice base layer. Carefully spoon the drained tomato and basil mixture over the top of the cheese layer. Try to distribute it evenly so you get that beautiful layered look with the vibrant red and green sitting atop the white or pale cheese base.
- Add the Finishing Flourish: The balsamic glaze is the perfect final touch. Drizzle it generously over the top of the tomato and basil mixture. The dark, syrupy glaze provides a beautiful visual contrast and a wonderful sweet and tangy counterpoint to the fresh ingredients.
- Serve and Enjoy!: Your non-watery bruschetta dip is ready! Serve it immediately with your homemade crispy pita chips. The contrast between the warm, crispy chips and the cool, creamy, fresh dip is simply irresistible.
Tips for Perfect Bruschetta Dip Every Time
While the core recipe is straightforward, a few extra tips can elevate your bruschetta dip from great to absolutely unforgettable.
- Tomato Quality Matters: The flavor of your dip is heavily reliant on the tomatoes. Use the freshest, ripest tomatoes you can find. In-season tomatoes will always yield the best results.
- Don’t Rush the Drain: Be patient with the tomato draining step. The longer (within reason, 10-15 minutes is usually enough), the more liquid will be drawn out, ensuring a less watery dip.
- Serving Temperature: The creamy base is best served at room temperature or slightly chilled. This allows the flavors to meld beautifully and ensures a spreadable consistency.
- Make Ahead? Sort Of: You can prepare the creamy cheese base and the tomato/basil mixture separately a few hours in advance. Store them covered in the refrigerator. However, do not combine them or add the balsamic glaze until just before serving. This prevents the tomato juices from sitting on the cheese base and potentially causing some wateriness over time, despite the draining step.
- Cheese Choice: If you’re having trouble deciding between cream cheese and ricotta, consider the occasion. Cream cheese is fantastic for a richer, more stable dip, while ricotta offers a slightly lighter, fresher feel, especially when enhanced with a drizzle of olive oil as we do in the recipe. For another creamy appetizer idea, you might enjoy our Whipped Feta Dip with Walnuts & Honey!
- Garlic Strength: If you love garlic but find raw minced garlic too potent, you can briefly sauté the minced garlic in a tiny bit of olive oil until fragrant before adding it to the cheese mixture. Let it cool completely first.
What to Serve With Your Bruschetta Dip
While the crispy pita chips made in the recipe are absolutely perfect, this bruschetta dip is versatile and delicious with a variety of dippers. Consider serving it with:
- Sliced and toasted baguette rounds (rubbed with a little garlic clove for extra flavor!).
- Plain or garlic-flavored toasted crostini.
- Fresh vegetable sticks like cucumber slices, bell pepper strips, or carrot sticks for a lighter option.
- Crackers (choose sturdy ones that won’t break easily).
- Consider baking up some Garlic Naan Bread and cutting it into pieces for a warm, soft dipper that complements the flavors beautifully.
Your Bruschetta Dip Questions Answered (FAQ)
Got questions about making this delicious dip? Here are some common ones I hear:
Can I use different types of tomatoes?
Absolutely! While large ripe tomatoes like Beefsteak or Roma work great, cherry or grape tomatoes diced small also work well and can sometimes be sweeter. Just be sure to drain them using the salting method regardless of the type.
What if I don’t have a fine mesh sieve?
You can try using a colander lined with cheesecloth or even a coffee filter set inside a regular strainer. The goal is just to keep the tomato pieces in while allowing the liquid to escape. The salt is the most critical part.
How long does homemade bruschetta dip last?
When stored separately (cheese base and tomato mixture) in airtight containers in the refrigerator, they can last for 2-3 days. Once combined, it’s best enjoyed within 24 hours for optimal freshness and texture.
Can I add other ingredients to the tomato mixture?
Yes, feel free to experiment! A little finely diced red onion or a pinch of red pepper flakes could add an extra layer of flavor. Just be mindful of adding other ingredients that might also release a lot of moisture.
Is there a dairy-free option for the creamy base?
You could try a dairy-free cream cheese alternative. The texture might be slightly different, but the principle of combining it with the drained tomatoes should still work. Look for varieties designed for spreading.
How can I make balsamic glaze if I can’t find it?
Simply pour balsamic vinegar into a small saucepan and bring it to a gentle simmer over medium heat. Let it simmer, stirring occasionally, until it reduces and thickens into a syrupy consistency. This usually takes about 10-15 minutes depending on the amount. Let it cool completely before drizzling.
Enjoy Your Homemade Bruschetta Dip!
There you have it! The simple secret to a perfect, non-watery bruschetta dip that’s sure to be a hit. It’s amazing how one small technique can make such a big difference in texture and enjoyment. This dip is all about celebrating fresh, simple ingredients and letting their natural flavors shine.
Give this recipe a try the next time you’re looking for an easy yet impressive appetizer. I promise you won’t miss that watery layer one bit! Let me know in the comments below how yours turns out. Happy dipping!
Bruschetta Dip

Ingredients
- 1.5 cups softened cream cheese or ricotta cheese
- 2 large ripe tomatoes
- 1/4 cup fresh basil leaves
- 1 clove garlic, minced (optional)
- 1/4 teaspoon salt, plus more for tomatoes
- 1/8 teaspoon black pepper
- 2 tablespoons olive oil
- 2 pita bread rounds
- 2 tablespoons balsamic glaze
Directions
- Preheat oven to 400F (200C).
- Cut each pita round into 8 wedges. In a medium bowl, toss the pita wedges with 1 tablespoon of olive oil and a pinch of salt. Spread in a single layer on a baking sheet. Bake for 8-12 minutes, or until golden brown and crispy. Set aside to cool.
- Dice the tomatoes into small pieces. Place the diced tomatoes in a fine mesh sieve set over a bowl. Sprinkle generously with salt and let them sit for at least 10 minutes to draw out excess water.
- While the tomatoes are draining, finely chop the fresh basil.
- In a medium bowl, combine the softened cream cheese (or ricotta), minced garlic (if using), 1/4 teaspoon salt, and black pepper. Stir until smooth and well combined. If using ricotta, you can add the remaining 1 tablespoon of olive oil here for extra creaminess.
- Press gently on the tomatoes in the sieve to help drain even more liquid. Discard the liquid. Add the drained tomatoes and chopped basil to a separate small bowl. Gently stir to combine.
- Spread the creamy cheese mixture evenly in a serving bowl.
- Carefully spoon the tomato and basil mixture over the top of the cheese layer.
- Drizzle the balsamic glaze generously over the top of the tomato and basil mixture.
- Serve immediately with the toasted pita chips.