Oh, sweet friends! Have you ever poured your heart and soul into a gorgeous no-bake dessert, envisioning that perfect, clean slice, only to have it collapse into a delicious (but decidedly messy) puddle when you try to serve it? Yep, I’ve been there. That frustrating moment is exactly why I set out to perfect this Candy Bar Dream Dessert. It’s a luscious, creamy, overloaded-with-candy treat that not only tastes absolutely incredible but is also guaranteed to set firmly every single time, giving you those beautiful, envy-inducing slices you dream of!
Forget wobbly messes and dessert disasters. This recipe is designed for success, focusing on a few key techniques that ensure stability without sacrificing that light, dreamy texture. It’s the ultimate easy dessert for parties, potlucks, or just when you need a serious chocolate and peanut butter fix without turning on the oven. Ready to dive into candy bar heaven?
Why You’ll Absolutely Adore This Candy Bar Dream Dessert
Besides the obvious reason (hello, candy!), there are so many things that make this no-bake wonder a total winner in my book. It’s the kind of dessert that brings smiles to faces and disappears from the plate in record time.
- Effortlessly Easy: Seriously, no baking required! Most of your time is spent chilling and anticipating.
- Crowd-Pleasing Flavors: Who can resist the combination of chocolate, peanut butter, and creamy goodness? It hits all the right notes for almost everyone.
- Perfectly Sliceable: That firm set means you can serve it up beautifully, making it ideal for entertaining.
- Customizable Candy Heaven: While this recipe focuses on classic candy bars, you can easily swap in your favorites.
- Minimal Cleanup: Since there’s no baking, you’re looking at far fewer greasy pans and a quicker post-dessert tidy-up.
Gathering Your Delicious Ingredients for This Dream Dessert
Creating this decadent Candy Bar Dream Dessert starts with assembling the right cast of characters. Each ingredient plays a vital role, from the sturdy base to the rich, creamy filling and the abundance of candy goodness piled on top. Let’s break down what you’ll need and why:
The base of our dessert is a classic no-bake crust made from chocolate cookie crumbs. These crumbs provide a deep chocolate flavor and a satisfying crunch that contrasts beautifully with the creamy filling. Binding them together is melted unsalted butter, which acts like glue, helping the crumbs compact and hold their shape firmly when chilled.
For the unbelievably smooth and rich filling, we rely on softened cream cheese. Using blocks, rather than whipped or spreadable varieties, gives us the density needed for a stable base. Granulated sugar sweetens the cream cheese, and a touch of pure vanilla extract enhances all the chocolate and peanut butter notes, adding warmth and complexity.
Now, for the magic ingredient that contributes to both texture and structure: thawed frozen whipped topping. When gently folded into the cream cheese mixture, it incorporates air and adds a lightness that keeps the dessert from being too heavy, while also helping it set up wonderfully. Using frozen whipped topping that has been properly thawed is key here, as it maintains a certain stability that liquid whipped cream doesn’t always offer in a no-bake setting.
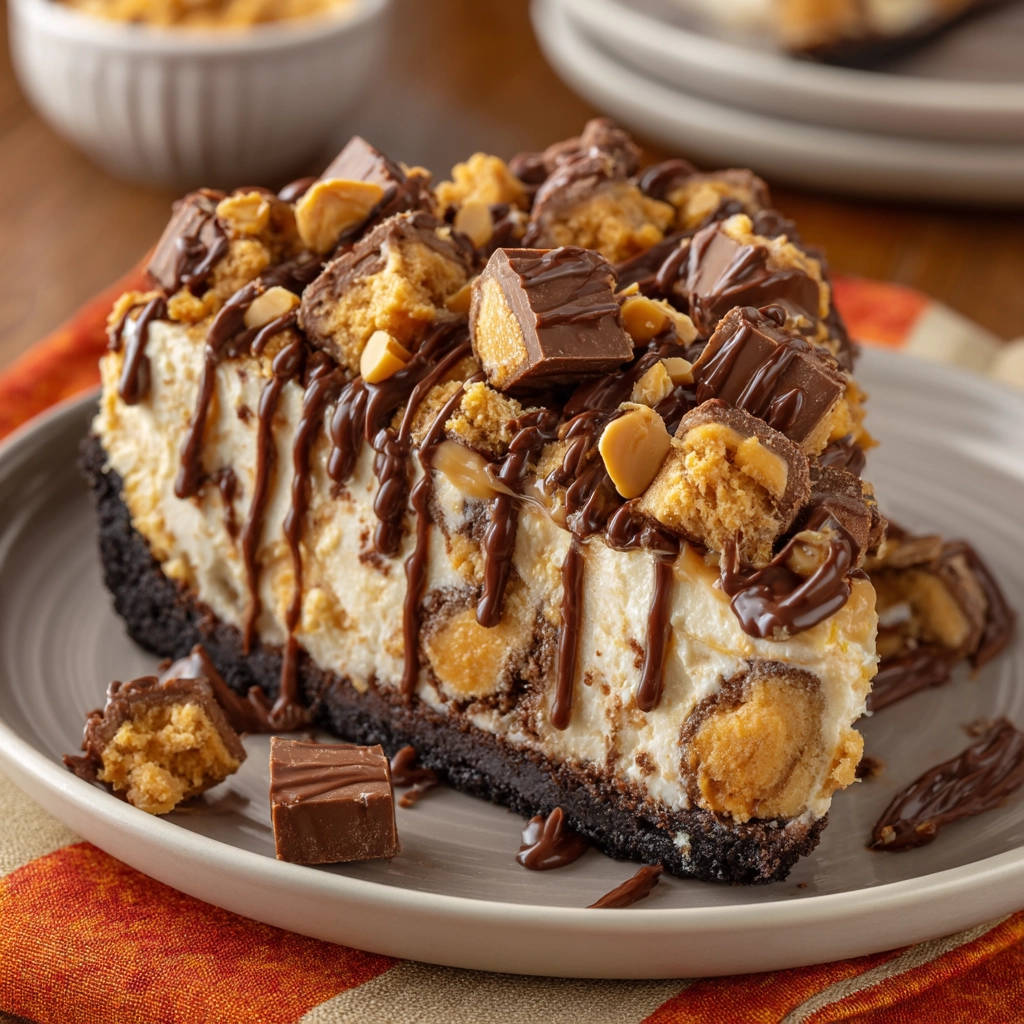
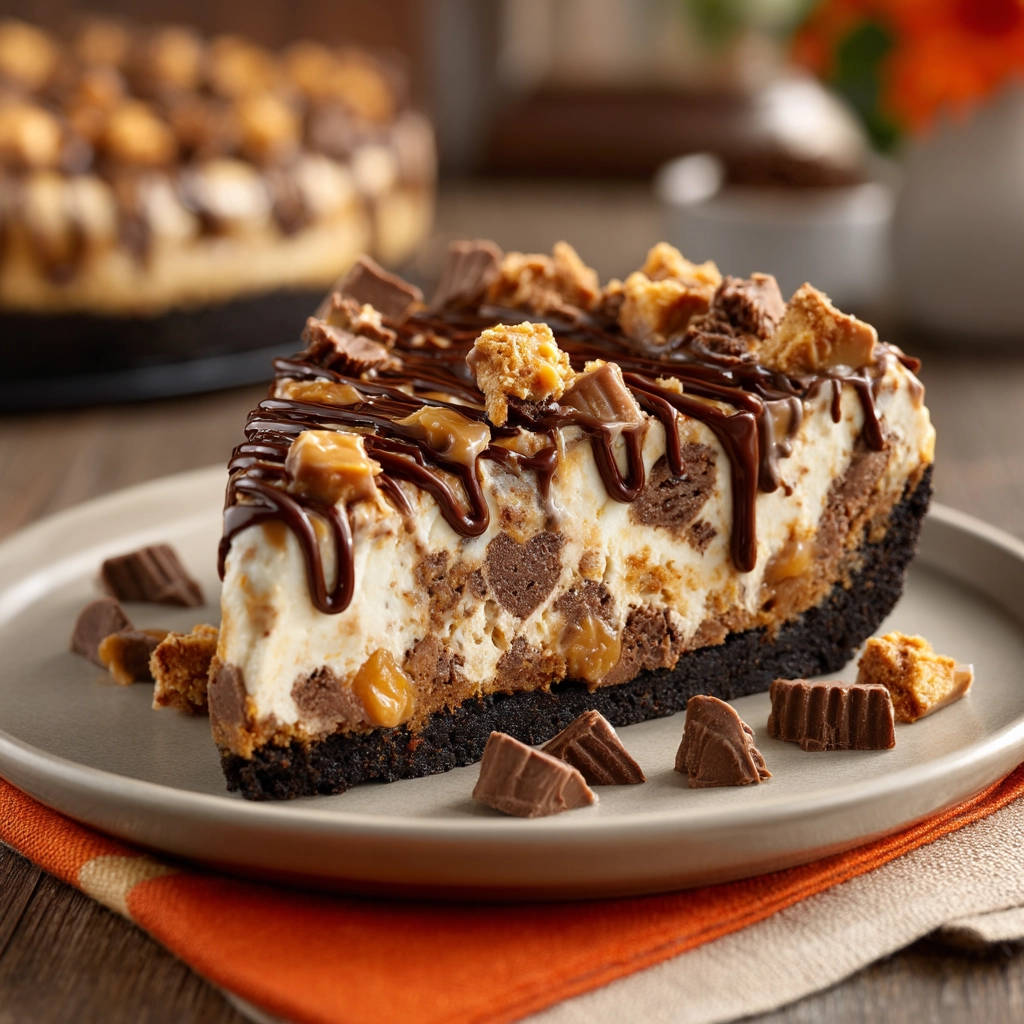
And finally, the stars of the show – the candy bars! A generous amount of chopped peanut butter cup candies brings that irresistible salty-sweet peanut butter element, while chopped chocolate candy bars (think classic milk chocolate varieties) add pure chocolatey bliss and textural pockets throughout the creamy filling. A scattering of chopped peanuts on top provides extra crunch and flavor, and a drizzle of melted chocolate chips or melting chocolate creates a final layer of decadence and visual appeal.
Here’s the full lineup you’ll need:
- 1 1/2 cups chocolate cookie crumbs (measure generously, about 24 standard chocolate sandwich cookies)
- 1/2 cup unsalted butter, melted
- 2 blocks (8 ounces each) cream cheese, softened
- 3/4 cup granulated sugar
- 1 teaspoon vanilla extract
- 1 container (8 ounces) frozen whipped topping, thawed
- 1 1/2 cups chopped peanut butter cup candies, plus more for topping
- 1 cup chopped chocolate candy bars, plus more for topping
- 1/2 cup chopped peanuts
- 1/4 cup chocolate chips or melting chocolate for drizzle
Crafting Your Candy Bar Dream Dessert: The Steps to Sweet Success
Ready to create this masterpiece? This Candy Bar Dream Dessert comes together easily with minimal fuss. Follow these steps carefully, paying special attention to the techniques that ensure that perfect, firm set we talked about!
-
Prepare the Crust Foundation: Begin by making your sturdy base. In a medium-sized mixing bowl, combine your measured chocolate cookie crumbs. If you’re starting with whole cookies, crush them finely first; a food processor makes quick work of this, but placing them in a bag and crushing with a rolling pin works too. Pour the melted unsalted butter over the crumbs. Stir everything together thoroughly until the crumbs are evenly moistened and look like wet sand. This ensures the butter is distributed throughout, acting as the binder.
Next, transfer this mixture into your chosen pan – a 9-inch pie plate works wonderfully for classic slices, or you can use a springform pan for easier removal and a more dramatic presentation. Use the bottom of a glass or a flat measuring cup to firmly press the mixture into the bottom and slightly up the sides of the pan. Compacting it tightly is crucial for a stable crust that won’t crumble when sliced. Once pressed, place the pan in the refrigerator for at least 30 minutes. This chilling time allows the butter to solidify, locking the crumbs together.
-
Whip Up the Creamy Filling Base: While the crust is chilling, prepare the main event – the luscious filling. In a large mixing bowl, place your softened cream cheese and granulated sugar. It’s important that your cream cheese is truly softened (left at room temperature for at least an hour) so that it beats smoothly. Use an electric mixer (either a hand mixer or stand mixer) to beat the cream cheese and sugar together on medium speed. Keep beating until the mixture is completely smooth and creamy, ensuring there are absolutely no lumps. This smooth base is essential for a luxurious filling texture. Once smooth, stir in the vanilla extract until just combined. The vanilla adds a warm depth of flavor that complements the chocolate and peanut butter beautifully.
-
Integrate the Whipped Topping Gently (The Key to Firmness!): This next step is perhaps the most critical for achieving that guaranteed firm set without a wobbly result. Take your thawed frozen whipped topping. Using a rubber spatula (not your electric mixer!), gently fold the whipped topping into the cream cheese mixture. Do this in two separate additions. Add about half of the whipped topping first, and gently use the spatula to lift and fold the cream cheese mixture over the whipped topping until they are just combined. The motion is more like cutting through the mixture and bringing the bottom to the top, rather than stirring vigorously. Once the first half is mostly incorporated, add the second half and repeat the gentle folding process until no streaks of whipped topping remain and the mixture is uniform.
Why be so gentle? Overmixing the whipped topping can deflate it. The air trapped within the whipped topping is what helps give structure and lightness to the filling as it chills. Handle it with care to maintain its volume.
-
Fold in the Candy Bar Treasures: Now for the fun part! Add 1 1/2 cups of your chopped peanut butter cup candies and 1 cup of your chopped chocolate candy bars to the creamy filling mixture. Again, use your rubber spatula and gently fold the candies into the filling until they are evenly distributed. You want pockets of candy throughout, so make sure they aren’t all stuck to the bottom. Don’t overmix; just fold until they are incorporated.
-
Assemble Your Dream Dessert: Carefully pour the prepared filling mixture into the chilled chocolate cookie crust in your pie plate or springform pan. Use the back of a spoon or your spatula to spread the filling out evenly, ensuring it fills the pan and is smooth on top.
-
Chill for Guaranteed Success: This is the non-negotiable step for a truly firm Candy Bar Dream Dessert! Cover the pan carefully with plastic wrap, pressing it lightly against the surface of the filling to prevent a skin from forming. Place the covered dessert in the refrigerator to chill. You need at least 4 hours for it to begin setting, but for the absolute best, most perfectly sliceable result, I highly recommend letting it chill ideally overnight (6-8 hours or longer). This extended time in the cold allows all the ingredients, especially the cream cheese and whipped topping, to bind together and firm up completely, delivering on the promise of a dessert that holds its shape beautifully.
-
Add the Final Flourishes: Just before you plan to serve this delightful treat, remove the plastic wrap. Scatter the remaining chopped peanut butter cup candies, chopped chocolate candy bars, and chopped peanuts generously over the top of the firmly set filling. These add both beautiful texture and extra bursts of flavor with every bite.
-
Drizzle with Chocolatey Goodness: In a small microwave-safe bowl, place your chocolate chips or melting chocolate. Microwave on medium power in 30-second intervals, stirring well after each interval, until the chocolate is completely melted and smooth. Be cautious not to overheat the chocolate, as it can seize. Once melted, you can use a spoon or a piping bag with a fine tip (or just snip a corner off a small zip-top bag) to drizzle the melted chocolate back and forth artistically over the candy and peanut toppings.
-
Slice and Enjoy Cold: And now, the moment of truth! Using a sharp knife (run under hot water and wiped dry for the cleanest cuts), slice the Candy Bar Dream Dessert into portions. Serve immediately while cold. Get ready for rave reviews!
Pro Tips for Your Candy Bar Creation
While this recipe is designed for ease and success, a few extra tips can elevate your Candy Bar Dream Dessert from great to absolutely unforgettable:
- Soften Cream Cheese Properly: This is key to a smooth filling. Take the cream cheese out of the fridge at least an hour before you plan to mix. If you’re in a hurry, you can unwrap it, cut it into smaller cubes, and spread them out on a plate for about 20-30 minutes, or even gently microwave the unwrapped blocks on 50% power for 15-20 second bursts until pliable (be careful not to melt it!).
- Don’t Rush the Chill Time: I know the anticipation is high, but trust me, the extended chilling is your best friend for a firm set. Plan ahead! Making it the night before is always the best approach.
- Chopping the Candy: Aim for pieces that are not too tiny, so you get nice chunks of candy throughout. Slightly irregular sizes are great for texture.
- Pan Size Matters: Using a 9-inch pie plate or springform pan is recommended. A larger pan might result in a thinner dessert that sets faster but has less height. A smaller pan might be too deep for the amount of filling.
- Clean Slices: For the neatest slices, use a long, sharp knife. Dip the knife in hot water and wipe it clean between each slice. This helps the chocolate and candy cut cleanly without dragging.
Serving Suggestions and Sweet Variations
This Candy Bar Dream Dessert is pretty perfect as is, but here are a few ideas to change things up or serve it in style:
Serve it simply, directly from the fridge, letting the textures and flavors speak for themselves. It pairs wonderfully with a glass of cold milk or a hot cup of coffee. If you want to add an extra touch, a dollop of extra whipped topping (maybe even a slightly sweetened homemade version!) or a scoop of vanilla ice cream would be delightful alongside.
Feeling creative? The beauty of this no-bake dessert is its adaptability. Instead of peanut butter cups and chocolate bars, you could use:
- Other Candy Bars: Experiment with nougat, caramel, or crispy cookie center candy bars. Just make sure they are easy to chop.
- Different Cookies: A graham cracker crust is a classic no-bake option, or try shortbread cookies for a buttery base.
- Add-ins: Swirl in a bit of caramel sauce or peanut butter before chilling, or mix in chocolate chips or nuts directly into the filling.
- Different Toppings: Top with mini chocolate chips, toffee bits, caramel drizzle, or different types of nuts.
If you enjoy creating stunning no-bake treats like this, you might also love exploring other simple, delicious desserts. Have you ever tried making an easy no-bake chocolate cream loaf? It’s another fantastic option for a simple yet impressive dessert that requires no oven time. Or perhaps something with a fruity twist like raspberry dream bars? The possibilities for easy, delightful no-bake creations are endless!
Your Candy Bar Dream Dessert Questions Answered (FAQ)
Got questions about making this delicious dessert? Here are some common queries and their answers to help you out:
What makes this no-bake dessert set firmly?
The key factors are the combination of full-fat cream cheese and the proper use of frozen whipped topping. The cream cheese provides a dense, stable base, while the thawed whipped topping, when gently folded, adds necessary structure without making it heavy. Most importantly, the extended chilling time (ideally overnight) allows these ingredients to bind and firm up completely. Skipping or shortening the chilling period is the most common reason for a wobbly dessert.
Can I use homemade whipped cream instead of frozen whipped topping?
While homemade whipped cream is delicious, frozen whipped topping contains stabilizers that help no-bake desserts set more reliably and hold their shape for longer, especially in warmer conditions. For the guaranteed firm set promised in this recipe, using thawed frozen whipped topping is strongly recommended.
How far in advance can I make this dessert?
This dessert requires at least 4 hours of chilling, but is best when chilled overnight. You can easily make it up to 2-3 days in advance. Keep it covered tightly with plastic wrap in the refrigerator until just before serving, then add the final toppings and chocolate drizzle.
How should I store leftovers?
Store any leftover Candy Bar Dream Dessert tightly covered with plastic wrap or in an airtight container in the refrigerator. It will keep well for 3-4 days. The crust might soften slightly over time, but the filling should remain firm.
Can I freeze this dessert?
Yes, you can freeze this dessert! Cover the chilled dessert tightly with plastic wrap, then wrap it again in aluminum foil or place it in a freezer-safe container. It can be frozen for up to 1-2 months. To thaw, transfer it to the refrigerator and let it thaw overnight. The texture might change slightly after freezing and thawing, but it will still be delicious.
What kind of chocolate candy bars work best?
Classic milk chocolate candy bars (like those with a nougat or caramel center, or just plain chocolate) work wonderfully. Choose ones you love! Avoid candy bars that have very hard or chewy centers that might be difficult to slice through once the dessert is set.
My crust isn’t holding together, what went wrong?
The most likely reason is not enough butter or not pressing the mixture firmly enough into the pan. Ensure you measure the melted butter accurately and really pack those crumbs down tightly into the bottom and sides of the pan before chilling. The chilling step is also vital for the butter to solidify and bind the crust.
Make This Candy Bar Dream Dessert Today!
Ready to experience no-bake dessert perfection? This Candy Bar Dream Dessert is the answer to your sweet cravings and your desire for a dessert that actually holds its shape. It’s rich, it’s creamy, it’s loaded with your favorite candy, and it’s surprisingly simple to make. It’s bound to become a go-to recipe for gatherings or just a special weeknight treat.
Give it a try and let me know what you think! Leave a comment below and tell me what candy bars you chose, or if you have any other great tips. Happy dessert making!
Candy Bar Dream Dessert

Ingredients
- 1 1/2 cups chocolate cookie crumbs (about 24 cookies)
- 1/2 cup unsalted butter melted
- 2 blocks (8 ounces each) cream cheese softened
- 3/4 cup granulated sugar
- 1 teaspoon vanilla extract
- 1 container (8 ounces) frozen whipped topping thawed
- 1 1/2 cups chopped peanut butter cup candies plus more for topping
- 1 cup chopped chocolate candy bars plus more for topping
- 1/2 cup chopped peanuts
- 1/4 cup chocolate chips or melting chocolate for drizzle
Directions
- In a medium bowl combine the chocolate cookie crumbs and melted butter. Press the mixture firmly into the bottom of a 9 inch pie plate or springform pan. Chill in the refrigerator for at least 30 minutes.
- In a large bowl beat the softened cream cheese and sugar together until smooth and creamy with no lumps. Stir in the vanilla extract.
- This next step is key to getting a firm set: Gently fold in the thawed whipped topping into the cream cheese mixture using a spatula. Do this in two additions, folding carefully until just combined. Overmixing can deflate the whipped topping which is crucial for structure.
- Gently fold in 1 1/2 cups of chopped peanut butter cup candies and 1 cup of chopped chocolate candy bars.
- Pour the filling into the chilled crust and spread evenly.
- Cover the dessert carefully with plastic wrap and refrigerate for at least 4 hours or ideally overnight until the filling is completely firm. This extended chilling time is essential for the ingredients to bind and set correctly, fulfilling the promise of a firm dessert.
- Just before serving scatter the remaining chopped candies and chopped peanuts over the top.
- Melt the chocolate chips or melting chocolate in a microwave-safe bowl in 30 second intervals stirring until smooth. Drizzle the melted chocolate over the toppings.
- Slice and serve cold.