Making savory rolls filled with delicious ingredients is incredibly satisfying, isn’t it? They’re perfect for parties, weeknight dinners, or just a tasty snack. But let’s be honest – the biggest headache can be keeping all that wonderful filling exactly where it belongs: inside the roll! We’ve all been there, watching precious beef, cheese, and bacon ooze out onto the baking sheet or counter. It’s frustrating and messy.
Well, I’ve finally cracked the code! After years of experimenting, I discovered a simple trick that ensures your Cheesy Bacon Beef Rolls stay perfectly intact from rolling to baking. Get ready for a game-changer that delivers maximum flavor with minimal mess. This recipe is about to become a favorite in your rotation!
Why You’ll Absolutely Love These Cheesy Bacon Beef Rolls
Beyond just solving the filling-spill problem, these Cheesy Bacon Beef Rolls are a guaranteed crowd-pleaser for so many reasons:
- They are packed with savory, satisfying flavor from the seasoned ground beef and rich cheddar cheese.
- The crispy bits of bacon add that irresistible salty crunch we all adore.
- They are incredibly versatile – serve them as an appetizer, a light lunch, or paired with a side for dinner.
- Using refrigerated pizza dough makes them surprisingly quick and easy to whip up, perfect for busy days.
- And of course, the best part: the simple method prevents the filling from falling out, giving you beautiful, stress-free rolls every time!
Ready to stop fighting with your savory rolls and start enjoying them? Let’s gather our ingredients.
Gathering Your Ingredients for Perfect Cheesy Bacon Beef Rolls
One of the beauties of these rolls is that the ingredient list is straightforward, using pantry staples you likely already have or can easily find. Each component plays a vital role in creating that irresistible, comforting flavor.
You’ll need the base – a good quality pizza dough. You can absolutely use a tube of refrigerated pizza dough for convenience, which is what makes this recipe so fast. If you’re feeling ambitious or prefer homemade, feel free to use your favorite batch of pizza dough. Just be sure it’s ready to roll out!
The heart of our filling is, of course, the beef. We’re using lean ground beef here. Cooking and draining it thoroughly is one of the first steps towards a cohesive filling that won’t make your rolls soggy. We’ll build flavor with finely chopped onion and minced garlic, classic aromatics that are foundational in so many delicious dishes.
To bind the meat mixture and add a hint of savory depth, we incorporate tomato paste and a little water or broth. This creates a slightly thickened sauce that coats the beef beautifully. Italian seasoning brings that familiar, comforting herby note, and of course, we’ll season generously with salt and black pepper.
And what would cheesy bacon beef rolls be without the stars themselves? Shredded cheddar cheese brings sharpness and meltiness, and cooked, crumbled bacon adds smoky, salty perfection. We’ll divide the cheese and bacon, using most inside and reserving some for that glorious topping.
Finally, a little melted butter brushed on top helps the rolls brown beautifully in the oven, and a sprinkle of fresh herbs like thyme or parsley adds a touch of brightness and freshness for garnish, if you like.
- 1 tube (13.8 oz) refrigerated pizza dough or 1 batch homemade pizza dough
- 1 pound ground beef
- 1/2 cup finely chopped onion
- 2 cloves garlic minced
- 1/4 cup tomato paste
- 1/4 cup water or broth
- 1 teaspoon dried Italian seasoning
- Salt and black pepper to taste
- 1 cup shredded cheddar cheese divided
- 4 slices cooked bacon crumbled
- 2 tablespoons melted butter
- Fresh thyme or parsley chopped for garnish (optional)
Crafting Your Cheesy Bacon Beef Rolls: Step-by-Step Perfection
Alright, let’s get these incredible rolls assembled! Don’t be intimidated; the process is quite simple, especially once you know the little tricks for keeping that filling locked in. We’ll go through each step carefully to ensure your success.
- Prepping for Baking: Begin by preheating your oven to 375 degrees F (190 degrees C). While the oven heats up, take a 9×13 inch baking pan and grease it well. This prevents the bottoms of your lovely rolls from sticking and makes cleanup so much easier.
- Cooking the Filling Base: Grab a large skillet and place it over medium heat. Add your ground beef and the finely chopped onion. Cook them together, using a spoon or spatula to break up the ground beef into small pieces. You want to continue cooking until the beef is nicely browned and the onions are softened and translucent.
- Draining and Adding Aromatics: This next part is absolutely critical for avoiding a soggy filling later on. Once the meat is browned, drain off all of the excess grease from the skillet. Tip the pan carefully to get as much out as possible. A greasy filling will lead to rolls that fall apart. Return the skillet to the heat and add the minced garlic. Cook the garlic for just about one minute, stirring constantly, until you can smell its wonderful fragrance. Be careful not to burn it!
- Building the Sauce: Now, stir in the tomato paste, water or broth, Italian seasoning, and pinches of salt and pepper to taste. Mix everything together until the tomato paste is fully incorporated and coats the meat. Let this mixture simmer gently for about 5 minutes. This simmering time is important as it helps the sauce thicken slightly, which is another key factor in keeping the filling contained.
- Cooling the Filling: Once the sauce has thickened, remove the skillet from the heat. Let the meat mixture cool for approximately 10 minutes. This cooling step is essential! Spreading hot filling onto the dough can make the dough warm and sticky, increasing the chance of blowouts. Slightly cooled filling is much easier to work with and stays in place better.
- Preparing the Dough: While your filling cools, lightly flour a clean work surface. Unroll your refrigerated pizza dough or roll out your homemade dough. Aim for a large rectangle, roughly 10×15 inches. It doesn’t have to be perfectly exact, but a general rectangular shape is best for rolling.
- Spreading the Filling: Spread the slightly cooled meat mixture evenly over the rolled-out dough. Make sure to leave a 1-inch border clear around all four edges. This border will act as your seal when you roll the dough, helping to prevent the filling from escaping.
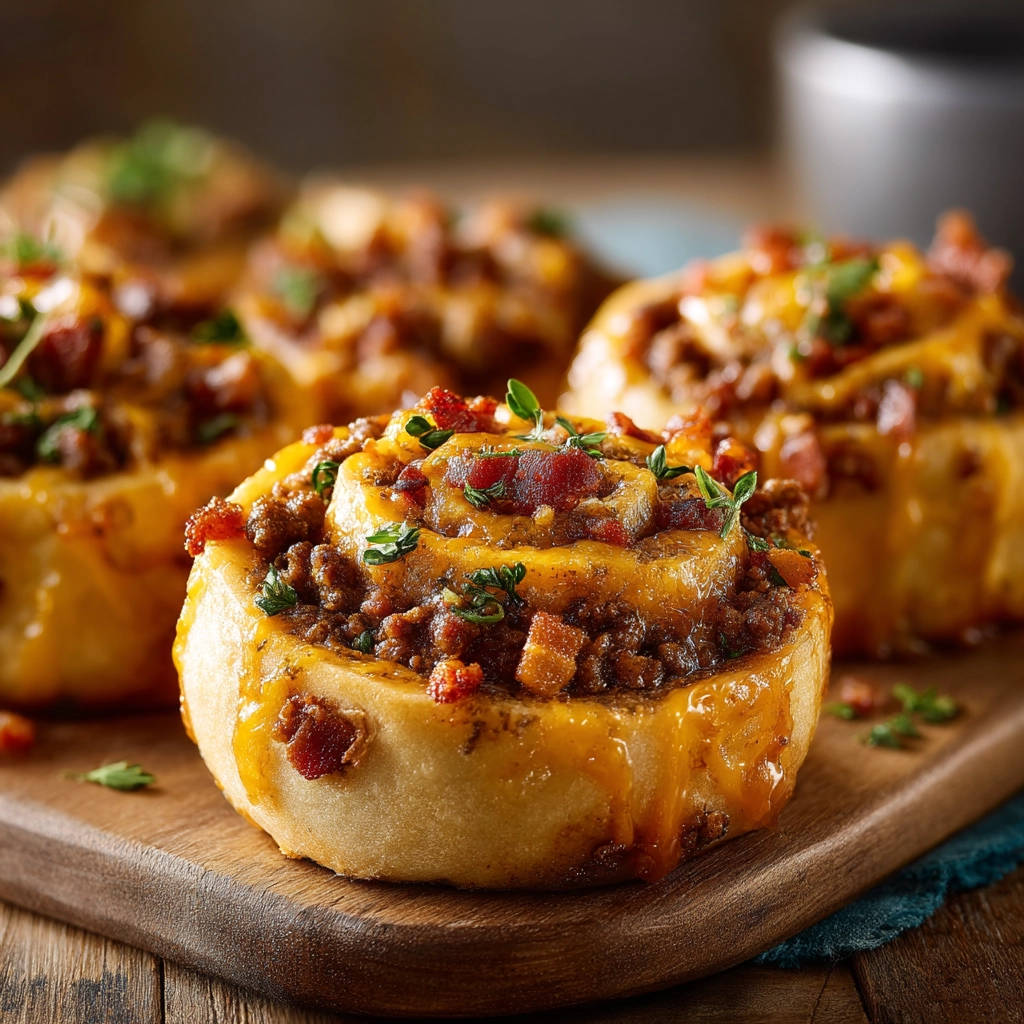
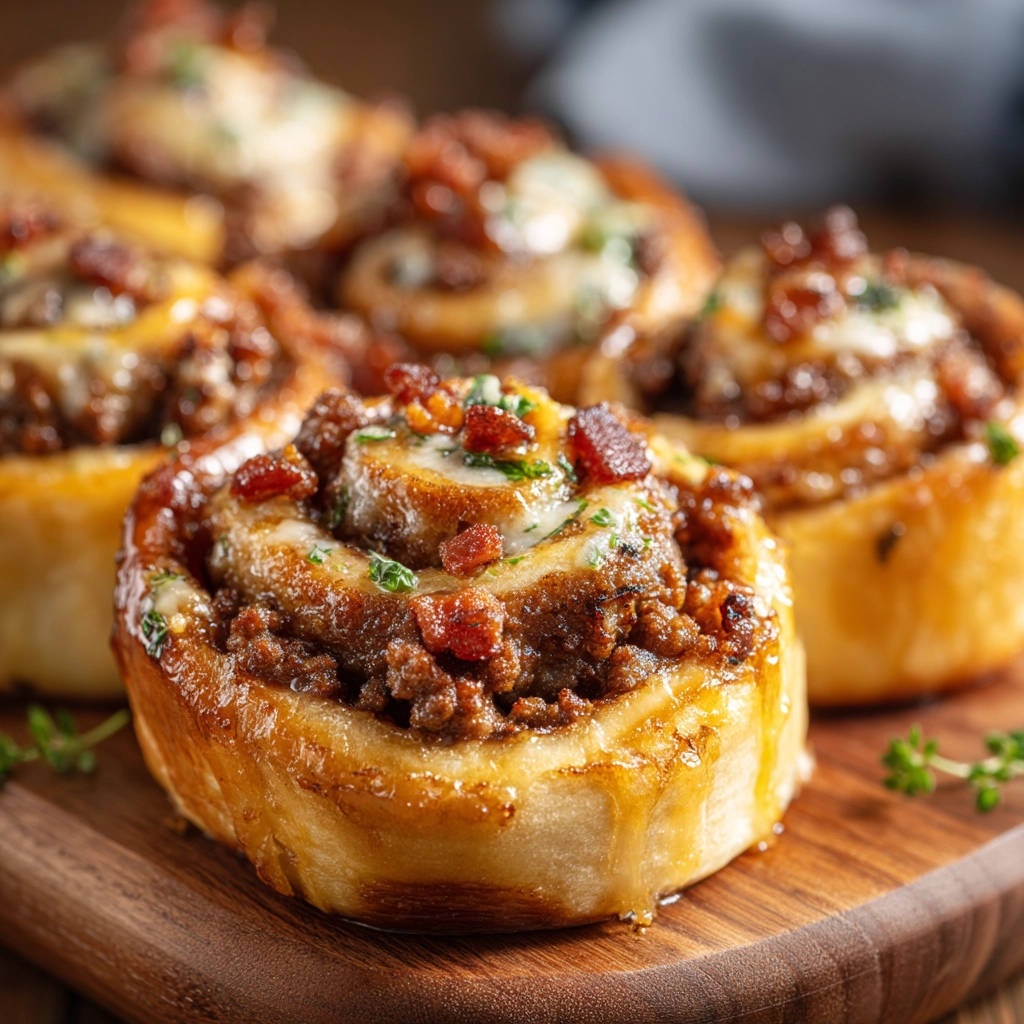
- Adding Cheese and Bacon: Sprinkle 3/4 cup of your shredded cheddar cheese evenly over the meat mixture. Then, scatter most of the crumbled bacon over the cheese. Keep the remaining 1/4 cup cheese and a few bacon bits aside for topping the rolls later.
- The No-Spill Rolling Technique: Here is the magic step! Starting from one of the long sides of your rectangle, begin to roll the dough up tightly, just like you would roll a jelly roll. As you roll, gently press down and tuck the filling inward with your fingers. Rolling it tightly and applying gentle pressure helps to compact the filling inside and create a uniform log, significantly reducing the chance of spills.
- Cleanly Cutting the Rolls: To get beautiful, neat rolls without squeezing the filling out, you have two good options: use a very sharp knife or, my favorite trick, use unflavored dental floss! If using a sharp knife, saw gently through the log to create 8 equal pieces. If using dental floss, slide a piece of floss under the log where you want to make a cut, bring the ends of the floss up and cross them over the top of the log, and pull the ends to slice cleanly through. This method is fantastic for keeping the filling right where it is.
- Arranging and Topping: Arrange the cut rolls in your prepared baking pan. Place them cut-side up, leaving a little space between them. Melt the 2 tablespoons of butter and brush it generously over the tops of each roll. Finally, sprinkle the reserved 1/4 cup cheddar cheese and the remaining bacon bits over the buttered tops.
- Baking to Golden Perfection: Place the pan in your preheated oven. Bake for 20-25 minutes, or until the dough is golden brown, puffed up, and the cheese on top is melted and bubbly. The timing may vary slightly depending on your oven and the thickness of your rolls.
- Serving Your Rolls: Once they’re baked, remove the pan from the oven and let the Cheesy Bacon Beef Rolls cool slightly in the pan for a few minutes. This allows the filling to set just a little. If desired, sprinkle with fresh chopped thyme or parsley before serving. Enjoy your perfectly filled, mess-free rolls!
Tips for Perfect Cheesy Bacon Beef Rolls Every Time
Even with the simple steps, a few extra tips can help ensure your rolls are absolutely perfect:
- Don’t Skip Draining: Seriously, I cannot stress this enough! Fully draining the cooked beef and onion mixture is the #1 way to prevent a watery filling that leads to soggy dough and spillage.
- Cool Down the Filling: Just 10 minutes is usually enough. Working with warm, not hot, filling makes a huge difference in how easily the dough rolls and how well the filling stays put.
- Roll Tightly, but Gently: You want the filling compacted, but you don’t want to rip the dough. A firm, steady roll is key.
- Dental Floss Magic: If you struggle with cutting cinnamon rolls or savory rolls neatly, give the dental floss trick a try. You’ll be amazed at how clean the cuts are!
- Cheese Variations: While cheddar is classic, feel free to mix in a little mozzarella for extra stretch or some Monterey Jack for mild flavor. Just make sure they are shredded varieties that melt well.
- Add Some Veggies: Want to sneak in more vegetables? Finely dice some bell pepper or mushrooms and cook them along with the onion and beef in step 2. Just make sure they are also cooked down and any excess liquid is drained off.
What to Serve With Your Savory Rolls
These Cheesy Bacon Beef Rolls are hearty enough to stand on their own as a substantial snack or appetizer. But if you’re serving them as a meal, they pair wonderfully with simple sides.
A fresh, crisp green salad is always a good choice to balance the richness. You might enjoy our Easy Kale Salad for something light and healthy.
Roasted vegetables make an excellent companion. Our recipe for Roasted Veggies is simple and versatile.Easy Crispy Oven Potato Wedges.
Your Cheesy Bacon Beef Rolls Questions Answered (FAQ)
Let’s tackle some common questions you might have about making these delicious rolls.
Can I make the filling ahead of time?
Absolutely! You can cook the meat and onion mixture, simmer it with the tomato paste and seasonings, and let it cool completely. Store it in an airtight container in the refrigerator for up to 2-3 days. When you’re ready to bake, simply roll out the dough, spread the cold filling, add cheese and bacon, roll, slice, and bake as directed.
Can I use a different type of ground meat?
Yes, you could substitute ground turkey or ground chicken for the ground beef. Just be sure to cook it thoroughly and drain off any liquid or grease, as leaner meats can sometimes release moisture as they cook.
Can I freeze these Cheesy Bacon Beef Rolls?
You have a couple of options for freezing. You can freeze the baked rolls after they have cooled completely. Wrap them individually or store in a freezer-safe container. Reheat in the oven or microwave. Alternatively, you could potentially assemble the rolls (steps 1-9), slice them, and freeze them uncooked on a baking sheet until solid. Then transfer to a freezer bag. To bake from frozen, arrange in a greased pan, brush with butter, top with cheese/bacon, and bake at the same temperature, but expect the cook time to be longer (likely 30-40 minutes) until golden and heated through.
Why is my filling watery even after draining?
Make sure you are draining the grease completely after browning the beef and onions. Also, ensure you simmer the tomato paste mixture for the full 5 minutes to allow it to thicken. If you’re using very lean beef, sometimes there’s less fat to drain but still moisture. Making sure you add the water/broth and tomato paste and let it simmer will help create a slightly thicker, more stable filling.
Can I add other spices besides Italian seasoning?
Certainly! You could use a pinch of garlic powder, onion powder, or even a little smoked paprika for a different flavor profile. Adjust seasonings to your personal preference.
Enjoy Your Homemade Cheesy Bacon Beef Rolls!
There you have it – the secret to making incredible, mess-free Cheesy Bacon Beef Rolls! These savory delights are bound to disappear quickly, whether you’re serving them as a fun appetizer, a game-day snack, or an easy weeknight meal. The combination of seasoned beef, smoky bacon, and gooey cheddar all wrapped in tender dough is simply irresistible.
Give this recipe a try and experience the joy of perfectly filled rolls. We’d love to hear how they turn out for you! Please leave a comment below and let us know your thoughts or any variations you tried. Happy baking!
Cheesy Bacon Beef Rolls

Ingredients
- 1 tube (13.8 oz) refrigerated pizza dough or 1 batch homemade pizza dough
- 1 pound ground beef
- 1/2 cup finely chopped onion
- 2 cloves garlic minced
- 1/4 cup tomato paste
- 1/4 cup water or broth
- 1 teaspoon dried Italian seasoning
- Salt and black pepper to taste
- 1 cup shredded cheddar cheese divided
- 4 slices cooked bacon crumbled
- 2 tablespoons melted butter
- Fresh thyme or parsley chopped for garnish
Directions
- Preheat your oven to 375 degrees F (190 degrees C). Grease a 9×13 inch baking pan.
- In a large skillet cook the ground beef and onion over medium heat breaking up the meat until browned. Drain off any excess grease completely. This is crucial for keeping the filling from becoming too wet. Add the minced garlic and cook for 1 minute more until fragrant.
- Stir in the tomato paste water or broth Italian seasoning salt and pepper. Simmer for 5 minutes until the sauce thickens slightly. Remove from heat and let the mixture cool for about 10 minutes. This cooling step helps prevent the filling from being too loose when you roll the dough.
- On a lightly floured surface unroll or roll the pizza dough into a large rectangle about 10×15 inches.
- Spread the slightly cooled meat mixture evenly over the dough leaving a 1 inch border around all edges.
- Sprinkle 3/4 cup of the shredded cheddar cheese and most of the crumbled bacon over the meat mixture.
- This is the key part: Starting from a long side roll the dough up tightly like a jelly roll. Press gently as you roll to ensure the filling compacts inside and the roll is uniform.
- To cut the rolls cleanly use a sharp knife or unflavored dental floss. If using a knife slice into 8 equal pieces. If using floss slide a piece under the roll wrap it around the top of the roll where you want to cut and pull the ends to slice through. Cutting cleanly prevents the filling from being pushed out.
- Arrange the cut rolls in the prepared baking pan cut side up.
- Brush the tops of the rolls with the melted butter. Sprinkle the remaining 1/4 cup cheddar cheese and bacon bits on top.
- Bake for 20-25 minutes or until the dough is golden brown and the cheese is melted and bubbly.
- Let cool slightly before serving. Garnish with fresh thyme or parsley if desired.