Have you ever eagerly spooned into a warm, cheesy dip, only to be met with an oily puddle instead of that luscious, melty goodness? It’s happened to me more times than I care to admit! That disappointing layer of grease sitting on top can really ruin the experience. But what if I told you there’s a simple, foolproof trick to ensure your Cheesy Beef Dip is always perfectly smooth, stretchy, and never greasy? Stay right there, because this recipe is about to change your dip game forever.
This Cheesy Beef Dip is a total crowd-pleaser, whether you’re hosting a holiday gathering, settling in for a cozy movie night, or looking for the ultimate game day snack. It’s packed with savory beef, creamy layers, and that essential cheesy topping. The best part? It’s incredibly easy to make, and my little secret ensures you get that ideal cheese pull every single time.
Why You’ll Love This Cheesy Beef Dip
Beyond solving the age-old greasy cheese problem, this warm beef dip stands out for several reasons:
- It’s unbelievably flavorful, thanks to the seasoned ground beef and creamy base.
- The layered structure makes for a visually appealing appetizer before it gets devoured!
- It’s quick and easy to assemble, perfect for last-minute plans.
- You can customize the toppings to suit any taste preference.
- It’s inherently comforting and satisfying – true comfort food in dip form.
Gathering Your Ingredients for the Perfect Cheesy Beef Dip
Creating this incredibly satisfying Cheesy Beef Dip requires a few simple, readily available ingredients. Each component plays a crucial role in building layers of flavor and texture, from the hearty base to the irresistible cheesy topping.
Here’s what you’ll need to gather:
- Ground Beef: You’ll need about a pound of ground beef. Using a lean-to-fat ratio like 85/15 or 90/10 works well here, as we’ll be draining off any excess grease after browning.
- Neutral Oil: Just a tablespoon of a neutral-flavored oil, like vegetable or canola oil, is needed to help brown the ground beef evenly in the skillet. Its mild flavor won’t interfere with the savory seasonings.
- Taco Seasoning Mix: Two tablespoons of your favorite taco seasoning mix bring that classic, zesty flavor to the beef layer. Feel free to use a store-bought packet or your own homemade beef seasoning blend for a personalized touch. If your seasoning mix requires water, have a few tablespoons ready.
- Refried Beans: One 15-ounce can of refried beans forms the foundational layer of this layered dip. They provide a creamy, earthy base that complements the beef and cheese beautifully. Choose traditional or vegetarian refried beans based on your preference.
- Cream Cheese: Eight ounces of softened cream cheese is essential for the rich, tangy layer that sits between the beans and the beef. Make sure it’s properly softened at room temperature so it spreads smoothly.
- Shredded Cheddar Cheese: A generous cup of shredded cheddar cheese, or a cheddar blend like a Mexican cheese blend, is the star of the cheesy topping. Pre-shredded works for convenience, but shredding your own off the block often results in a smoother melt because it lacks anti-caking agents.
- Fresh Tomatoes: About half a cup of finely chopped fresh tomatoes adds a burst of freshness and color to the finished dip. Roma tomatoes or cherry tomatoes work well, just dice them small.
- Green Onions: A quarter cup of sliced green onions (scallions) provides a mild oniony bite and vibrant green garnish. Slice both the white and green parts.
Having all your ingredients prepped and ready before you start cooking makes the assembly process go incredibly smoothly.
Crafting Your Cheesy Beef Dip: Step-by-Step for Success
Now, let’s get to the fun part – putting this delicious dip together! This process is straightforward, but paying attention to a couple of key steps will guarantee that perfect, non-greasy outcome you’re aiming for.
- Prepare Your Oven: Begin by preheating your oven to 375°F (190°C). Getting the oven to the correct temperature from the start is crucial for achieving an even melt on the cheese without scorching it. It’s this gentle, even heat that helps prevent the cheese from releasing excess oil.
- Brown the Beef: Heat the tablespoon of neutral oil in a large skillet over medium-high heat. Add the pound of ground beef and use a spoon or spatula to break it apart as it cooks. Continue cooking until the beef is fully browned and no pink remains. This step is important for building flavor and texture. Once browned, carefully drain off any excess grease from the skillet. This removes a significant source of potential greasiness in the final dip. Stir in the two tablespoons of taco seasoning mix. If your seasoning instructions call for it, add a few tablespoons of water to help the seasoning distribute and cling to the meat. Cook for just 1-2 minutes more, stirring constantly, until the seasoning is fragrant and well combined with the beef. Then, remove the skillet from the heat.
- Lay the Refried Bean Foundation: Find a shallow oven-safe dish. An 8×8 inch square dish or something similar in size works perfectly, providing enough surface area for even layers. Open the can of refried beans and spread them evenly across the bottom of the dish using the back of a spoon or a spatula. This forms the warm, substantial base for our layered dip.
- Add the Creamy Layer: Spoon the softened cream cheese over the layer of refried beans. Gently spread it out into an even layer. Having the cream cheese softened is key here; trying to spread cold cream cheese will likely tear up the bean layer below. The cream cheese adds a wonderful tang and extra creaminess that balances the savory beef and beans.
- Spoon on the Seasoned Beef: Take your seasoned ground beef from the skillet and spoon it evenly over the cream cheese layer. Try to distribute it as evenly as possible so every scoop of dip gets a good amount of meat. This layer provides the main savory punch to the dip.
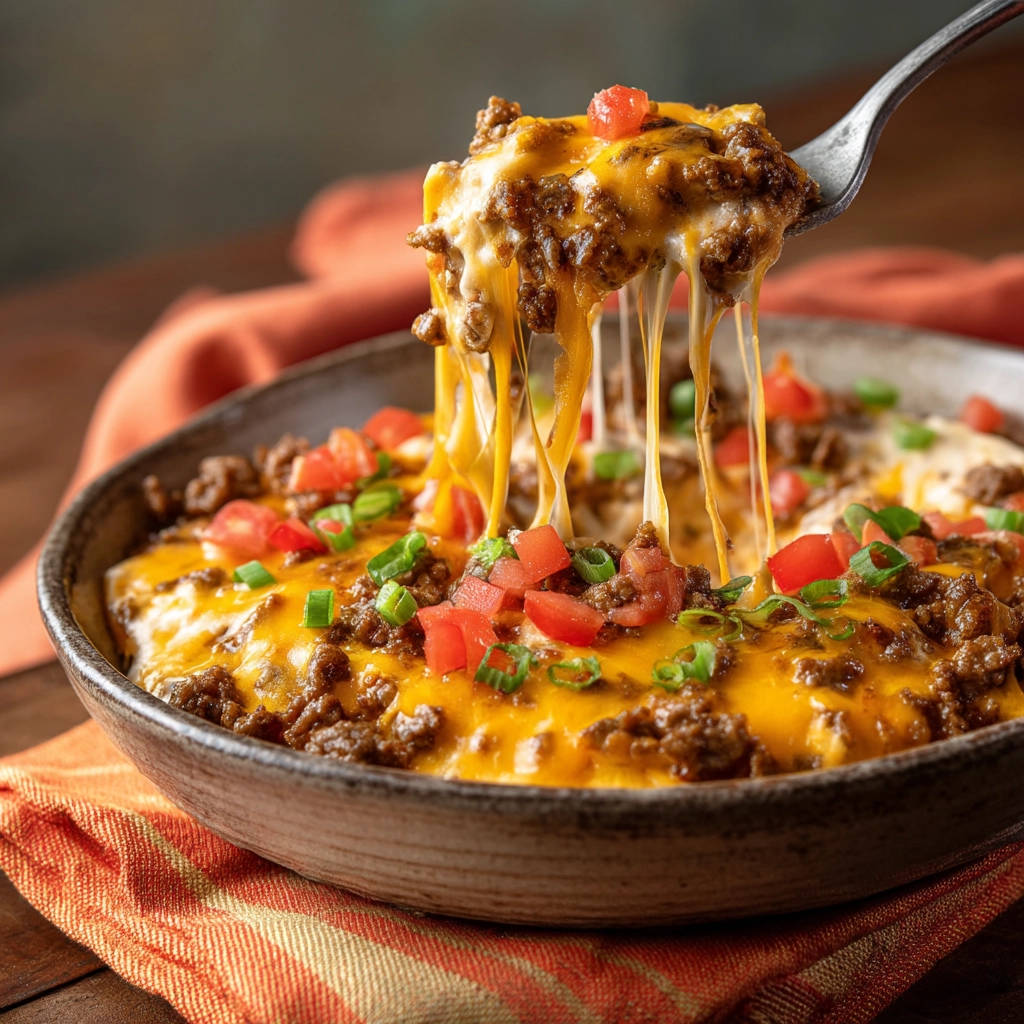
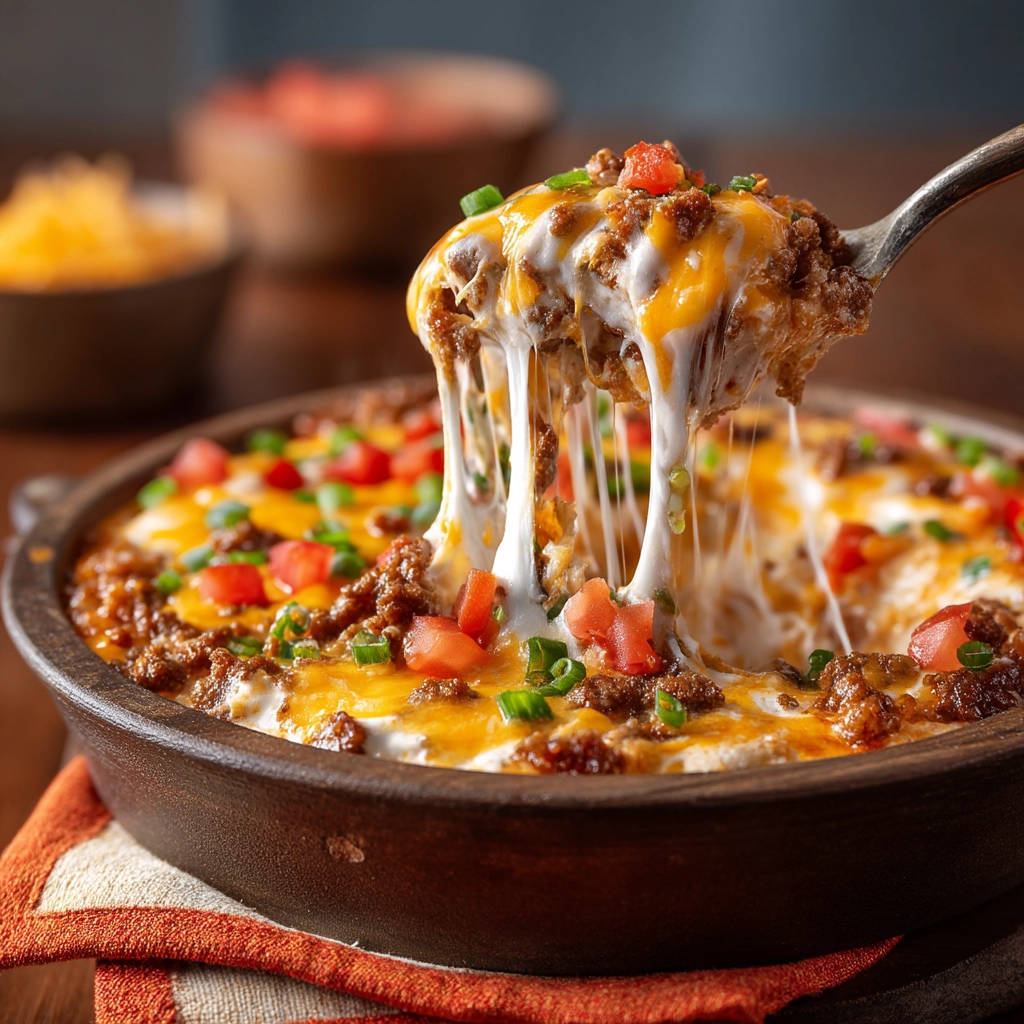
- Generously Add the Cheese: Now for the star topping before the magic happens! Generously sprinkle the shredded cheddar cheese (or cheddar blend) over the ground beef layer. Make sure you get good coverage, as this is the cheese layer we are going to melt to perfection.
- The Key Baking Step: This is the absolute most crucial step for achieving perfect, non-greasy cheese! Place the dish into your preheated 375°F (190°C) oven. Bake for 10 to 15 minutes. You’re looking for the cheese to be completely melted, bubbly around the edges, and appear smooth across the top, with no separation or oil slick. Melting the cheese slowly and evenly in the oven prevents it from overheating, which is the primary cause of grease separation you often see when melting cheese directly on the stovetop or in a microwave. Keep a close eye on it during the last few minutes to prevent any scorching.
- Finish with Freshness: Once the cheese is perfectly melted and bubbly, carefully remove the hot dish from the oven. Immediately sprinkle the chopped fresh tomatoes and sliced green onions evenly over the melted cheese layer. The heat from the dip will slightly warm the toppings, and their vibrant colors and flavors provide a fresh contrast to the rich dip below.
- Serve Immediately: Your amazing Cheesy Beef Dip is now ready to be devoured! Serve it piping hot with your favorite tortilla chips, crackers, or even slices of toasted baguette. The layers of flavor and that beautiful, smooth cheese pull are best enjoyed right away.
Tips for Perfect Cheesy Beef Dip Every Time
Want to make sure your Cheesy Beef Dip is the talk of the party? Here are a few extra tips to ensure success:
- Soften Cream Cheese Properly: Don’t skip this step! Cold cream cheese is difficult to spread evenly and can clump. Leave it out at room temperature for at least 30-60 minutes before you plan to use it.
- Drain Beef Thoroughly: Lingering grease from the ground beef is another contributor to an oily dip. Use a spoon to scoop out as much rendered fat as possible after browning.
- Cheese Quality Matters: While pre-shredded cheese is convenient, blocks of cheese that you shred yourself often melt more smoothly because they don’t contain anti-caking agents. Experiment to see which you prefer.
- Don’t Overbake the Cheese: Once the cheese is melted and bubbly, take it out! Leaving it in the oven too long, even at the right temperature, can eventually lead to some fat separation.
- Customizing Your Dip: This recipe is a fantastic base. Feel free to add a layer of salsa or a sprinkle of black olives before the cheese layer. A dash of hot sauce mixed into the beef or beans can add extra heat. If you’re looking for more inspiration for savory bites, our Crispy Beef Taquitos or Ultimate Nachos Supreme offer similar flavor profiles in different formats!
- Serving Hot: Warm dips like this are best served hot. If it sits out for a while and cools, you can gently reheat it in the oven at a lower temperature (around 300°F) until warmed through, watching the cheese carefully.
What to Serve With Cheesy Beef Dip
The classic choice is, of course, tortilla chips! Sturdy corn tortilla chips hold up beautifully to the thick, layered dip. But don’t stop there!
Consider serving with:
- Various types of crackers (buttery, whole grain, or even cheese crackers)
- Slices of toasted baguette or crusty bread
- Vegetable sticks like carrot sticks, celery sticks, or bell pepper strips for a lighter option.
- Potato chips (kettle cooked chips offer great crunch!)
- Small toasted pita bread pieces
A fresh counterpoint is always welcome. Alongside the dip, you might serve a bowl of Perfect Guacamole or a simple salsa for dipping variety.
Your Cheesy Beef Dip Questions Answered (FAQ)
Making a new recipe often brings up questions. Here are some common ones about this Cheesy Beef Dip:
Can I make this dip ahead of time?
Yes, you can prepare the dip up to the point of adding the shredded cheese. Cover it tightly with plastic wrap and refrigerate for up to 24 hours. When ready to bake, remove it from the fridge while the oven preheats, add the cheese, and bake as directed, potentially adding a few extra minutes to account for the dip being cold.
How do I store leftovers?
Store any leftover Cheesy Beef Dip in an airtight container in the refrigerator for 3-4 days. Reheat gently in the microwave or in a 300°F oven until warmed through. Be aware that reheating can sometimes cause slight oil separation, but it usually reabsorbs upon stirring.
What if my cream cheese isn’t softened?
If you’re in a pinch, you can speed up the softening process by unwrapping the cream cheese, cutting it into smaller cubes (about 1-inch), and spreading them out on a plate. Leave them at room temperature for 10-15 minutes, or microwave on low power (around 30%) for 15-30 second intervals, just until softened, not melted.
Can I use ground turkey or chicken instead of beef?
Absolutely! Ground turkey or chicken are great alternatives if you prefer. Cook and season them the same way you would the ground beef, making sure to drain any liquid. The flavor profile will be slightly different but still delicious. If you enjoy cooking with ground meat, you might also like our recipe for Hearty Beef Chili.
Why did my cheese still turn out greasy?
Even with the oven method, cheese can become slightly oily if it gets too hot. Ensure your oven temperature is accurate. Using pre-shredded cheese can sometimes exacerbate this due to the added starches; shredding block cheese often melts cleaner. Also, ensure you drained all the excess grease from the ground beef.
Can I make this spicier?
Definitely! Add a pinch of cayenne pepper or red pepper flakes to the ground beef with the taco seasoning. You could also add a layer of diced jalapeños (pickled or fresh) on top with the tomatoes and green onions.
Enjoy Your Homemade Cheesy Beef Dip!
Say goodbye to disappointing, greasy cheese dips and hello to this perfectly layered, incredibly flavorful Cheesy Beef Dip! It’s simple enough for a weeknight treat but impressive enough for any gathering. That secret oven trick makes all the difference, guaranteeing a smooth, melty, stretchy cheese topping that everyone will love.
Give this recipe a try and let me know what you think in the comments below! What are your favorite dippers? Did you try any fun variations? I can’t wait to hear about your non-greasy cheese success!
Cheesy Beef Dip

Ingredients
- 1 pound ground beef
- 1 tablespoon neutral oil (like vegetable or canola)
- 2 tablespoons taco seasoning mix (or your favorite beef seasoning)
- 1 can (15 ounces) refried beans
- 8 ounces cream cheese, softened
- 1 cup shredded cheddar cheese, or cheddar blend
- 1/2 cup chopped fresh tomatoes
- 1/4 cup sliced green onions
Directions
- Preheat oven to 375°F (190°C).
- Heat the oil in a large skillet over medium-high heat. Add the ground beef and cook, breaking it apart with a spoon, until browned. Drain off any excess grease. Stir in the taco seasoning and a few tablespoons of water if required by seasoning mix instructions. Cook for 1-2 minutes more, until fragrant. Remove from heat.
- In a shallow oven-safe dish (about 8×8 inches or similar), spread the refried beans evenly across the bottom.
- Spread the softened cream cheese in an even layer over the refried beans.
- Spoon the seasoned ground beef evenly over the cream cheese layer.
- Generously sprinkle the shredded cheddar cheese over the ground beef.
- This is the key step for perfect, non-greasy cheese: Place the dish in the preheated oven. Bake for 10-15 minutes, or until the cheese is completely melted, bubbly around the edges, and looks smooth. Melting the cheese in the gentle, even heat of the oven prevents it from overheating and becoming greasy compared to melting on direct stovetop heat. Watch carefully to prevent scorching.
- Remove from oven. Sprinkle the chopped tomatoes and sliced green onions over the melted cheese.
- Serve immediately with tortilla chips or crackers.