Oh friends, let’s talk about party dips! There’s arguably no greater crowd-pleaser than a hot, bubbling, cheesy dip. But admit it, haven’t you been there? Excitedly digging into a glorious appetizer, only for the cheese on top to quickly seize up, turning stiff and, dare I say, a little greasy? It’s a dip disaster, truly!
That perfect, decadent, melty pull is what dreams are made of. You want cheese that stretches luxuriously with every scoop, staying creamy and inviting from the first chip to the last. I used to face the same cheesy dip dilemma, constantly tweaking recipes, trying different cheese blends, hoping for that elusive, lasting meltiness.
Well, after much delicious experimentation (it’s a tough job, but someone has to do it!), I cracked the code. There’s a simple, but absolutely crucial, element in this Cheesy Beef Dip recipe that guarantees that luscious, melty cheese goodness lasts and lasts. Get ready to elevate your appetizer game. This isn’t just a beef dip; it’s a warm hug in a dish, guaranteed to disappear fast and leave everyone asking for the recipe!
Why You’ll Love This Cheesy Beef Dip That Stays Perfectly Melty
Aside from the obvious (hello, cheese and beef!), this recipe stands out for several key reasons that make it an absolute winner for any gathering, game day, or just a cozy night in. It’s more than just throwing ingredients together; it’s about achieving that perfect texture and depth of flavor.
First and foremost, the melt factor is truly unparalleled. We’re talking about cheese that remains wonderfully dippable, without separating or becoming a solid, unyielding layer. This is a common pitfall for many baked cheese dips, but we tackle it head-on with a simple technique embedded right into the recipe.
The combination of savory ground beef seasoned just right provides a hearty base that’s incredibly satisfying. It’s not just cheese; it’s a substantial dip that feels like a meal starter. The beef adds a layer of robust flavor that pairs beautifully with the rich, gooey cheese on top.
It’s also surprisingly easy to whip up. Most of the work is done on the stovetop, building the flavorful beef base. Once that’s ready, it’s simply transferred to a dish, topped with cheese, and baked until bubbly perfection. Minimal fuss, maximum flavor payoff.
This dip is a proven crowd-pleaser. Seriously, put this Cheesy Beef Dip out at any party, and watch it vanish. It appeals to almost everyone and is just inherently fun to eat with chips or your dippers of choice.
Finally, the flexibility of this recipe is a major plus. You can easily adjust the heat level, add in extra veggies, or play with different cheese combinations to make it your own. It’s a fantastic foundation for your creative culinary adventures.
Gathering Your Delicious Cheesy Beef Dip Ingredients
Creating this incredible dip starts with selecting quality ingredients that build layers of flavor and ensure that signature melty texture. This isn’t a complicated list, but each component plays a vital role in the final, irresistible result. Think of these as the building blocks for your dippable masterpiece.
Our base begins with savory ground beef. Using a pound of beef provides a generous, hearty foundation that makes the dip substantial. You can opt for lean ground beef to minimize grease, or a slightly higher fat content for more flavor, just be sure to drain off any excess grease thoroughly after browning.
Flavor boosters come in the form of a medium onion, finely chopped, and fresh garlic, minced. Cooking the onion until softened lays the groundwork for sweetness, while the garlic adds that essential aromatic punch. Don’t skimp on these; they are crucial for depth.
For that classic, slightly spicy, and deeply savory profile, a packet of taco seasoning is our shortcut hero. It contains a blend of spices like chili powder, cumin, and paprika, perfectly balanced to infuse the beef mixture with vibrant Tex-Mex inspired flavor. You can adjust the amount or even make your own blend if you prefer, but a standard packet works wonderfully and ensures consistency.
Now, for the secret to our lasting meltiness: moisture from either crushed tomatoes or salsa. Using a can of crushed tomatoes or about 1 and a half cups of your favorite salsa is key. This liquid isn’t just for flavor; it simmers with the beef, creating a moist, flavorful base that helps regulate the temperature and moisture content of the cheese layer above it as it bakes. This is the magic trick!
And, of course, the stars of the show – the cheese! We use a dynamic duo of shredded cheddar cheese and shredded Monterey Jack cheese. Cheddar brings that familiar sharp, tangy flavor, while Monterey Jack is renowned for its superior meltiness and creamy texture. Combining them gives you the best of both worlds: great flavor and incredible stretch and gooeyness.
To start the cooking process, you’ll need a tablespoon of vegetable oil for sautéing. Simple salt and pepper to taste are also essential for seasoning the beef base perfectly before the taco seasoning is added.
Finally, you’ll need dippers! Tortilla chips are the classic choice, providing that perfect salty crunch against the warm, cheesy dip. But feel free to get creative with other options too!
Here is the list of what you’ll need:
- 1 pound ground beef: The hearty anchor of our dip.
- 1 medium onion, chopped: Adds foundational sweetness and aroma.
- 2 cloves garlic, minced: Provides a punchy, essential flavor.
- 1 packet taco seasoning (about 1 ounce): Our shortcut to Tex-Mex deliciousness.
- 1 can (15 ounces) crushed tomatoes OR 1 1/2 cups salsa: The unsung hero for maintaining moisture and flavor.
- 1 cup shredded cheddar cheese: For classic sharp cheese flavor.
- 1 cup shredded Monterey Jack cheese: Chosen for its incredible melting properties.
- Tortilla chips, for serving: Your trusty vehicle for dipping.
- 1 tablespoon vegetable oil: For sautéing aromatics and beef.
- Salt and pepper to taste: To season the beef base just right.
Crafting Your Incredible Cheesy Beef Dip: A Step-by-Step Guide
Now that we have all our delicious components ready, let’s walk through how easily this amazing dip comes together. The process is straightforward, mostly taking place on your stovetop before a final bake to achieve that perfect melty cheese topping. Pay attention to the details, especially the simmering step, as it’s key to our melty magic!
-
Begin by preparing your oven. You’ll want to preheat it to 375 degrees Fahrenheit (190 degrees Celsius). Getting your oven to the correct temperature ensures the cheese melts evenly and bubbles beautifully without overcooking the base.
-
Grab a large skillet – one that’s big enough to comfortably brown your beef and simmer the sauce. Heat the vegetable oil over medium-high heat. Once the oil is shimmering, add your chopped onion. Cook the onion for about 5 minutes, stirring occasionally, until it softens and becomes translucent. This step brings out the natural sweetness of the onion.
-
Now, add your minced garlic to the skillet with the softened onions. Cook for just about 1 minute more. You’ll know it’s ready when you start to smell that wonderful, pungent garlic aroma. Be careful not to let the garlic burn, as it can turn bitter quickly.
-
Add the pound of ground beef to the skillet with the onions and garlic. Use a spoon or spatula to break up the meat into crumbles as it cooks. Continue cooking until the beef is fully browned and no longer pink. This usually takes about 8-10 minutes. Once browned, it’s important to drain off any excess grease. This prevents the final dip from being oily.
-
With the beef browned and drained, stir in the packet of taco seasoning. Cook this for about 1 minute, stirring constantly. This step helps to toast the spices slightly, bringing out their full flavor before adding the liquid.
-
Now, pour in the crushed tomatoes or the salsa. Stir everything together well, scraping up any browned bits from the bottom of the skillet – that’s where lots of flavor is! Bring the mixture to a gentle simmer. Once simmering, reduce the heat slightly to maintain a gentle bubble and let it cook for 5 to 7 minutes. This simmering time is absolutely crucial. It allows the flavors from the beef, onion, garlic, and seasoning to meld together beautifully, and importantly, it allows the mixture to thicken slightly while retaining essential moisture. That moisture is the secret weapon that keeps your cheese topping perfectly melty throughout your dipping session. Don’t let it get too dry; you want it to be a rich, slightly saucy beef mixture.
-
Carefully pour the hot beef mixture into an 8×8 inch baking dish or a similar-sized oven-safe dish. Spread the mixture out evenly in the bottom of the dish.
-
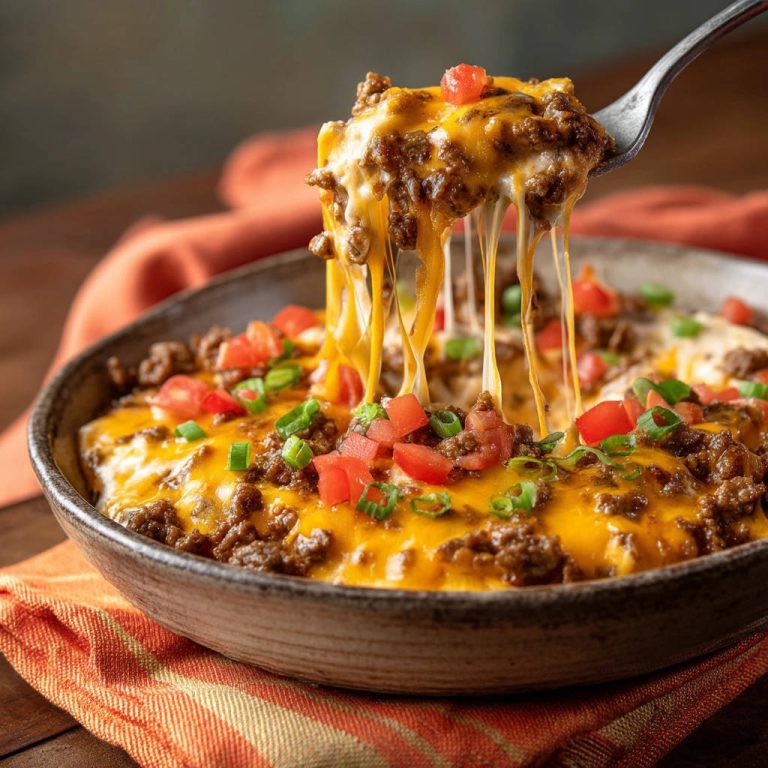
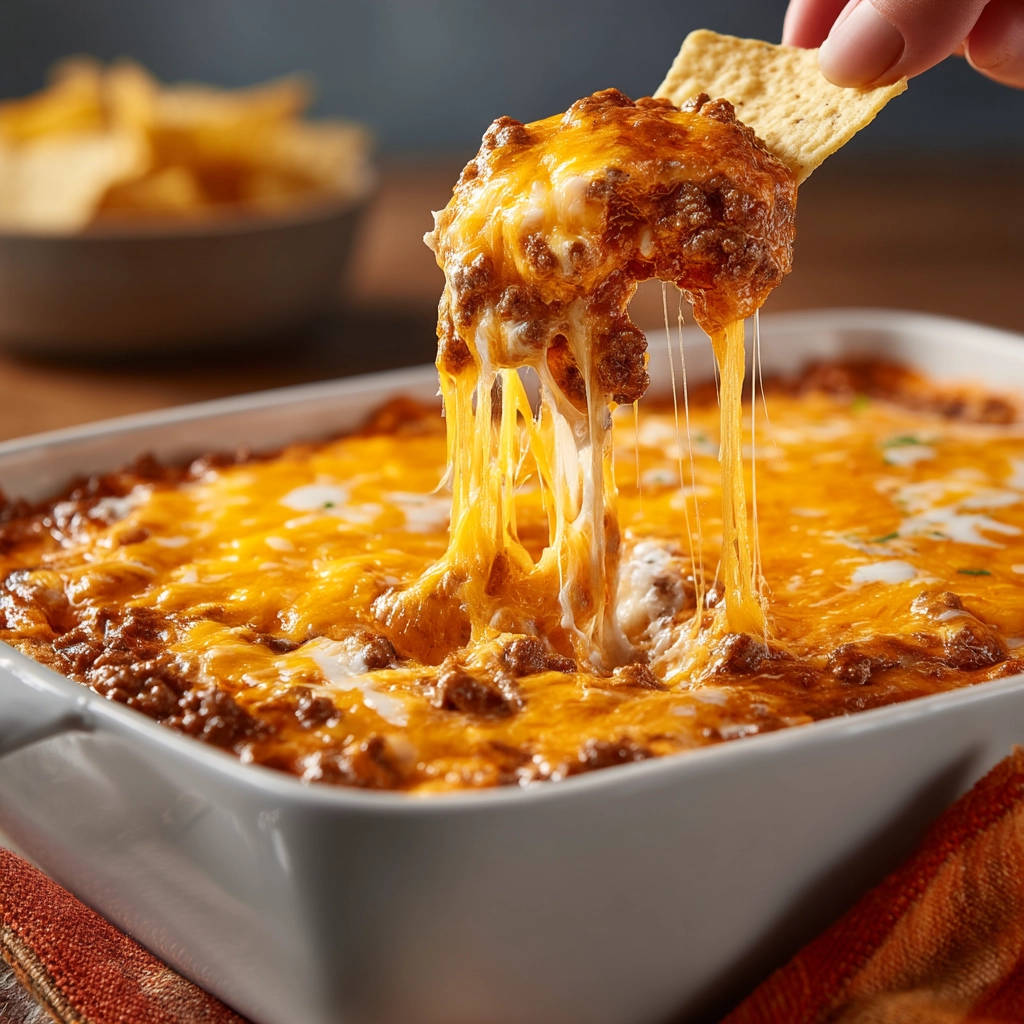
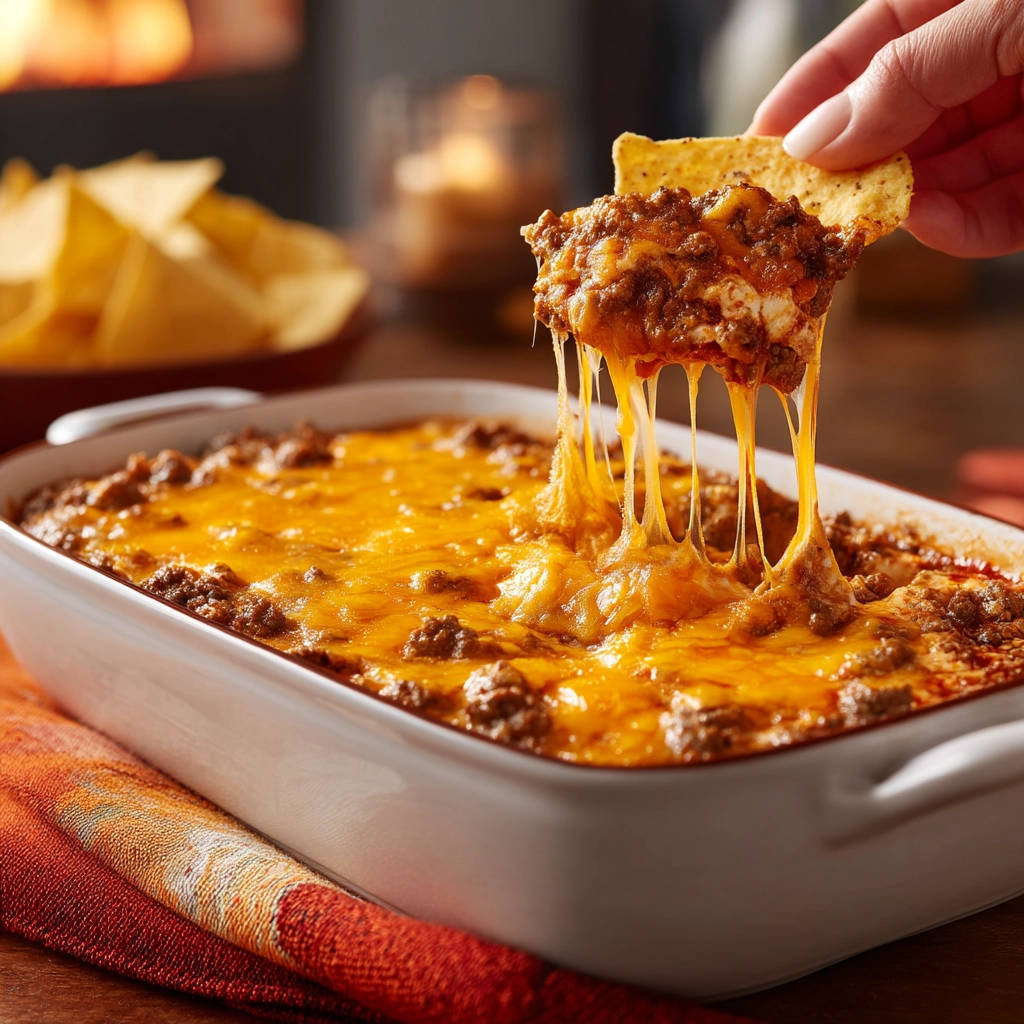
In a small separate bowl, combine your shredded cheddar cheese and Monterey Jack cheese. Give them a quick toss to mix them together. Sprinkle this cheese mixture evenly over the hot beef layer in the baking dish, making sure the beef is completely covered. The combination of these two cheeses provides both great flavor and that desired stretchy, melty texture.
-
Place the baking dish in your preheated oven. Bake for 15 to 20 minutes. Keep an eye on it during the last few minutes. The dip is ready when the cheese is completely melted, bubbling around the edges, and possibly has a few slightly browned spots on top. Avoid the temptation to overbake, as this is another factor that can lead to the cheese becoming greasy or separating.
-
Once it’s out of the oven, resist the urge to dive in immediately! Let the dip sit for a few minutes (3-5 minutes is usually sufficient). This brief resting period allows the cheese to set just slightly, preventing it from being excessively runny and ensuring that perfect melty pull when you scoop. Serve it hot with your favorite tortilla chips and enjoy that incredible, lasting melty cheese!
Tips, Variations, and Serving Suggestions for Your Cheesy Beef Dip
While this Cheesy Beef Dip is fantastic as is, there are plenty of ways to customize it and ensure absolute perfection every time. These tips and variations allow you to tailor the dip to your personal preferences and whatever ingredients you have on hand.
Ensuring the Melty Cheese: As we emphasized in the steps, the moisture from the tomato/salsa base is key. Don’t over-simmer the beef mixture to the point where it’s dry. It should be moist and flavorful. Also, keep an eye on the dip while baking and don’t bake it longer than necessary once the cheese is fully melted and bubbly. Overbaking is the quickest way to turn beautiful melty cheese into a greasy layer.
Cheese Combinations: While cheddar and Monterey Jack are a winning team, feel free to experiment! Other good melting cheeses include Colby Jack, Provolone, or even a touch of process cheese like Velveeta (though the texture will be different) for ultimate smoothness. For a little kick, you could add some shredded pepper jack cheese to the mix.
Spice It Up or Down: The heat level will largely depend on your taco seasoning packet or the salsa you use. For a milder dip, use a mild seasoning and crushed tomatoes. For extra heat, add a pinch of cayenne pepper or red pepper flakes to the beef mixture, use a spicy salsa, or top the finished dip with sliced fresh jalapeños before baking.
Add-Ins: Want to make it even heartier or add more texture?
Consider stirring in a can of drained and rinsed black beans or kidney beans into the beef mixture before transferring it to the baking dish. You could also sauté some finely diced bell peppers (any color!) along with the onion.
Make-Ahead Magic: This dip is excellent for preparing ahead of time. Complete steps 1 through 6, allowing the beef mixture to cool completely. Store the beef mixture and the shredded cheese separately in airtight containers in the refrigerator for up to 2-3 days. When you’re ready to bake, transfer the beef mixture to the baking dish, top with the cheese, and bake as directed, adding a few extra minutes to the baking time if the base is cold, until everything is hot and bubbly.
Storage and Reheating: Leftovers? Lucky you! Store any remaining dip in an airtight container in the refrigerator for up to 3-4 days. To reheat, you can gently warm individual portions in the microwave, or cover the baking dish loosely with foil and reheat in a 350°F (175°C) oven until heated through and melty again. The magic moisture trick helps it reheat well!
What to Serve with Your Cheesy Beef Dip
This Cheesy Beef Dip is the ultimate centerpiece, but what do you pair it with for the full experience? Tortilla chips are non-negotiable classics, but don’t limit yourself!
Beyond classic tortilla chips, consider serving with sturdy corn chips or even Fritos for a different kind of crunch. Warm slices of crusty bread or toasted baguette are also fantastic for scooping up the hearty beef and cheese.
For a healthier option, offer a platter of fresh vegetable sticks like carrots, celery, bell peppers, cucumber, and even broccoli florets. They provide a refreshing contrast to the rich dip.
Think about adding some fresh toppings for garnish and extra flavor. A sprinkle of fresh cilantro, chopped green onions, a dollop of sour cream, or a spoonful of extra salsa or our perfect guacamole would be excellent additions served on the side.
If you’re building a whole appetizer spread, this dip pairs wonderfully with other easy-to-share bites. Alongside this Cheesy Beef Dip, you might consider whipping up some Buffalo Chicken Pinwheels or perhaps some cheesy baked taquitos for a variety of flavors and textures.
Your Cheesy Beef Dip Questions Answered (FAQ)
Got questions about making the best Cheesy Beef Dip? Here are some common queries and their answers to help you succeed!
Can I make this Cheesy Beef Dip ahead of time?
Absolutely! This is a fantastic make-ahead appetizer. Prepare the beef mixture completely through step 6, let it cool down, and store it in an airtight container in the refrigerator for up to 2-3 days. Keep the shredded cheese separate. When you’re ready to bake, put the beef mixture in the baking dish, top with the cheese, and bake as directed. You might need to add an extra 5-10 minutes to the baking time since the base is cold, just make sure it’s heated through and the cheese is bubbly.
What kind of ground beef should I use?
You can use anywhere from 80/20 to 93/7 ground beef. If you use ground beef with a higher fat content (like 80/20), be sure to drain off the cooked grease very thoroughly after browning. This is important to prevent the dip from becoming greasy. Leaner beef requires less draining.
Can I substitute the cheeses?
Yes, you can experiment with different cheese blends, but stick to cheeses that are known for melting well. Cheddar and Monterey Jack are chosen specifically for their flavor and melt factor. Good alternatives or additions (in combination) include Colby Jack, Provolone, or even some mozzarella (though mozzarella has less flavor). Avoid low-fat cheeses, as they often don’t melt as smoothly. For best results, shred the cheese yourself from blocks rather than using pre-shredded cheese, which often contains anti-caking agents that can affect meltiness.
How do I keep the cheese from getting greasy or stiff?
This is the core of the recipe’s promise! The key factors are the moisture in the beef base (from the crushed tomatoes or salsa simmering) and not overbaking. Ensure the beef mixture is still moist when you transfer it to the baking dish – that liquid helps steam and keep the cheese soft. And bake only until the cheese is melted and bubbly, not until it’s browned all over or looks like it’s separating. The 15-20 minute bake time after preheating should be just right.
Is this dip very spicy?
The spice level depends entirely on the taco seasoning packet or salsa you choose. Most standard taco seasonings are mild to medium. If you prefer a milder dip, use a mild seasoning and crushed tomatoes instead of salsa. For more heat, pick a spicy seasoning, use hot salsa, or add a pinch of cayenne pepper to the beef mixture while it simmers.
Can I make this in a slow cooker?
You can definitely keep the beef mixture warm in a slow cooker after cooking it on the stovetop. However, adding the cheese and expecting it to melt perfectly for hours without getting greasy can be tricky in a slow cooker. The best method for that perfect melty top is the quick bake in the oven just before serving. If using a slow cooker to keep the beef warm, add the cheese to the top only when you’re ready to serve and let it melt briefly, or transfer the warm beef mixture to a baking dish, top with cheese, and bake as directed for 15-20 minutes.
Can I use ground turkey instead of ground beef?
Yes, you can substitute ground turkey for ground beef. The flavor will be slightly different, but it will still be delicious. Make sure to brown the turkey and drain off any liquid just as you would with beef, and proceed with the rest of the recipe as written.
For other ground meat ideas, you might explore recipes like our classic creamy meatballs or some savory meat rolls.
Why This Cheesy Beef Dip Is Your New Go-To Appetizer
Seriously, once you try this Cheesy Beef Dip, you’ll understand the hype. That perfect combination of savory, seasoned beef and consistently melty cheese is simply irresistible. It’s comfort food in dip form, perfect for sharing, and surprisingly simple to execute thanks to that little trick we’ve perfected.
Forget about disappointing, stiff cheese dips. This recipe delivers on its promise of lasting meltiness and incredible flavor, making it a guaranteed hit at any gathering. Whether it’s game day, a holiday party, or just a casual get-together, this dip will be the first thing to disappear.
So, gather your ingredients, follow these easy steps, and get ready to make some seriously happy dippers. I can’t wait for you to try it and experience the magic of truly melty cheese!
Have you tried this Cheesy Beef Dip? What’s your favorite dipper? Let me know in the comments below! Happy dipping!
Cheesy Beef Dip

Ingredients
- 1 pound ground beef
- 1 medium onion, chopped
- 2 cloves garlic, minced
- 1 packet taco seasoning (about 1 ounce)
- 1 can (15 ounces) crushed tomatoes or 1 1/2 cups salsa
- 1 cup shredded cheddar cheese
- 1 cup shredded Monterey Jack cheese
- Tortilla chips, for serving
- 1 tablespoon vegetable oil
- Salt and pepper to taste
Directions
- Preheat oven to 375 degrees F (190 degrees C).
- Heat the vegetable oil in a large skillet over medium high heat. Add the chopped onion and cook until softened, about 5 minutes. Add the minced garlic and cook for 1 minute more until fragrant.
- Add the ground beef to the skillet with the onion and garlic. Cook, breaking up the meat with a spoon, until browned. Drain off any excess grease.
- Stir in the taco seasoning and cook for 1 minute.
- Pour in the crushed tomatoes or salsa. Bring the mixture to a simmer, stirring well. Let it simmer for 5-7 minutes, allowing the flavors to meld and the mixture to thicken slightly while still remaining moist. This is key the moisture from the beef mixture is essential for keeping the cheese on top melty.
- Pour the hot beef mixture into an 8×8 inch or similar sized baking dish. Spread it evenly.
- In a small bowl, combine the shredded cheddar and Monterey Jack cheeses. Sprinkle the cheese mixture evenly over the beef layer, making sure to cover it completely. Using a blend of cheeses helps with both flavor and texture.
- Bake for 15-20 minutes, or until the cheese is completely melted, bubbly, and slightly browned on top. Do not overbake, as this can cause the cheese to separate and become greasy.
- Let the dip sit for a few minutes before serving with tortilla chips. Enjoy that perfectly melty cheese!