
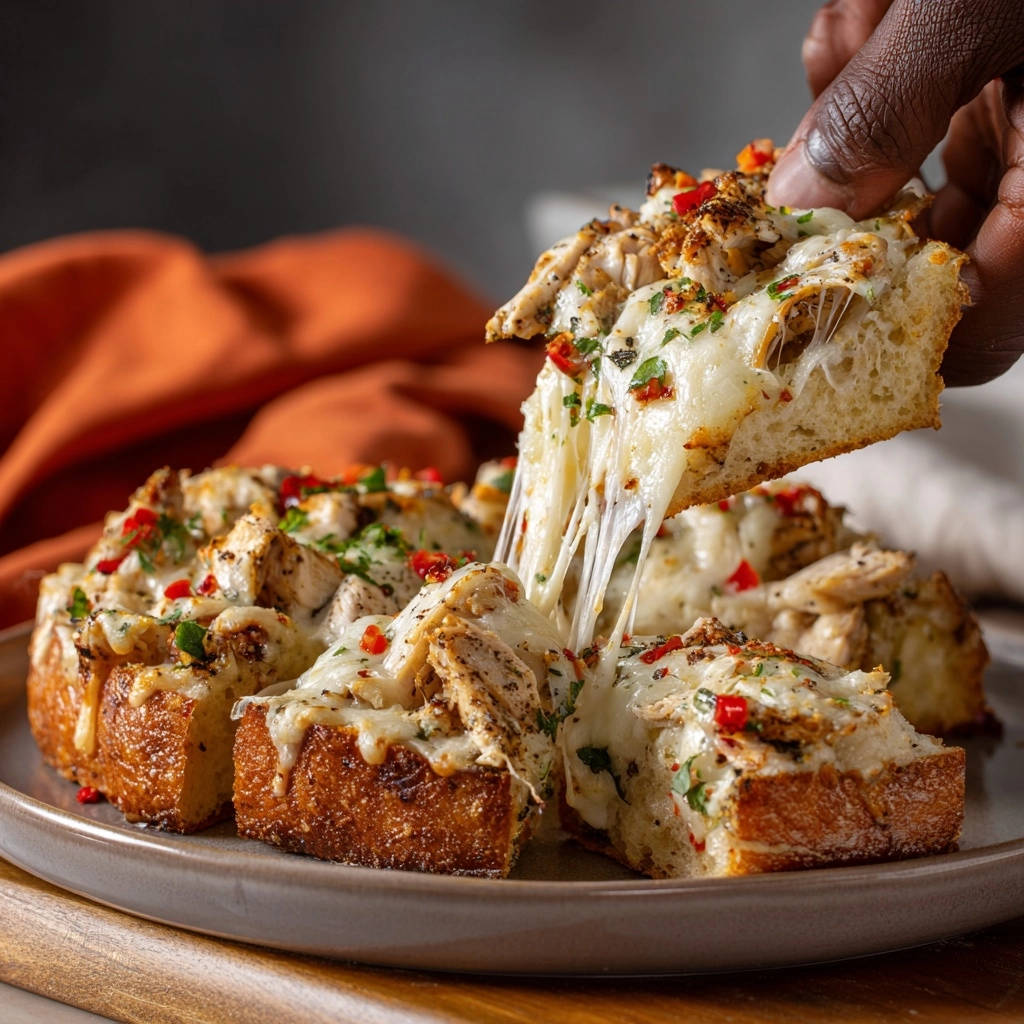
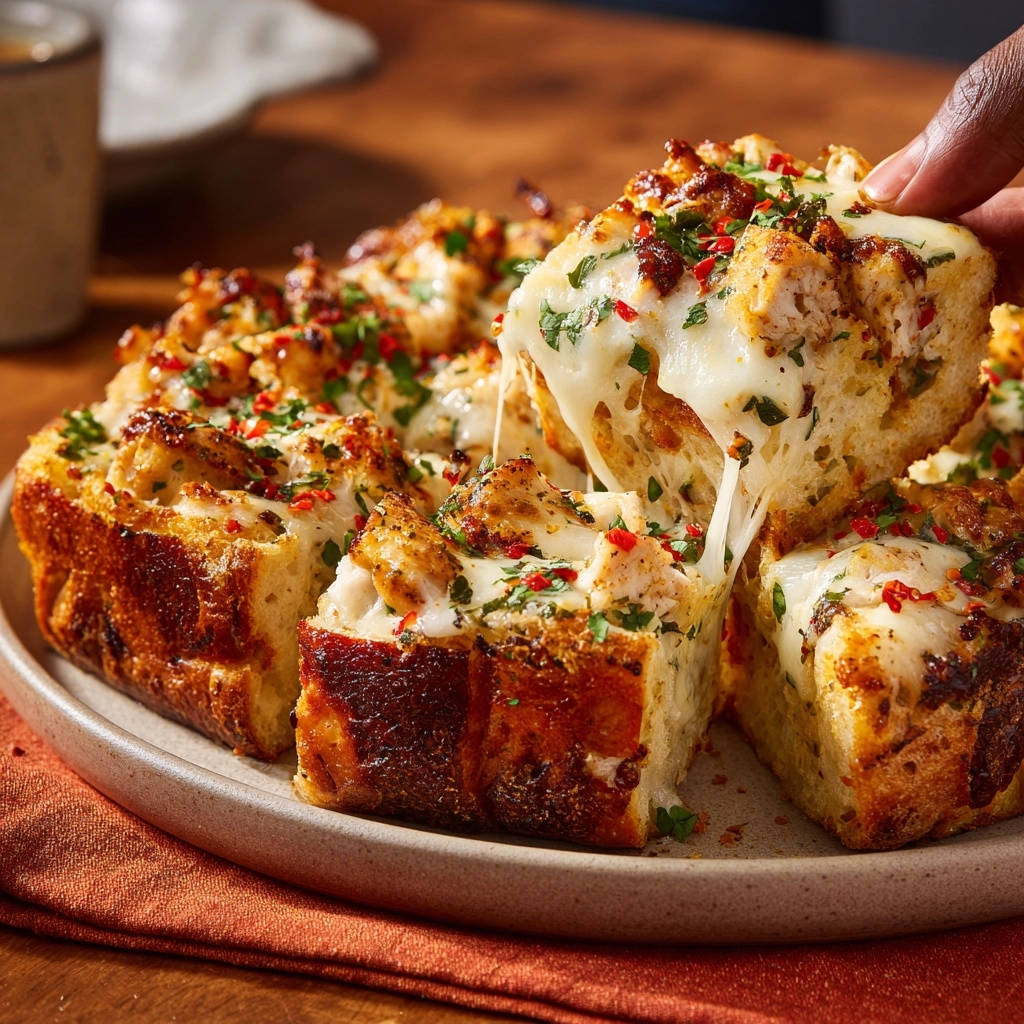
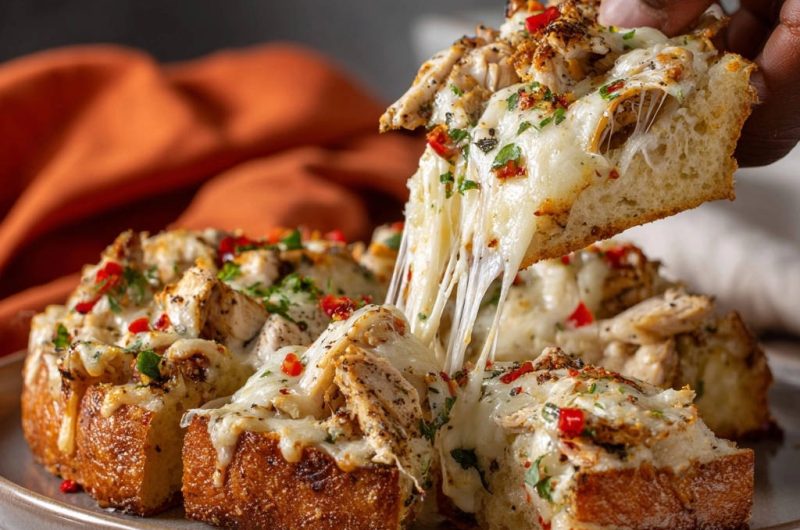
There’s nothing quite like the communal joy of a pull-apart bread, but I’ve heard the sighs of disappointment over a delicious topping clinging to a soggy base. After countless trials, I’ve perfected a method for this Cheesy Chicken Pull-Apart Bread that guarantees a perfectly crisp bottom while keeping every cheesy, chicken-filled crevice wonderfully melty and moist.
This recipe isn’t just easy; it’s a game-changer, ensuring your pull-apart bread remains structurally fantastic and irresistibly flavorful from the first pull to the last bite.
Why This Cheesy Chicken Pull-Apart Bread is Your New Go-To
Solving the Soggy Bread Dilemma: Our Game-Changing Method
The secret weapon in this recipe is a crucial pre-bake step for the buttered bread. This simple action toasts the bread’s surface and creates a barrier, preventing it from absorbing too much moisture from the filling.
The result is a delightfully crisp exterior and tender interior, a common pitfall other pull-apart bread recipes often miss.
Effortless Entertaining & Family Favorite Appeal
This Cheesy Chicken Pull-Apart Bread is an absolute showstopper for any gathering, from casual game nights to holiday appetizers. It’s incredibly easy to make in advance, requiring only a quick reheat before serving.
Beyond entertaining, it’s a hearty and comforting dish that quickly becomes a family favorite for dinner, offering satisfying flavors everyone can enjoy.
Versatile and Satisfying: Beyond a Simple Snack
While perfect as an appetizer, this savory bread is substantial enough to stand as a light meal on its own. It pairs beautifully with a simple side salad or a bowl of soup for a complete, satisfying dinner.
Its rich flavor and satisfying texture make it far more than just a snack; it’s a culinary experience.
The Building Blocks of Flavor: Inside Your Cheesy Chicken Pull-Apart Bread
Selecting the Perfect Bread Base
Choosing the right bread is foundational for successful Cheesy Chicken Pull-Apart Bread. A crusty loaf like ciabatta, sourdough, or a good quality French bread provides the necessary structure.
These varieties have a robust crust that holds up well to the filling and baking, contributing to that desired crisp texture.
Dairy Delights: Cheese Choices for Melted Perfection
Shredded mozzarella is the star here, offering that classic, stretchy, gooey melt we all crave. Its mild flavor perfectly complements the chicken and garlic butter.
For an extra layer of flavor, consider blending in a small amount of sharp cheddar, Monterey Jack, or even some Parmesan for a nutty kick.
Aromatic Essentials: Garlic Butter & Herb Infusion
Melted butter infused with fresh minced garlic forms the savory backbone of this recipe. This mixture bastes the bread, ensuring every crevice is permeated with delicious aroma and taste.
Dried Italian seasoning, along with fresh parsley, adds a vibrant herbal note that balances the richness of the cheese and chicken.
Protein Power: Prepping Your Chicken
Cooked chicken breast, shredded or diced, is the ideal protein for this dish. You can use leftover roast chicken, rotisserie chicken, or quickly poach and shred chicken breasts.
Seasoning the chicken separately with Italian seasoning, salt, and pepper ensures every bite is flavorful, not just relying on the cheese and butter.
Essential Kitchen Companions for Pull-Apart Success
Serrated Knife: Crucial for making precise, clean cuts in the bread without tearing it, ensuring the loaf stays intact for stuffing.
Baking Sheet: A sturdy sheet pan is essential for baking, providing ample space for the bread to bake evenly and for catching any delicious drips.
Pastry Brush: Ideal for generously brushing the garlic butter into all the cuts and crevices of the bread, ensuring maximum flavor penetration and that crucial pre-bake crispness.
Mixing Bowls: You’ll need one small bowl for the garlic butter and a medium bowl for tossing the seasoned chicken.
Your Path to Cheesy Chicken Pull-Apart Bread Perfection: Step-by-Step
Setting the Stage: Oven & Bread Prep
Preheat your oven to 375°F (190°C). This ensures the oven is at the optimal temperature for even baking from the moment your bread goes in.
Place the loaf on a cutting board. Using a serrated knife, carefully slice the bread crosswise at 1-inch intervals, almost all the way through, but leaving the bottom crust intact. Then, slice lengthwise down the middle of the loaf, again, not cutting all the way through. This meticulous cutting creates a perfect grid pattern, ready for all that delicious filling.
The Flavor Foundation: Whipping Up Garlic Butter
In a small bowl, combine the melted butter, minced garlic, 1/4 teaspoon salt, and 1/8 teaspoon black pepper. Stir well to ensure the garlic and seasonings are evenly distributed throughout the butter, creating a fragrant, savory base.
The Crucial ‘Never-Soggy’ Pre-Bake
Place the prepared bread on a baking sheet. Generously brush the garlic butter all over the bread, making sure to get it into all the cracks and crevices created by the cuts. This initial buttering not only adds flavor but also sets the stage for crispness.
Bake the buttered bread for 10-12 minutes, or until the edges are lightly golden and the bread feels slightly crisp to the touch. This vital pre-bake helps the bread hold its shape and, more importantly, prevents it from becoming soggy when the moist chicken and cheese are added.
Seasoning the Star: Chicken Preparation
While the bread is in the oven, prepare the chicken: In a medium bowl, toss the cooked shredded chicken with the dried Italian seasoning, remaining 1/4 teaspoon salt, and 1/8 teaspoon black pepper. This step ensures every piece of chicken is flavorful on its own.
If using, add 1 tablespoon of olive oil to the chicken to help keep it moist and enhance the seasoning adhesion. For an even more intense flavor, consider using perfect slow cooker BBQ pulled chicken as a base for a different spin.
Assembling Your Masterpiece: Filling the Loaf
Remove the pre-baked bread from the oven. Carefully, without tearing the loaf, gently open up the cuts and stuff the seasoned chicken and shredded mozzarella cheese into all the crevices.
Make sure to distribute the chicken and cheese evenly throughout the loaf so every pull-apart piece is loaded. Sprinkle with the chopped fresh parsley and red pepper flakes for a pop of color and subtle heat.
The Final Bake: Golden, Bubbly Perfection
Return the loaded bread to the oven and bake for another 12-15 minutes, or until the cheese is completely melted, bubbly, and lightly golden. Keep an eye on it to prevent over-browning; the goal is gooey cheese with a hint of crispness.
Cooling & Serving: The Moment of Truth
Carefully remove the bread from the oven. Let it cool on the baking sheet for 5 minutes before transferring to a serving platter. This short resting period allows the cheese to set slightly, making it easier to pull apart without everything falling out.
Pull apart the cheesy chicken sections and enjoy immediately! It’s best served warm to fully appreciate the melted cheese and crispy texture.
Chef’s Secrets: Elevate Your Cheesy Chicken Pull-Apart Bread Game
Mastering the Pre-Bake: Timing and Temperature
The pre-bake is non-negotiable for that crispy exterior. Listen for a subtle sizzle from the butter as it crisps the bread, and look for a pale golden hue on the edges.
If your oven runs hot, check a minute or two earlier; if it’s cooler, you might need an extra minute for optimal crispness.
Evenly Distributed Goodness
When stuffing, use your fingers to gently pry open each cut and push the chicken and cheese deep inside. Don’t just place it on top.
This ensures every single “pull” gets a generous amount of delicious filling, preventing dry or empty sections.
Creative Flavor Twists & Add-ins
Beyond mozzarella, consider adding a sprinkle of smoked paprika to your chicken for depth, or a pinch of garlic powder for extra pungency. A touch of finely chopped chives alongside the parsley can also brighten the flavor profile.
For a little kick, add a dash of cayenne pepper to your chicken seasoning. You can also experiment with different cheeses; a blend of fontina and provolone creates an incredibly creamy melt.
Preventing Dryness: Moisture Tips
If your cooked chicken tends to be dry, a tablespoon of olive oil or even a tiny splash of chicken broth when tossing can help. The melted butter from the initial bake also contributes moisture and richness.
Avoid over-baking the bread in the second phase. The goal is melted cheese, not a dry, tough loaf.
Common Pitfalls & How to Avoid Them
My Bread is Soggy After Baking!
This is almost always due to skipping or not adequately performing the crucial pre-bake step. Ensure the garlic butter is generously brushed into all crevices before the first bake.
The bread needs to feel slightly crisp and look lightly golden before adding the chicken and cheese. This initial dry heat seals the bread against moisture.
Unevenly Melted Cheese
Uneven melting often happens when cheese is clumped together or not distributed thoroughly. Take your time to carefully stuff the cheese into all the cuts, pushing it down slightly.
If you notice some spots are melting faster, you can loosely tent that area with foil for the last few minutes of baking to promote even melting.
Chicken Tastes Dry or Bland
Ensure your chicken is properly seasoned before stuffing. Don’t rely solely on the butter and cheese for flavor.
If using very lean chicken, adding a tablespoon of olive oil or a very small amount of chicken broth when tossing helps maintain moisture.
Beyond the Oven: Serving, Storing & Reheating Your Delight
Perfect Pairings: What to Serve Alongside
This Cheesy Chicken Pull-Apart Bread is fantastic on its own, but it also shines with simple accompaniments. A crisp green salad with a light vinaigrette offers a refreshing contrast.
For a heartier meal, serve it alongside a comforting bowl of tomato soup or even some creamy potato salad.
Storing Leftovers for Maximum Freshness
If you happen to have any leftovers, allow the bread to cool completely. Wrap it tightly in aluminum foil or plastic wrap and store it in the refrigerator for up to 2-3 days.
Reheating for That Freshly Baked Feel
To reheat, wrap the leftover bread tightly in foil and warm it in a preheated oven at 300°F (150°C) for 15-20 minutes, or until heated through and the cheese is re-melted. This method helps retain moisture and prevents drying out.
You can also microwave individual portions for about 30-60 seconds, though the bread won’t be as crispy.
Make-Ahead Strategies for Easy Prep
You can pre-cut the bread and prepare the garlic butter mixture a day in advance, storing them separately. The seasoned cooked chicken can also be prepared ahead of time.
This makes assembly incredibly quick on the day of serving, minimizing last-minute stress.
Your Burning Questions Answered About This Cheesy Chicken Pull-Apart Bread
Can I use rotisserie chicken?
Absolutely! Rotisserie chicken is a fantastic shortcut. Simply shred the meat and proceed with seasoning as directed in the recipe. It’s a convenient way to reduce prep time without sacrificing flavor.
What about other cheese types?
While mozzarella is key for the classic pull, feel free to get creative! A blend of mozzarella with provolone, Monterey Jack, or even a sharp cheddar can add wonderful depth. Just ensure your chosen cheeses melt well for that gooey texture.
Is it possible to make this gluten-free?
Yes, you can adapt this recipe to be gluten-free. Look for a dense, crusty gluten-free loaf that is specifically designed to hold up to slicing and filling, similar to a gluten-free artisan-style bread.
Can I prepare the bread cuts ahead of time?
You can cut the bread up to a few hours in advance, especially if you plan to bake it the same day. Keep it covered at room temperature to prevent it from drying out. The garlic butter can also be made ahead and stored in the fridge, then gently re-melted before use.
Ready to Impress? Share Your Cheesy Chicken Pull-Apart Bread Masterpiece!
With these expert tips and a foolproof method, you’re ready to create a Cheesy Chicken Pull-Apart Bread that will be the undisputed star of your next meal or gathering. Say goodbye to soggy bases and hello to crispy, cheesy, chicken-packed perfection.
Don’t forget to explore other fantastic recipes like our classic cheesy pull-apart bread for more crowd-pleasing ideas!
Cheesy Chicken Pull-Apart Bread
Course: Main CourseCuisine: American CuisineDifficulty: easy6
servings15
minutes25
minutes40
minutesAmerican Cuisine
Ingredients
1 loaf crusty bread (such as ciabatta, sourdough, or French bread)
2 cups cooked chicken breast, shredded or diced
2 cups shredded mozzarella cheese
1/2 cup unsalted butter, melted
3 cloves garlic, minced
2 tablespoons fresh parsley, chopped
1 teaspoon red pepper flakes (or finely diced red bell pepper for less heat)
1 teaspoon dried Italian seasoning
1/2 teaspoon salt
1/4 teaspoon black pepper
1 tablespoon olive oil (optional, for chicken)
Directions
- Preheat your oven to 375F (190C).
- Prepare the bread: Place the loaf on a cutting board. Using a serrated knife, slice the bread crosswise at 1-inch intervals, almost all the way through, but leaving the bottom crust intact so the slices remain connected. Then, slice lengthwise down the middle of the loaf, again, not cutting all the way through. This creates a grid pattern of pull-apart sections.
- Make the garlic butter: In a small bowl, combine the melted butter, minced garlic, 1/4 teaspoon salt, and 1/8 teaspoon black pepper.
- The “Never Soggy” Secret Step: Place the prepared bread on a baking sheet. Generously brush the garlic butter all over the bread, making sure to get it into all the cracks and crevices created by the cuts. This creates a flavor layer and a crucial barrier. Bake the buttered bread for 10-12 minutes, or until the edges are lightly golden and the bread feels slightly crisp to the touch. This initial bake helps the bread hold its shape and prevents it from becoming soggy when the other ingredients are added.
- While the bread is in the oven, prepare the chicken: In a medium bowl, toss the cooked shredded chicken with the dried Italian seasoning, remaining 1/4 teaspoon salt, and 1/8 teaspoon black pepper. If using, add 1 tablespoon of olive oil to the chicken to help keep it moist.
- Remove the bread from the oven. Carefully, without tearing the loaf, open up the cuts and stuff the seasoned chicken and shredded mozzarella cheese into all the crevices. Make sure to distribute the chicken and cheese evenly throughout the loaf. Sprinkle with the chopped fresh parsley and red pepper flakes.
- Return the loaded bread to the oven and bake for another 12-15 minutes, or until the cheese is completely melted, bubbly, and lightly golden.
- Carefully remove the bread from the oven. Let it cool on the baking sheet for 5 minutes before transferring to a serving platter. Pull apart the cheesy chicken sections and enjoy immediately!
Notes
- Features a unique initial baking step to ensure a crispy, non-soggy base.


