Okay, let’s be real. Is there anything more disappointing than slicing into a gorgeous, layered pie, anticipating that perfect bite of sweet filling and flaky crust, only to have your fork meet a sad, soggy bottom? It’s a dessert dream crusher, pure and simple. We’ve all been there, right?
But what if I told you there was a simple, ingenious trick to ensure every single slice of your Cherry Chocolate Cream Pie is a triumph, right down to the last crumb of the crust? Get ready to say goodbye to the dreaded soggy bottom forever!
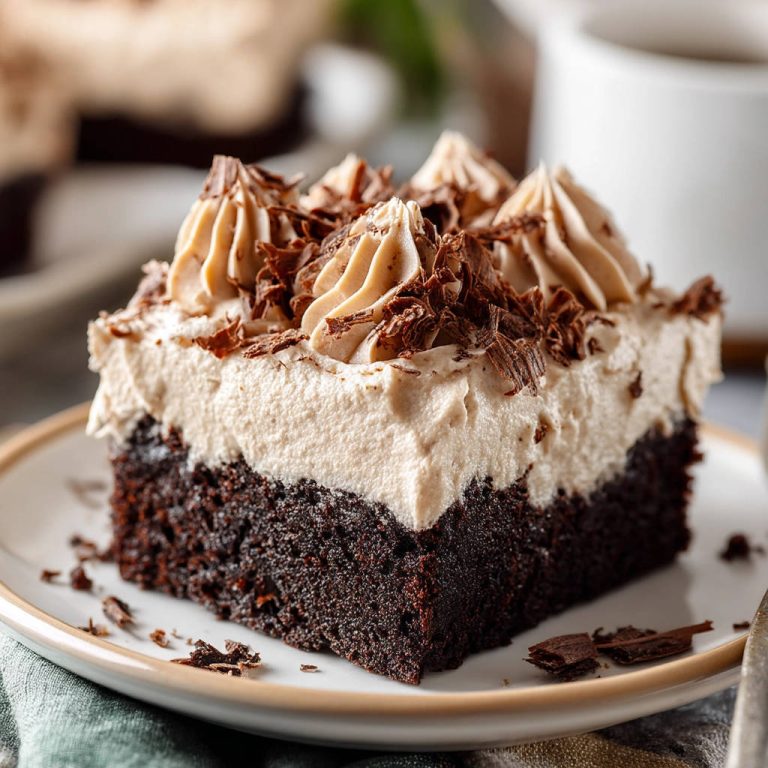
This recipe combines the timeless pairing of rich chocolate and bright, juicy cherries with a secret weapon. It’s layered decadence perfected, and trust me, you’ll wonder why you ever made pie any other way.
Reasons This Cherry Chocolate Cream Pie is a Keeper
Beyond the sheer deliciousness of cherry and chocolate together, this pie solves a common baking woe and delivers on multiple levels:
- Soggy Bottom Solved: This is the star! A simple layer of chocolate applied to the crust acts as a barrier, protecting it from the moisture of the cherry filling. Genius!
- Decadent Flavor Combination: The pairing of sweet-tart cherries with smooth, slightly bitter semi-sweet chocolate is a classic for a reason. It’s balanced, rich, and utterly satisfying.
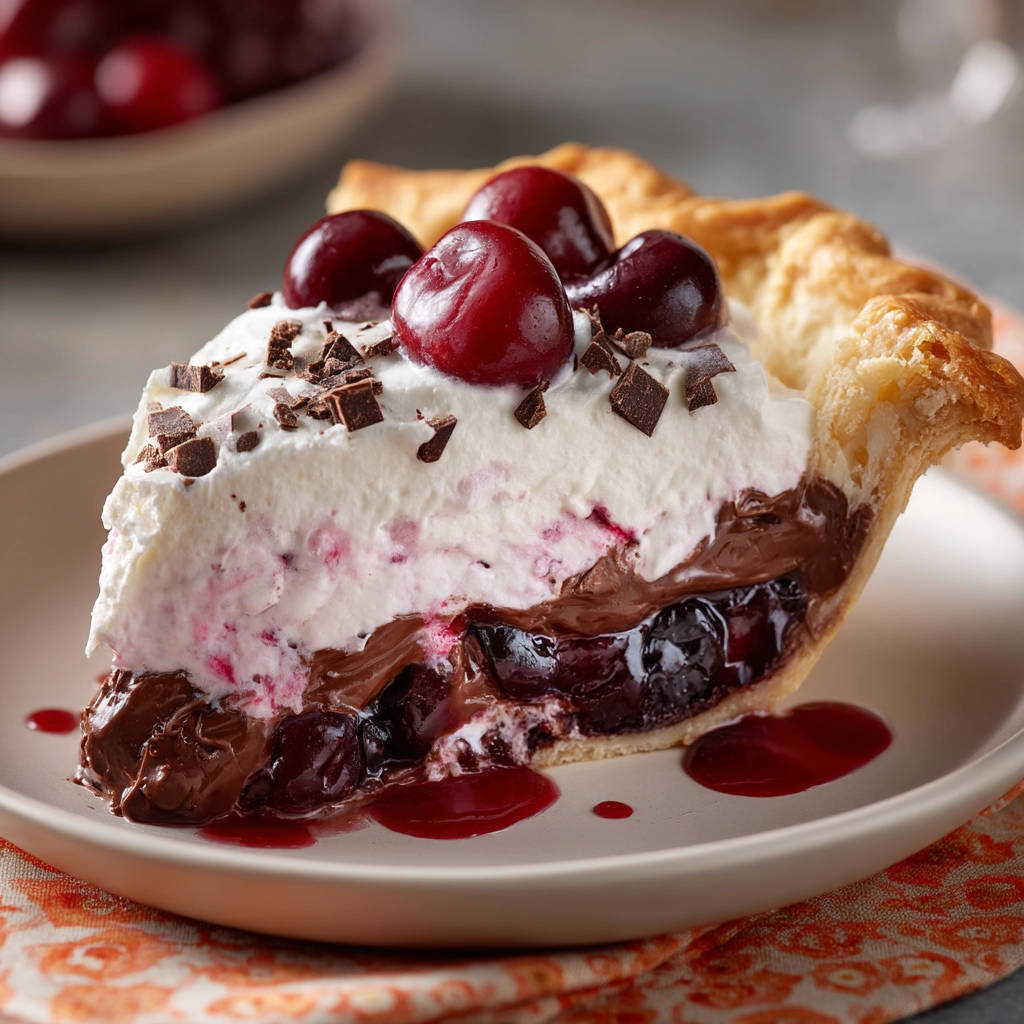
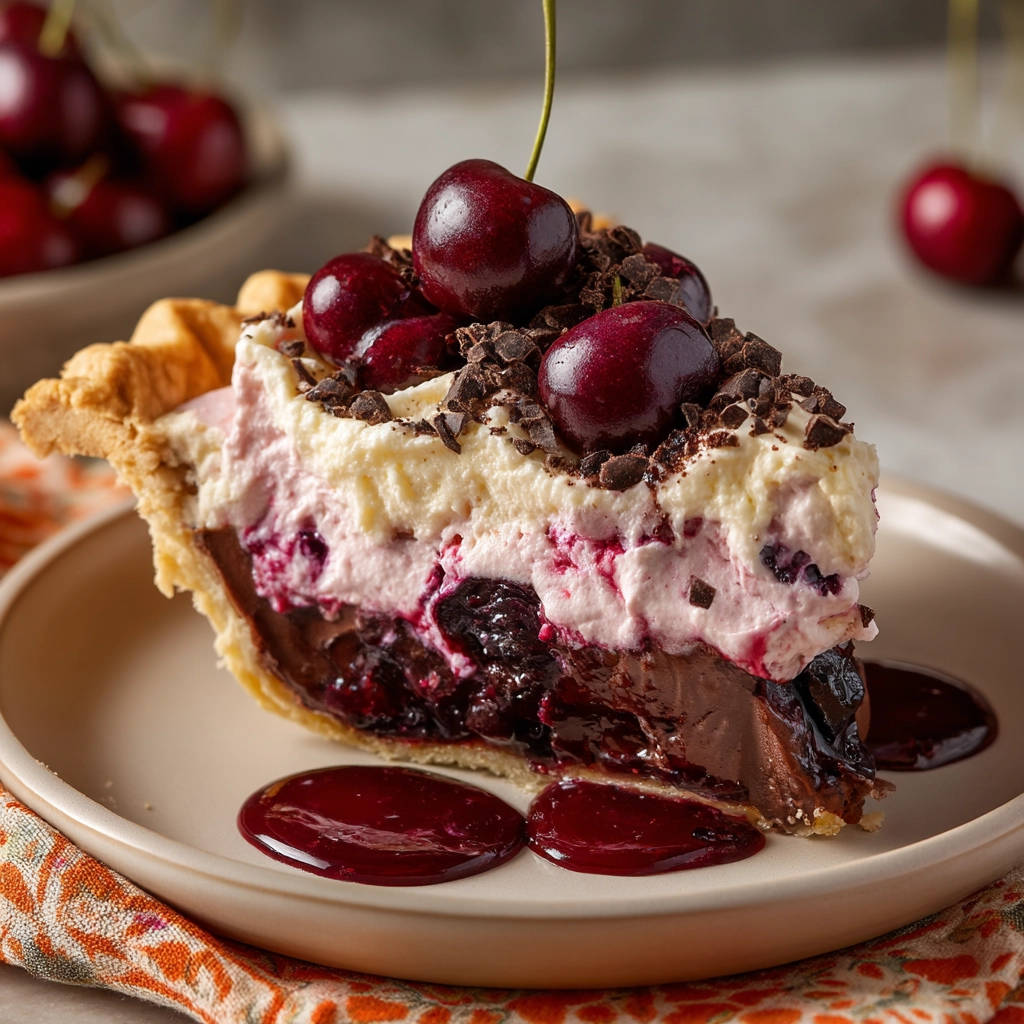
- Luxuriously Creamy Texture: Layers of firm chocolate, luscious cherry filling, and fluffy whipped cream create a delightful textural contrast in every bite.
- Relatively Straightforward: While there are a few components, none are overly complicated, especially using a pre-baked crust. It’s completely achievable for home bakers.
- Showstopper Presentation: With its distinct layers and generous topping of whipped cream and garnishes, this pie looks as impressive as it tastes.
Gathering Your Ingredients for Cherry Chocolate Cream Pie
Creating this layered masterpiece requires a few key components, each playing a vital role in achieving that perfect balance of flavor and texture, and crucially, that non-soggy crust. Think of these as your building blocks for pie perfection!
Let’s talk about what you’ll need. The base starts with convenience:
- 1 pre-baked 9-inch pie crust, cooled: Opting for pre-baked saves you time and ensures you have a sturdy base ready to go. It’s essential that it’s fully baked and completely cooled before you add anything wet to it.
Next, the star flavors come into play. For the luscious cherry layer:
- 3 cups pitted cherries (fresh or frozen, thawed): Cherries are the heart of this pie! Fresh, ripe cherries offer the brightest flavor, but thawed frozen cherries work wonderfully too – just be sure to drain off any excess liquid after thawing. Removing the pits is crucial!
- 1/2 cup granulated sugar: Sweetness to complement the tartness of the cherries. Adjust slightly based on the sweetness of your fruit.
- 2 tablespoons cornstarch: This is your thickening agent. It helps transform the juicy cherries and sugar into a thick, glossy filling that sets beautifully. Without it, you’d have a watery mess!
The secret weapon and main flavor pairing require just two simple items:
- 1 cup heavy cream (for the chocolate layer): Heated heavy cream is the base for our chocolate ganache-like barrier layer. It provides the richness needed to create a smooth, set chocolate layer.
- 6 ounces semi-sweet chocolate, chopped: Good quality chocolate will make a difference here. Semi-sweet offers that perfect balance – rich enough to be decadent but not so sweet it overpowers the cherries. Chopping it finely helps it melt smoothly into the hot cream.
Finally, the crowning glory – that irresistible whipped cream topping:
- 1 1/2 cups cold heavy cream (for whipped cream): Starting with cold cream is essential for whipping it into stiff, stable peaks. Room temperature cream simply won’t whip properly.
- 1/4 cup powdered sugar: Also known as confectioners’ sugar, this dissolves easily and adds sweetness without a grainy texture.
- 1 teaspoon vanilla extract: A touch of vanilla enhances the sweetness and adds a lovely aromatic note to the whipped cream.
And don’t forget those crucial finishing touches:
- Fresh cherries for garnish: A few fresh cherries on top signal the flavor inside and add a pop of color.
- Chocolate shavings for garnish: A sprinkle of chocolate shavings ties the chocolate element into the visual presentation.
Crafting Your Cherry Chocolate Cream Pie: Step-by-Step
Now that you’ve gathered your ingredients, let’s walk through bringing this stunning pie to life. The process is broken down into simple stages, ensuring each layer is perfect before assembly. The key here is patience, especially when it comes to cooling times!
-
Begin with the Decadent Chocolate Layer: Grab a saucepan and pour in the first measurement of heavy cream (1 cup). Place it over medium heat and watch it closely. You want to heat it just until you see tiny bubbles starting to form around the edges – that’s a simmer, not a rolling boil! As soon as it hits that point, pull the pan off the heat immediately. Add all of your finely chopped semi-sweet chocolate directly into the hot cream. Don’t stir just yet! Let the residual heat from the cream work its magic for about 5 minutes. This allows the chocolate to soften and begin melting evenly. After 5 minutes, grab a whisk and gently whisk the mixture. Start in the center and work your way out until every piece of chocolate is melted and you have a gorgeously smooth, shiny, and completely uniform chocolate ganache. Set this aside at room temperature to cool slightly while you get the crust ready.
-
Implement the Soggy Bottom Solution: This is the critical step that prevents disappointment! Take your fully cooled, pre-baked pie crust. Ensure it’s not warm at all, or the chocolate won’t set properly. Pour the slightly cooled chocolate mixture directly into the bottom of the crust. Use a spatula to carefully spread the chocolate evenly across the entire base and slightly up the sides. You want a complete, smooth layer that acts like a waterproof barrier against the juicy filling that will come later. This chocolate seals the crust, preventing moisture migration. Once the chocolate layer is spread, place the entire pie crust with its new chocolate foundation into the refrigerator. This allows the chocolate to set firmly while you move on to the next component.
-
Prepare the Vibrant Cherry Filling: In a separate medium saucepan, combine your pitted cherries (fresh or thawed frozen, remember to drain frozen ones!), granulated sugar, and cornstarch. Give everything a gentle stir with a spoon or spatula to make sure the cornstarch is distributed evenly among the cherries and sugar. Place this saucepan over medium heat. Now, the important part: stir constantly! This prevents the cornstarch from clumping and the mixture from sticking to the bottom and burning. As you stir and the mixture heats, you’ll notice the cherries releasing their juices, and the liquid will start to bubble and thicken. Keep cooking and stirring for about 8 to 10 minutes, until the filling is visibly thick, glossy, and coats the back of your spoon. Remove the cherry filling from the heat and transfer it to a heatproof bowl or dish. Let it cool completely at room temperature. Patience here is key – if you add warm filling to the set chocolate layer, it could melt the chocolate or cause condensation.
-
Assemble the Pie Base Layers: Before you combine them, double-check that both your chocolate layer (firmly set in the pie crust) and your cherry filling are completely, entirely cool. They should be at room temperature or even slightly chilled. Once you confirm they are cool, carefully pour the cooled cherry filling evenly over the set chocolate layer in the pie crust. Use the spatula again if needed to spread it into an even layer, ensuring it goes right to the edges.
-
Chill for Perfect Setting: Now comes the most important waiting period. Cover the pie loosely. Plastic wrap tented over the top works well, or use a pie carrier lid to avoid touching the filling. Place the pie in the refrigerator for a minimum of 4 hours. Ideally, let it chill longer, like 6-8 hours or even overnight. This extended chilling time is absolutely crucial. It allows the cherry filling to set completely and gives that chocolate barrier maximum time to firm up and do its job protecting the crust. Don’t rush this step!
-
Whip Up the Cloud-Like Topping: Just before you’re ready to serve, prepare the whipped cream. In a large, clean mixing bowl, combine the remaining 1 1/2 cups of cold heavy cream, the powdered sugar, and the vanilla extract. Using an electric mixer (a stand mixer or hand mixer works), start on medium speed. The cream will start to thicken. Increase the speed gradually to medium-high. Beat until stiff peaks form. This means when you lift the beaters, the peaks of cream stand straight up and hold their shape firmly. Be careful not to overbeat, or you’ll end up with butter!
-
Finish and Serve Your Masterpiece: Take your thoroughly chilled and set pie from the refrigerator. Gently spoon or spread the freshly whipped cream evenly over the top of the cherry layer, creating a beautiful, fluffy cloud. For that final touch of visual appeal and flavor reinforcement, garnish the top. Arrange some fresh cherries around the edge or in the center. Sprinkle chocolate shavings over the whipped cream. Now, admire your work! Slice the pie using a sharp knife dipped in hot water for cleaner cuts. Serve immediately and enjoy the delightful layers and, most importantly, that perfectly firm, non-soggy crust!
Tips for Perfect Cherry Chocolate Cream Pie Every Time
Making this pie is quite straightforward, but a few expert tips can elevate it from great to absolutely unforgettable and ensure that glorious, non-soggy result:
- Chill, Chill, Chill: I cannot stress this enough. The chilling time is not optional. It’s the secret to a firm cherry filling and a protective chocolate layer. Minimum 4 hours, but longer is always better.
- Use Quality Chocolate: The chocolate layer is a key flavor component. Using good quality semi-sweet chocolate will give you a richer, smoother ganache than chocolate chips, which contain stabilizers that can affect texture.
- Drain Frozen Cherries Thoroughly: If using frozen cherries, make sure they are fully thawed and drained exceptionally well. Excess moisture is the enemy of a non-soggy crust! Pat them dry with paper towels if necessary before cooking.
- Don’t Overcook the Cherry Filling: Cook it just until it’s thick and glossy, about 8-10 minutes as directed. Overcooking can make it too jammy, while undercooking will leave it too runny.
- Ensure Layers are Cool Before Assembling: Adding a warm layer to a cold layer will cause condensation and can prevent proper setting. Both the chocolate and cherry layers must be completely cooled before you combine them in the crust.
- Whip Cream Just Before Serving: Whipped cream is best when freshly made. If it sits too long, it can weep. Whip it just before you’re ready to slice and serve.
- Clean Slices: For neat slices, use a sharp knife and dip it in hot water between each cut. Wipe the knife clean before dipping again.
Serving Suggestions for Your Decadent Pie
This Cherry Chocolate Cream Pie is certainly substantial enough to be the star of any dessert table all on its own. However, pairing it with a simple beverage can enhance the experience.
Consider serving it alongside a hot cup of coffee or tea. A glass of cold milk is also a classic pairing that complements the richness of the chocolate and cream. For those who enjoy a refreshing contrast, a light, non-alcoholic sparkling beverage could be a nice touch.
Your Cherry Chocolate Cream Pie Questions Answered (FAQ)
Here are some common questions you might have when making this delicious pie:
Can I use canned cherry pie filling instead of making my own?
While you could use canned filling for convenience, this recipe specifically relies on making a cooked cherry filling thickened with cornstarch. Canned pie filling often contains stabilizers and is already quite thick, but it might not provide the exact consistency needed to interact correctly with the chocolate barrier in the same way our homemade version does. The flavor of fresh or frozen cooked cherries is also generally superior. If you choose to use canned, make sure it is well-drained of any excess liquid, as added moisture is the enemy of a crisp crust.
Can I use different types of chocolate for the barrier layer?
Yes, you can! Semi-sweet is recommended for balance, but you could use dark chocolate for a richer, less sweet result, or milk chocolate for something sweeter and creamier. Just be aware that the setting consistency might vary slightly depending on the chocolate’s cocoa butter content. Ensure it’s a good quality baking chocolate that melts smoothly.
How far in advance can I make this pie?
The pie base (crust, chocolate layer, and cherry filling) can be assembled and chilled a day in advance. This actually benefits the pie, allowing the flavors to meld and the layers to set even more firmly. However, the whipped cream topping should be prepared and added just before serving for the best texture and appearance. The garnishes should also be added just before serving.
Why did my chocolate layer not set properly?
There are a few reasons this could happen. The most common is not chilling the pie long enough. The chocolate ganache needs ample time in the cold to firm up completely. Ensure your ingredients were measured correctly, especially the cream-to-chocolate ratio. Also, make sure the pie crust was completely cooled before the chocolate was added. Adding chocolate to a warm crust can prevent it from setting correctly.
My cherry filling seems too runny even after cooking. What happened?
This usually means the filling wasn’t cooked quite long enough for the cornstarch to fully activate and thicken it. Cornstarch requires boiling temperatures to reach its maximum thickening potential. Make sure you brought the mixture to a simmer and stirred constantly for the full 8-10 minutes, ensuring it thickened visibly and became glossy. If it’s still a little thin after cooling, it will likely firm up considerably during the long refrigeration time, but an undercooked filling might still pose a risk to the crust.
Can I freeze this pie?
Cream-based pies and fruit fillings can sometimes be frozen, but the texture of the whipped cream will definitely suffer upon thawing. The fruit filling might also release more moisture when frozen and thawed, potentially compromising the crust, even with the chocolate barrier. It’s best enjoyed fresh after its initial chilling period. If you must freeze, freeze the pie before adding the whipped cream and garnishes. Thaw it in the refrigerator, then add freshly whipped cream and garnishes before serving.
Enjoy Your Homemade Cherry Chocolate Cream Pie!
There you have it – a truly decadent, showstopping Cherry Chocolate Cream Pie that defies the common problem of a soggy crust. With rich chocolate, sweet-tart cherries, and a cloud of whipped cream, every bite is a celebration.
Whether you’re making it for a special occasion or just because you deserve a treat, this recipe is sure to become a favorite. The simple trick of the chocolate barrier makes all the difference, guaranteeing a delightful texture from top to bottom.
Give this recipe a try and let us know how it turns out in the comments below! Did you love the crispy crust? Have any variation ideas? Share your pie triumphs with us!
Cherry Chocolate Cream Pie

Ingredients
- 1 pre-baked 9-inch pie crust, cooled
- 3 cups pitted cherries (fresh or frozen, thawed)
- 1/2 cup granulated sugar
- 2 tablespoons cornstarch
- 1 cup heavy cream
- 6 ounces semi-sweet chocolate, chopped
- 1 1/2 cups cold heavy cream
- 1/4 cup powdered sugar
- 1 teaspoon vanilla extract
- Fresh cherries for garnish
- Chocolate shavings for garnish
Directions
- Prepare the chocolate layer: Heat 1 cup heavy cream in a saucepan over medium heat until it just begins to simmer. Remove from heat, add chopped chocolate, and let sit for 5 minutes. Whisk until the mixture is completely smooth and glossy. Let cool slightly at room temperature.
- Prevent Soggy Bottom: Pour the slightly cooled chocolate mixture evenly into the bottom of the cooled, pre-baked pie crust. Use a spatula to spread it out and completely cover the base of the crust. This layer acts as a barrier against moisture. Place the crust with the chocolate layer into the refrigerator while you prepare the cherry filling.
- Prepare the cherry filling: In a medium saucepan, combine the pitted cherries, granulated sugar, and cornstarch. Stir gently to combine. Cook over medium heat, stirring constantly, until the mixture thickens and becomes glossy, about 8 to 10 minutes. Remove from heat and let the cherry filling cool completely at room temperature.
- Assemble the pie base: Once both the chocolate layer (in the crust) and the cherry filling are completely cooled, pour the cooled cherry filling evenly over the set chocolate layer in the pie crust.
- Chill the pie thoroughly: Cover the pie loosely and refrigerate for at least 4 hours, or preferably longer, until the layers are completely set. This chilling time is crucial for the layers to firm up and for the chocolate barrier to effectively protect the crust.
- Prepare the whipped cream: In a large mixing bowl, combine the 1 1/2 cups cold heavy cream, powdered sugar, and vanilla extract. Beat using an electric mixer on medium speed until stiff peaks form.
- Finish and serve: Spread the whipped cream evenly over the chilled pie. Garnish the top with fresh cherries and chocolate shavings just before serving. Slice and enjoy your perfectly set, non-soggy bottom pie!