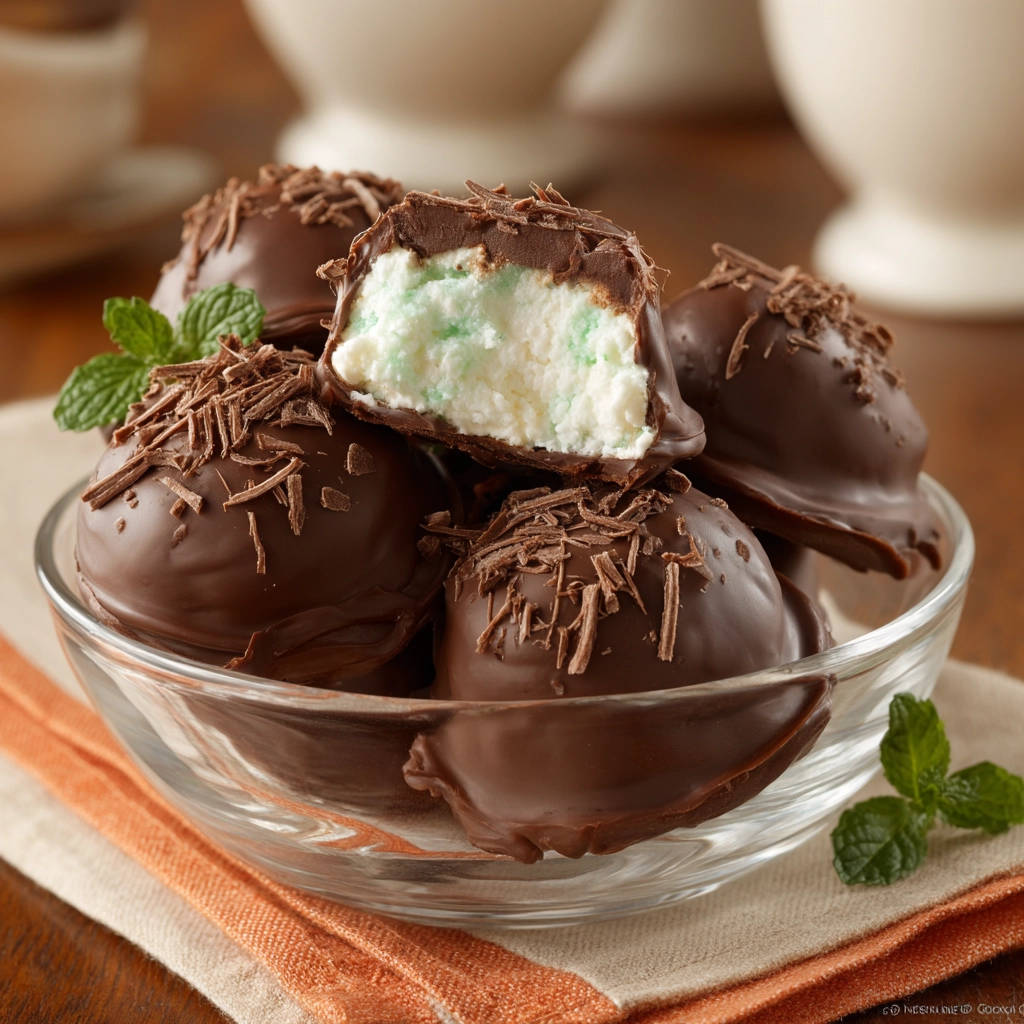
There’s something truly special about homemade candies, isn’t there? They feel like a labor of love, a sweet gesture crafted right in your own kitchen. But let’s be honest, making beautifully coated treats at home can sometimes feel like you’re wrestling with chocolate itself! Those lumpy, uneven layers can be frustrating when you’re dreaming of smooth, glossy finishes like the ones you see in fancy chocolate shops. If you’ve ever struggled to get that perfect chocolate shell on your homemade confections, especially on delightful little bites like Chocolate Mint Cream Truffles, you’re definitely not alone. It’s a common hurdle for many home candy makers.
But what if I told you there’s a surprisingly simple trick to achieving that flawless, crack-free chocolate coating every single time? Yes, it’s possible! This recipe for creamy, refreshing chocolate mint truffles not only gives you an incredibly delicious treat but also shares the key technique that will make your dipped candies look like they came straight from a professional chocolatier. Get ready to impress yourself and everyone lucky enough to try these minty gems!
Why You’ll Love Making These Chocolate Mint Cream Truffles
These aren’t just any homemade candies; they offer a fantastic combination of flavor and texture, plus they come with a secret weapon for presentation. Here are a few reasons why this recipe is about to become your go-to for edible gifts and personal indulgence:
- Irresistible Flavor Combo: The classic pairing of cool, refreshing mint with rich, decadent chocolate is simply divine. It’s a timeless favorite for a reason!
- Creamy Dreamy Centers: The inside of these truffles is soft, smooth, and melts in your mouth, providing a delightful contrast to the outer shell.
- That Perfect Chocolate Coat: Thanks to the simple, clever technique we’ll explore, you can finally achieve that smooth, professional-looking chocolate layer without the usual dipping dramas.
- Easy & Fun to Make: While there’s a bit of chilling time involved, the active steps are straightforward and enjoyable, making it a great project for a weekend afternoon.
- Impressive Results: Whether you’re gifting them or serving them after dinner, the beautiful appearance and delicious taste will earn you rave reviews.
Gathering Your Ingredients for Perfectly Coated Chocolate Mint Cream Truffles
Creating these delightful minty centers and their smooth chocolate shells requires just a handful of readily available ingredients. Each component plays an important role in achieving the perfect texture, flavor, and finish.
For the rich, minty filling, you’ll need:
- Softened Butter or Cream Cheese: This forms the creamy base of our truffles. Using softened butter gives a classic, rich candy base, while softened cream cheese offers a slight tang and incredibly smooth texture. Make sure whichever you choose is truly soft, not melted, to ensure it creams properly with the sugar.
- Powdered Sugar: Also known as confectioners’ sugar, this super-fine sugar is essential for creating a smooth, non-grainy dough for the truffle centers. You’ll need a generous amount to achieve the right consistency for rolling.
- Mint Extract: This is where that signature cool mint flavor comes in. Start with the suggested amount and taste a tiny bit of the dough (before rolling!) to adjust the intensity if you prefer a stronger or milder mint profile.
- Green Food Coloring (Optional): Just a drop or two gives the centers a lovely hint of green, signaling the mint flavor inside and adding a touch of visual appeal. It’s purely for aesthetics, so feel free to skip it if you prefer.
And for that crucial perfect coating:

- Chocolate Confectionery Coating or Chocolate Chips: While high-quality chocolate can be used with tempering, using confectionery coating (sometimes called candy melts or compound chocolate) or even standard chocolate chips is often easier for home candy makers as they don’t require precise tempering to set smoothly. Confectionery coating is specifically designed for melting and dipping, offering a very easy, forgiving option for a glossy finish.
Finally, for those beautiful finishing touches:
- Chocolate Shavings (Optional): A classic garnish that adds texture and reinforces the chocolate theme.
- Fresh Mint Leaves (Optional): A simple, elegant garnish that enhances the minty freshness, especially if serving immediately.
Crafting Your Chocolate Mint Cream Truffles: Step-by-Step to a Smooth Finish
Ready to make these delicious truffles? Follow these steps carefully, paying special attention to the chilling and dipping techniques. This is where the magic happens for that perfect coating!
-
Begin by preparing the creamy base for your truffle centers. In a medium-sized mixing bowl, place your softened butter or cream cheese. Use an electric mixer or a sturdy whisk to beat it until it’s completely smooth and has a creamy consistency. This initial step ensures there are no lumps from the start.
-
Now, it’s time to incorporate the sweetness and structure. Gradually add the powdered sugar to the creamed butter or cream cheese. Do this slowly, mixing as you go, until all the sugar is well combined. Continue mixing until a thick, stiff dough forms. It should be firm enough to hold its shape when rolled.
-
Introduce the signature flavor! Stir in the mint extract. If you’re using the optional green food coloring, add 1-2 drops now as well. Mix thoroughly until the extract and coloring are evenly distributed throughout the dough. You’ll see the color change and smell that lovely mint aroma!
-
Portion and shape the truffle centers. Take small amounts of the mixture, about 1 inch in diameter, and roll them smoothly between your palms to form uniform balls. As you form them, place the balls onto a baking sheet that you’ve lined with parchment paper. The parchment prevents sticking and makes cleanup easier.
-
This next step is absolutely CRUCIAL for achieving that perfect coating later: Chill the truffle balls. Place the baking sheet with the rolled centers into the refrigerator for at least 1 hour. They need to become very firm. Trying to dip soft, pliable centers will result in misshapen truffles and a messy, uneven chocolate layer. The firmer they are, the easier they are to dip cleanly.
-
While the truffles are chilling, prepare your chocolate coating. Place the chocolate confectionery coating or chocolate chips into a microwave-safe bowl. Melt the chocolate gently using the microwave on 50% power. Heat for 30 seconds at a time, then stir well. Repeat this process, heating and stirring, until the chocolate is completely melted and smooth. Melting slowly at lower power helps prevent the chocolate from overheating, which can make it seize or become thick and difficult to work with. A smooth, fluid chocolate is key for a perfect dip.
-
Set up your dipping station for efficiency. Bring the very firm, chilled truffle balls out of the refrigerator and place the baking sheet conveniently near the bowl of melted chocolate. Have another baking sheet, also lined with parchment paper, ready and waiting nearby for the dipped truffles.
-
Here is the secret technique for that flawless coat: Using a fork or, ideally, a specialized candy dipping tool, carefully drop one chilled truffle ball into the melted chocolate. Ensure the truffle is fully submerged. The cold center will help the warm chocolate adhere and start to set quickly.
-
Lift the truffle out of the chocolate using your fork or dipping tool. Hold it over the bowl and allow the excess chocolate to drip back down. This removes the bulk of the extra coating. For an even smoother, professional finish, gently tap the side of the bowl with your fork or tool. This helps shake off remaining drips and encourages the chocolate to settle smoothly around the truffle.
-
Carefully transfer the coated truffle to the prepared parchment-lined baking sheet. Use a second fork or toothpick to help slide it off the dipping tool onto the paper if needed, being careful not to mar the surface.
-
If you plan to add chocolate shavings or other garnishes, do it immediately after placing the truffle on the sheet, before the chocolate coating has a chance to set. The melted chocolate will act as “glue.”
-
Continue the dipping process with the remaining truffle balls. Work relatively quickly while the chocolate stays melted. If you notice the melted chocolate in your bowl starting to thicken as you work, don’t worry! You can gently reheat it slightly in the microwave on 50% power for just a few seconds. Stir it again until it’s smooth and fluid before continuing to dip.
-
Allow the dipped truffles to set completely. You can do this at room temperature if your kitchen isn’t too warm, or place the baking sheet back in the refrigerator for about 15-20 minutes until the chocolate coating is firm to the touch.
-
Just before serving, if desired, add a final touch by garnishing with fresh mint leaves. This adds a pop of color and freshness, making them even more appealing.
Tips for Perfect Chocolate Mint Truffles Every Time
Achieving truffle perfection is easier than you think, especially with a few expert tips up your sleeve. Beyond the crucial chilling step, here are some pointers to ensure your chocolate mint cream truffles turn out beautifully:
- Start with Softened Ingredients: Ensure your butter or cream cheese is genuinely softened to room temperature before you start mixing. This makes creaming it with the powdered sugar much easier and prevents lumps in your truffle base.
- Don’t Rush the Chill Time: I can’t stress this enough! The one-hour minimum chill time is not a suggestion; it’s essential. Very firm truffle centers are the key to a clean, even chocolate dip. If they feel too soft after an hour, give them another 15-30 minutes.
- Gentle Melting is Key: When melting your chocolate coating, always use a low power setting on your microwave and stir frequently. Overheated chocolate becomes thick, difficult to work with, and can even “seize” (become a hard, unusable mess). Slow and steady wins the race here.
- Maintain Chocolate Consistency: If your melted chocolate starts to thicken as you dip, don’t hesitate to give it a quick, gentle reheat in the microwave. A few seconds is often all it takes to bring it back to the right dipping consistency.
- Use the Right Tool: A dedicated candy dipping tool is fantastic, but a simple fork works surprisingly well. The key is the tapping action against the bowl to remove excess chocolate, leaving a thin, even layer.
- Work Quickly: Once the truffles are out of the fridge, work relatively quickly to dip them before they start to soften. Dip one, tap, place, garnish, and move to the next.
- Storage: Store finished Chocolate Mint Cream Truffles in an airtight container in the refrigerator. Layer them between sheets of parchment or wax paper to prevent sticking. They should keep well for up to 1-2 weeks.
Delicious Variations to Try
Once you’ve mastered the basic Chocolate Mint Cream Truffles, feel free to get creative with variations! While we’re focusing on dipping techniques today, the creamy base is versatile.
- Different Extracts: Swap the mint extract for other flavors like almond, orange, or even a touch of pure vanilla extract for a classic chocolate truffle. A hint of pumpkin spice could make a fun seasonal variation!
- Roll, Don’t Dip (Another Time): If you’re practicing your centers but aren’t focused on the dipping technique, you could roll the chilled balls in cocoa powder, finely chopped nuts, or powdered sugar for a different finish. However, for that smooth shell, dipping is required!
- Add Texture: Mix finely crushed cookies or toasted coconut into the truffle dough before chilling for a little crunch inside. If you like chocolate and coconut together, you might also enjoy these Toasted Coconut Chocolate Cake or Chocolate Coconut Dream Pie recipes!
Serving Suggestions for Your Homemade Truffles
These delightful Chocolate Mint Cream Truffles are perfect for so many occasions. Here are a few ways to enjoy and share them:
- Edible Gifts: Package them in small boxes or bags tied with a ribbon. They make a thoughtful and delicious homemade gift for holidays, birthdays, or just because.
- Dessert Platters: Arrange them on a platter with other small treats like Perfect Sugar Cookies or Mini Cheesecakes for a beautiful spread.
- After-Dinner Treat: Serve one or two truffles with coffee or tea for a simple yet elegant end to a meal.
- Party Favors: Place a couple of truffles in small bags as charming party favors your guests can take home.
Your Chocolate Mint Cream Truffles Questions Answered (FAQ)
Got questions about making these perfectly coated chocolate mint truffles? Here are some answers to common queries:
Can I use real chocolate instead of confectionery coating?
Yes, you can use real chocolate (like high-quality chocolate bars or wafers) for dipping. However, to get that smooth, glossy finish that sets up firm at room temperature without blooming (white streaks), you will need to temper the chocolate. Tempering involves melting and cooling the chocolate to specific temperatures. It’s a more advanced technique than simply melting confectionery coating. Confectionery coating is formulated to melt and set easily without tempering, which is why it’s recommended for beginners focusing on the dipping technique.
Can I skip the chilling step?
Technically, you could try, but it’s highly discouraged if you want perfectly coated truffles. Soft centers will lose their shape in the warm chocolate, making them very difficult to dip cleanly and resulting in lumpy, uneven coatings. Chilling until very firm is the key to easy, successful dipping and beautiful results.
My melted chocolate is too thick. What happened?
This usually happens if the chocolate was heated too quickly, at too high a temperature, or if a tiny bit of water got into it. If it’s just thickened from cooling slightly while you’re dipping, a brief reheat on low power should fix it. If it’s completely seized (hard and crumbly), unfortunately, there’s often no saving it for dipping. This is why gentle, low-power melting is so important!
How long do these truffles last?
When stored properly in an airtight container in the refrigerator, these Chocolate Mint Cream Truffles should stay fresh for about 1 to 2 weeks. You can also freeze them for longer storage (up to 2-3 months), thawing them in the refrigerator before serving.
Can I use peppermint extract instead of mint extract?
Absolutely! Peppermint extract will give you a stronger, more classic “candy cane” like mint flavor, while standard mint extract is usually a blend that can sometimes have a slightly sweeter or spearmint-like note. Use whichever you prefer, adjusting the amount to taste.
Enjoy Your Homemade Chocolate Mint Cream Truffles!
Now that you have the secret to the perfect coating, you’re ready to make batch after batch of these delightful Chocolate Mint Cream Truffles. The combination of the smooth, creamy mint center and the crisp, perfect chocolate shell is truly addictive. They are wonderful for sharing, perfect for satisfying a sweet craving, and surprisingly simple to master with the right technique.
Give this recipe a try, and watch those dipping woes disappear! Let me know in the comments below how yours turned out, or if you experimented with any fun variations. Happy candy making!
Chocolate Mint Cream Truffles

Ingredients
- 1/2 cup softened butter or cream cheese
- 3 cups powdered sugar
- 1/2 teaspoon mint extract
- 1-2 drops green food coloring (optional)
- 1 pound chocolate confectionery coating or chocolate chips
- Chocolate shavings for garnish (optional)
- Fresh mint leaves for garnish (optional)
Directions
- In a medium bowl, beat the softened butter or cream cheese until smooth.
- Gradually add the powdered sugar, mixing until well combined and a stiff dough forms.
- Stir in the mint extract and green food coloring, if using, until evenly distributed.
- Roll the mixture into small balls, about 1 inch in diameter. Place the balls on a baking sheet lined with parchment paper.
- Chill the truffle balls in the refrigerator for at least 1 hour, or until very firm. This is key for easy dipping!
- Place the chocolate confectionery coating or chocolate chips in a microwave-safe bowl. Microwave on 50% power, stirring every 30 seconds, until completely melted and smooth. This gentle melting helps keep it smooth.
- Set up your dipping station. Place the chilled truffle balls near the melted chocolate. Have another baking sheet lined with parchment paper ready for the dipped truffles.
- This is the secret to a perfect coat: Using a fork or a candy dipping tool, carefully drop one chilled truffle ball into the melted chocolate. Ensure it is fully submerged.
- Lift the truffle out of the chocolate using the fork or tool, letting the excess chocolate drip back into the bowl. Gently tap the side of the bowl with the tool to remove even more excess chocolate and get a smooth finish.
- Carefully slide the coated truffle onto the prepared parchment-lined baking sheet.
- Immediately sprinkle with chocolate shavings if desired before the chocolate sets.
- Repeat with the remaining truffle balls. If the chocolate starts to thicken, gently reheat it slightly in the microwave on 50% power for a few seconds, stirring until smooth again.
- Let the truffles set completely at room temperature or in the refrigerator for about 15-20 minutes.
- Garnish with fresh mint leaves if desired before serving.