As a food content strategist, I’ve seen countless recipes promise ease, only to deliver frustration, especially when it comes to melting chocolate. Like many of you, I’ve battled seized chocolate and clumpy coatings, ruining what should be a simple joy. But I’m thrilled to share my perfected method for creating truly irresistible Chocolate Peanut Butter Dates with a silky-smooth, reliable finish every single time.
This recipe isn’t just about combining ingredients; it’s about mastering the technique that guarantees success, transforming wholesome dates and rich peanut butter into a decadent, no-bake treat that’s perfect for any occasion.
Beyond Basic: What Makes These Chocolate Peanut Butter Dates Irresistible?
The Secret to Effortlessly Silky Chocolate
The biggest hurdle in making chocolate-covered treats is often the chocolate itself. Our method focuses on gentle, low-and-slow melting, ensuring your chocolate stays fluid and glossy. This specific technique prevents seizing, giving you a beautiful, professional-looking coating.
A Wholesome Treat, Deceptively Decadent
Medjool dates offer natural sweetness and a satisfying chew, while peanut butter provides healthy fats and protein. These Chocolate Peanut Butter Dates deliver indulgent flavor without excessive added sugars, making them a smart choice for a healthier craving.
Quick, Customizable, and Oh-So-Satisfying
From start to finish, this recipe is incredibly efficient, requiring minimal active time and no baking. It’s also remarkably versatile, easily adapted with different nuts, spices, or even alternative nut butters to suit any palate or dietary preference.
The Simple Stars: Essential Ingredients for Your Chocolate Peanut Butter Dates
The Medjool Date Foundation
We specifically use large Medjool dates for their soft, plump texture and rich, caramel-like flavor. Their size makes them ideal for stuffing, creating a substantial and satisfying bite.
Choosing Your Creamy Core
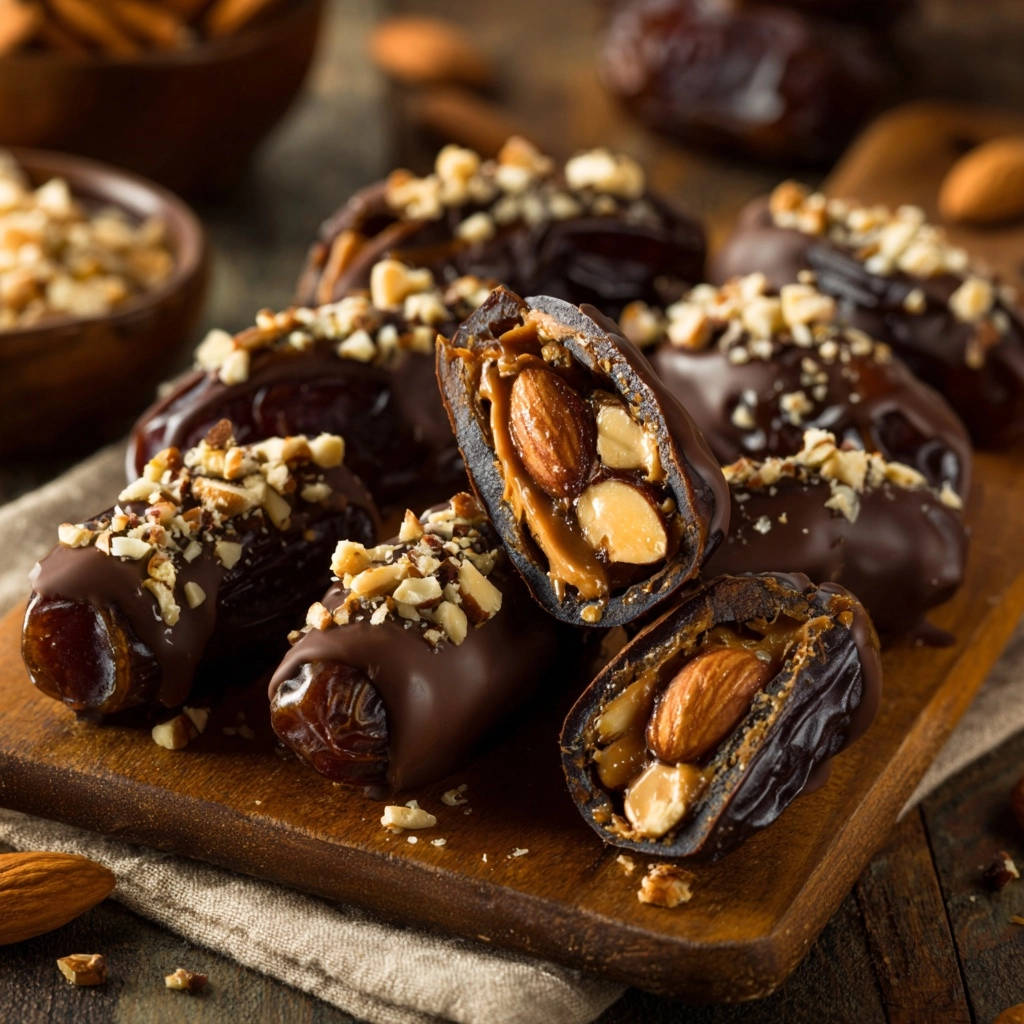
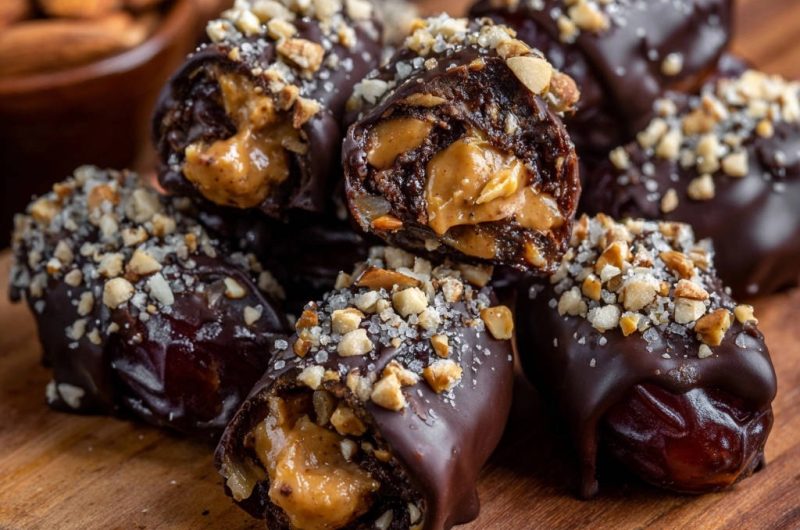
Creamy peanut butter or almond butter forms the delicious, gooey center. Ensure you use a smooth, natural variety without added sugars for the best flavor and texture contrast. This creamy filling is what truly defines these Chocolate Peanut Butter Dates.
Decoding the Perfect Chocolate Coating
For a guaranteed smooth finish, chocolate melting wafers are highly recommended as they melt beautifully. If using chocolate chips, opt for a high-quality brand designed for melting to achieve a similar silky consistency and avoid seizing issues.
Elevating Flavors with Finishing Touches
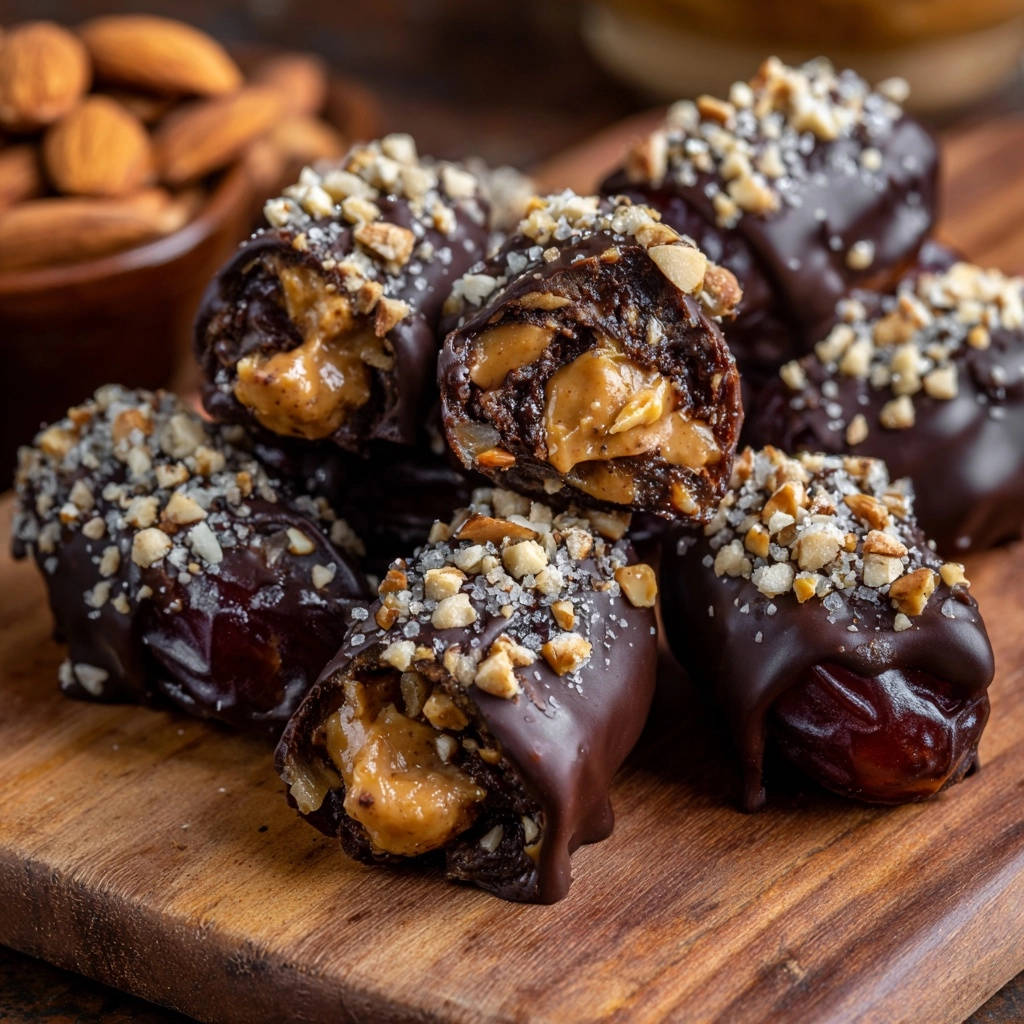
Chopped almonds or other nuts add a delightful crunch and nutty flavor, contrasting with the soft date and creamy filling. A sprinkle of flaky sea salt enhances all the flavors, cutting through the sweetness for a perfectly balanced bite.
Gather Your Gear: Tools for Dipping Perfection
Essential Kitchen Utensils
You’ll need a small paring knife for carefully pitting the dates and measuring cups and spoons for accurate ingredient portions. A sturdy mixing bowl and a baking sheet lined with parchment or wax paper are crucial for preparing and setting your treats.
Handy Helpers for Chocolate Work
A double boiler setup (a heatproof bowl over a pot of simmering water) is ideal for gentle chocolate melting. Alternatively, a microwave-safe bowl works well for controlled heating. Parchment or wax paper is non-negotiable for preventing sticking and easy cleanup once the dates are dipped.
Crafting Your Chocolate Peanut Butter Dates: A Step-by-Step Guide
Preparing the Medjool Dates for Stuffing
Begin by carefully slitting each large Medjool date lengthwise down one side with a small paring knife. Be gentle and avoid cutting all the way through, as you want to create a pocket. Remove the pit with the tip of your knife, leaving the date intact and ready for filling.
Filling with Flavor: Peanut Butter Perfection
Using a small spoon, fill each pitted date with about one teaspoon of your chosen creamy peanut butter or almond butter. Gently press the date closed around the filling. The natural stickiness of the date will help seal the nut butter inside, creating a neat little package.
The Game-Changing Chocolate Melting Method
This step is critical for success. If using chocolate chips, chop them into smaller pieces for faster, more even melting. Set up a double boiler by placing a heatproof bowl over a pot of simmering water, ensuring the bowl’s bottom doesn’t touch the water.
Alternatively, use a microwave-safe bowl, melting the chocolate in 30-second intervals. Whether using a double boiler or microwave, stir gently but constantly. The key is low heat and patience.
Never let the chocolate overheat or come into contact with water, which can cause it to seize into an unworkable lump. Stop heating when just a few small lumps remain, and then stir vigorously until the residual heat melts them completely smooth. This ensures a beautifully silky, dippable chocolate.
Dipping, Decorating, and Drying
Once your chocolate is perfectly smooth, hold a filled date by one end and dip it into the melted chocolate. Swirl it gently to coat evenly, then lift the date, allowing any excess chocolate to drip back into the bowl. A fork or spoon can help scrape off extra chocolate for a cleaner finish.
Immediately place the dipped date onto your prepared baking sheet lined with parchment paper. While the chocolate is still wet and glossy, sprinkle generously with chopped nuts and a pinch of flaky sea salt. The salt is crucial for balancing the sweetness.
Chilling for the Perfect Set
Repeat the dipping and decorating process with the remaining dates. Once all dates are coated and topped, transfer the baking sheet to the refrigerator. Chill for at least 30 minutes, or until the chocolate is completely set and firm to the touch.
Mastering Your Chocolate Peanut Butter Dates: Expert Tips & Tricks
Ensuring a Foolproof Chocolate Dip
Always melt chocolate slowly and at a low temperature to prevent burning or seizing. If your chocolate seems too thick, add a tiny bit of coconut oil or a neutral oil (1/4 teaspoon at a time) and stir well to thin it out slightly, but be very cautious not to add too much.
Ensure all your tools and ingredients are completely dry; even a tiny drop of water can cause chocolate to seize instantly.
Flavor Variations and Customizations
Experiment with different nut butters like cashew butter or sunflower seed butter for unique flavors. For a different chocolate experience, try dark chocolate for a richer taste or white chocolate for a sweeter profile. You can also mix in a little orange zest or peppermint extract into the melted chocolate for festive twists.
Beyond nuts and sea salt, consider toppings like toasted shredded coconut, mini chocolate chips, colorful sprinkles, or a drizzle of contrasting chocolate. For another delightful no-bake treat, you might enjoy making easy no-bake chocolate cream loaf.
Presentation Pointers
To make your Chocolate Peanut Butter Dates look extra special, use a small spoon to create decorative swirls on top of the chocolate before it sets. Arrange them artfully on a platter for serving or package them in small boxes tied with a ribbon for a thoughtful homemade gift.
Common Queries & Clever Solutions for Your Chocolate Peanut Butter Dates
“My Chocolate Seized!” – Troubleshooting Guide
If your chocolate seizes (becomes a stiff, crumbly paste), it’s likely due to water contact or overheating. Try to rescue it by stirring in a small amount of vegetable oil or melted shortening, a teaspoon at a time, until it loosens. This won’t make it perfectly dippable, but it can be used for other purposes, like a chocolate crumb topping.
To prevent seizing, ensure your bowl is completely dry, and no steam or water splashes into the chocolate while melting.
Dates Not Holding Shape?
If your Medjool dates are very soft, they might not hold the nut butter filling as well. Choose firmer, plumper dates if possible. Also, avoid overfilling them; a modest teaspoon of nut butter is usually sufficient. You can briefly chill the filled dates before dipping to help them firm up.
Uneven Coating Woes
An uneven coating usually means your chocolate isn’t at the right consistency or temperature. It might be too thick (add a tiny bit of oil) or too cool (gently rewarm). Ensure you swirl the date thoroughly and allow excess chocolate to drip off before placing it on the parchment paper. Using a fork to support the date can also help achieve an even coat.
Enjoying Your Chocolate Peanut Butter Dates: Serving & Storage Tips
Ideal Serving Temperatures and Pairings
These Chocolate Peanut Butter Dates are best enjoyed chilled, as this allows the chocolate to maintain its firm snap and the peanut butter to be perfectly creamy. They pair wonderfully with a cup of coffee, a glass of cold milk, or even a robust tea. For more chocolate and peanut butter delights, consider our dark chocolate peanut butter cups.
Keeping Them Fresh: Storage Guidelines
Store your finished Chocolate Peanut Butter Dates in an airtight container in the refrigerator. This will keep the chocolate firm and prevent the dates from drying out. Properly stored, they maintain their freshness and texture beautifully.
Make-Ahead Marvels for Easy Entertaining
These treats are perfect for making in advance, as they require chilling time and store well. Prepare a batch a day or two before a party or gathering, freeing up your time on the day of the event. They’re also an excellent option for meal prepping healthy snacks throughout the week.
Your Top Questions About Chocolate Peanut Butter Dates Answered
Can I use different types of dates?
While Medjool dates are highly recommended for their size, softness, and caramel notes, you can use other large, soft dates like Deglet Noor. Just be aware that their texture and sweetness may differ slightly, and you might need to adjust the amount of filling if they are smaller.
Are these suitable for dietary restrictions (e.g., vegan, gluten-free)?
Yes, these Chocolate Peanut Butter Dates are naturally vegan and gluten-free, provided you use dairy-free chocolate and ensure your peanut or almond butter is pure. Always check ingredient labels to confirm no hidden dairy or gluten-containing additives.
How long do Chocolate Peanut Butter Dates last?
When stored in an airtight container in the refrigerator, these delicious treats will last for up to 1-2 weeks. The chocolate coating helps preserve their freshness, keeping the dates moist and the peanut butter soft.
Can I freeze these treats?
Absolutely! These dates freeze beautifully. Place them in a single layer on a baking sheet to freeze, then transfer to a freezer-safe airtight container or bag. They will keep for up to 2-3 months. Thaw them in the refrigerator for a few hours before serving, or enjoy them straight from the freezer for a firmer bite.
Ready to Indulge? Share Your Chocolate Peanut Butter Dates Creation!
You’ve now mastered the art of creating perfect Chocolate Peanut Butter Dates with a foolproof silky finish. These simple yet elegant treats are bound to become a favorite in your household. Don’t hesitate to experiment with your favorite toppings and make them uniquely yours.
I encourage you to whip up a batch and share your delicious creations! We’d love to see how you customize these decadent delights.
Chocolate Peanut Butter Dates: Silky Smooth & Easy!
As a food content strategist, I’ve seen countless recipes promise ease, only to deliver frustration, especially when it comes to melting chocolate. Like many of you, I’ve battled seized chocolate and clumpy coatings, ruining what should be a simple joy. But I’m thrilled to share my perfected method for creating truly irresistible Chocolate Peanut Butter Dates with a silky-smooth, reliable finish every single time.
This recipe isn’t just about combining ingredients; it’s about mastering the technique that guarantees success, transforming wholesome dates and rich peanut butter into a decadent, no-bake treat that’s perfect for any occasion.
Beyond Basic: What Makes These Chocolate Peanut Butter Dates Irresistible?
The Secret to Effortlessly Silky Chocolate
The biggest hurdle in making chocolate-covered treats is often the chocolate itself. Our method focuses on gentle, low-and-slow melting, ensuring your chocolate stays fluid and glossy. This specific technique prevents seizing, giving you a beautiful, professional-looking coating.
A Wholesome Treat, Deceptively Decadent
Medjool dates offer natural sweetness and a satisfying chew, while peanut butter provides healthy fats and protein. These Chocolate Peanut Butter Dates deliver indulgent flavor without excessive added sugars, making them a smart choice for a healthier craving.
Quick, Customizable, and Oh-So-Satisfying
From start to finish, this recipe is incredibly efficient, requiring minimal active time and no baking. It’s also remarkably versatile, easily adapted with different nuts, spices, or even alternative nut butters to suit any palate or dietary preference.
The Simple Stars: Essential Ingredients for Your Chocolate Peanut Butter Dates
The Medjool Date Foundation
We specifically use large Medjool dates for their soft, plump texture and rich, caramel-like flavor. Their size makes them ideal for stuffing, creating a substantial and satisfying bite.
Choosing Your Creamy Core
Creamy peanut butter or almond butter forms the delicious, gooey center. Ensure you use a smooth, natural variety without added sugars for the best flavor and texture contrast. This creamy filling is what truly defines these Chocolate Peanut Butter Dates.
Decoding the Perfect Chocolate Coating
For a guaranteed smooth finish, chocolate melting wafers are highly recommended as they melt beautifully. If using chocolate chips, opt for a high-quality brand designed for melting to achieve a similar silky consistency and avoid seizing issues.
Elevating Flavors with Finishing Touches
Chopped almonds or other nuts add a delightful crunch and nutty flavor, contrasting with the soft date and creamy filling. A sprinkle of flaky sea salt enhances all the flavors, cutting through the sweetness for a perfectly balanced bite.
Gather Your Gear: Tools for Dipping Perfection
Essential Kitchen Utensils
You’ll need a small paring knife for carefully pitting the dates and measuring cups and spoons for accurate ingredient portions. A sturdy mixing bowl and a baking sheet lined with parchment or wax paper are crucial for preparing and setting your treats.
Handy Helpers for Chocolate Work
A double boiler setup (a heatproof bowl over a pot of simmering water) is ideal for gentle chocolate melting. Alternatively, a microwave-safe bowl works well for controlled heating. Parchment or wax paper is non-negotiable for preventing sticking and easy cleanup once the dates are dipped.
Crafting Your Chocolate Peanut Butter Dates: A Step-by-Step Guide
Preparing the Medjool Dates for Stuffing
Begin by carefully slitting each large Medjool date lengthwise down one side with a small paring knife. Be gentle and avoid cutting all the way through, as you want to create a pocket. Remove the pit with the tip of your knife, leaving the date intact and ready for filling.
Filling with Flavor: Peanut Butter Perfection
Using a small spoon, fill each pitted date with about one teaspoon of your chosen creamy peanut butter or almond butter. Gently press the date closed around the filling. The natural stickiness of the date will help seal the nut butter inside, creating a neat little package.
The Game-Changing Chocolate Melting Method
This step is critical for success. If using chocolate chips, chop them into smaller pieces for faster, more even melting. Set up a double boiler by placing a heatproof bowl over a pot of simmering water, ensuring the bowl’s bottom doesn’t touch the water.
Alternatively, use a microwave-safe bowl, melting the chocolate in 30-second intervals. Whether using a double boiler or microwave, stir gently but constantly. The key is low heat and patience.
Never let the chocolate overheat or come into contact with water, which can cause it to seize into an unworkable lump. Stop heating when just a few small lumps remain, and then stir vigorously until the residual heat melts them completely smooth. This ensures a beautifully silky, dippable chocolate.
Dipping, Decorating, and Drying
Once your chocolate is perfectly smooth, hold a filled date by one end and dip it into the melted chocolate. Swirl it gently to coat evenly, then lift the date, allowing any excess chocolate to drip back into the bowl. A fork or spoon can help scrape off extra chocolate for a cleaner finish.
Immediately place the dipped date onto your prepared baking sheet lined with parchment paper. While the chocolate is still wet and glossy, sprinkle generously with chopped nuts and a pinch of flaky sea salt. The salt is crucial for balancing the sweetness.
Chilling for the Perfect Set
Repeat the dipping and decorating process with the remaining dates. Once all dates are coated and topped, transfer the baking sheet to the refrigerator. Chill for at least 30 minutes, or until the chocolate is completely set and firm to the touch.
Mastering Your Chocolate Peanut Butter Dates: Expert Tips & Tricks
Ensuring a Foolproof Chocolate Dip
Always melt chocolate slowly and at a low temperature to prevent burning or seizing. If your chocolate seems too thick, add a tiny bit of coconut oil or a neutral oil (1/4 teaspoon at a time) and stir well to thin it out slightly, but be very cautious not to add too much.
Ensure all your tools and ingredients are completely dry; even a tiny drop of water can cause chocolate to seize instantly.
Flavor Variations and Customizations
Experiment with different nut butters like cashew butter or sunflower seed butter for unique flavors. For a different chocolate experience, try dark chocolate for a richer taste or white chocolate for a sweeter profile. You can also mix in a little orange zest or peppermint extract into the melted chocolate for festive twists.
Beyond nuts and sea salt, consider toppings like toasted shredded coconut, mini chocolate chips, colorful sprinkles, or a drizzle of contrasting chocolate. For another delightful no-bake treat, you might enjoy making easy no-bake chocolate cream loaf.
Presentation Pointers
To make your Chocolate Peanut Butter Dates look extra special, use a small spoon to create decorative swirls on top of the chocolate before it sets. Arrange them artfully on a platter for serving or package them in small boxes tied with a ribbon for a thoughtful homemade gift.
Common Queries & Clever Solutions for Your Chocolate Peanut Butter Dates
“My Chocolate Seized!” – Troubleshooting Guide
If your chocolate seizes (becomes a stiff, crumbly paste), it’s likely due to water contact or overheating. Try to rescue it by stirring in a small amount of vegetable oil or melted shortening, a teaspoon at a time, until it loosens. This won’t make it perfectly dippable, but it can be used for other purposes, like a chocolate crumb topping.
To prevent seizing, ensure your bowl is completely dry, and no steam or water splashes into the chocolate while melting.
Dates Not Holding Shape?
If your Medjool dates are very soft, they might not hold the nut butter filling as well. Choose firmer, plumper dates if possible. Also, avoid overfilling them; a modest teaspoon of nut butter is usually sufficient. You can briefly chill the filled dates before dipping to help them firm up.
Uneven Coating Woes
An uneven coating usually means your chocolate isn’t at the right consistency or temperature. It might be too thick (add a tiny bit of oil) or too cool (gently rewarm). Ensure you swirl the date thoroughly and allow excess chocolate to drip off before placing it on the parchment paper. Using a fork to support the date can also help achieve an even coat.
Enjoying Your Chocolate Peanut Butter Dates: Serving & Storage Tips
Ideal Serving Temperatures and Pairings
These Chocolate Peanut Butter Dates are best enjoyed chilled, as this allows the chocolate to maintain its firm snap and the peanut butter to be perfectly creamy. They pair wonderfully with a cup of coffee, a glass of cold milk, or even a robust tea. For more chocolate and peanut butter delights, consider our dark chocolate peanut butter cups.
Keeping Them Fresh: Storage Guidelines
Store your finished Chocolate Peanut Butter Dates in an airtight container in the refrigerator. This will keep the chocolate firm and prevent the dates from drying out. Properly stored, they maintain their freshness and texture beautifully.
Make-Ahead Marvels for Easy Entertaining
These treats are perfect for making in advance, as they require chilling time and store well. Prepare a batch a day or two before a party or gathering, freeing up your time on the day of the event. They’re also an excellent option for meal prepping healthy snacks throughout the week.
Your Top Questions About Chocolate Peanut Butter Dates Answered
Can I use different types of dates?
While Medjool dates are highly recommended for their size, softness, and caramel notes, you can use other large, soft dates like Deglet Noor. Just be aware that their texture and sweetness may differ slightly, and you might need to adjust the amount of filling if they are smaller.
Are these suitable for dietary restrictions (e.g., vegan, gluten-free)?
Yes, these Chocolate Peanut Butter Dates are naturally vegan and gluten-free, provided you use dairy-free chocolate and ensure your peanut or almond butter is pure. Always check ingredient labels to confirm no hidden dairy or gluten-containing additives.
How long do Chocolate Peanut Butter Dates last?
When stored in an airtight container in the refrigerator, these delicious treats will last for up to 1-2 weeks. The chocolate coating helps preserve their freshness, keeping the dates moist and the peanut butter soft.
Can I freeze these treats?
Absolutely! These dates freeze beautifully. Place them in a single layer on a baking sheet to freeze, then transfer to a freezer-safe airtight container or bag. They will keep for up to 2-3 months. Thaw them in the refrigerator for a few hours before serving, or enjoy them straight from the freezer for a firmer bite.
Ready to Indulge? Share Your Chocolate Peanut Butter Dates Creation!
You’ve now mastered the art of creating perfect Chocolate Peanut Butter Dates with a foolproof silky finish. These simple yet elegant treats are bound to become a favorite in your household. Don’t hesitate to experiment with your favorite toppings and make them uniquely yours.
I encourage you to whip up a batch and share your delicious creations! We’d love to see how you customize these decadent delights.
Chocolate Peanut Butter Dates
Course: SnacksCuisine: American CuisineDifficulty: easy12
dates20
minutes5
minutes25
minutesAmerican Cuisine
Ingredients
12-15 large Medjool dates
About 1/2 cup creamy peanut butter or almond butter
1 cup chocolate melting wafers or good quality chocolate chips
1/4 cup chopped almonds or other nuts
Flaky sea salt, for sprinkling
Directions
- Prepare the dates. Use a small paring knife to make a slit down one side of each date and carefully remove the pit. Be careful not to cut all the way through.
- Fill each date with about 1 teaspoon of peanut butter or nut butter. Gently press the date closed around the filling.
- Prepare your melting station. Chop the chocolate if using chocolate chips. Set up a double boiler by placing a heatproof bowl over a pot of simmering water, ensuring the bottom of the bowl does not touch the water. Alternatively, use a microwave-safe bowl and melt the chocolate in 30-second intervals, stirring thoroughly after each interval.
- This is the key to smooth chocolate: Add the chocolate to your prepared melting station. If using a double boiler, stir gently and constantly as the chocolate melts. If using the microwave, stir vigorously after each 30-second burst. Use low to medium heat and never let the chocolate overheat or come into contact with water, which can cause it to seize. Stop heating when just a few small lumps remain and stir until completely smooth from the residual heat. This gentle, low-and-slow method ensures your chocolate stays silky.
- Once the chocolate is perfectly smooth, hold a filled date by one end and dip it into the melted chocolate, swirling gently to coat. Lift the date out, letting excess chocolate drip back into the bowl. Use a fork or spoon to help scrape off any extra chocolate from the bottom if needed for a cleaner look.
- Immediately place the dipped date onto a baking sheet lined with parchment paper or wax paper. While the chocolate is still wet, sprinkle the top with chopped nuts and a pinch of flaky sea salt.
- Repeat with the remaining dates.
- Place the baking sheet in the refrigerator for at least 30 minutes, or until the chocolate is completely set and firm.
- Store finished dates in an airtight container in the refrigerator.
Notes
- Requires additional chilling time (at least 30 minutes) for chocolate to set.