Oh, banana pudding. Just the words conjure up images of creamy goodness, sweet bananas, and those delightfully soft vanilla wafers. It’s a dessert that feels like a warm hug! But let’s be honest, we’ve all been there – excitedly digging into a bowl only to find the cookies at the bottom have dissolved into a watery, mushy disappointment. It’s a tragedy, really!
For years, I struggled with the dreaded soggy cookie syndrome in my banana pudding. I tried everything – different cookie brands, varying chill times, even attempting to waterproof the wafers (okay, maybe not that last one, but I was desperate!). That is, until I discovered the simple, game-changing secret: the layering technique.
This recipe for Classic Banana Pudding Jars focuses specifically on this method, ensuring each bite delivers that perfect balance of creamy pudding, sweet banana, and tender-yet-intact vanilla wafer. Making individual jars isn’t just cute for serving; it actually helps control the moisture distribution, leading to a superior texture that stays just right. If you love easy, creamy desserts that bring smiles, you might also enjoy our easy no-bake chocolate cream loaf or a classic chocolate cream pie!
Ready to banish mushy cookies forever and create individual servings of banana pudding bliss? Let’s get started!
Why You’ll Fall in Love with These Banana Pudding Jars
This isn’t just any banana pudding recipe; it’s the one that solves the most common problem while delivering incredible flavor and convenience. Here are a few reasons why these classic banana pudding jars will become your go-to dessert:
- No More Mushy Cookies: Seriously, the layering technique is a revelation. You get soft cookies, but they hold their shape just enough.
- Perfect Portion Control: Serving individual jars means everyone gets their own delightful dessert without any fuss. They’re great for parties, picnics, or just a treat for two.
- Quick & Easy Assembly: Once your pudding and whipped cream are ready, layering takes mere minutes. It’s a fantastic no-bake (well, mostly no-bake!) option.
- Crowd-Pleaser: Who doesn’t love classic banana pudding? This recipe captures all that nostalgic flavor.
- Beautiful Presentation: Serving in jars looks elegant and inviting, making dessert feel extra special.
Gathering Your Ingredients for Classic Banana Pudding Jars
Creating these delightful individual treats requires just a handful of simple ingredients, most of which you likely already have in your pantry. The magic lies in how these humble components come together to form a creamy, comforting dessert. Quality matters here, especially when it comes to the freshness of your fruit and the richness of your dairy (or non-dairy) products.
Here’s what you’ll need, along with a few notes on selecting the best for this recipe:
- 1 small box (3.4 oz) instant vanilla pudding mix: This provides the creamy base with minimal fuss. Instant pudding is key here for its quick setting time, which is important for the layering process. Make sure it’s instant, not cook-and-serve.
- 2 cups cold milk (dairy or non-dairy): The liquid that transforms the pudding mix into a luscious custard. Using cold milk is essential for instant pudding to thicken properly and quickly according to package directions. Feel free to use your preferred type of milk, whether it’s whole milk for richness or a non-dairy alternative like almond or oat milk.
- 1 teaspoon vanilla extract (optional): While the pudding mix provides vanilla flavor, a little extra splash of pure vanilla extract can boost that classic taste and add a touch of aromatic depth. Use good quality extract for the best flavor.
- 1 cup heavy cream: This is the foundation for our heavenly whipped cream topping. Heavy cream (sometimes called heavy whipping cream) has a high enough fat content (typically 36% or more) to whip into stable peaks that hold their shape beautifully over the pudding.
- 2 tablespoons granulated sugar: To sweeten the whipped cream. This amount provides a lovely, not-too-sweet balance to the rich cream and sweet pudding/bananas. You can adjust this slightly based on your preference, but remember the pudding and bananas also contribute sweetness.
- 2-3 ripe bananas, sliced: The star fruit! Choose bananas that are ripe but still firm enough to hold their shape when sliced. They should have yellow skins with maybe a few brown spots, but avoid overly soft or bruised bananas, as they can become mushy too quickly in the pudding. Slice them just before assembling to minimize browning.
- About 2 cups vanilla wafer cookies: The crucial textural component. Classic Nilla Wafers are the traditional choice, providing that familiar flavor and just the right porous structure to absorb moisture without disintegrating too fast. The quantity is approximate; you’ll need enough to create three layers in your jars.
Having all your ingredients measured and ready before you start assembling makes the process smooth and quick, which is beneficial for that no-mush layering technique!
Crafting Your Classic Banana Pudding Jars: Step-by-Step
Putting these jars together is incredibly straightforward, but paying attention to a couple of key details will ensure your cookies stay perfectly tender and your pudding is smooth and creamy. Let’s walk through the process, focusing on making every layer count!
-
Prepare the vanilla pudding base: Begin by grabbing a medium-sized bowl. Pour in the small box of instant vanilla pudding mix. Measure out your 2 cups of cold milk and add it to the bowl with the pudding mix. Now, whisk vigorously! You want to really get in there with your whisk, ensuring all the pudding powder is dissolved and there are absolutely no lumps. Whisking for about 2 minutes should do the trick. If you’re using it, stir in the teaspoon of vanilla extract at this point for an extra layer of flavor. Once thoroughly whisked, resist the urge to touch it! Let the mixture sit undisturbed for 5 minutes. This resting time is critical, allowing the instant pudding to fully activate and thicken into that characteristic wobbly, creamy consistency we need for layering.
-
Whip the cream for a fluffy topping: While your pudding is setting up, turn your attention to the whipped cream. In a separate, clean bowl (preferably chilled, as cold bowls help cream whip faster), pour in the 1 cup of heavy cream. If you have an electric mixer (handheld or stand mixer), this is the easiest way to get perfect whipped cream. Start beating the cream on medium speed. Watch closely as it goes from liquid to slightly thicker, forming soft peaks (where the peaks curl over when you lift the whisk). At this stage, gradually add the 2 tablespoons of granulated sugar while continuing to beat. Increase the speed slightly and continue beating until stiff peaks form – these peaks will stand straight up when the whisk is lifted. Be careful not to over-beat, or you’ll end up with butter! If you don’t have an electric mixer, you can certainly do this by hand with a whisk, it just requires a bit more arm power and patience!
-
Begin assembling the jars with the key layering technique: This is where the “no mushy cookies” magic happens! You’ll need two individual jars (or glasses, bowls, etc., suitable for single servings). Place a single layer of vanilla wafers flat on the bottom of each jar. Don’t try to cram too many in or overlap them excessively; a simple base layer is perfect. Next, add a layer of your sliced ripe bananas directly over the cookies. Now, take about a third of the thickened vanilla pudding you prepared earlier. Spoon this pudding gently over the banana layer in each jar. The goal is to cover the bananas and cookies beneath, but do so without pressing down heavily or trying to force the pudding into every tiny crevice. A lighter touch allows the pudding’s moisture to seep down gradually rather than flooding the cookies instantly.
-
Repeat the layers to build your dessert: Now, repeat the exact same layering sequence. Add another layer of vanilla wafers over the pudding, followed by more sliced bananas, and then another third of the prepared pudding. For your final layer, add a third layer of vanilla wafers, the remaining sliced bananas, and finally, top with the rest of the pudding. The critical part of repeating these layers is to work relatively quickly once the pudding is ready and, again, to avoid pressing down on any layer. You want to build height without compaction. This quick, gentle layering is the cornerstone of preventing overly mushy cookies by allowing controlled moisture absorption during chilling.
-
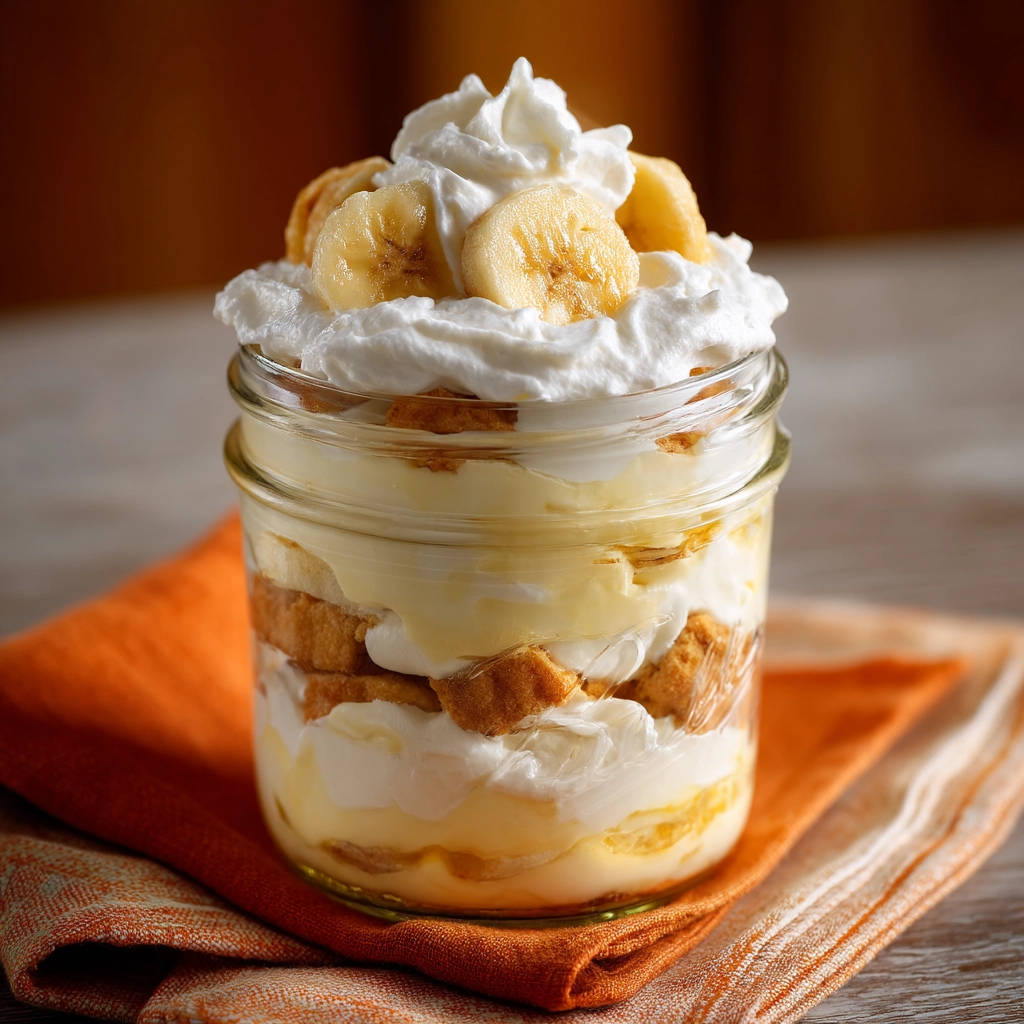
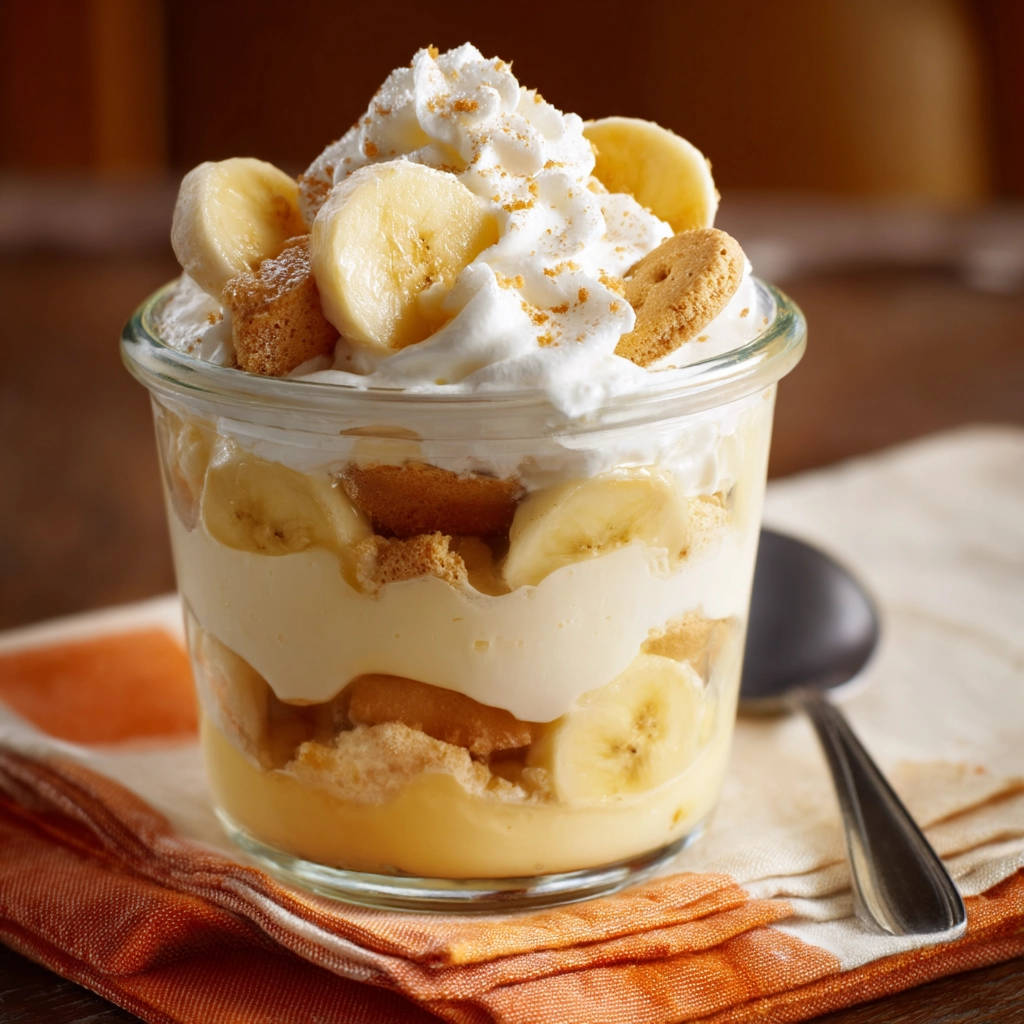
Add the whipped cream topping and garnish: Spoon or pipe a generous dollop (or a beautiful swirl!) of your freshly whipped cream over the top of the final pudding layer in each jar. The whipped cream adds a lovely richness and lightness to contrast with the dense pudding. If you like, you can reserve a few extra banana slices to use as a fresh garnish on top of the whipped cream just before serving, or sprinkle with a few crushed vanilla wafers for texture.
-
Refrigerate for the perfect texture: This step is non-negotiable and is just as important as the layering technique! Cover the jars tightly (lids or plastic wrap work well). Place them in the refrigerator for at least 2 hours. This chilling time serves multiple purposes: it allows the pudding to set further, the flavors to meld, and, most importantly for our mission, it gives the vanilla wafers time to soften to that ideal tender, cake-like consistency without becoming a watery mess. For the absolute best cookie texture, aim to serve these within 4-6 hours of chilling. While they are still edible after that, the wafers may start to become more uniformly soft if left for much longer.
Tips for Perfect Classic Banana Pudding Jars Every Time
Mastering the no-mush banana pudding jar is simple with the right technique, but a few extra tips can take your dessert from great to absolutely perfect!
- Choose the Right Bananas: As mentioned, ripe but firm bananas are key. Green bananas are flavorless and hard, while overly brown, mushy bananas can disintegrate and water down your pudding.
- Keep Ingredients Cold: Ensure your milk and heavy cream are very cold before starting. This helps the instant pudding set properly and the heavy cream whip up beautifully.
- Don’t Overfill Jars: Leave enough space at the top for the whipped cream layer. This also prevents spillage when moving or covering the jars.
- Layer Swiftly: Once the pudding is ready, assemble the jars without delay. The longer the cookies sit exposed to the pudding before chilling, the more moisture they’ll absorb uncontrollably.
- Chill Time is Crucial: Stick to the recommended 2-4 (up to 6) hour chilling time for optimal cookie texture. Serving too soon means hard cookies; waiting too long risks mush.
- Slice Bananas Last: Bananas brown quickly once sliced. Prepare all your other components first, and slice the bananas right before you start layering the jars.
Recipe Variations
While the classic is amazing, you can easily adapt this recipe to suit your taste or what you have on hand (remembering our NO alcohol and NO pork rule!):
- Add Other Fruit: Sliced strawberries or even some raspberries can add a different dimension, though be mindful that some fruits release more liquid than bananas. Strawberries are a popular addition.
- Try Different Cookies: Shortbread cookies, graham cracker pieces, or even certain types of plain shortcake could work, but the absorption rate will vary, potentially impacting the chill time needed for the perfect texture.
- Spiced Pudding: Whisk a pinch of cinnamon or nutmeg into the instant pudding mix for a warmer flavor profile.
- Chocolate Twist: Use instant chocolate pudding mix instead of vanilla for a chocolate-banana treat.
Your Classic Banana Pudding Jar Questions Answered (FAQ)
Why are my vanilla wafers still mushy even in a jar?
The most common culprit, even with this method, is over-chilling. The goal is for the cookies to soften, but not dissolve completely. If you leave them in the fridge for much longer than 6 hours, the moisture will eventually saturate them. Ensure you are layering gently and not pressing down, and stick to the 2-4 hour minimum, but serve within 4-6 hours for best results.
Can I use homemade pudding instead of instant?
Absolutely! If you have a favorite cooked vanilla pudding recipe, you can use that. However, you may need to adjust the chilling time slightly, as cooked pudding often has a different thickness and setting time than instant. Ensure the pudding is completely cooled before layering.
How long do Classic Banana Pudding Jars last in the refrigerator?
For the absolute best texture (cookies soft but not mush), they are best enjoyed within 4-6 hours of chilling. You can store them for up to 2-3 days, but the cookies will become progressively softer over time.
Can I make a large batch in a trifle dish instead of jars?
Yes, the same layering principles apply! Use a trifle dish or a large serving bowl. Layer wafers, bananas, pudding, repeating until the dish is full, finishing with whipped cream. Be mindful that in a larger dish, gravity can pull more moisture down, potentially leading to slightly softer bottom layers compared to individual jars, but the technique still helps prevent total mush.
Can I use frozen bananas?
No, fresh, ripe bananas are essential. Frozen bananas release too much liquid as they thaw, which would make the pudding and cookies watery and mushy very quickly.
Enjoy Your Homemade Classic Banana Pudding Jars!
There you have it! The simple secret to enjoying that beloved classic banana pudding flavor with the perfect cookie texture, all neatly presented in charming individual jars. This recipe is proof that sometimes the smallest tweaks, like a specific layering method and mindful chilling time, can make all the difference in a classic dessert.
Whether you’re making these for a special occasion or just to satisfy a craving for comfort food, they are sure to be a hit. Give this method a try and say goodbye to soggy banana pudding blues!
Have you tried this recipe? What are your favorite banana pudding secrets? Let me know in the comments below! Happy baking (or rather, no-baking)!
Classic Banana Pudding Jar

Ingredients
- 1 small box (3.4 oz) instant vanilla pudding mix
- 2 cups cold milk (dairy or non-dairy)
- 1 teaspoon vanilla extract (optional)
- 1 cup heavy cream
- 2 tablespoons granulated sugar
- 2-3 ripe bananas, sliced
- About 2 cups vanilla wafer cookies
Directions
- Prepare the vanilla pudding: In a medium bowl, whisk together the instant pudding mix and cold milk according to package directions. Stir in the vanilla extract if using. Let it sit for 5 minutes to thicken.
- Make the whipped cream: In a separate bowl, beat the heavy cream with an electric mixer (or whisk vigorously) until soft peaks form. Gradually add the sugar and continue beating until stiff peaks form.
- Assemble the jars, focusing on the layering technique that prevents mushiness: Place a single layer of vanilla wafers in the bottom of each jar. Add a layer of sliced bananas over the cookies. Spoon about a third of the prepared pudding over the banana layer, gently ensuring it covers the cookies beneath but isn’t so thick it instantly saturates them.
- Repeat the layers: Add another layer of vanilla wafers, then bananas, then pudding. Finish with a third layer of wafers, bananas, and the remaining pudding. The key is to layer quickly and avoid pressing down, allowing the pudding’s moisture to soften the cookies gradually.
- Top and chill: Spoon or pipe a generous amount of whipped cream over the top of each jar. Garnish with a few extra banana slices.
- Refrigerate: Cover the jars and refrigerate for at least 2 hours. This chilling time is crucial; it allows the cookies to soften to the perfect texture without becoming completely waterlogged mush. Do not chill for more than 4-6 hours for optimal cookie texture.