There’s nothing quite like the joy of a homemade taco night, yet many struggle with dry, bland ground beef that disappoints. I’ve refined a simple technique that guarantees perfectly moist and flavor-packed meat every time, transforming your approach to Classic Beef Tacos.
Get ready to elevate your next taco night with a recipe that’s as reliable as it is delicious.
Why This Classic Beef Tacos Recipe Belongs in Your Rotation
The Secret to Unbeatable, Moist Beef
The core innovation in this recipe is a simple liquid trick that rehydrates the cooked ground beef, locking in moisture and infusing deep flavor. This method ensures your ground beef filling is never dry or crumbly.
Quick Prep, Maximum Flavor: Ready in 35 Minutes
Despite its incredible depth of flavor, these Classic Beef Tacos come together remarkably fast. With just 15 minutes of prep and 20 minutes of cook time, you can have a full, satisfying meal on the table in under an hour.
Customizable for Every Palate and Occasion
Tacos are inherently versatile, and this recipe provides the perfect flavorful canvas. Easily adapt the toppings to suit individual tastes, dietary needs, or whatever fresh ingredients you have on hand.
Essential Ingredients for Your Perfect Classic Beef Tacos
The Heart of the Taco: Ground Beef Selection
For succulent taco meat, lean ground beef (85-90%) is ideal as it requires minimal draining. If using leaner beef, a touch of olive oil helps with browning and prevents sticking.
Fattier beef will render more grease, which must be drained for the best results.
Crafting the Signature Spice Blend
Our carefully selected spice blend is crucial for authentic taco flavor. Chili powder brings warmth, cumin offers earthy depth, and garlic and onion powders provide foundational savory notes.
Smoked paprika adds a hint of smoky complexity, while dried oregano brightens the entire profile. Together, these spices create that quintessential taco seasoning.
The Moisture Magic: Water or Vegetable Broth
This is the star ingredient that sets our recipe apart. A half-cup of water or vegetable broth, added post-browning, rehydrates the meat and allows it to absorb all the delicious spices.
Vegetable broth adds an extra layer of savory depth, enhancing the overall taste significantly.
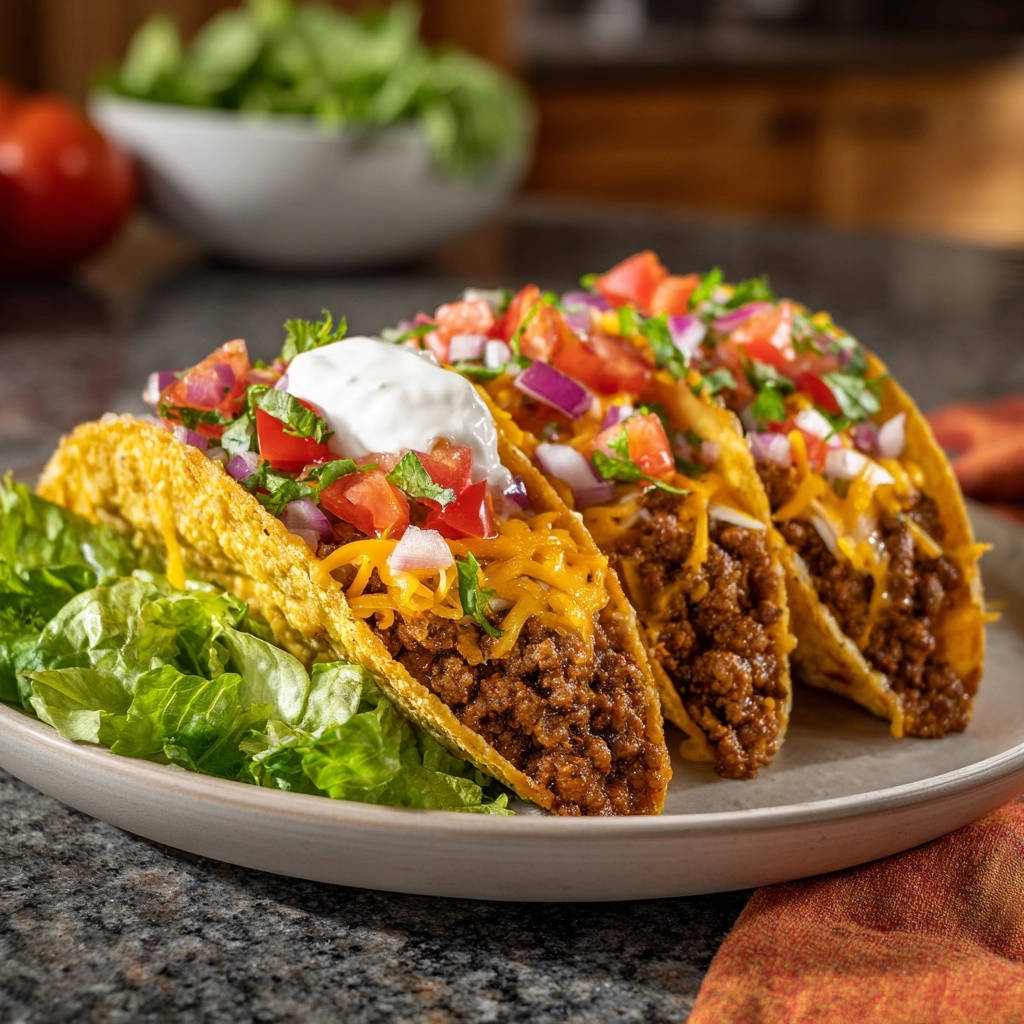
Fresh Toppings & Crunchy Shells
Quality ingredients for your taco toppings make all the difference. Crisp shredded lettuce, ripe diced tomatoes, sharp red onion, and fresh cilantro add essential texture and vibrant flavor.
Warm, crunchy hard taco shells provide the satisfying crunch that completes the classic experience. Fresh shredded cheese and cool sour cream offer creamy contrast.
Step-by-Step: Mastering Juicy Classic Beef Tacos
- Step 1: Brown Your Beef to Perfection.
Heat a large skillet over medium-high heat. If your ground beef is very lean, add a tablespoon of olive oil to the pan; this helps prevent sticking and promotes even browning. Add the ground beef and cook, using a spoon to break it into small, even crumbles until it’s fully browned with no pink remaining.
- Step 2: Drain Excess, Not Flavor.
Once the beef is thoroughly browned, carefully drain any significant excess grease from the skillet. This crucial step prevents your assembled tacos from becoming overly greasy. However, be mindful not to over-drain, as some natural moisture is vital for the next step.
- Step 3: Infuse with Signature Spices.
Return the beef to the heat. Add the salt, black pepper, chili powder, ground cumin, garlic powder, onion powder, smoked paprika, and dried oregano directly to the browned meat. Stir vigorously to ensure every piece of beef is evenly coated with this aromatic blend, distributing the rich flavors throughout.
- Step 4: The Game-Changing Simmer (Our Juicy Secret!).
Here’s the heart of our “never dry” promise for juicy beef tacos: Pour the 1/2 cup of water or vegetable broth into the skillet with the seasoned beef. Stir everything together gently to combine, then bring the mixture to a gentle simmer.
- Step 5: Perfecting the Simmer & Absorption.
Reduce the heat to medium-low. Allow the mixture to simmer for 5 to 7 minutes, stirring occasionally. This step is vital as the liquid rehydrates the meat and infuses it deeply with all those delicious spices, resulting in incredibly moist and flavorful beef that is never dry and always satisfying.
- Step 6: Prepare Your Crispy Shells.
While the beef simmers, prepare your hard taco shells. You can warm them in the oven according to package directions (typically a few minutes at 300 degrees Fahrenheit for optimal crispness) or microwave them briefly for a quick warm-up. This ensures they are ready for filling and won’t break.
- Step 7: Arrange Your Flavor Bar.
For easy and fun assembly, arrange your prepared toppings in separate bowls. This includes shredded lettuce, diced tomatoes, finely diced red onion, chopped fresh cilantro, shredded cheese, and sour cream. A colorful topping bar encourages guests to customize their own Classic Beef Tacos to their liking.
- Step 8: Assemble & Savor.
Once the beef has absorbed most of the liquid and your shells are warm, it’s time to assemble! Spoon the seasoned, moist ground beef generously into each warm taco shell. Top with your favorite prepared toppings. Serve immediately and enjoy your perfectly juicy Classic Beef Tacos!
Chef’s Tips for Next-Level Classic Beef Tacos
Choosing the Right Beef Fat Content
While lean ground beef is recommended to minimize grease, 80/20 ground beef can also be used. Just ensure you thoroughly drain the rendered fat after browning to avoid a greasy texture, before adding the spices and liquid.
Amping Up the Spice: A Flavor Boost
To increase the heat, add a pinch of cayenne pepper or a diced jalapeño (seeds removed for milder heat, left in for more kick) with the spices. For extra depth, toast the whole cumin seeds and grind them just before adding.
You can also use a homemade chili powder for an even fresher flavor, or consider making your own homemade chili powder to fully customize the blend.
Beyond Hard Shells: Versatile Serving Options
While hard shells are classic, this delicious beef filling is incredibly versatile. Serve it in warm, soft tortillas for a softer bite, or wrap it in large lettuce leaves for a fresh, low-carb option.
It also makes an excellent filling for easy taco bake or a satisfying taco bowl over rice or quinoa.
Prepping Your Toppings Ahead of Time
To save time on busy weeknights, prepare all your toppings in advance. Dice the tomatoes and onions, shred the lettuce, and chop the cilantro hours or even a day beforehand. Store them in airtight containers in the refrigerator, ready for quick assembly.
Troubleshooting Common Taco Night Mishaps
“My Beef Tastes Dry or Bland!”
The key to juicy, flavorful beef lies in the simmering step with water or broth. Ensure you allow the liquid to fully absorb into the meat, infusing it with flavor and preventing dryness. Also, make sure your spices are fresh and properly measured.
“Why Are My Tacos So Greasy?”
Excess grease is usually due to not fully draining the fat after browning the beef. If using fattier ground beef, it’s crucial to thoroughly tilt the pan and spoon or pour out the rendered fat before adding the spices and liquid.
“My Taco Shells Are Falling Apart!”
Taco shells can become brittle if over-baked or if not warmed properly. For hard shells, follow package directions precisely, typically warming them for just a few minutes in a moderate oven. Avoid microwaving them for too long, as this can make them tough or unevenly heated.
Elevate Your Classic Beef Taco Experience
Creative Topping Combinations to Explore
Beyond the basics, consider adding pickled red onions for a tangy crunch, a dollop of creamy avocado crema, or a vibrant corn and black bean salsa. A sprinkle of crumbled cotija cheese or a squeeze of fresh lime juice can also brighten the flavors.
Make-Ahead & Storage Tips
The seasoned ground beef can be cooked entirely in advance and stored in an airtight container in the refrigerator for up to 3-4 days. Reheat gently in a skillet with a splash of water or broth to restore moisture.
Most prepared toppings will last 1-2 days in the fridge, making weeknight assembly a breeze. Cooked Classic Beef Tacos are best enjoyed immediately, as shells can get soggy.
Serving Your Tacos: Family Style or Individual Portions?
For a fun and interactive meal, set up a “taco bar” with all the components arranged buffet-style, allowing everyone to build their own custom tacos. For individual portions, assemble them fresh for each person as they’re ready to eat.
Frequently Asked Questions About Classic Beef Tacos
Can I use different ground meat like turkey or chicken?
Yes, you can absolutely substitute ground turkey or chicken. For the best flavor and texture, choose ground turkey with at least 7% fat. You might need to add a touch more olive oil when browning, as poultry tends to be leaner, and ensure your spice blend is robust to compensate for milder meat flavor.
What if I don’t have all the recommended spices?
While the full spice blend provides the most authentic flavor, you can certainly use a good quality pre-made taco seasoning mix as a substitute. Adjust the quantity to taste, typically 2-3 tablespoons per pound of meat. If you’re missing just one or two spices, the recipe will still be delicious.
How long do cooked beef tacos last in the refrigerator?
The cooked, seasoned ground beef filling will last safely in an airtight container in the refrigerator for 3-4 days. For optimal freshness and texture, store the beef and toppings separately, and assemble the tacos just before serving.
Can I make this recipe spicier or milder?
Absolutely! To make it spicier, increase the chili powder, add a pinch of cayenne pepper, or include finely diced jalapeños or serrano peppers. For a milder version, reduce the chili powder or omit the smoked paprika if you prefer a less intense flavor profile.
Ready to Transform Your Taco Tuesday?
With this recipe, dry, bland beef tacos are a thing of the past. Embrace the simple secret to juicy, flavorful meat and customize your toppings to create a meal everyone will love. Get ready to enjoy the best taco night you’ve ever had!

Classic Beef Tacos
Course: Main CourseCuisine: Mexican cuisineDifficulty: easy4
servings15
minutes20
minutes35
minutesMexican cuisine
Ingredients
1 pound lean ground beef
1 tablespoon olive oil (optional, if beef is very lean)
1 teaspoon salt
1/2 teaspoon black pepper
2 teaspoons chili powder
1 teaspoon ground cumin
1 teaspoon garlic powder
1/2 teaspoon onion powder
1/2 teaspoon smoked paprika
1/4 teaspoon dried oregano
1/2 cup water or vegetable broth
12 hard taco shells
1 cup shredded cheddar or Mexican blend cheese
1 head iceberg or romaine lettuce, shredded
2 medium tomatoes, diced
1/2 small red onion, finely diced
1/4 cup chopped fresh cilantro
1/2 cup sour cream
Directions
- Heat a large skillet over medium-high heat. If using very lean beef, add olive oil. Add the ground beef and cook, breaking it up with a spoon, until fully browned.
- Once the beef is browned, drain any excess grease from the skillet. This is key to preventing a greasy taco, but don’t over-drain to remove all moisture.
- Return the beef to the heat. Add the salt, black pepper, chili powder, ground cumin, garlic powder, onion powder, smoked paprika, and dried oregano to the beef. Stir well to coat the meat evenly.
- Here’s the trick to juicy, flavorful meat: Pour the 1/2 cup of water or vegetable broth into the skillet with the seasoned beef. Stir everything together and bring it to a gentle simmer.
- Reduce the heat to medium-low and let the mixture simmer for 5 to 7 minutes, stirring occasionally, until most of the liquid has been absorbed by the beef. This step rehydrates the meat and infuses it with all those delicious spices, making it incredibly moist and flavorful, not dry!
- While the beef simmers, prepare your taco shells. You can warm them in the oven according to package directions (usually a few minutes at 300 degrees Fahrenheit) or microwave them briefly to make them crisp and ready for filling.
- Arrange the shredded lettuce, diced tomatoes, diced red onion, chopped cilantro, shredded cheese, and sour cream in separate bowls for easy assembly.
- To assemble, spoon the seasoned, moist ground beef into each warm taco shell. Top generously with your favorite prepared toppings. Serve immediately and enjoy your perfectly juicy tacos!
Notes
- The key to juicy, flavorful ground beef is simmering it with water or broth and spices after browning.