There’s something uniquely intimidating about a Classic Beef Wellington, isn’t there? I remember many attempts, each met with the disheartening sight of a soggy bottom. That challenge fuelled my resolve, and I’m thrilled to share the meticulously tested methods that ensure a gloriously flaky crust and perfectly tender beef every single time. This isn’t just a recipe; it’s your definitive guide to mastering an impressive dish, designed to build your confidence and deliver stunning results that will truly amaze.
Tired of Soggy Bottoms? Our Foolproof Classic Beef Wellington
This Classic Beef Wellington recipe tackles the most common fears head-on. We’ve refined every step to make it genuinely foolproof, transforming a complex dish into an achievable culinary triumph.
The “Secret” to a Consistently Flaky Crust (Every Time!)
The secret lies in rigorous moisture control and strategic chilling. By meticulously drying the duxelles and ensuring both the beef and the assembled Wellington are thoroughly chilled, we prevent steam from turning your beautiful puff pastry into a damp disappointment.
These crucial steps guarantee your pastry bakes up light, golden, and shatteringly crisp, just as it should be.
Why This Isn’t Your Average Beef Wellington Recipe
Many recipes skip the vital nuances that lead to perfection. Our guide emphasizes critical details, like specific chilling times and the exact consistency needed for your mushroom mixture.
We focus on the “why” behind each instruction, empowering you to understand the process and achieve exceptional results with confidence, avoiding common pitfalls.
The Culinary Confidence You’ll Gain
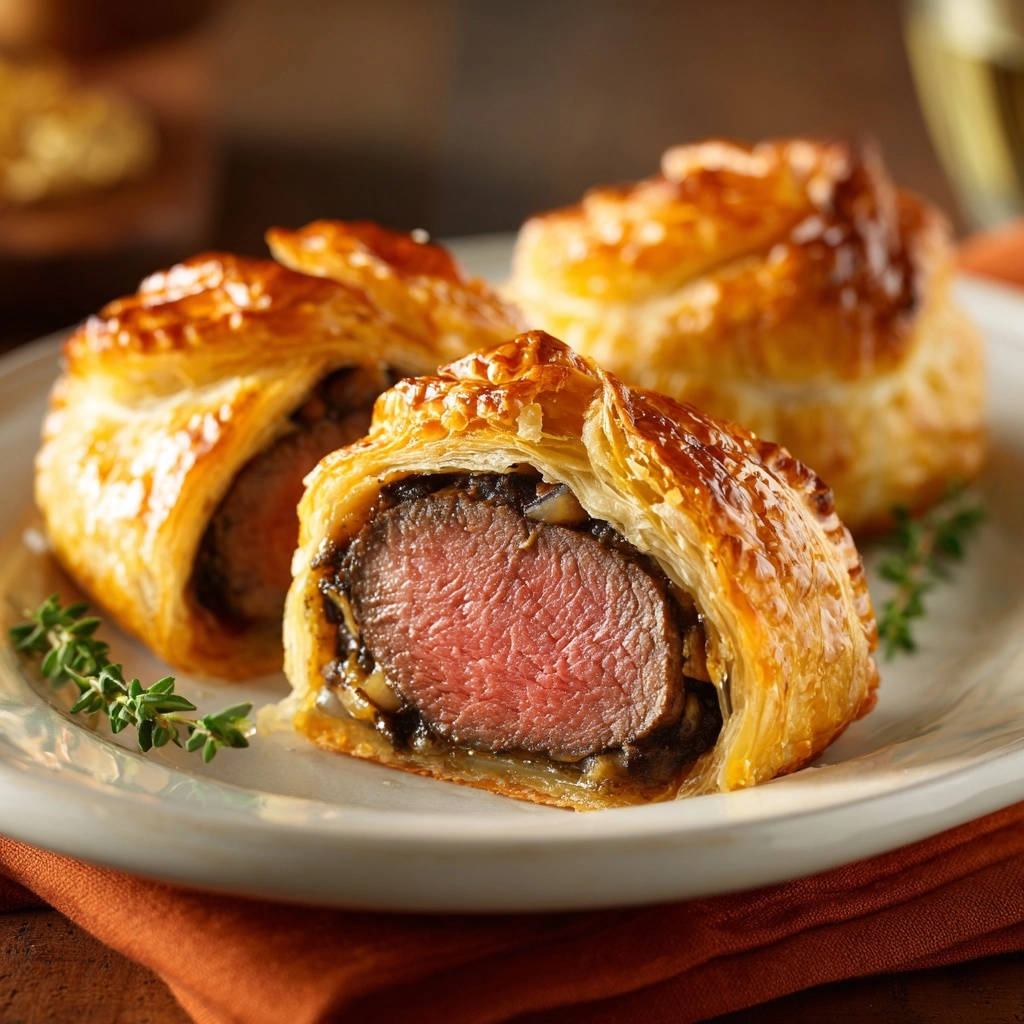
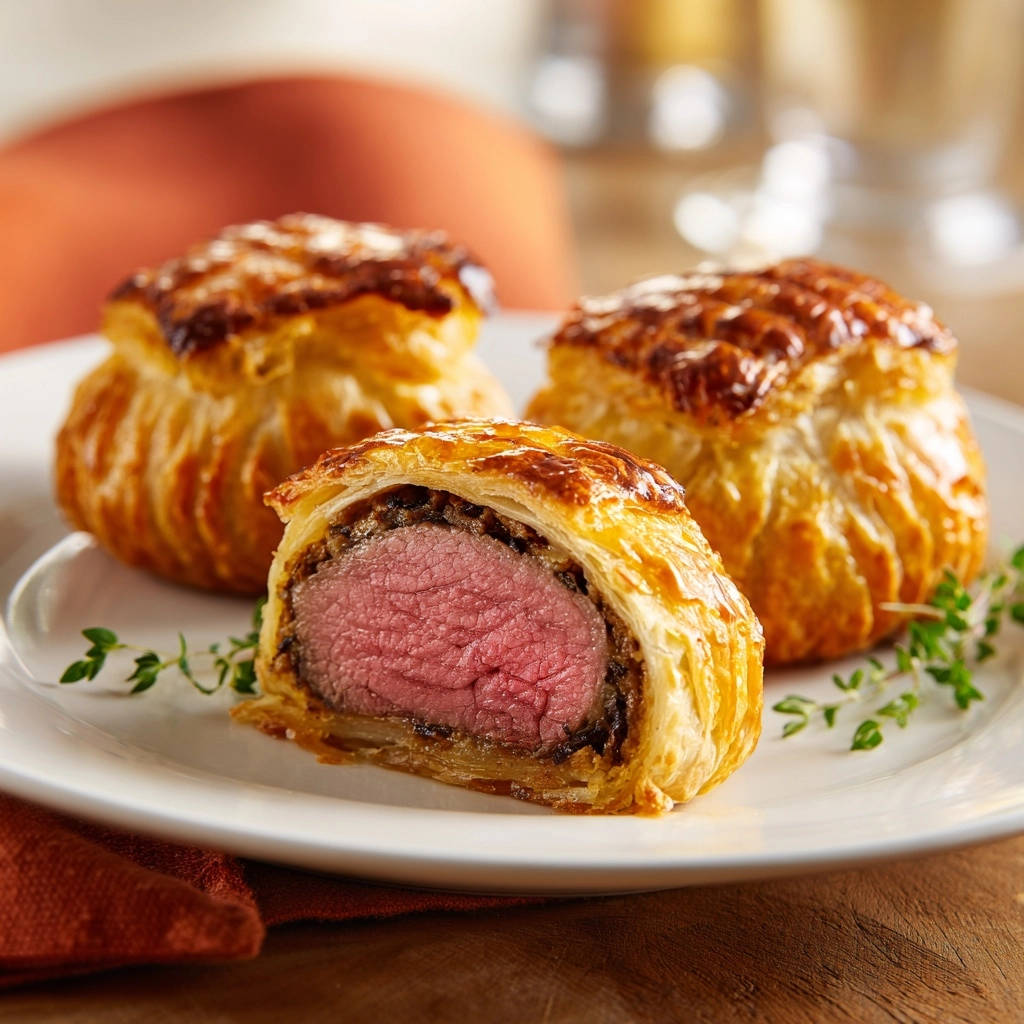
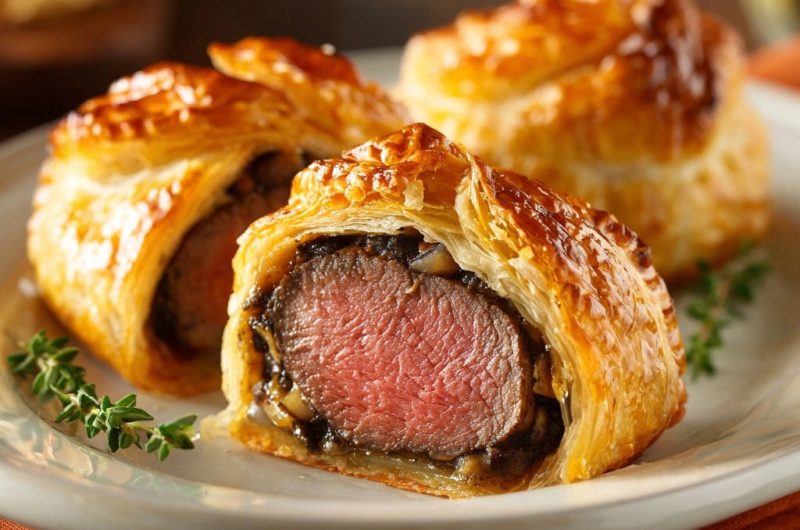
Imagine serving a stunning, golden-brown Classic Beef Wellington, perfectly sliced to reveal a juicy, medium-rare center. This recipe equips you with the expertise to create such a showstopper.
You’ll not only impress your guests but also gain a profound sense of accomplishment in mastering a truly iconic dish.
Essential Ingredients for a Spectacular Classic Beef Wellington
The quality of your ingredients directly impacts the final masterpiece. Choosing wisely ensures the rich flavors and textures this dish is famous for.
The Star: Premium Beef Tenderloin
Select a high-quality center-cut beef tenderloin, preferably prime or choice grade. Its inherent tenderness is paramount, as it’s a lean cut that cooks relatively quickly.
The tenderloin’s uniform shape also makes for easier wrapping and more even cooking within the puff pastry.
The Flavor Foundation: Mastering Duxelles
Cremini mushrooms are ideal for their robust, earthy flavor and lower water content compared to white button mushrooms. Finely chopping them ensures a cohesive, spreadable layer.
Shallots and fresh thyme add aromatic depth and brightness, perfectly complementing the rich beef. The critical step is cooking this mixture until it’s “very dry,” preventing moisture from seeping into your pastry.
The Golden Blanket: Puff Pastry Perfection
Use high-quality all-butter puff pastry if possible; it yields superior flavor and flakiness. Ensure it’s thawed completely but still cold enough to handle without tearing.
The pastry forms the crispy, golden exterior that encases and protects the succulent beef and savory duxelles.
Rounding Out Your Pantry: Salt, Pepper, & More
Generous seasoning with salt and black pepper is essential for the beef itself, building flavor from the inside out. Olive oil is used for searing, creating a beautiful crust on the tenderloin.
Butter enriches the duxelles, while a large egg, whisked for an egg wash, provides that irresistible golden sheen and helps seal the pastry.
Your Culinary Toolkit for Classic Beef Wellington Success
Having the right tools on hand makes the process smoother and more enjoyable. These essential items contribute to a seamless preparation.
Must-Have Equipment for a Smooth Process
-
Large Oven-Safe Skillet: Crucial for searing the beef evenly and efficiently, creating a beautiful crust.
-
Wire Rack & Baking Sheet: Essential for cooling the seared beef and chilling the assembled Wellington, allowing air circulation to prevent steaming.
-
Reliable Meat Thermometer: Absolutely non-negotiable for precise doneness. An instant-read thermometer ensures your beef is perfectly cooked without guesswork.
-
Rolling Pin: For evenly rolling out your puff pastry to the correct dimensions, ensuring consistent thickness.
-
Sharp Knife: For finely chopping mushrooms and shallots, and for clean slicing of the finished Wellington.
-
Parchment Paper: Prevents sticking and makes transferring the Wellington much easier and safer.
Crafting Your Classic Beef Wellington: A Step-by-Step Journey
- Step 1: Preparing and Seasoning the Beef Tenderloin
Start by patting the beef tenderloin exceedingly dry with paper towels. This crucial step removes surface moisture, which is key for achieving a deep, flavorful sear.
Season the beef generously all over with salt and freshly ground black pepper. Don’t be shy; this is where the foundational flavor of your Beef Wellington truly begins.
- Step 2: Searing for Maximum Flavor and Juiciness
Heat olive oil in a large, oven-safe skillet over high heat until it shimmers. The high heat is vital for quickly developing a rich, brown crust on all sides of the beef, locking in its precious juices.
Sear for about 2-3 minutes per side until well browned, then remove the beef and transfer it to a wire rack set over a baking sheet.
- Step 3: The Critical First Chill of the Beef
Allow the seared beef to cool completely on the wire rack, then refrigerate it for at least 30 minutes, or up to 2 hours, until thoroughly chilled. This prevents residual heat from cooking the pastry prematurely.
A cold beef tenderloin is paramount to avoid a soggy bottom and ensure the puff pastry crisps perfectly around it.
- Step 4: Mastering the Dry Duxelles (Mushroom Mixture)
In the same skillet, melt butter over medium heat. Add your finely chopped cremini mushrooms, shallots, and fresh thyme.
Cook this mixture, stirring frequently, for about 15-20 minutes, until ALL the liquid has evaporated and the duxelles are very dry and concentrated in flavor. This is absolutely critical for preventing moisture transfer to the pastry.
Stir in minced garlic during the last 5 minutes of cooking, then season with a pinch of salt and pepper. Spread the cooked duxelles thinly on a plate to cool completely.
- Step 5: Laying the Foundation: Puff Pastry Prep
Lightly flour a clean work surface to prevent sticking. Carefully roll out your thawed puff pastry into a rectangle large enough to fully encase the beef tenderloin, aiming for approximately 14×18 inches.
The even thickness of the pastry is important for uniform baking and a beautiful presentation.
- Step 6: Assembling Your Classic Beef Wellington Masterpiece
Spread the cooled, very dry duxelles evenly over the center of the puff pastry, leaving a clean 2-inch border around all edges. This border is essential for sealing the pastry properly.
Carefully place the chilled beef tenderloin directly in the center of the duxelles-covered pastry. Bring one side of the pastry over the beef, then bring the other side over, overlapping slightly.
Firmly press the overlapping edges and the ends to seal them completely, trimming any significant excess pastry. Ensure the beef is fully enclosed without any gaps.
- Step 7: The Indispensable Second Chill for Structure
Carefully transfer the assembled Wellington, seam-side down, to a parchment-lined baking sheet. Refrigerate for at least 30 minutes, or up to 1 hour.
This re-chilling step helps the puff pastry firm up and hold its shape during baking, resulting in a more uniform and flakier crust.
- Step 8: Preheating and Preparing for the Oven
While the Wellington chills, preheat your oven to a hot 425°F (220°C). This high initial temperature is key for an immediate puff and golden color on your pastry.
Remove the chilled Wellington from the refrigerator just before baking.
- Step 9: The Egg Wash and Decorative Scoring
Lightly brush the entire surface of the puff pastry with the whisked egg. This creates a beautiful, glossy golden-brown finish.
Using the back of a knife, lightly score a decorative pattern on top of the pastry, being careful not to cut all the way through. This adds visual appeal and helps steam escape from the pastry.
- Step 10: Baking to Golden Perfection
Bake the Classic Beef Wellington for 30-40 minutes. The pastry should be deeply golden brown and beautifully puffed.
Crucially, use a meat thermometer inserted into the thickest part of the beef to confirm doneness. For medium-rare, aim for an internal temperature of 125-130°F (52-54°C).
Remember, the internal temperature will continue to rise a few degrees after it’s removed from the oven, so pull it slightly before your target.
- Step 11: The Essential Resting Period for Juicy Results
Once baked, remove the Beef Wellington from the oven and let it rest on the baking sheet for at least 10-15 minutes before slicing. This is a non-negotiable step.
Resting allows the beef’s juices to redistribute throughout the meat, ensuring every slice is incredibly tender, moist, and flavorful.
- Step 12: Slicing and Serving Your Impressive Creation
After resting, use a sharp, serrated knife to carefully slice the Wellington into thick, even portions. The crisp pastry and perfectly cooked beef will make for an incredible cross-section.
Serve immediately, perhaps garnished with a sprig of fresh thyme, and prepare for applause. For a complete meal, consider serving alongside our incredibly fluffy mashed potatoes or a vibrant green vegetable.
Elevate Your Wellington: Pro Tips from Our Kitchen
Achieving Beef Wellington perfection means paying attention to these crucial details that professional chefs swear by.
Don’t Skip the Chilling! (Seriously, It’s That Important)
The two chilling stages are perhaps the most vital steps in this recipe. Chilling the seared beef prevents it from warming the puff pastry prematurely, which would lead to a soggy crust.
The second chill after assembly allows the pastry to firm up, ensuring it holds its shape beautifully and puffs evenly in the oven, giving you that desirable flaky texture.
The Art of the Perfect Sear
Searing the beef at high heat is about more than just color; it develops a deep, complex flavor through the Maillard reaction. Ensure your pan is screaming hot, and don’t overcrowd the skillet.
Sear quickly on all sides to create a robust crust without cooking the interior too much, as it will continue to cook in the oven.
Achieving That Signature Golden Crust
A thorough and even egg wash is essential for a beautiful, golden-brown finish. Don’t miss any spots, especially around the seams.
If your oven has a convection setting, using it can sometimes help achieve an even crisper crust, but be mindful of potentially faster cooking times.
Temperature Matters: Knowing When It’s Done
A reliable instant-read meat thermometer is your best friend here. Visual cues alone are not accurate enough for such an investment of time and ingredients.
For medium-rare, aim for 125-130°F (52-54°C). The temperature will rise by 5-10 degrees during the resting period, ensuring a perfect medium-rare center.
Duxelles Dryness: The Non-Negotiable Step
This cannot be stressed enough: your mushroom duxelles must be cooked until extremely dry. Any lingering moisture will release steam during baking, making your beautiful pastry soft and unappetizing.
Cook until the mixture pulls away from the bottom of the pan and looks almost paste-like, indicating all moisture has evaporated.
Common Classic Beef Wellington Hurdles (And How to Clear Them)
Even with the best intentions, things can sometimes go awry. Here’s how to troubleshoot common issues.
Problem: My Pastry is Soggy on the Bottom!
This is usually due to insufficient chilling of the beef, or the duxelles not being dry enough. Ensure both the seared beef and the mushroom mixture are completely cold and moisture-free before assembly.
Proper searing also creates a barrier that helps, but dryness is your primary defense against a soggy bottom.
Problem: The Beef is Overcooked or Unevenly Cooked
This often stems from not chilling the beef sufficiently, inconsistent searing, or baking for too long. Always use an accurate meat thermometer to track the internal temperature.
A quick, high-heat sear followed by a good chill will ensure the beef cooks evenly to your desired doneness in the oven.
Problem: My Pastry Cracked or Leaked During Baking
Cracking can occur if the pastry is rolled too thin in certain spots, or if it’s overfilled. Ensure an even pastry thickness and sufficient overlap when sealing.
Leaks might indicate a seam wasn’t pressed firmly enough. Don’t be afraid to press those edges firmly to create a tight seal.
Beyond the Bake: Serving & Storing Your Classic Beef Wellington
Once your Classic Beef Wellington is out of the oven, the celebration isn’t over yet! Proper serving and storage extend the enjoyment.
Perfect Pairings and Presentation
The rich flavors of Beef Wellington pair beautifully with simple, elegant sides. Consider roasted asparagus, green beans, or a light salad to balance the richness.
A simple red wine reduction or a creamy mushroom sauce can further elevate the dish, enhancing its luxurious appeal.
Make-Ahead Magic: Prepping Your Wellington in Advance
You can prepare the seared beef and the duxelles up to 2 days in advance, storing them separately in the refrigerator. This breaks up the active prep time considerably.
For full make-ahead, assemble the Wellington, wrap it tightly in plastic wrap, and refrigerate for up to 24 hours. Just before baking, remove the plastic, egg wash, and score.
Storing Leftovers (If There Are Any!)
Any leftover Classic Beef Wellington can be stored in an airtight container in the refrigerator for up to 3 days. The pastry will inevitably lose some of its crispness.
To reheat, wrap individual slices loosely in foil and warm in a 350°F (175°C) oven until heated through, about 15-20 minutes. This helps the pastry crisp up slightly again.
Classic Beef Wellington: Your Burning Questions Answered
Can I use a different cut of beef?
While beef tenderloin is traditional and highly recommended for its tenderness and even cooking, you could, in theory, use another lean, high-quality cut like eye of round. However, the cooking time and tenderness will vary significantly, and it may not achieve the melt-in-your-mouth texture of tenderloin. For a different but still impressive beef dish, consider our Juicy Beef Roast with Caramelized Onions.
What if I don’t have fresh thyme or shallots?
Dried thyme can be used, but reduce the quantity by two-thirds (e.g., 1 teaspoon dried for 1 tablespoon fresh). The flavor will be less bright but still effective. For shallots, a small amount of finely minced yellow onion can be substituted, though shallots offer a milder, sweeter onion flavor.
Can I freeze an unbaked Classic Beef Wellington?
Yes, you can! After assembling and the second chill, wrap the unbaked Wellington very tightly in several layers of plastic wrap, then a layer of foil. Freeze for up to 1 month. To bake, thaw overnight in the refrigerator, then proceed with egg wash, scoring, and baking as directed, adding 5-10 minutes to the bake time as needed.
How do I know if my Classic Beef Wellington is medium-rare without a thermometer?
It is exceptionally difficult to achieve perfect medium-rare without a meat thermometer for a dish like Classic Beef Wellington. This is a significant investment of time and ingredients, and a thermometer provides critical accuracy. Without one, you risk either overcooking the beautiful tenderloin or, worse, serving it undercooked. Invest in an instant-read thermometer for guaranteed success.
Ready to Impress? Share Your Classic Beef Wellington Masterpiece!
Mastering the Classic Beef Wellington is a truly rewarding experience, and with this foolproof guide, you’re more than ready. Each step is designed to ensure success, transforming a challenging dish into one you’ll confidently prepare again and again.
Go ahead, embrace the challenge, and create a culinary showstopper that will be the talk of your next gathering. We can’t wait to hear about your magnificent creation!
Classic Beef Wellington
Course: Main CourseCuisine: French cuisineDifficulty: easy4
servings45
hours30
minutes180
minutesFrench cuisine
Ingredients
1.5-2 pounds beef tenderloin center cut
2 tablespoons olive oil
1 teaspoon salt
0.5 teaspoon black pepper
1 pound cremini mushrooms, finely chopped
2 shallots, finely minced
2 cloves garlic, minced
1 tablespoon fresh thyme leaves, chopped
2 tablespoons butter
1 large egg, whisked (for egg wash)
All-purpose flour for dusting
1 sheet (approx. 14 oz) frozen puff pastry, thawed
Directions
- Prepare the Beef: Pat the beef tenderloin very dry with paper towels. Season generously all over with salt and pepper.
- Sear the Beef: Heat olive oil in a large oven-safe skillet over high heat until shimmering. Sear the beef on all sides until well browned, about 2-3 minutes per side. This step is crucial for flavor and sealing in juices. Remove the beef from the skillet and place it on a wire rack set over a baking sheet to cool completely. Ideally, refrigerate for at least 30 minutes, or up to 2 hours, until thoroughly chilled. This prevents the pastry from getting soggy from residual heat.
- Make the Duxelles (Mushroom Mixture): In the same skillet (or a clean one), melt butter over medium heat. Add finely chopped mushrooms, shallots, and chopped thyme. Cook, stirring frequently, until all the liquid has evaporated and the mushroom mixture is very dry and concentrated in flavor, about 15-20 minutes. This is critical for preventing a soggy pastry bottom. Add minced garlic during the last 5 minutes of cooking. Season with a pinch of salt and pepper. Spread the duxelles out on a plate to cool completely.
- Assemble the Wellington: Lightly flour a clean work surface. Roll out the thawed puff pastry into a rectangle large enough to fully encase the beef tenderloin, approximately 14×18 inches.
- Layer the Duxelles: Spread the cooled, dry duxelles evenly over the center of the puff pastry, leaving about a 2-inch border around the edges.
- Position the Beef: Place the chilled beef tenderloin in the center of the duxelles-covered pastry.
- Wrap the Wellington: Carefully bring one side of the pastry over the beef, then bring the other side over, overlapping slightly. Press the edges firmly to seal, trimming any excess pastry if necessary. Press the ends to seal as well. Ensure the beef is completely enclosed in the pastry.
- Chill Again: Carefully transfer the assembled Wellington, seam-side down, to a parchment-lined baking sheet. Refrigerate for at least 30 minutes, or up to 1 hour. This re-chilling step helps the pastry hold its shape and prevents it from getting too warm before baking, which contributes to a flakier crust.
- Prepare for Baking: Preheat your oven to 425F (220C). Remove the chilled Wellington from the refrigerator.
- Egg Wash and Score: Lightly brush the entire surface of the pastry with the whisked egg. Use the back of a knife to lightly score a decorative pattern on top of the pastry, being careful not to cut all the way through. This adds visual appeal and helps steam escape.
- Bake: Bake for 30-40 minutes, or until the pastry is deeply golden brown and puffed, and a meat thermometer inserted into the thickest part of the beef reads 125-130F (52-54C) for medium-rare. (The internal temperature will rise a few degrees after it rests). The initial high temperature helps the pastry crisp up quickly.
- Rest and Serve: Remove the Wellington from the oven and let it rest on the baking sheet for at least 10-15 minutes before slicing. Resting allows the juices to redistribute, ensuring a tender and juicy result. Slice into thick portions and serve immediately, garnished with fresh thyme if desired.
Notes
- Crucial chilling steps and ensuring the duxelles are very dry are key to achieving a perfect flaky crust.