
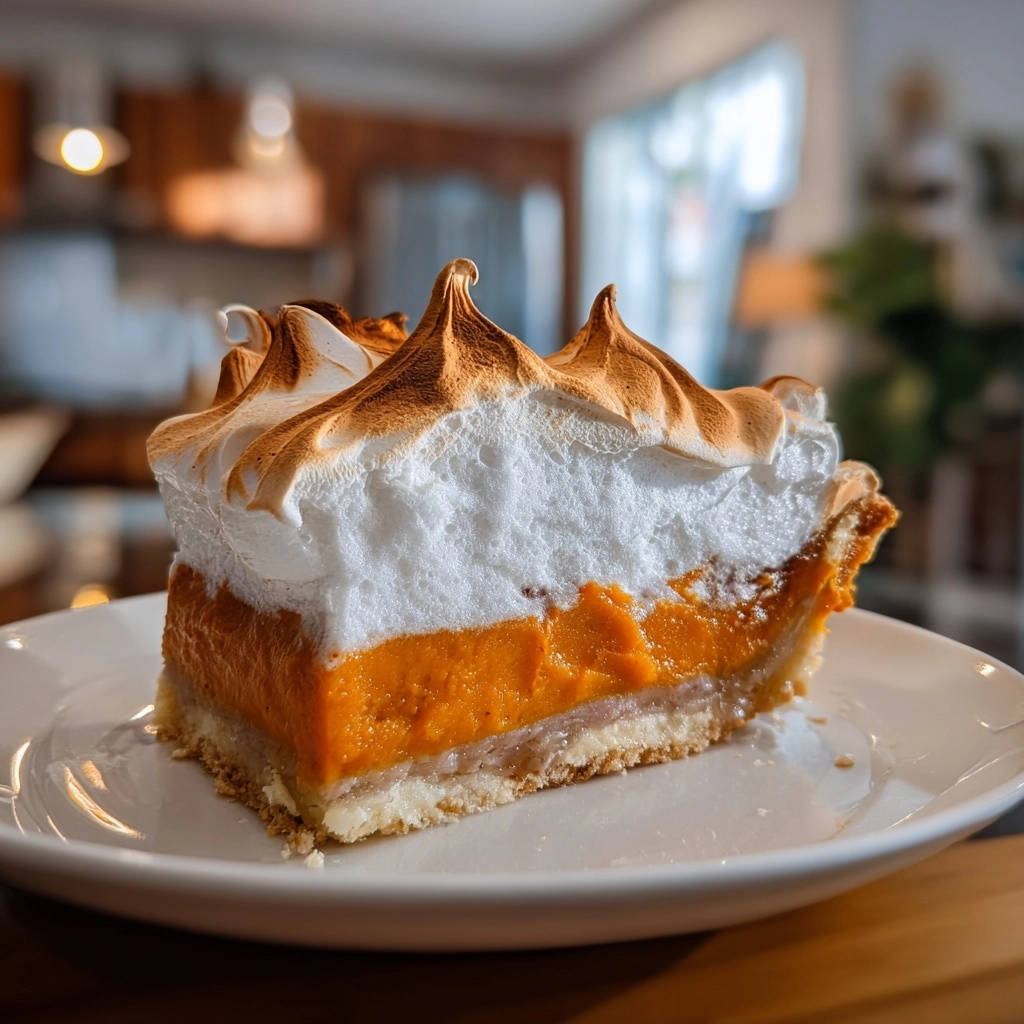
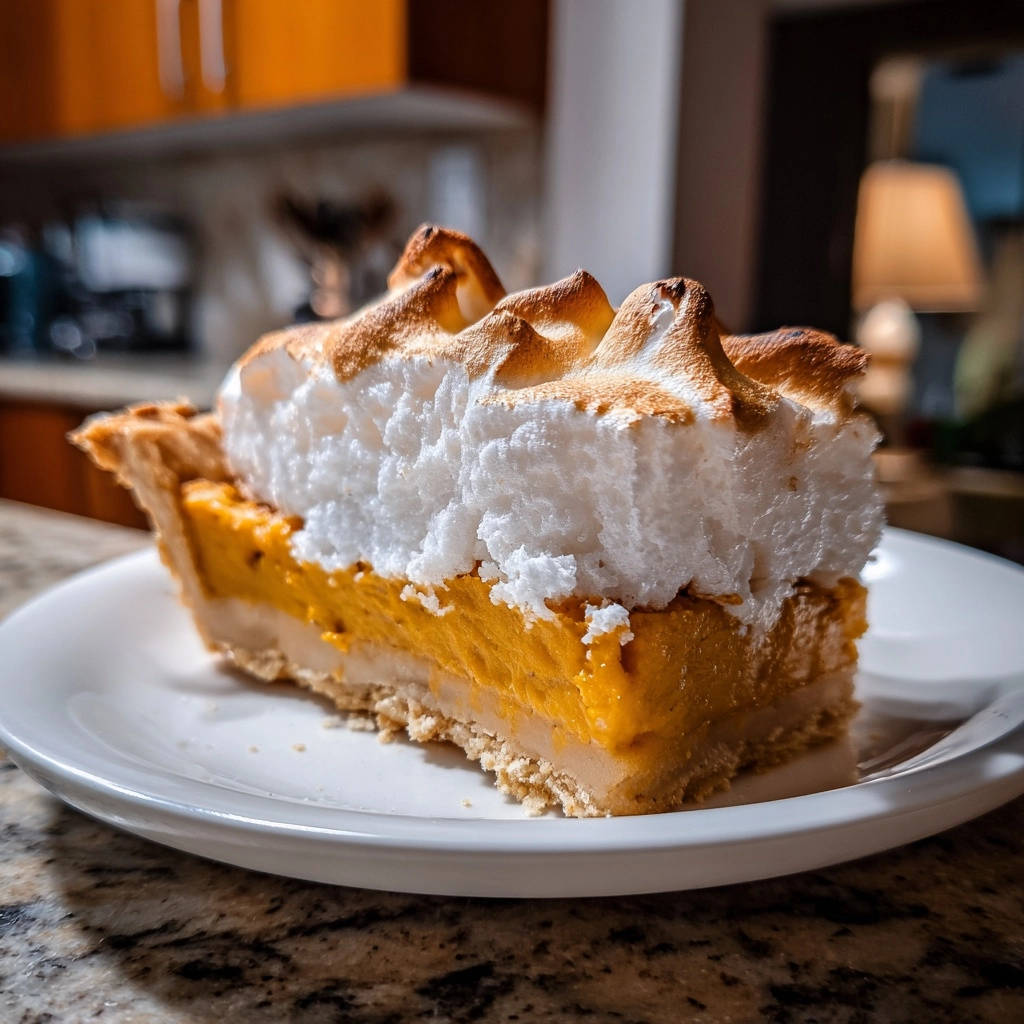
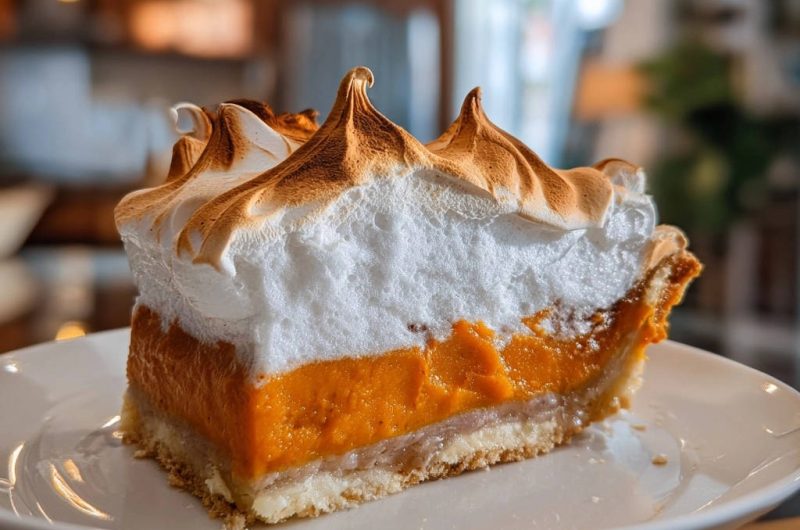
There’s nothing quite like a slice of homemade pie, especially when it’s crowned with a majestic, sky-high meringue. For years, I struggled with weepy, shrinking meringues, but my quest for the perfect, stable topping led me to crack the code for this irresistible Classic Sweet Potato Meringue Pie. This recipe guarantees a silky filling and a cloud-like meringue that holds its shape beautifully, making every slice a triumph.
Why This Classic Sweet Potato Meringue Pie Stands Apart
This isn’t just another sweet potato pie; it’s a testament to perfected technique. We eliminate the common frustrations of meringue, delivering a stable, glossy topping that won’t weep or collapse. The filling itself is incredibly smooth and perfectly spiced, balancing richness with comforting warmth.
Each component, from the flaky crust to the delicate meringue, is designed for optimal texture and flavor. This comprehensive guide provides the “why” behind every crucial step, empowering you to bake with confidence and achieve consistent, stunning results.
Essential Tools for Your Pie-Making Adventure
9-inch Pie Plate: Crucial for the pie’s shape and even baking. A ceramic or glass pie plate ensures consistent heat distribution.
Pastry Blender: Essential for cutting cold butter into the flour, creating that desirable flaky crust texture. Cold butter pieces create steam, preventing a dense crust.
Electric Mixer (Stand or Handheld): Absolutely necessary for whipping the meringue to stiff peaks with sufficient aeration. It ensures a consistent, stable foam.
Large Mixing Bowls: You’ll need separate bowls for the crust, filling, and meringue. Ensure your meringue bowl is impeccably clean and grease-free.
Wire Rack: Vital for cooling the pie completely. Air circulation underneath prevents a soggy bottom and allows the filling and meringue to set properly.
The Building Blocks: Ingredients for a Decadent Pie
For the Flaky Pie Crust
The foundation of this pie is a tender, flaky crust. Using cold butter is paramount as it creates steam pockets during baking, resulting in a light, airy texture. Ice water helps the dough come together without developing too much gluten, which would make the crust tough.
For the Silky Sweet Potato Filling
The star, sweet potato puree, needs to be incredibly smooth for a luxurious filling. The combination of granulated and brown sugar provides balanced sweetness and a hint of molasses depth. Warming spices like cinnamon, nutmeg, and ginger elevate the natural sweetness, creating that signature comforting aroma. Eggs, milk, and melted butter bind the filling, adding richness and a creamy texture.
For the Sky-High, Stable Meringue
Achieving a “no-weep” meringue hinges on key components. Room temperature egg whites whip up with far more volume and stability than cold ones. Cream of tartar acts as an acid, stabilizing the egg white foam. Gradual addition of granulated sugar is critical; it dissolves completely, building a strong, glossy structure that resists weeping.
The Meringue Masterclass: Achieving Sky-High, No-Weep Perfection
The secret to a show-stopping meringue that doesn’t weep or shrink lies in precision and technique. It’s truly a masterclass in chemistry.
Firstly, your mixing bowl and whisk attachment must be impeccably clean and completely grease-free. Even a tiny speck of fat can prevent the egg whites from whipping to their full potential, leading to a weak, unstable meringue.
Secondly, using room temperature egg whites is non-negotiable. They have less surface tension, allowing them to incorporate air more easily and achieve greater volume.
Thirdly, the slow and gradual addition of sugar is crucial. This gives the sugar crystals time to dissolve completely into the egg whites, creating a stable, glossy, and non-gritty meringue that holds its shape beautifully. This also helps prevent the meringue from “weeping” sticky liquid later.
Finally, dolloping the meringue onto the hot pie filling immediately after it comes out of the oven is a vital step. The residual heat from the pie helps to “set” the bottom of the meringue, creating a seal and preventing the dreaded weeping and shrinkage.
Your Step-by-Step Guide to Baking Classic Sweet Potato Meringue Pie
- Prepare the Pie Crust:
In a large bowl, whisk flour and salt. Cut in cold butter using a pastry blender until pea-sized crumbs form. Gradually add ice water, mixing just until the dough comes together without overmixing. Form into a disk, wrap, and chill for at least 30 minutes. This chilling time prevents shrinkage and ensures flakiness, much like perfecting a classic apple pie crust.
- Pre-bake the Crust:
Preheat your oven to 375°F (190°C). Roll out the chilled dough and carefully transfer it to a 9-inch pie plate. Prick the bottom with a fork several times. Bake for 10-12 minutes until lightly golden. This blind baking step is critical for preventing a soggy bottom once the filling is added.
Remove from the oven and reduce the temperature to 350°F (175°C).
- Prepare the Sweet Potato Filling:
In a large bowl, combine the sweet potato puree, both sugars, cinnamon, nutmeg, ginger, and vanilla extract. Mix thoroughly until well combined. Stir in the beaten eggs, milk, and melted butter until the mixture is smooth and uniform. Ensure there are no lumps for a silky filling.
- Bake the Pie Filling:
Pour the prepared sweet potato filling into the pre-baked pie crust. Bake for 40-50 minutes, or until the edges are set but the center still jiggles slightly when gently shaken. This subtle jiggle indicates perfect doneness, as the pie will continue to set as it cools.
- Initiate the Meringue Process:
As the pie nears the end of its baking time, prepare your meringue equipment. Ensure your mixing bowl and whisk attachment are impeccably clean and entirely grease-free. Use room temperature egg whites for maximum volume and stability.
- Whip Egg Whites to Soft Peaks:
In the clean bowl, beat the room temperature egg whites and cream of tartar with an electric mixer on medium speed until soft peaks form. The cream of tartar assists in stabilizing the egg white foam, giving your meringue strength.
- Gradually Incorporate Sugar for Stiff Peaks:
While continuing to beat on high speed, gradually add the granulated sugar, one tablespoon at a time. This slow addition allows the sugar to fully dissolve, which is absolutely vital for a stable, glossy, and non-weepy meringue. Continue beating until the meringue is glossy, forms very stiff, upright peaks, and feels completely smooth when a tiny bit is rubbed between your fingers.
- Apply Meringue to Hot Pie:
Immediately after removing the hot pie from the oven, dollop the prepared meringue over the hot sweet potato filling. This crucial step helps prevent weeping by “setting” the bottom of the meringue. Quickly spread the meringue to the edges of the pie crust, ensuring it touches the crust all around to create a protective seal. This seal is key to preventing shrinkage.
- Brown the Meringue:
Return the pie to the 350°F (175°C) oven for 10-15 minutes, or until the meringue peaks are beautifully golden brown. For more precise browning and dramatic peaks, you can use a kitchen torch instead.
- Cool Completely Before Serving:
Let the pie cool completely on a wire rack for at least 3-4 hours, or even longer, before slicing and serving. This extended cooling time is vital for both the filling to fully set and the meringue to stabilize, ensuring clean slices and preventing collapse. This patience pays off, similar to how proper cooling is essential for desserts like perfectly set pecan pralines.
Elevate Your Pie: Expert Tips for a Flawless Finish
Perfect Sweet Potato Puree: For the ultimate creamy filling, roast your sweet potatoes rather than boiling them; roasting intensifies their flavor and minimizes water content. Once tender, peel and push them through a food mill or process them in a food processor until absolutely smooth and lump-free.
Don’t Overmix the Pie Filling: Once you’ve added the eggs and milk to the sweet potato mixture, mix just until everything is combined and smooth. Overmixing can introduce too much air, leading to a denser or even gummy texture in the baked filling.
Spotless Meringue Bowl: It cannot be stressed enough: any trace of grease or egg yolk in your mixing bowl or on your whisk attachment will prevent your egg whites from whipping properly. Before starting, wipe your bowl and whisk with a paper towel dampened with lemon juice or white vinegar to ensure they are perfectly clean.
Room Temperature Eggs: This applies to eggs for both the filling and especially the meringue. Room temperature eggs emulsify more easily into the filling, creating a smoother consistency, and whip to a much greater volume for the meringue.
Test Meringue for Sugar Dissolution: Before spreading your meringue, take a tiny bit between your thumb and forefinger and rub them together. If you feel any grittiness, continue beating for another minute or two until the sugar is completely dissolved. This ensures a stable, glossy, and non-weepy meringue.
Decorate with Confidence: For a rustic, charming look, simply use the back of a spoon to create beautiful swirls and peaks on your meringue. For a more elegant presentation, you can pipe the meringue onto the pie using a pastry bag fitted with a star tip before browning.
Common Pie Predicaments & Simple Solutions
Problem: Meringue is Weeping or Sliding Off
Weeping (when clear liquid forms under the meringue) often happens if the meringue wasn’t applied to a sufficiently hot pie, or if the sugar wasn’t fully dissolved during whipping. Ensure your pie comes directly from the oven, and your meringue forms stiff, non-gritty peaks.
Also, a crucial preventive step is to ensure the meringue touches and seals the crust all around the edge of the pie. This creates an anchor that prevents the meringue from shrinking inwards and consequently weeping.
Problem: Pie Filling is Cracking or Dry
A cracked or dry sweet potato filling is almost always a sign of overbaking. The key is to watch for the subtle jiggle in the center, which indicates it’s set but still moist. The pie will continue to firm up considerably as it cools, so resist the urge to bake it until completely firm in the oven.
Problem: Soggy Pie Crust
A soggy pie crust is typically due to insufficient pre-baking (blind baking) or not allowing the pie to cool completely before slicing. Blind baking creates a protective barrier against moisture from the filling. Full cooling allows any residual steam to dissipate, preventing the crust from reabsorbing moisture.
Problem: Meringue Deflates or Shrinks
Meringue deflation or shrinkage can stem from several factors: not adding the sugar gradually enough, under-beating the egg whites (they need to be very stiff), or failing to spread the meringue all the way to the edges of the pie crust to create a good seal. The “hot pie” step also significantly helps to prevent this.
Serving & Savoring: Enjoying Your Sweet Potato Meringue Pie
Perfect Serving Suggestions
While this pie is undeniably delicious on its own, you can elevate the experience further. A light dusting of ground cinnamon or a sprinkle of finely chopped toasted pecans adds wonderful aroma and crunch. Serve the pie at room temperature for the very best texture and flavor balance, allowing the spices to truly shine.
Storing Your Leftovers
Store any leftover Classic Sweet Potato Meringue Pie loosely covered with plastic wrap or in an airtight container in the refrigerator. It will keep well for up to 3-4 days. For optimal meringue texture, it’s best to enjoy the pie within the first 1-2 days after baking.
Can You Make This Pie Ahead?
You can certainly get a head start! The pie crust can be prepared and chilled up to 2 days in advance, or even pre-baked and frozen for up to a month. While the sweet potato filling can be made a day ahead and refrigerated, it’s highly recommended to assemble and bake the meringue topping on the day you plan to serve the pie. This ensures the meringue is at its freshest and most stable.
Your Classic Sweet Potato Meringue Pie Questions Answered
Can I use canned sweet potato puree?
Yes, you can use canned sweet potato puree as a convenient alternative. However, for the most vibrant flavor and ideal texture, I highly recommend using freshly cooked and pureed sweet potatoes. If using canned, ensure it’s 100% sweet potato puree with no added sugars or spices.
Why did my meringue not get stiff peaks?
The most common culprits for a meringue that won’t achieve stiff peaks are traces of fat (even a tiny speck of egg yolk or residual oil on your bowl/whisk), using cold egg whites, or adding the sugar too quickly. Always ensure your equipment is meticulously clean and your egg whites are at room temperature before you begin whipping.
Can I freeze Classic Sweet Potato Meringue Pie?
Freezing is generally not recommended for pies topped with meringue. The delicate meringue texture tends to degrade significantly upon thawing, often becoming watery, sticky, or rubbery. While the sweet potato filling itself can be baked, cooled, and frozen without the meringue, it’s always best to prepare the meringue fresh right before serving for the ultimate experience.
What if I don’t have cream of tartar?
Cream of tartar is a helpful stabilizing agent for meringue, but if you don’t have it, you can substitute it. For every 4 egg whites used in this recipe, you can use 1 teaspoon of fresh lemon juice or white vinegar. The acidity from these substitutes helps to achieve stable peaks, though the final meringue texture might be ever so slightly different.
Crafting this Classic Sweet Potato Meringue Pie is a truly rewarding experience, transforming humble ingredients into a show-stopping dessert. With these expert tips and precise instructions, you’re now equipped to create a perfectly balanced pie with that magnificent, non-weeping meringue every single time. Dive in, enjoy the process, and delight in the sweet, comforting flavors. Share your beautiful creations – I can’t wait to see them!
Classic Sweet Potato Meringue Pie
Course: DessertCuisine: American CuisineDifficulty: easy8
servings45
minutes1
hour120
minutesAmerican Cuisine
Ingredients
For the Pie Crust:
1 1/4 cups all-purpose flour
1/2 teaspoon salt
1/2 cup cold unsalted butter, cut into small pieces
4-5 tablespoons ice water
For the Sweet Potato Filling:
2 cups cooked sweet potato puree (about 2 medium sweet potatoes)
1/2 cup granulated sugar
1/4 cup packed light brown sugar
1/2 teaspoon ground cinnamon
1/4 teaspoon ground nutmeg
1/4 teaspoon ground ginger
1/2 teaspoon vanilla extract
2 large eggs, beaten
1/2 cup milk or evaporated milk
2 tablespoons unsalted butter, melted
For the Meringue Topping:
4 large egg whites, at room temperature
1/4 teaspoon cream of tartar
1/2 cup granulated sugar
1/2 teaspoon vanilla extract
Directions
- Prepare the Pie Crust: In a large bowl, whisk together the flour and salt. Cut in the cold butter using a pastry blender or your fingertips until the mixture resembles coarse crumbs with some pea-sized pieces of butter remaining. Gradually add ice water, one tablespoon at a time, mixing until the dough just comes together. Do not overmix. Form the dough into a disk, wrap in plastic wrap, and refrigerate for at least 30 minutes.
- Preheat oven to 375 degrees F (190 degrees C). On a lightly floured surface, roll out the chilled dough into a 12-inch circle. Carefully transfer the dough to a 9-inch pie plate. Trim and crimp the edges as desired. Prick the bottom of the crust with a fork several times. Bake for 10-12 minutes, or until lightly golden. Remove from oven and reduce oven temperature to 350 degrees F (175 degrees C).
- Prepare the Sweet Potato Filling: In a large bowl, combine the sweet potato puree, granulated sugar, brown sugar, cinnamon, nutmeg, ginger, and vanilla extract. Mix well. Stir in the beaten eggs, milk, and melted butter until thoroughly combined and smooth.
- Pour the sweet potato filling into the pre-baked pie crust. Bake for 40-50 minutes, or until the edges are set but the center still jiggles slightly. The pie will continue to set as it cools.
- Prepare the Meringue Topping (The Key to No Weep!): As the pie nears the end of its baking time, ensure your mixing bowl and whisk attachment are impeccably clean and grease-free. Even a tiny bit of grease can prevent your meringue from stiffening properly.
- In the clean bowl, beat the room temperature egg whites and cream of tartar with an electric mixer on medium speed until soft peaks form.
- Gradually add the granulated sugar, 1 tablespoon at a time, while continuing to beat on high speed. This slow addition helps the sugar dissolve completely, which is crucial for a stable, non-weepy meringue. Continue beating until the meringue is glossy, forms very stiff peaks, and the sugar has fully dissolved (you should not feel any grit when rubbing a small amount between your fingers). Stir in the vanilla extract.
- Immediately after removing the hot pie from the oven, dollop the meringue over the hot sweet potato filling. This step is vital for preventing weeping. Quickly spread the meringue to the edges of the pie crust, ensuring it touches the crust all around to seal it. Creating a seal helps prevent the meringue from shrinking and weeping later. You can create decorative peaks with the back of a spoon.
- Return the pie to the 350 degrees F (175 degrees C) oven for 10-15 minutes, or until the meringue peaks are lightly golden brown. Alternatively, you can brown the meringue with a kitchen torch for more control.
- Let the pie cool completely on a wire rack for at least 3-4 hours before slicing and serving. Cooling completely allows the filling to set and the meringue to stabilize.
Notes
- Ensure mixing bowl and whisk are grease-free for meringue success. Spread meringue to crust edges to prevent weeping. Cool completely for at least 3-4 hours before serving.


