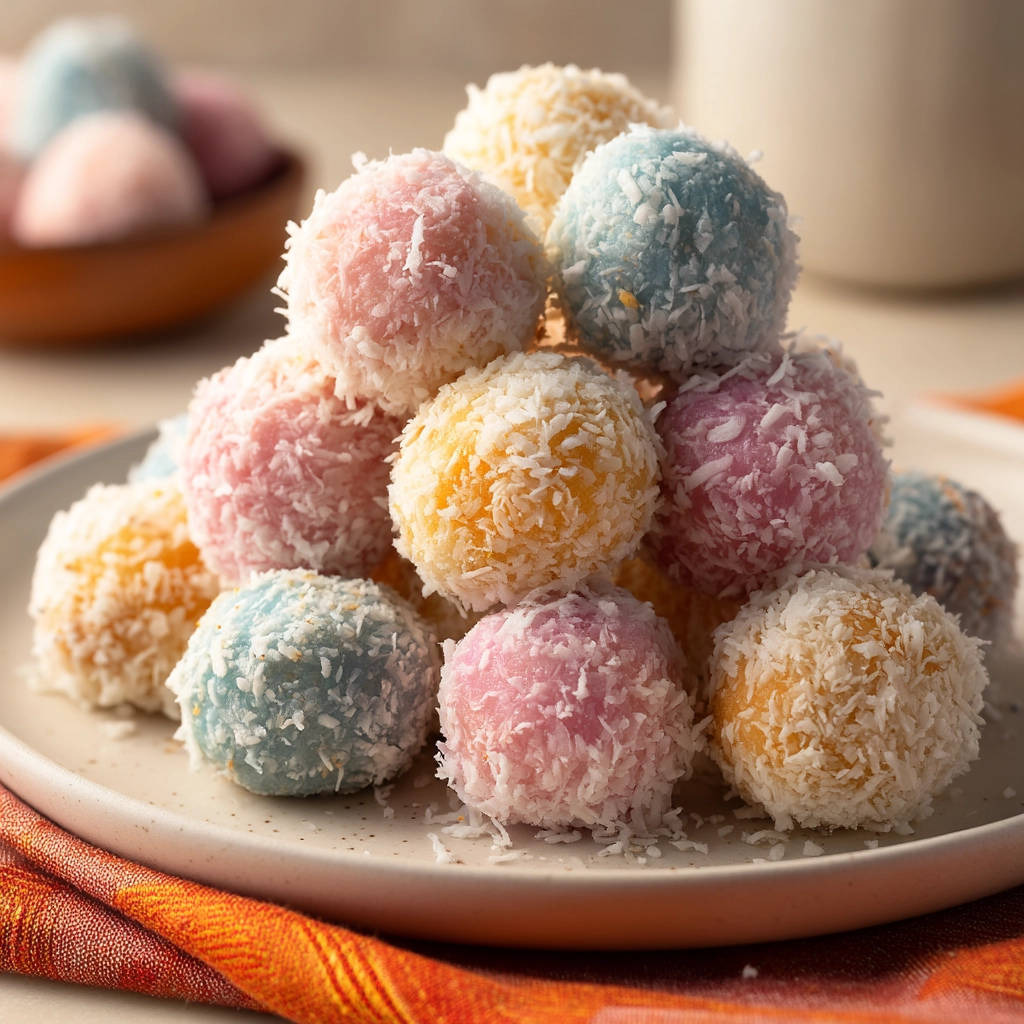
Who doesn’t love a sweet treat that’s as fun to make as it is to eat? These colorful coconut candies are exactly that! They’re a delightful confection, perfect for parties, holidays, or just a little something to brighten your day. And the best part? This recipe includes a simple, yet brilliant, non-sticky mixing trick that guarantees a melt-in-your-mouth texture every time. Say goodbye to frustrating, sticky messes and hello to perfectly formed, vibrant coconut candies.
Why You’ll Love This Colorful Coconut Candy
There are so many reasons to fall in love with this recipe! Here are just a few:
- Easy to Make: This recipe requires minimal ingredients and equipment, making it perfect for beginner candy makers.
- Fun and Colorful: The vibrant colors make these candies visually appealing and perfect for celebrations.
- Melt-in-Your-Mouth Texture: The non-sticky mixing trick ensures a soft and delicate texture that’s simply irresistible.
- Customizable: You can easily adapt the colors and flavors to your liking.
- A Perfect Treat for all ages: With its fun colors and naturally sweet taste, this colorful coconut candy is a great crowd-pleaser for kids and adults.
Gathering Your Ingredients for Colorful Coconut Candy
The key to truly amazing coconut candy lies in the quality and purpose of the ingredients. We’re aiming for a balanced sweetness and a fantastic texture, so let’s break down what you’ll need and why each element is important. Consider this a quick guide before you head into the kitchen. We want to make this delicious coconut candy a success!
- Sweetened Condensed Milk: This is the binder that holds everything together and provides the primary sweetness. Look for a good quality brand, as the flavor will directly impact the final candy. You’ll need 1 cup.
- Unsweetened Shredded Coconut: The star of the show! Using unsweetened coconut allows us to control the sweetness level and prevent the candies from becoming overly sweet. Make sure it’s finely shredded for the best texture. You’ll need 3 cups.
- Vanilla Extract: A touch of vanilla enhances the overall flavor profile and adds a subtle warmth. Pure vanilla extract is always preferred for the best taste, but imitation vanilla will also work in a pinch. Just a teaspoon is all you need.
- Food Coloring (Red, Yellow, Blue): These are what give our candies their vibrant colors. Gel food coloring is recommended, as it’s more concentrated and won’t add extra liquid to the mixture. Of course, you can mix these to create other amazing colors like green, orange, and purple!
- Powdered Sugar: This is used for dusting your hands and preventing the coconut mixture from sticking. It’s a simple, yet essential, ingredient for easy handling. A small amount is all you’ll need.
Crafting Your Colorful Coconut Candy: Step-by-Step
Now for the fun part! Making these colorful coconut candies is a breeze, especially with our secret non-sticky mixing trick. Follow these steps carefully, and you’ll be enjoying a batch of these delightful treats in no time.
- Combine the Wet Ingredients: In a large bowl, whisk together the sweetened condensed milk and vanilla extract until well combined. This creates a smooth and flavorful base for our candies.
- Prepare the Coconut: Divide the shredded coconut into three separate bowls, ensuring each bowl contains an equal portion. This will allow us to color each batch individually.
- Color the Coconut: Add a few drops of red food coloring to one bowl of coconut, yellow to another, and blue to the third. Mix each bowl thoroughly until the coconut is evenly colored. Start with just a few drops of food coloring and add more as needed to achieve your desired shade.
- The Non-Sticky Mixing Trick: This is the key to preventing sticky coconut candy! Gently fold one color of shredded coconut into the sweetened condensed milk mixture. Do not overmix! The goal is to incorporate the coconut just until it’s moistened and holds together slightly. Overmixing releases the natural oils in the coconut, leading to a sticky texture. Repeat this process with the remaining colors of coconut, keeping the mixtures separate. This step is crucial for achieving that perfect melt-in-your-mouth texture.
- Shape the Candies: Lightly dust your hands with powdered sugar to prevent sticking. Take a small amount of the coconut mixture (about 1 tablespoon) and gently roll it into a ball. The powdered sugar will keep the mixture from sticking to your hands, making this step much easier.
- Arrange and Chill: Place the coconut balls on a parchment-lined baking sheet. This prevents the candies from sticking to the sheet and makes for easy removal. Once all the candies are formed, refrigerate for at least 30 minutes to allow them to firm up. This chilling process is essential for creating a stable candy that holds its shape.
- Serve and Enjoy: Serve the colorful coconut candies chilled. They’re perfect for parties, snacks, or a sweet treat any time of day!
Tips for Perfect Colorful Coconut Candy Every Time
Want to take your coconut candy game to the next level? Here are a few pro tips to ensure success every time.
- Don’t Overmix: This is the golden rule! Overmixing releases the natural oils in the coconut, resulting in a sticky, greasy candy. Gently fold the coconut into the sweetened condensed milk until just combined.
- Use Gel Food Coloring: Gel food coloring is more concentrated than liquid food coloring and won’t add excess moisture to the mixture.
- Adjust the Colors: Feel free to experiment with different colors and combinations. You can even create pastel shades by using less food coloring.
- Storage: Store the coconut candies in an airtight container in the refrigerator for up to a week.
What to Serve With Colorful Coconut Candy
These colorful coconut candies are delicious on their own, but they also pair well with other desserts. Consider serving them alongside chocolate-covered apple dessert cups for a delightful contrast of flavors and textures. They’re also great with a simple cup of coffee or tea.
Your Colorful Coconut Candy Questions Answered (FAQ)
Can I use regular coconut flakes instead of shredded coconut?
While you can use regular coconut flakes, the texture of the candy will be slightly different. Shredded coconut is finer and creates a smoother, more delicate texture. If using coconut flakes, you may want to pulse them in a food processor to break them down slightly.
Can I use a different extract instead of vanilla?
Absolutely! Almond extract, coconut extract, or even a citrus zest would be delicious additions to these candies. Just be sure to use a small amount, as extracts can be quite potent.
Can I make these candies ahead of time?
Yes, these candies are perfect for making ahead of time. They can be stored in an airtight container in the refrigerator for up to a week. In fact, they taste even better after they’ve had a chance to chill and the flavors have melded together.
Why is my coconut candy too sticky?
The most common reason for sticky coconut candy is overmixing. Remember to gently fold the coconut into the sweetened condensed milk until just combined. Another potential cause is using too much liquid food coloring. Gel food coloring is recommended to avoid adding excess moisture.
Enjoy Your Homemade Colorful Coconut Candy!
There you have it – a simple, yet stunning, recipe for colorful coconut candy that’s sure to impress. With our non-sticky mixing trick, you can confidently create these melt-in-your-mouth treats every time. So, gather your ingredients, unleash your creativity with the colors, and get ready to enjoy a delightful confection that’s as fun to make as it is to eat. Don’t forget to leave a comment below and let us know how your colorful coconut candies turned out! We’d love to hear your feedback and see your creations!
Colorful Coconut Candy (The Non-Sticky Mixing Trick)

Ingredients
- 1 cup sweetened condensed milk
- 3 cups shredded coconut unsweetened
- 1 teaspoon vanilla extract
- Food coloring (red, yellow, blue)
- Powdered sugar (for dusting hands)
Directions
- In a large bowl, combine sweetened condensed milk and vanilla extract.
- Divide the shredded coconut into three equal portions in separate bowls.
- Add a few drops of red food coloring to one bowl, yellow to another, and blue to the third. Mix each bowl thoroughly until the coconut is evenly colored.
- **The Non-Sticky Mixing Trick:** Gently fold one color of the shredded coconut into the sweetened condensed milk mixture. Do not overmix. The key is to incorporate the coconut just until it’s moistened and holds together slightly. Overmixing releases the natural oils in the coconut, leading to a sticky texture. Repeat with the remaining colors of coconut, keeping the mixtures separate.
- Dust your hands with powdered sugar. Take a small amount of the coconut mixture (about 1 tablespoon) and gently roll it into a ball.
- Place the coconut balls on a parchment-lined baking sheet.
- Refrigerate for at least 30 minutes to allow the candies to firm up.
- Serve chilled.