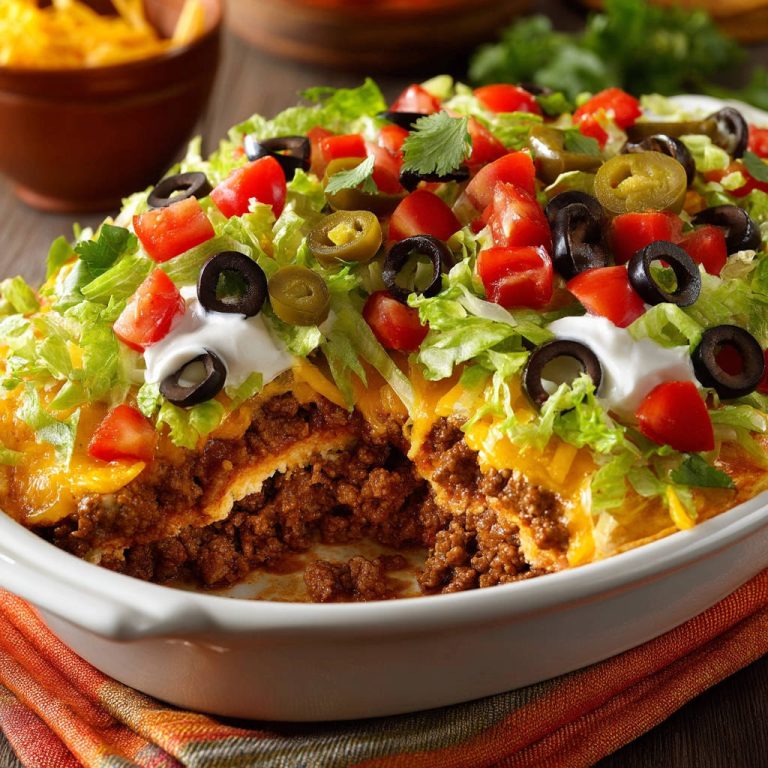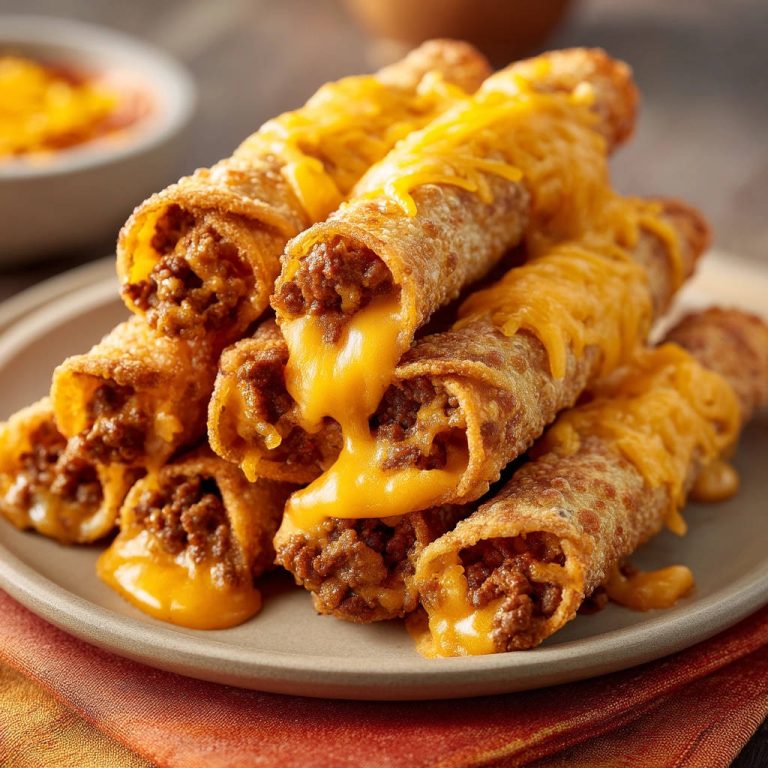
Oh, hello there, fellow food lover! Are you ready to talk about one of the most satisfying kitchen wins there is? We’re diving into the wonderful world of roll-ups today, specifically those glorious, golden, and utterly delicious Crispy Beef & Cheese Roll-Ups . You know the kind – that perfect crunch as you bite through the tortilla, followed by a savory filling of seasoned beef and warm, gooey cheese? Pure comfort food bliss!
I don’t know about you, but for the longest time, making roll-ups at home felt like a gamble. Sometimes they’d come out perfectly crisp and golden, and other times… well, let’s just say “soggy” or “unevenly browned” were unwelcome guests at my table. It was frustrating, to say the least! But after a lot of trial and error, I finally unlocked the simple, game-changing techniques that ensure a guaranteed crispy and golden result every single time. And today, I’m sharing that secret with you!
This recipe isn’t just about mixing ingredients and rolling; it’s about understanding the little nuances that make a huge difference in achieving that sought-after crispiness. It’s quick enough for a weeknight yet impressive enough for a casual get-together. Trust me, once you make these crispy beef and cheese roll-ups using this method, you won’t go back!
Why These Crispy Beef & Cheese Roll-Ups Are a Game Changer
So, what makes this recipe for crispy beef and cheese roll-ups stand out from the rest? It boils down to a few key factors that deliver maximum flavor and, crucially, maximum crunch.
- That Unbeatable Texture: Forget soggy disappointments! We focus heavily on the frying technique to give you a shell that shatters in the most satisfying way, providing the perfect contrast to the soft filling.
- Simple Yet Flavorful Filling: Ground beef is seasoned with classic spices that are likely already in your pantry, creating a savory core that pairs beautifully with the melty cheese.
- Quick & Easy: With minimal prep and a speedy cook time, you can have these golden treasures on the table in under 30 minutes.
- Kid-Friendly & Crowd-Pleasing: Who doesn’t love a crispy, cheesy roll-up? They’re perfect for picky eaters, party appetizers, or a fun family dinner.
- Versatile: They serve as a fantastic base for all your favorite toppings and dippers.
Ready to say goodbye to soggy roll-ups forever? Let’s gather what we need!
Gathering Your Ingredients for Crispy Beef & Cheese Roll-Ups
Part of the beauty of these crispy beef and cheese roll-ups lies in their simplicity. You don’t need a long list of exotic items. We’re working with straightforward ingredients that come together to create something truly special. Think of these as building blocks for flavor and texture.

Here’s what you’ll need to bring this crispy dream to life:
- Ground Beef: About half a pound. This forms the hearty base of our filling. I recommend using an 80/20 blend for a good balance of flavor and moisture, but you’ll drain off any excess grease anyway.
- Essential Seasonings: Salt and black pepper are non-negotiables, of course. We’re adding a little warmth and depth with chili powder (or paprika if you prefer a milder touch), onion powder, and garlic powder. These pantry staples infuse the beef with classic, comforting flavors that pair perfectly with cheese. For an extra kick, you could even explore making your own homemade chili powder if you’re feeling adventurous!
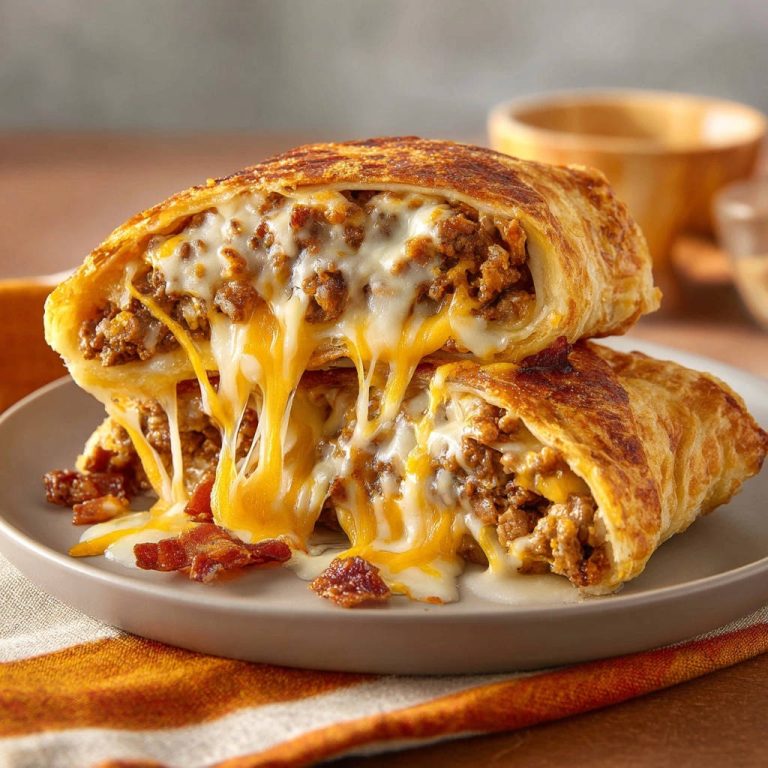
- Shredded Cheese: About a cup. Monterey Jack or mozzarella are fantastic choices here because they melt beautifully and get wonderfully gooey. You want a cheese that stretches and creates that satisfying pull when you bite into the roll-up. Feel free to mix cheeses if you like!
- Small Tortillas: You’ll need 6 to 8 small ones, either flour or corn. The type you choose will affect the final texture slightly, but both work well. Corn tortillas tend to be more traditional for taquito-style roll-ups and can get exceptionally crispy, but sometimes need a little help to be pliable enough to roll without cracking.
- Vegetable Oil (or other frying oil): Approximately half a cup. The type of oil matters less than its ability to reach and maintain a consistent temperature. Vegetable, canola, or even peanut oil (if no allergies) are good options for frying. We need enough to create about a half-inch depth in your skillet.
- Optional Toppings: Grated cheese and chopped fresh parsley are suggested for garnish, adding a pop of color and freshness. But the possibilities are endless – think sour cream, salsa, guacamole (maybe whip up some perfect guacamole !), or even a drizzle of a creamy sauce.
Gathering these simple items is the first step on our journey to crispy perfection!
Crafting Your Crispy Beef & Cheese Roll-Ups: Step-by-Step
Now for the fun part – bringing it all together! This process is straightforward, but paying attention to a couple of key details will make all the difference between good roll-ups and amazing, guaranteed crispy ones. Follow along, and you’ll master the technique in no time.
-
Prep the Flavorful Filling: Start by browning your half pound of ground beef in a skillet over medium heat. Cook it until it’s no longer pink and is nicely browned. This step is crucial for developing flavor. Once cooked, tilt the pan and carefully drain away any excess grease. This prevents your filling from being too oily and affecting the crispiness later. Return the beef to the skillet and stir in your flavor builders: the salt, black pepper, chili powder (or paprika), onion powder, and garlic powder. Give it a good mix to ensure the seasonings are evenly distributed throughout the meat. Once seasoned, remove the skillet from the heat. You want the beef to be seasoned and ready to go, but not actively cooking anymore.
-
Prepare the Tortillas for Rolling: This is a make-or-break step, especially if you’re using corn tortillas! Corn tortillas can sometimes be a bit stiff and prone to cracking when rolled, which you definitely want to avoid. If you’re using corn tortillas, take a few at a time, wrap them in a damp paper towel, and warm them in the microwave for just 15-30 seconds. This brief warming makes them pliable and much easier to roll without breaking. Flour tortillas are usually flexible enough straight from the pack, so you can skip the warming step if using those.
-
Fill and Roll: Lay one of your prepared tortillas flat on a clean surface. Spoon about 2 to 3 tablespoons of the seasoned ground beef filling down the center. Here’s a little tip: slightly off-center the filling towards the edge you’ll start rolling from. This helps ensure a tighter roll. Next, generously top the meat with about 2 tablespoons of your shredded cheese. Don’t overfill, or the filling might spill out during frying.
-
Tightly Roll Them Up: Starting from the edge with the filling slightly off-center, roll the tortilla up as tightly as possible around the meat and cheese. A tight roll is important for maintaining shape and ensuring even cooking. As you finish rolling each one, place it seam-side down on a plate. The weight of the roll itself helps seal the seam as you assemble the others. This also helps prevent them from unrolling in the hot oil.
-
Heat the Frying Oil: Pour your vegetable oil (or preferred frying oil) into a skillet. You need enough oil to reach a depth of about half an inch. Place the skillet over medium-high heat. Getting the oil to the correct temperature is absolutely crucial for crispy results and preventing sogginess. How do you know when it’s ready? A simple test is to carefully flick a tiny drop of water into the pan. If it sizzles immediately and vigorously, the oil is hot enough and ready for frying. Be patient and let the oil heat fully.
-
Carefully Fry the Roll-Ups (The Secret Step!): Now for the key to that guaranteed crispiness! Carefully place the rolled taquitos into the hot oil, seam-side down first. This helps the seam seal instantly in the hot oil. Here is the MOST important part: DO NOT OVERCROWD THE PAN. Seriously, this is the number one reason roll-ups turn out soggy. Overcrowding dramatically lowers the oil temperature, and instead of frying to a crisp, your roll-ups will just sit there and soak up oil. Work in batches if necessary, leaving plenty of space between each roll-up.
-
Achieve Golden Perfection: Let the roll-ups fry undisturbed for about 2-3 minutes on the first side. You’ll see them turn a beautiful golden brown and start to firm up. Use tongs to carefully turn each taquito to its remaining sides. Continue frying for another 2-3 minutes, rotating as needed, until they are uniformly golden brown and look wonderfully crispy all around. Keep a close eye on them; they can go from perfect to too dark quickly.
-
Drain the Excess Oil: As each batch finishes frying to golden, crispy perfection, use tongs to carefully remove them from the skillet. Transfer them to a plate lined with paper towels. The paper towels will absorb any excess oil, ensuring they stay crispy after frying. Resist the urge to stack them immediately; let them drain in a single layer if possible while you fry the remaining batches.
-
Serve Hot and Garnish: These are best enjoyed fresh and hot when they are at their crispiest! Arrange them on a serving platter. If you like, sprinkle with optional grated cheese and chopped fresh parsley for a touch of color and extra flavor. Serve them alongside your favorite dipping sauces – salsa, sour cream, or that homemade guacamole would be fantastic! For a similar crispy experience with chicken, you might also enjoy making crispy chicken flautas .
There you have it! Follow these steps, paying special attention to the oil temperature and avoiding overcrowding, and you’ll have a batch of perfectly crispy beef and cheese roll-ups every single time.
Tips for Perfect Crispy Beef & Cheese Roll-Ups Every Time
We’ve covered the core technique, but here are a few extra tips and considerations to help you achieve roll-up greatness consistently:
- Don’t Rush Heating the Oil: I know, you’re excited to eat! But starting with oil that isn’t hot enough is a guaranteed path to sogginess. Wait for that sizzle test!
- Maintain Oil Temperature: If you’re frying multiple batches, the oil temperature might drop. Give it a minute or two to reheat between batches, especially if you noticed the previous batch wasn’t crisping up as quickly.
- Mind the Seam: Always place the seam-side down first when putting the roll-ups into the hot oil. This quick blast of heat helps “seal” the seam, preventing it from unraveling during frying.
- Even Rolling: Try to roll the taquitos as evenly and tightly as possible. This helps them cook evenly and keeps the filling securely inside.
- Consider Tortilla Type: Corn tortillas generally get crispier than flour when fried. If maximum crunch is your goal, opt for corn (and remember to warm them!). However, flour tortillas are more forgiving to roll. If you’re interested in exploring other crispy tortilla creations, check out our recipe for crispy beef taquitos , which offers another take on this popular dish.
- Draining is Key: Don’t skip the paper towel step! It’s essential for absorbing excess grease and keeping your roll-ups crispy.
- Making Ahead: You can assemble the roll-ups ahead of time and store them in the refrigerator on a plate covered with plastic wrap for several hours before frying. This can be a great time saver for parties. However, they are truly best fried fresh.
- Serving Suggestions: These are fantastic on their own, but serving them with dips elevates the experience. Salsa, sour cream, guacamole, or even a creamy cheese sauce are classic pairings. For a complete meal, consider serving them alongside some easy Mexican rice or a fresh salad.
Recipe Variations to Try
While the classic beef and cheese filling is divine, these roll-ups are incredibly versatile!
- Cheeses: Experiment with different shredded cheeses like cheddar, a Mexican blend, or even Pepper Jack for a little heat.
- Spices: Add a pinch of cumin, smoked paprika, or a tiny bit of cayenne pepper to the beef for a different flavor profile.
- Add-ins: Finely diced onions or bell peppers can be sautéed with the beef, but make sure they are very small and well-drained to avoid adding moisture to the filling.
- Different Meat: Shredded chicken or ground turkey can be used in place of ground beef. Ensure it is well-seasoned and any excess moisture is removed. If using chicken, our guide to crispy baked chicken tacos might give you some inspiration for prepping chicken fillings!
- Baked Version: While frying is key to this crispy method, you can bake roll-ups for a lighter option. Brush them lightly with oil and bake at a higher temperature (around 400°F or 200°C) until golden and crispy, flipping halfway. They won’t be quite as uniformly crunchy as fried, but still delicious! We even have a recipe specifically for cheesy baked taquitos if that’s your preferred cooking method.
Your Crispy Beef & Cheese Roll-Ups Questions Answered (FAQ)
Got questions about making the perfect crispy beef and cheese roll-ups? Here are some common ones:
Why are my roll-ups soggy?
The most common culprit for soggy roll-ups is overcrowding the pan when frying. When you add too many at once, the oil temperature drops significantly. This causes the tortillas to absorb oil rather than crisp up. Always fry in batches, ensuring there’s space between each roll-up. Also, make sure your oil is hot enough to begin with!
Can I use different meat?
Absolutely! Ground turkey, shredded chicken, or even seasoned lentil or bean fillings can work. Just ensure the filling isn’t too wet, as excess moisture can prevent the tortilla from crisping. Cook and drain thoroughly.
What’s the best cheese to use?
Monterey Jack and mozzarella are excellent choices because they melt smoothly and don’t release too much oil during frying. Cheddar or a Mexican blend are also good options, but some harder cheeses might not melt as creamily inside.
Can I make these ahead of time?
Yes, you can assemble the roll-ups several hours in advance and store them covered in the refrigerator. Frying them just before serving is best for maximum crispiness. Reheating leftovers in an oven or air fryer is preferable to microwaving, which can make them soggy.
How do I store and reheat leftovers?
Store leftover roll-ups in an airtight container in the refrigerator for up to 3-4 days. To reheat and regain some crispiness, place them on a baking sheet and warm in a preheated oven at 350°F (175°C) for 10-15 minutes, or use an air fryer until heated through and crispy again.
Can I bake these instead of frying?
Yes, you can! While frying yields the crispiest result, baking is a healthier alternative. Brush or spray the assembled roll-ups lightly with oil and bake at around 400°F (200°C) for 15-20 minutes, flipping halfway, until golden and crispy. Check out our dedicated recipe for cheesy baked taquitos for specific instructions on baking them.
Enjoy Your Homemade Crispy Beef & Cheese Roll-Ups!
And there you have it – your guide to making truly irresistible, guaranteed crispy and golden crispy beef and cheese roll-ups at home! Forget the soggy disappointments of the past. With these simple techniques, you’re well on your way to becoming a roll-up master.
Whether you’re making them for a party, a snack, or a fun dinner, these are sure to be a hit. The combination of savory beef, gooey cheese, and that incredible crunch is simply unbeatable. So go ahead, give this recipe a try!
Let me know how they turn out in the comments below! What are your favorite toppings? Did you try a variation? I love hearing from you!
Crispy Beef & Cheese Roll-Ups

Ingredients
- 1/2 pound ground beef
- 1/4 teaspoon salt
- 1/4 teaspoon black pepper
- 1/2 teaspoon chili powder (or paprika)
- 1/4 teaspoon onion powder
- 1/4 teaspoon garlic powder
- 1 cup shredded Monterey Jack or mozzarella cheese
- 6-8 small flour or corn tortillas
- 1/2 cup vegetable oil (or other frying oil)
- Optional toppings: grated cheese, chopped fresh parsley
Directions
- Cook the ground beef in a skillet over medium heat until browned. Drain off any excess grease. Stir in the salt, pepper, chili powder, onion powder, and garlic powder. Remove from heat.
- If using corn tortillas, briefly warm them in a damp paper towel in the microwave for 15-30 seconds to make them pliable. If using flour tortillas, they should be pliable enough.
- Lay a tortilla flat. Spoon about 2-3 tablespoons of the seasoned ground beef down the center, slightly off-center towards one edge. Top the meat with about 2 tablespoons of shredded cheese.
- Roll the tortilla up tightly from the filling side. Place the rolled taquito seam-side down on a plate while you assemble the rest.
- Heat the vegetable oil in a skillet over medium-high heat. You need about 1/2 inch depth of oil. To test if the oil is ready, flick a tiny drop of water into the pan; it should sizzle immediately.
- Carefully place the rolled taquitos into the hot oil, seam-side down first. Do not overcrowd the pan; cook in batches if necessary. This is key to getting them crispy and golden! Overcrowding cools the oil and leads to sogginess.
- Fry for 2-3 minutes on the first side until golden brown and crispy. Use tongs to carefully turn the taquitos to cook the remaining sides, frying for another 2-3 minutes, or until they are uniformly golden brown and crispy all around.
- Remove the fried taquitos from the skillet and place them on a plate lined with paper towels to drain excess oil.
- Serve hot, garnished with optional grated cheese and parsley if desired.