Craving that perfect, satisfying crunch? Look no further! This Crispy Chicken Katsu recipe will guide you through creating golden, irresistible cutlets every single time. Say goodbye to soggy breading and hello to Japanese-inspired perfection, all from the comfort of your own kitchen. We’ll reveal the secrets to achieving the crispiest katsu imaginable!
Why You’ll Love This Crispy Chicken Katsu
This isn’t just another chicken recipe. Here’s why you’ll be making this Crispy Chicken Katsu again and again:
- Unbeatable Crunch: The secret lies in the technique, guaranteeing a satisfying crispy exterior.
- Flavor Explosion: The savory chicken paired with tangy katsu sauce is a match made in heaven.
- Surprisingly Easy: Despite the impressive results, the process is straightforward and beginner-friendly.
- Versatile: Serve it with rice, in sandwiches, or even atop a salad – the possibilities are endless!
Gathering Your Ingredients for Crispy Chicken Katsu
Let’s talk ingredients! The beauty of chicken katsu is its simplicity, but selecting the right components makes all the difference. We’re aiming for a balance of savory, crispy, and slightly tangy notes that create a truly addictive dish. The quality of your chicken and panko breadcrumbs are particularly important for achieving optimal results. Make sure to also have your condiments nearby, or get them ready while preparing the chicken.
- Chicken Breasts: 2 boneless, skinless chicken breasts form the heart of our katsu. Look for plump, evenly sized breasts for uniform cooking. Pounding them to an even thickness is crucial to ensure they cook quickly and stay tender.
- All-Purpose Flour: 1 cup of all-purpose flour forms the first layer of our breading, helping the egg mixture adhere properly.
- Salt and Pepper: A teaspoon of salt and half a teaspoon of black pepper are essential for seasoning the chicken and enhancing its natural flavors. Don’t be shy – a little seasoning goes a long way!
- Eggs and Water: 2 large eggs whisked with 1/4 cup of water create a light and binding egg wash. The water thins the eggs slightly, creating a smoother coating.
- Panko Breadcrumbs: 2 cups of panko breadcrumbs are the key to that irresistible crunch. Panko is made from crustless white bread and has a coarser texture than regular breadcrumbs, resulting in a lighter, crispier coating.
- Vegetable Oil: 4 cups of vegetable oil (or other neutral oil) are needed for frying. Choose an oil with a high smoke point to prevent it from burning. Canola oil, peanut oil, or grapeseed oil are also good options.
- Cooked Rice: Steaming white rice, our golden vegetable rice pilaf, or brown rice makes the perfect accompaniment for chicken katsu.
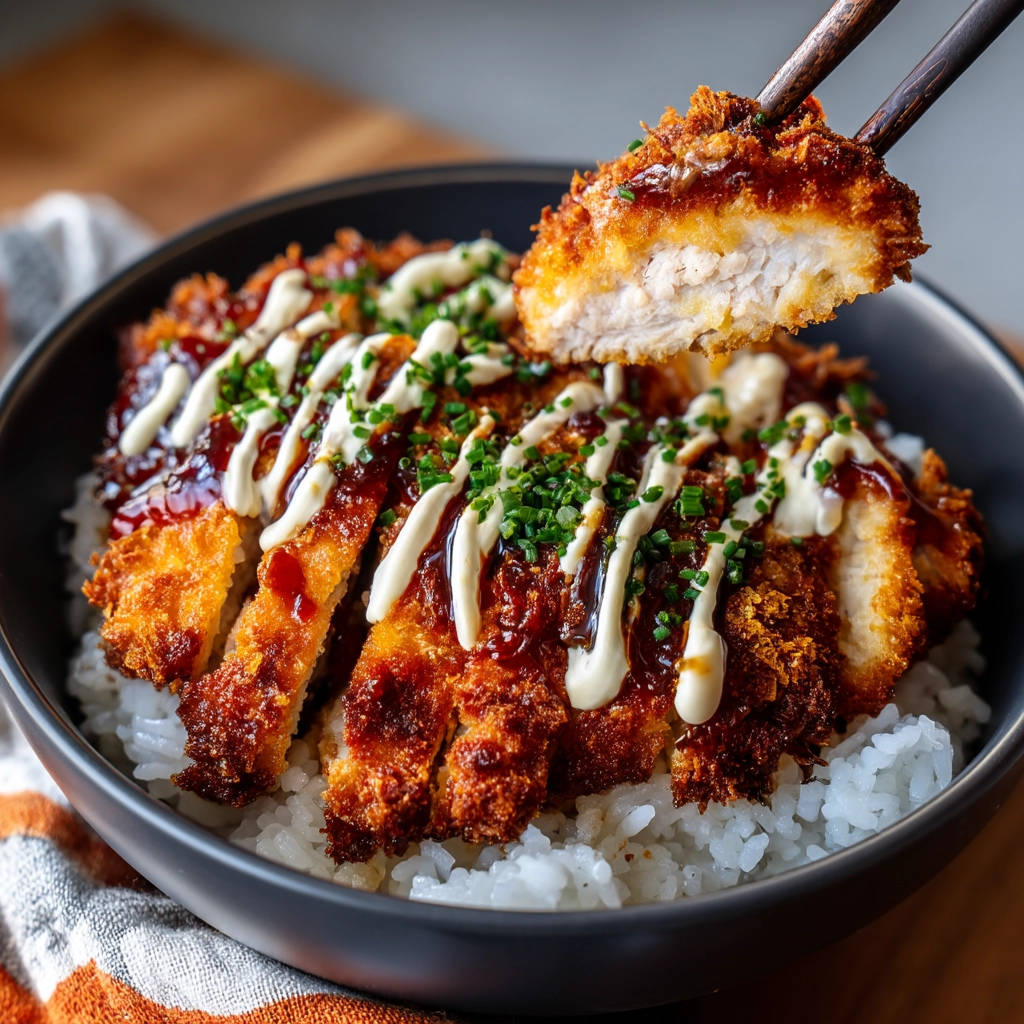
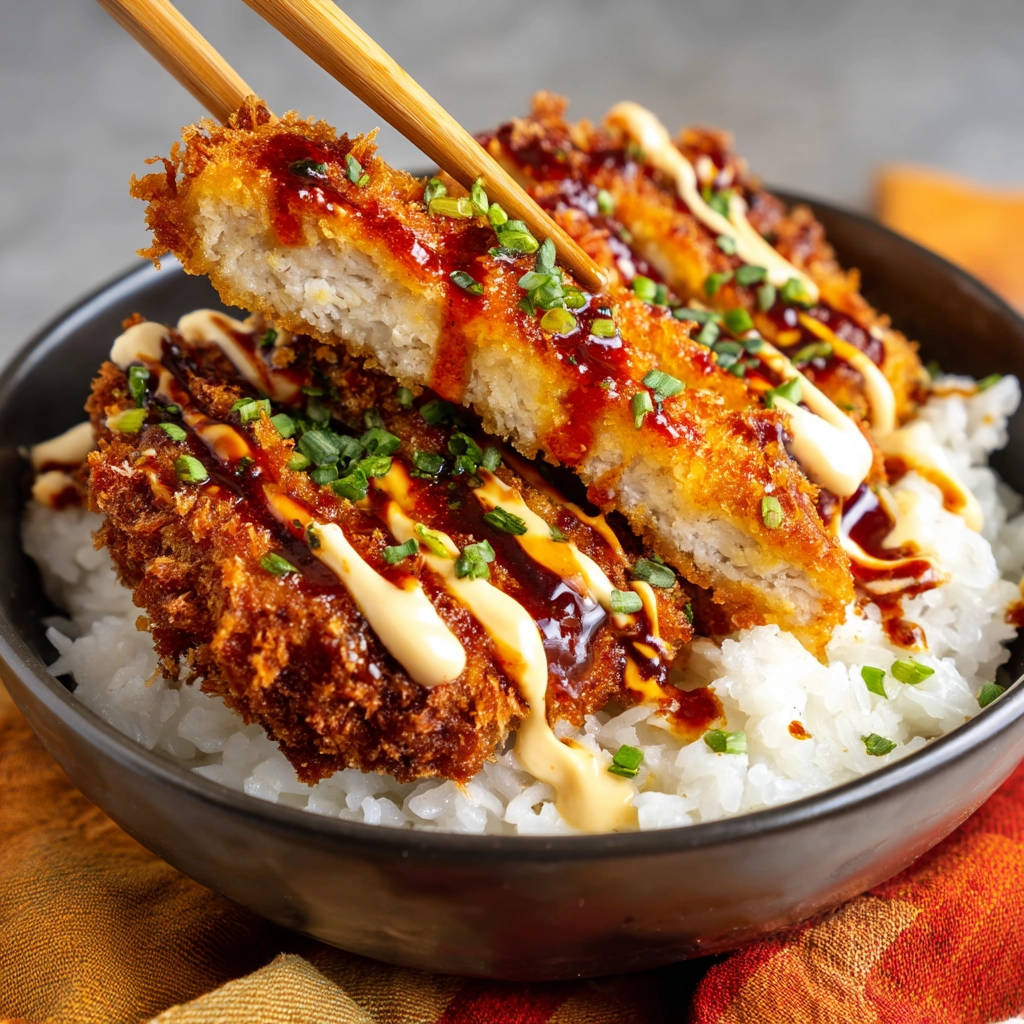
- Katsu Sauce: Katsu sauce is a sweet and tangy Japanese sauce specifically designed to complement katsu. You can find it at most Asian grocery stores or online.
- Mayonnaise: A drizzle of mayonnaise adds a creamy richness to the dish. Japanese mayonnaise (Kewpie) is particularly delicious, but regular mayonnaise works just fine.
- Fresh Chives: A sprinkle of minced fresh chives adds a pop of color and a subtle oniony flavor.
Crafting Your Crispy Chicken Katsu: Step-by-Step
Ready to transform these ingredients into crispy, golden perfection? Don’t worry, I’ll guide you through each step. The most important part is keeping the oil at the right temperature – that’s the real secret to achieving ultimate crunch!
- Prepare the Chicken: Begin by placing the chicken breasts between two sheets of plastic wrap or inside a large resealable bag. Using a meat mallet or rolling pin, gently pound the chicken to an even thickness of about 1/2 inch. This tenderizes the chicken and ensures it cooks evenly.
- Set Up Your Breading Station: This is where the magic happens! Arrange three shallow dishes in a row. In the first dish, combine the flour, salt, and pepper. In the second, whisk the eggs and water together until smooth. In the third, place the panko breadcrumbs. This assembly line will make the breading process much smoother.
- Bread the Chicken: Now, the fun part! Take each chicken piece and dredge it thoroughly in the seasoned flour, making sure to shake off any excess. Next, dip it into the egg mixture, allowing any extra egg to drip back into the dish. Finally, coat the chicken completely with panko breadcrumbs, pressing gently to help them adhere. Make sure every nook and cranny is covered!
- Heat the Oil: This is the key to the perfect crunch! Pour the vegetable oil into a large, heavy skillet or Dutch oven. Heat the oil over medium-high heat until it reaches 350 degrees F (175 degrees C). If you don’t have a thermometer, test the oil by dropping in a few panko breadcrumbs. They should sizzle immediately and turn golden brown within seconds. If they sink to the bottom without sizzling, the oil isn’t hot enough. If they brown too quickly, the oil is too hot.
- Fry the Chicken: Carefully place one or two breaded chicken cutlets into the hot oil, being careful not to overcrowd the pan. Overcrowding will lower the oil temperature and result in soggy katsu. Cook for 3 to 4 minutes per side, or until the chicken is golden brown and cooked through. The internal temperature should reach 165 degrees F (74 degrees C).
- Drain and Cool: Use tongs to carefully remove the cooked chicken from the oil and transfer it to a wire rack set over a baking sheet. This allows excess oil to drip off and prevents the katsu from getting soggy. Important: Do NOT place the chicken on paper towels, as they will trap steam and make the breading soft.
- Serve and Enjoy: Slice the crispy chicken katsu into strips. Serve immediately over hot cooked rice. Generously drizzle with katsu sauce and mayonnaise. Garnish with minced chives for a final touch of flavor and color. Enjoy!
Tips for Perfect Crispy Chicken Katsu Every Time
Want to elevate your katsu game? Here are a few extra tips and tricks to ensure crispy, delicious results every single time:
- Don’t skip the pounding: Pounding the chicken to an even thickness is crucial for even cooking and tender meat.
- Use high-quality panko: The better the panko, the crispier the crust. Look for Japanese panko breadcrumbs for the best results.
- Maintain the oil temperature: This is arguably the most important factor. Use a thermometer to ensure the oil stays at 350 degrees F (175 degrees C).
- Don’t overcrowd the pan: Fry the chicken in batches to prevent the oil temperature from dropping.
- Use a wire rack: Allowing the chicken to drain on a wire rack ensures maximum crispness.
- Get creative with the sauce: While katsu sauce and mayonnaise are classic, feel free to experiment with other sauces, such as teriyaki sauce or even a spicy sriracha mayo.
What to Serve With Crispy Chicken Katsu
Chicken katsu is a versatile dish that pairs well with a variety of sides. Of course, rice is a classic choice, but don’t be afraid to explore other options. Consider a refreshing side salad, such as a simple cucumber salad or a vibrant seaweed salad. You could also serve it with steamed vegetables, such as broccoli or green beans, for a healthy and balanced meal. For a fun twist, try serving the katsu in a sandwich or burger bun with shredded cabbage and katsu sauce. If you’re looking for another flavorful side dish to accompany your katsu, consider preparing a batch of golden rice pilaf; its aromatic spices and fluffy texture would complement the savory chicken beautifully.
Your Crispy Chicken Katsu Questions Answered (FAQ)
Can I bake the chicken katsu instead of frying it?
While frying provides the best, most authentic crispy texture, you can bake the chicken katsu for a healthier option. Preheat your oven to 400 degrees F (200 degrees C). Place the breaded chicken on a baking sheet lined with parchment paper and spray generously with cooking oil spray. Bake for 15-20 minutes, or until golden brown and cooked through, flipping halfway through. It won’t be quite as crispy as fried katsu, but it will still be delicious!
Can I make chicken katsu ahead of time?
Chicken katsu is best served immediately for maximum crispness. However, you can prepare the chicken up to the breading stage ahead of time. Store the breaded chicken in the refrigerator for up to 24 hours. When ready to cook, simply fry or bake as directed. Cooked katsu can be stored in the refrigerator for up to 3 days, but it will lose its crispness. Reheat in a preheated oven or air fryer to help restore some of the crispness.
Can I use different types of meat?
While chicken is the most common choice for katsu, you can also use other types of meat, such as pork (pork loin cutlets), or even firm tofu for a vegetarian option. Adjust the cooking time accordingly based on the thickness of the meat or tofu.
Is there a gluten-free option?
Yes! To make gluten-free chicken katsu, simply substitute the all-purpose flour with a gluten-free all-purpose flour blend and use gluten-free panko breadcrumbs. You can find gluten-free panko at most specialty grocery stores or online. The rest of the recipe remains the same. For a gluten-free side dish option, try our creamy paneer rice bowl, a flavorful alternative to traditional rice.
Enjoy Your Homemade Crispy Chicken Katsu!
There you have it – a step-by-step guide to creating perfectly crispy, restaurant-quality Chicken Katsu in your own kitchen! This recipe is more than just a meal; it’s an experience. The satisfying crunch, the savory flavors, and the joy of creating something delicious from scratch make this dish a true winner. Now it’s your turn to impress your family and friends with your newfound katsu skills. Don’t forget to leave a comment below and let me know how yours turned out! Share your pictures on social media and tag us, we love seeing your creations! And if you’re looking for other delicious ways to enjoy fried goodness, check out our recipe for the ultimate crispy chicken sandwich with special sauce recipe!