If you’ve ever embarked on the noble quest of making homemade snack mix, you know the potential heartbreak. There’s the promise of a flavorful, crunchy treat, but the reality can sometimes be a frustrating landscape of bland cereal squares and others absolutely buried in seasoning. It’s like a flavor lottery where most people lose! Achieving that glorious, consistent coating of seasoning on every single bite of crispy snack squares can feel like the culinary equivalent of finding a unicorn.
But what if I told you there’s a simple, game-changing technique that guarantees snack perfection? A method so effective, it completely eliminates those sad, unseasoned dry spots? Get ready to unlock the secret to the best crispy snack squares you’ve ever made. This recipe uses a little trick that changed my snack mix game forever, ensuring uniform crispiness and irresistible flavor throughout.
Forget everything you thought you knew about soggy or unevenly coated snack mixes. We’re diving into a low-and-slow baking process combined with the magic butter step that creates consistently seasoned, crunchy squares you won’t be able to stop munching on. Let’s get started!
Why You’ll Adore This Crispy Snack Squares Recipe
This isn’t just another snack mix recipe. It’s the recipe for achieving snack enlightenment. Here are just a few reasons why this version will become your go-to:
- Consistently Perfect Flavor: No more plain pieces! The unique method ensures seasoning coats every square evenly.
- Superior Crispiness: Low temperature baking delivers a satisfying crunch without any burnt bits.
- Simple Ingredients: You likely have most of these pantry staples on hand already.
- Highly Adaptable: Once you master the base, it’s easy to play with flavor variations.
- Crowd-Pleaser: Ideal for parties, holidays, road trips, or just everyday snacking.
Making a big batch of this crispy snack mix is always a good idea. It disappears fast!
Gathering Your Ingredients for Perfectly Seasoned Squares
Let’s talk about what goes into making these irresistible crispy snack squares. The beauty of this recipe lies in its simplicity, relying on foundational flavors and textures to create something truly special. We’re building a savory, aromatic profile that clings beautifully to the cereal base.
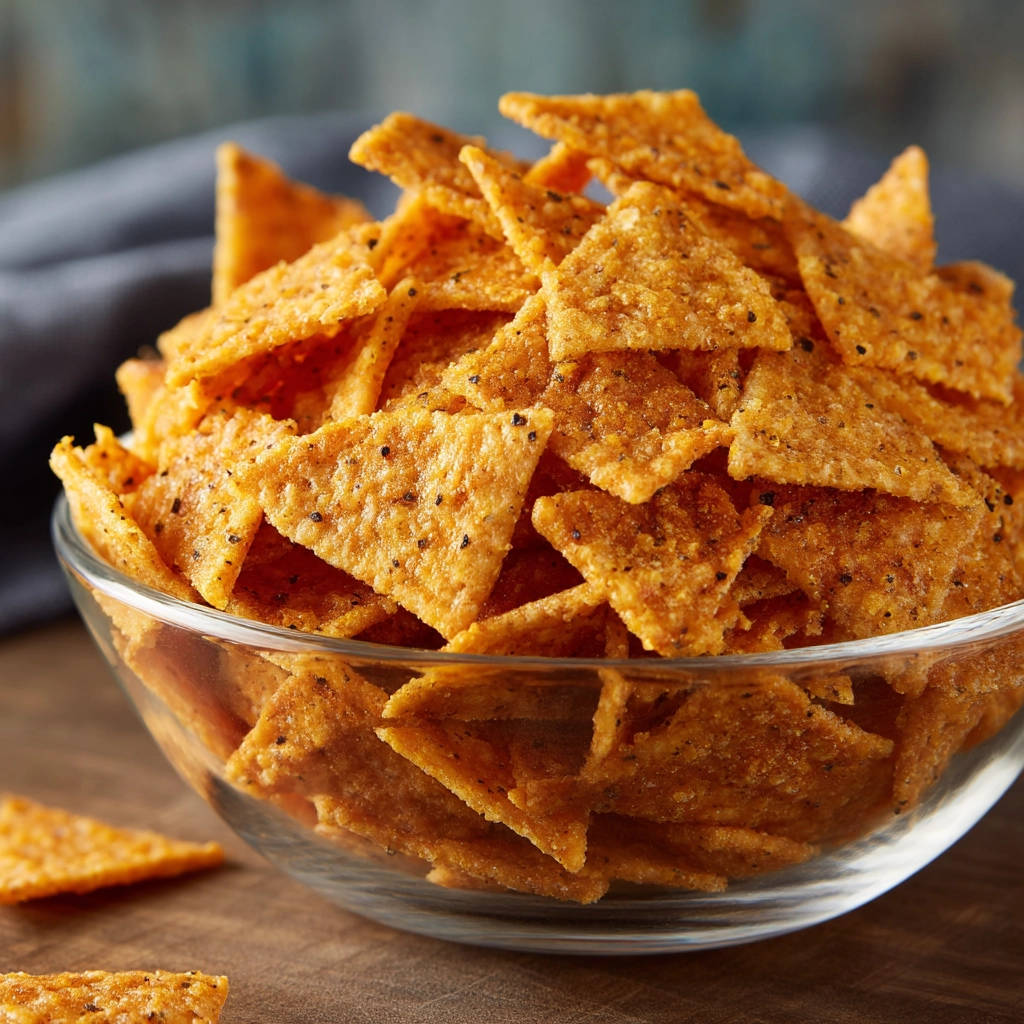
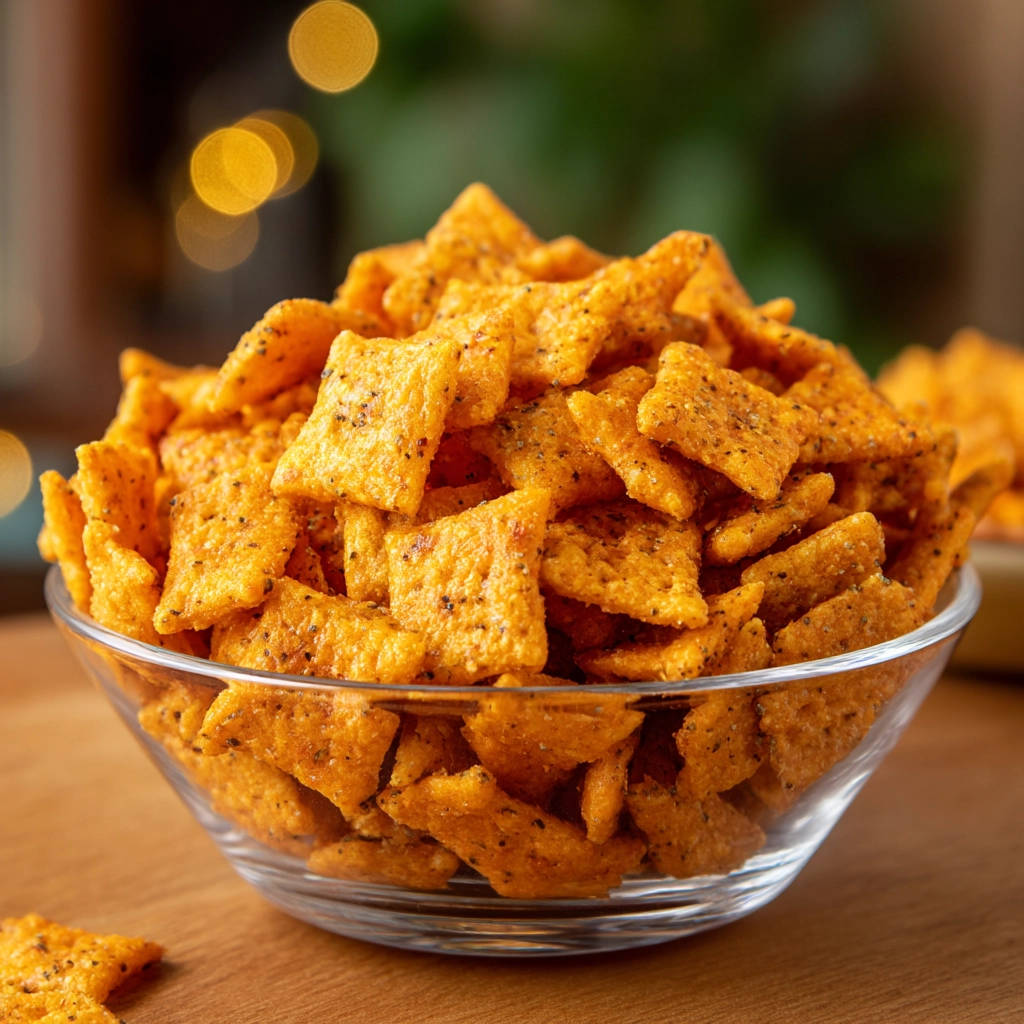
For the base, you’ll want about 6 cups of square corn or rice cereal. Think classic brands like Chex. Using square cereals is key because their nooks and crannies are perfect for holding onto that precious butter and seasoning.
The magic happens with the flavor agents. We start with half a cup of unsalted butter, melted. Using unsalted butter gives you complete control over the final saltiness of your snack mix. The melted butter is absolutely essential – it’s the flavorful liquid gold that acts as the necessary “glue” for all the dry seasonings we’re about to add. Don’t skip melting it properly!
Then comes the classic savory blend: 1 teaspoon each of garlic powder and onion powder, 1 teaspoon of paprika for color and mild peppery warmth, half a teaspoon of salt (remember we used unsalted butter, so this is important), and a quarter teaspoon of black pepper for a touch of bite. This combination provides a balanced, universally appealing savory base. For those who like a little heat, a pinch of cayenne pepper is optional but highly recommended to add a subtle warmth that elevates the whole mix.
Here’s the simple list of what you’ll need:
- 6 cups square corn or rice cereal (like Chex)
- 1/2 cup unsalted butter, melted
- 1 teaspoon garlic powder
- 1 teaspoon onion powder
- 1 teaspoon paprika
- 1/2 teaspoon salt
- 1/4 teaspoon black pepper
- Pinch cayenne pepper (optional, for heat)
Having everything measured out and ready to go before you start is always a good practice for smooth sailing in the kitchen.
Crafting Your Crispy Snack Squares: Step-by-Step Perfection
Now for the fun part – bringing it all together! The process is straightforward, but pay close attention to the critical butter-coating step. It’s the cornerstone of achieving that perfectly seasoned result every time.
- Begin by preparing your oven and workspace. Preheat your oven to a low 250 degrees Fahrenheit (120 degrees Celsius). This low temperature is crucial for slowly toasting the cereal and adhering the seasoning without burning anything. Get out your largest mixing bowl – you’ll need plenty of room for tossing later – and at least one large baking sheet, maybe two, to ensure you can spread the snack mix in a single layer for optimal crisping.
- Pour the full 6 cups of your chosen square cereal directly into that large mixing bowl. Make sure the bowl is big enough to comfortably hold the cereal with room to toss.
- In a separate, smaller bowl, let’s create our initial flavor binder. Whisk together the half cup of melted unsalted butter with the dry seasonings: garlic powder, onion powder, paprika, salt, black pepper, and the pinch of cayenne if you’re adding heat. Whisking them into the butter first helps distribute these potent dry spices evenly throughout the liquid, preventing clumps later on.
- This is the absolute game-changer for consistently coated crispy snack squares! Take the bowl with your seasoned melted butter and pour it evenly over the cereal in the large bowl. Now, grab a large spatula or spoon and get to work gently tossing the cereal. The goal here is simple but requires patience: ensure every single piece of cereal gets a coating of that buttery goodness. The butter is literally the adhesive for the dry seasonings that are coming next. Take your time; lift and fold, making sure no dry spots are hiding at the bottom or sides of the bowl.
- Once you’re confident every square is glistening with a light coat of butter mixture, it’s time for the main seasoning event. Sprinkle the dry seasonings (from step 3, now incorporated into the butter mix) evenly over the buttered cereal. Toss again, very gently but thoroughly. This second toss adheres the dry seasonings to the buttered surface of the cereal pieces. You’ll see the color and flavor building on each square. Continue until the seasonings appear uniformly distributed and clinging nicely.
- Prepare your baking sheets. Spread the coated cereal out in a single layer on one or two large baking sheets. It’s important not to overcrowd the sheets; leaving space allows hot air to circulate around each piece, which is essential for achieving maximum crispiness. If your cereal is piled high, it will steam rather than toast, resulting in a less crispy snack.
- Place the baking sheet(s) in your preheated 250°F (120°C) oven. Bake for a total of 60 minutes. The low and slow bake works wonders here. It allows the cereal to toast gradually, becoming wonderfully crunchy, while the butter and seasonings effectively bake onto each piece without burning them. Remember to stir the mix gently every 15 minutes during the baking time. This ensures even toasting and crisping throughout the batch.
- After 60 minutes, remove the crispy snack squares from the oven. Leave them spread out on the baking sheets and let them cool completely. This cooling step is critical! The snack mix will continue to crisp up as it cools down. Resist the urge to transfer them to a container too soon. Once fully cooled, they are ready to serve. Store any leftovers in an airtight container at room temperature for up to a week to maintain their crispness.
Tips for Perfect Crispy Snack Squares Every Time
Mastering these crispy snack squares is easy once you understand the core technique. Here are a few extra pointers to ensure your batch is always a winner:
- Don’t Rush the Butter Coat: Seriously, step 4 is the make-or-break moment. Spend a few extra minutes here ensuring every piece is coated. It’s the foundation for even seasoning.
- Low and Slow is Key: The 250°F oven temperature is intentional. A higher temperature might bake faster but increases the risk of burning the seasonings or uneven crisping.
- Stirring Matters: Gently stirring every 15 minutes helps expose all sides of the cereal pieces to the heat, promoting uniform toasting and crisping.
- Cool Completely on Sheets: As mentioned, letting the snack mix cool on the baking sheets is crucial for the final crisping process. Don’t skip this step!
- Use a Large Enough Bowl: Tossing needs space. Using a bowl that’s just big enough will make step 4 and 5 much more frustrating than they need to be.
Want to add other components to your snack mix, like pretzels, nuts, or bagel chips? Bake the cereal squares first using this method to get them perfectly seasoned and crispy. Let them cool completely, then toss gently with any additional pre-baked or ready-to-eat components you want to include. This ensures everything stays crispy and none of the other pieces get soggy or interfere with the cereal’s texture during baking. If you’re looking for other delicious bites perfect for parties, try our Sausage and Cheese Balls or Sweet Savory Bacon Bites!
Fun Variations for Your Crispy Snack Squares
While the basic savory seasoning is fantastic, feel free to get creative! Once you’ve mastered the butter-coating technique, the possibilities are endless. Consider adding a pinch of smoked paprika for a smoky depth, a dash of dried herbs like thyme or rosemary, or even a sprinkle of nutritional yeast for a cheesy flavor without dairy.
For those who really love heat, you can increase the cayenne or whisk in a few drops of your favorite hot sauce with the melted butter mixture in step 3. Remember to start small and taste as you go!
Serving Suggestions for Your Crispy Snack Squares
These crispy snack squares are incredibly versatile and perfect for almost any occasion where snacks are welcome. They are the ultimate party mix, ideal for setting out in a big bowl for guests to graze on. Their sturdy crunch makes them fantastic for road trips or packing in lunchboxes.
They also make a great addition to snack boards or charcuterie spreads, offering a savory, crunchy contrast to cheeses, fruits, and meats. Don’t forget them for movie nights or game days – they are truly addictive!
Your Crispy Snack Squares Questions Answered (FAQ)
Let’s tackle some common questions you might have about making these perfectly seasoned crispy snack squares.
Can I use different types of cereal?
While square corn and rice cereals like Chex work best due to their structure, you can experiment with others. Puffed cereals are often too delicate, and dense flakes might not crisp up or hold seasoning as well. If mixing cereals, ensure they have similar baking times and textures.
Why do I need to toss the cereal with butter before the dry seasonings?
This is the secret! The melted butter coats the cereal pieces and acts as a sticky base. When you add the dry seasonings afterward, they adhere beautifully and evenly to the buttered surface, rather than clumping or falling to the bottom of the bowl. It’s the key to ensuring every square gets its fair share of flavor.
My snack mix isn’t as crispy as I’d like. What went wrong?
Several factors could affect crispiness. Ensure you preheated the oven correctly and baked for the full 60 minutes at the low temperature, stirring as directed. Crucially, did you spread the mixture in a single layer on the baking sheets? Overcrowding is a common culprit, as it steams the cereal instead of toasting it. Also, make sure you let the mix cool completely on the baking sheets before storing – much of the final crisping happens during cooling. For more tips on achieving crispy oven-baked results, you might find our guide on Easy Crispy Oven Potato Wedges helpful, as the low-and-slow baking principle is similar!
Can I use salted butter instead of unsalted?
Yes, but you will need to adjust the amount of added salt. If using salted butter, start by omitting the 1/2 teaspoon of salt called for in the recipe. Taste the mixture after it’s baked and cooled slightly, and you can always add a tiny pinch more salt if needed, but it’s best to err on the side of caution.
How should I store the crispy snack squares?
Once completely cooled, store the snack mix in an airtight container at room temperature. This will help maintain their crispness and flavor for up to a week.
Can I double or triple the recipe?
Absolutely! This recipe scales up well. Just be sure to use an even larger mixing bowl and spread the mixture across multiple baking sheets to avoid overcrowding during baking. You may need to increase the stirring frequency slightly if you have a very large batch.
Enjoy Your Homemade Crispy Snack Squares!
Say goodbye to unevenly seasoned snack mixes forever! With this simple technique, you can whip up batches of perfectly seasoned, wonderfully crispy snack squares that everyone will rave about. They’re easy to make, require minimal effort, and deliver maximum flavor and crunch.
Whether you’re hosting a get-together, heading out on a road trip, or just need a satisfying snack for your next movie marathon, these crispy snack squares are guaranteed to hit the spot. Give them a try and see the difference that one little step makes!
Did you try this recipe? Let me know how yours turned out in the comments below! What seasoning variations did you experiment with?
Crispy Snack Squares

Ingredients
- 6 cups square corn or rice cereal (like Chex)
- 1/2 cup unsalted butter, melted
- 1 teaspoon garlic powder
- 1 teaspoon onion powder
- 1 teaspoon paprika
- 1/2 teaspoon salt
- 1/4 teaspoon black pepper
- Pinch cayenne pepper (optional, for heat)
Directions
- Preheat your oven to 250 degrees F (120 degrees C).
- Pour the cereal into a large mixing bowl.
- In a separate small bowl, whisk together the melted butter, garlic powder, onion powder, paprika, salt, black pepper, and cayenne pepper (if using).
- This is the key step for perfect seasoning! Pour the melted butter mixture evenly over the cereal in the large bowl. Using a large spatula or spoon, gently toss the cereal until every piece is coated in the butter mixture. Take your time here to ensure no dry spots remain. The butter acts as the glue for the seasonings.
- Sprinkle the whisked dry seasonings evenly over the coated cereal. Toss again very gently, but thoroughly, until the seasonings appear evenly distributed and sticking to the buttered cereal pieces.
- Spread the coated cereal in a single layer on a large baking sheet. You may need two baking sheets to avoid crowding, which helps everything get crispy.
- Bake for 60 minutes, stirring gently every 15 minutes. This low and slow baking process helps toast the cereal and locks the seasoning onto each piece without burning.
- Remove from the oven and let cool completely on the baking sheets before serving or storing. The snack mix will become crispier as it cools. Store in an airtight container at room temperature for up to a week.