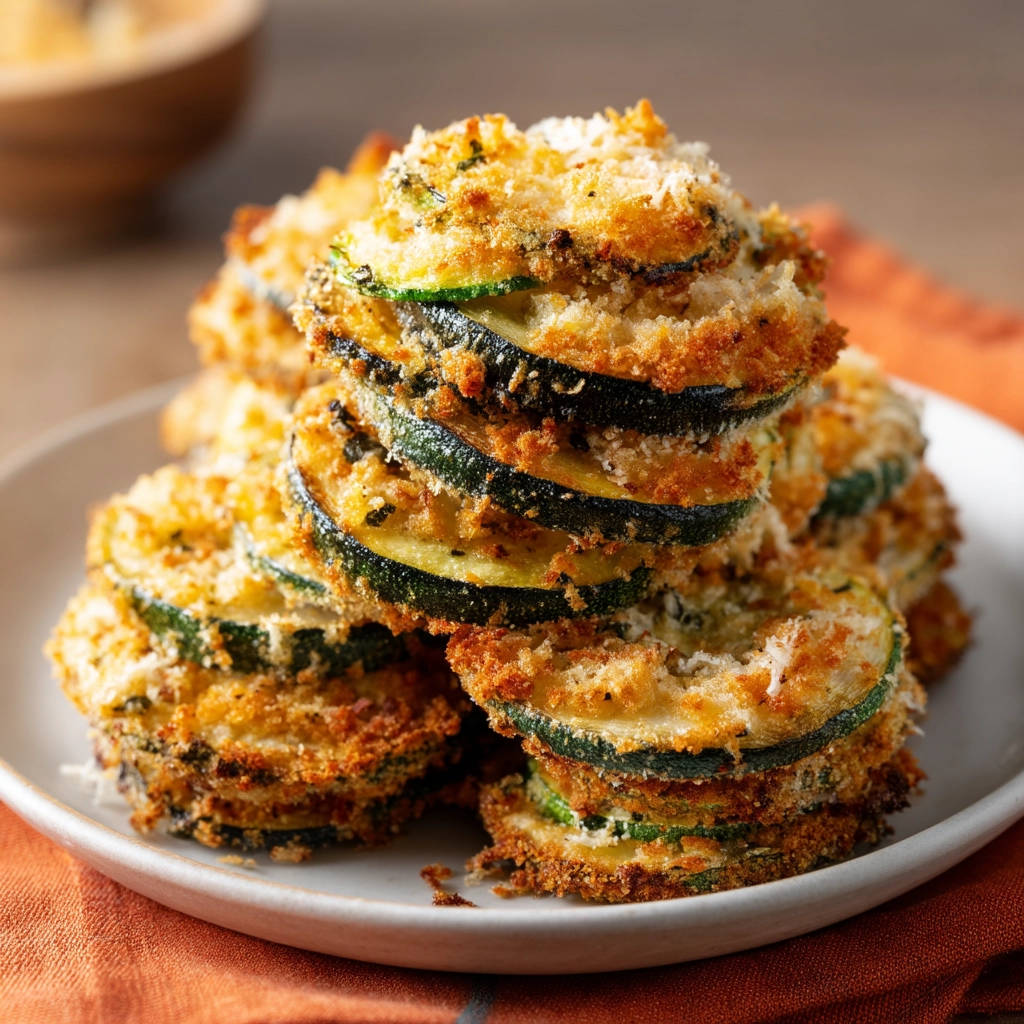
Have you ever craved perfectly crispy zucchini, only to end up with a soggy middle or burnt edges? It’s a common kitchen woe, but fear not! This Crispy Zucchini Stacks recipe is your ticket to achieving zucchini perfection, every single time. The secret? An even-browning method that ensures a uniformly golden and delightfully crunchy result. Get ready to transform humble zucchini into a star side dish or a satisfying snack!
Why You’ll Love These Crispy Zucchini Stacks
These aren’t your average zucchini bites. Here’s why you’ll keep coming back to this recipe:
- Perfectly Crispy: The even-browning method guarantees maximum crunch.
- Flavorful: Parmesan and garlic add a delicious savory kick.
- Easy to Make: Simple ingredients and straightforward instructions make this recipe a breeze.
- Versatile: Serve as a side, appetizer, or even a light meal.
- Kid-Friendly: Even picky eaters will love these crispy veggie stacks!
Gathering Your Ingredients for Crispy Zucchini Stacks
The beauty of this recipe lies in its simplicity. We’re using fresh, readily available ingredients to create a flavorful and texturally exciting dish. The combination of the crisp breadcrumb coating, the savory Parmesan, and the tender zucchini makes for a truly irresistible bite. Let’s break down what you’ll need:
- 2 Medium Zucchinis: Choose zucchinis that are firm to the touch and have smooth, unblemished skin. Smaller to medium-sized zucchinis tend to have fewer seeds and a sweeter flavor.
- 1 Cup Breadcrumbs: Plain breadcrumbs work best, allowing the Parmesan and garlic powder to shine. You can use store-bought or homemade. For a gluten-free option, consider using gluten-free breadcrumbs.
- 1/2 Cup Grated Parmesan Cheese: Freshly grated Parmesan cheese is highly recommended for its superior flavor and texture. Pre-shredded Parmesan often contains cellulose, which can prevent it from melting properly.
- 1/4 Cup Olive Oil: A good quality olive oil adds richness and helps the zucchini brown beautifully. Extra virgin olive oil is preferred for its flavor, but regular olive oil will also work well.
- 1 Teaspoon Garlic Powder: Garlic powder provides a subtle, savory flavor that complements the zucchini and Parmesan perfectly.
- 1/2 Teaspoon Salt: Salt enhances all the flavors in the dish.
- 1/4 Teaspoon Black Pepper: Freshly ground black pepper adds a touch of spice and complexity.
- 1/4 Cup All-Purpose Flour: The flour helps the egg adhere to the zucchini, creating a better base for the breadcrumb coating.
- 1 Large Egg, Beaten: The beaten egg acts as a binder, helping the breadcrumbs stick to the zucchini. Make sure the egg is well-beaten for even coverage.
Crafting Your Crispy Zucchini Stacks: Step-by-Step
Now for the fun part! These instructions may look lengthy, but the cooking process is super simple! The most crucial part is the preheated baking sheet. This step is non-negotiable and key to achieving that perfect, all-over golden crisp.
- Preheat the Oven: Start by preheating your oven to 400 degrees F (200 degrees C). This ensures that the zucchini cooks evenly and the breadcrumbs get nice and crispy.
- Slice the Zucchini: Thinly slice the zucchinis into approximately 1/4-inch thick rounds. Uniformity is key here, as it ensures even cooking. A mandoline slicer can be helpful for achieving consistent slices, but a sharp knife works just fine too.
- Prepare the Breadcrumb Mixture: In a shallow dish, thoroughly combine the breadcrumbs, grated Parmesan cheese, garlic powder, salt, and pepper. Mixing these ingredients ensures every bite is flavorful.
- Set Up the Dredging Station: Place the all-purpose flour in one shallow dish and the beaten egg in another. Having these prepared and ready to go makes the coating process much smoother.
- Dredge the Zucchini: This is where the magic happens. First, dredge each zucchini slice in the flour, making sure to coat it evenly. Shake off any excess flour. Then, dip the floured zucchini into the beaten egg, allowing any excess to drip off. Finally, coat the zucchini slice with the breadcrumb mixture, pressing gently to help the breadcrumbs adhere. Repeat this process for all zucchini slices.
- Preheat the Baking Sheet: This is the secret to even browning! Place your baking sheet in the preheated oven for 5 minutes. This ensures the baking sheet is hot when the zucchini is added, promoting even heat distribution and preventing soggy bottoms.
- Oil the Hot Baking Sheet: Carefully remove the hot baking sheet from the oven and immediately drizzle it with olive oil, spreading it evenly. The hot pan will sizzle slightly when the oil hits it – that’s a good sign!
- Arrange the Zucchini: Arrange the breaded zucchini slices in a single layer on the preheated, oiled baking sheet. Make sure the zucchini slices are not touching, as this can prevent them from browning properly.
- Bake to Golden Perfection: Bake for 15-20 minutes, flipping halfway through, until golden brown and tender. Keep a close eye on them to prevent burning, as oven temperatures can vary.
- Cool and Stack: Remove the zucchini from the oven and let it cool slightly on the baking sheet. Then, carefully stack the zucchini slices and serve.
Tips for Perfect Crispy Zucchini Stacks Every Time
Want to take your Crispy Zucchini Stacks to the next level? Here are a few pro tips:
- Don’t overcrowd the baking sheet. Overcrowding will steam the zucchini instead of baking it, resulting in a less crispy texture. Work in batches if necessary.
- Pat the zucchini dry. If your zucchini seems particularly moist, pat it dry with paper towels before dredging. This will help the breadcrumbs adhere better.
- Add a little spice. For a touch of heat, add a pinch of red pepper flakes to the breadcrumb mixture.
- Get creative with the cheese. Try using a blend of Parmesan and Romano cheese for an extra layer of flavor.
- Use an Air Fryer. For an even faster method that results in super crispy zucchini, try cooking them in an air fryer! Preheat your air fryer to 400°F (200°C), arrange the zucchini in a single layer, and cook for 8-10 minutes, flipping halfway through.
- Storage: Store leftover zucchini stacks in an airtight container in the refrigerator for up to 2 days. Reheat in the oven or air fryer to restore crispness. They might lose some crispness, but the flavor will still be fantastic.
What to Serve With Crispy Zucchini Stacks
These Crispy Zucchini Stacks are incredibly versatile and pair well with a variety of dishes. They make a fantastic side dish for grilled chicken or fish, or you could add them to a Spiced Potato Stack Sandwich for a vegetarian lunch. They’re also delicious served alongside a simple salad for a light and healthy meal. If you’re looking for something heartier, they complement creamy dishes like our Slow Cooker Cheesy Potatoes perfectly. The crunchy zucchini offers a delightful textural contrast to the creamy, comforting potatoes. You could even serve them with a dipping sauce, such as marinara or a creamy garlic sauce.
Your Crispy Zucchini Stacks Questions Answered (FAQ)
Can I use yellow squash instead of zucchini?
Yes, you can definitely substitute yellow squash for zucchini in this recipe. The taste and texture will be slightly different, but still delicious. Yellow squash tends to be a bit sweeter than zucchini.
Can I make these ahead of time?
While these Crispy Zucchini Stacks are best served fresh, you can prepare the zucchini slices and breadcrumb mixture ahead of time. Store them separately in the refrigerator until you’re ready to bake. The preheating of the baking sheet must be done right before baking the breaded zucchini.
Can I freeze these Crispy Zucchini Stacks?
Freezing is not recommended. The zucchini will lose its crispness and become soggy when thawed. It’s better to enjoy them fresh!
What if my zucchini is watery?
Zucchini can sometimes release a lot of moisture. If you notice your zucchini slices are watery, sprinkle them with a little salt and let them sit for about 10 minutes. The salt will draw out the excess moisture. Pat them dry with paper towels before dredging.
Can I use different types of cheese?
Absolutely! Feel free to experiment with different types of cheese. Pecorino Romano, Asiago, or even a sprinkle of shredded mozzarella would all be delicious. Keep in mind that some cheeses melt more easily than others, so adjust the baking time accordingly.
Enjoy Your Homemade Crispy Zucchini Stacks!
There you have it – a foolproof method for achieving perfectly Crispy Zucchini Stacks every time. With just a few simple ingredients and this even-browning technique, you can transform humble zucchini into a culinary delight. So go ahead, give this recipe a try and prepare to be amazed! Don’t forget to leave a comment below to let me know how yours turned out, and share this recipe with your friends and family. Happy cooking!
Crispy Zucchini Stacks (The Even-Browning Method)
Ingredients
- 2 medium zucchinis
- 1 cup breadcrumbs
- 1/2 cup grated Parmesan cheese
- 1/4 cup olive oil
- 1 teaspoon garlic powder
- 1/2 teaspoon salt
- 1/4 teaspoon black pepper
- 1/4 cup all-purpose flour
- 1 large egg, beaten
Directions
- Preheat oven to 400 degrees F (200 degrees C).
- Slice the zucchinis into approximately 1/4-inch thick rounds.
- In a shallow dish, combine breadcrumbs, Parmesan cheese, garlic powder, salt, and pepper.
- Place the flour in another shallow dish and the beaten egg in a third shallow dish.
- Dredge each zucchini slice in flour, then dip in the beaten egg, and finally coat with the breadcrumb mixture, pressing gently to adhere.
- The key to even browning is preheating the baking sheet in the oven for 5 minutes. This ensures even heat distribution from the start.
- Carefully remove the hot baking sheet from the oven and immediately drizzle with olive oil, spreading it evenly.
- Arrange the breaded zucchini slices in a single layer on the preheated, oiled baking sheet.
- Bake for 15-20 minutes, flipping halfway through, until golden brown and tender.
- Remove from oven and let cool slightly. Stack zucchini slices to serve.

