
Oh, the heartbreak of a dry chocolate cake! You spend time measuring, mixing, and waiting patiently as that glorious chocolate aroma fills your kitchen, only to cut into it and find… disappointment. Crumbly, dense, and just plain sad. I’ve been there! For years, I chased that elusive moist chocolate cake perfection. I tried recipe after recipe, tweak after tweak, until I finally cracked the code.
This isn’t just a chocolate cake; it’s the Decadent Chocolate Cake that stays incredibly moist and boasts a deep, rich flavor that will make everyone swoon. It’s simple, straightforward, and delivers perfect results every single time. Say goodbye to dry cakes forever and get ready for requests for this recipe!
For a lighter treat with fruit, try these fluffy pancakes with fresh cherries.
Why This is Your Perfect Decadent Chocolate Cake
What makes this particular Decadent Chocolate Cake stand out from the rest? It’s all about delivering an exceptional experience with minimal fuss.
- Unbelievable Moisture: This recipe incorporates a secret ingredient that guarantees a tender, moist crumb unlike anything you’ve tried before. No more dry edges or crumbly centers!
- Intense Chocolate Flavor: We use a generous amount of unsweetened cocoa powder, and a special technique enhances its rich chocolatey depth.
- Simple & Reliable: Despite its decadent results, this recipe is incredibly easy to follow, making it perfect for bakers of all skill levels.
- Perfect for Any Occasion: From birthdays and holidays to a simple craving for something truly special, this cake fits the bill.
- Crowd-Pleasing Frosting: The accompanying frosting is velvety smooth, rich, and complements the cake perfectly without being overly sweet.
Gathering Your Ingredients for Decadent Chocolate Cake
Crafting a truly amazing chocolate cake starts with selecting the right ingredients and understanding how they work together. Think of these as building blocks for chocolate perfection!
For the cake itself, we combine standard pantry staples in specific ways to achieve that signature moist texture. You’ll need:
- All-Purpose Flour: The structure of our cake. Measure it carefully by spooning it into the measuring cup and leveling it off, rather than scooping directly from the bag, which can pack it down and result in too much flour.
- Granulated Sugar: Provides sweetness and also helps with moisture and tenderizing the crumb.
- Unsweetened Cocoa Powder: For that deep, dark chocolate flavor. Using unsweetened allows us to control the sweetness and really lets the chocolate shine. Make sure it’s good quality!
- Baking Soda & Baking Powder: Our leavening agents. Baking soda reacts with the acid in the buttermilk to create lift, while baking powder provides additional lift for a tender, airy texture. Having both ensures a beautiful rise.
- Salt: Crucial for balancing the sweetness and enhancing all the other flavors, especially the chocolate. Don’t skip it!
- Large Eggs: Bind the ingredients together, add richness, and contribute to the cake’s structure. Using large, room temperature eggs is ideal for better emulsification.
- Buttermilk: A key moisture provider! Its acidity reacts with the baking soda for lift and tenderizes the gluten in the flour, resulting in a softer, more delicate crumb.
- Vegetable Oil: Unlike butter, oil remains liquid at room temperature, contributing significantly to the cake’s moistness long after it’s baked.
- Vanilla Extract: A flavor enhancer that pairs beautifully with chocolate, adding depth and complexity.
- Hot Brewed Coffee or Hot Water: And here’s the secret ingredient for unparalleled moisture and amplified chocolate flavor! Hot liquid “blooms” the cocoa powder, releasing its full potential. Coffee adds an extra layer of richness that complements chocolate wonderfully, but hot water works perfectly too if you prefer or don’t have coffee.
Now, let’s talk about that irresistible frosting. This is a classic American-style buttercream, made extra chocolatey and smooth:
- Unsalted Butter: Softened to room temperature is critical for a smooth, lump-free frosting. Make sure it’s truly soft, but not melted.
- Unsweetened Cocoa Powder: Again, use good quality unsweetened cocoa for intensity.
- Powdered Sugar: The base and sweetener for the frosting. Sift it if it’s clumpy.
- Milk: Used to thin the frosting to the perfect spreadable consistency. Whole milk works best for richness.
- Vanilla Extract: Adds another layer of flavor to the frosting.
- Melted Semi-Sweet Chocolate or Ganache (Optional): This is the ultimate upgrade for a glossy, extra-rich frosting. If you want maximum decadence and a stunning finish, I highly recommend adding this!
Crafting Your Decadent Chocolate Cake: Step-by-Step
Ready to bake the cake of your dreams? Follow these steps carefully, paying attention to the little details that make all the difference. The process is designed to be simple but effective, especially when it comes to incorporating that magical hot liquid.
- Get Ready to Bake: Begin by preheating your oven to 350 degrees F (175 degrees C). Properly preparing your cake pans is essential for easy release. Grease the insides thoroughly with butter or baking spray, then dust with flour, tapping out any excess. This creates a non-stick layer ensuring your beautiful cakes don’t stick. We’re using two 8-inch round pans for classic layers.
- Combine the Dry Ingredients: In your largest mixing bowl, measure out your all-purpose flour, granulated sugar, unsweetened cocoa powder, baking soda, baking powder, and salt. Give these a good whisk together. The goal here is to distribute the leavening agents and salt evenly throughout the flour and cocoa, and to break up any small lumps, especially in the cocoa powder.
- Whisk the Wet Ingredients: In a separate, medium-sized bowl, whisk together your large eggs, buttermilk, vegetable oil, and vanilla extract. Combining these liquids separately ensures they are well mixed before hitting the dry ingredients. Remember, room temperature ingredients emulsify better, leading to a smoother batter.
- Bring Wet and Dry Together (Gently!): Pour the wet ingredients from the medium bowl into the large bowl with your dry ingredients. Use an electric mixer on a low speed, or a whisk or spatula if mixing by hand. Mix just until you no longer see streaks of dry flour. It’s absolutely crucial not to overmix at this stage, as this develops gluten, which can make your cake tough.
- Add the Moisture Secret: Now for the game-changer! Carefully pour in the hot brewed coffee or hot water. The batter will instantly become quite thin – don’t panic, this is exactly how it should be! Gently mix on low speed, or with a whisk/spatula, just until the hot liquid is fully incorporated. The hot liquid helps the cocoa bloom for richer flavor and creates a very thin batter that bakes into an incredibly moist cake.
- Portion the Batter: Divide the batter evenly between the two prepared 8-inch cake pans. You can eye it, or for precision, use a kitchen scale to weigh the batter in each pan. Even distribution ensures both cake layers bake in roughly the same amount of time and are the same thickness for easy stacking.
- Bake to Perfection: Place the pans in the preheated oven. Bake for 30 to 35 minutes. The best way to check for doneness is to insert a wooden skewer or toothpick into the center of the cakes. If it comes out clean or with just a few moist crumbs attached (no wet batter!), they are ready. If there’s wet batter, bake for a few more minutes and test again.
- Cooling is Key: Do NOT rush the cooling process! Let the cakes cool in their pans on a wire rack for about 10 minutes. This allows them to firm up slightly before you handle them. After 10 minutes, carefully invert the cakes onto the wire rack to cool completely. Ensure they are stone cold before even thinking about frosting. Warm cakes will melt the frosting!
- Whip Up the Decadent Frosting: While the cakes cool, make the frosting. In a large bowl, beat the softened unsalted butter until it’s wonderfully creamy and pale. Gradually add the unsweetened cocoa powder and powdered sugar, alternating with the milk. Start by adding some powdered sugar and cocoa, beat until just combined, then add a splash of milk, beat, and repeat until all are incorporated and the frosting is smooth and fluffy. Stir in the vanilla extract. If you’re going for ultimate decadence and gloss, beat in the melted semi-sweet chocolate or ganache now – it makes a noticeable difference!
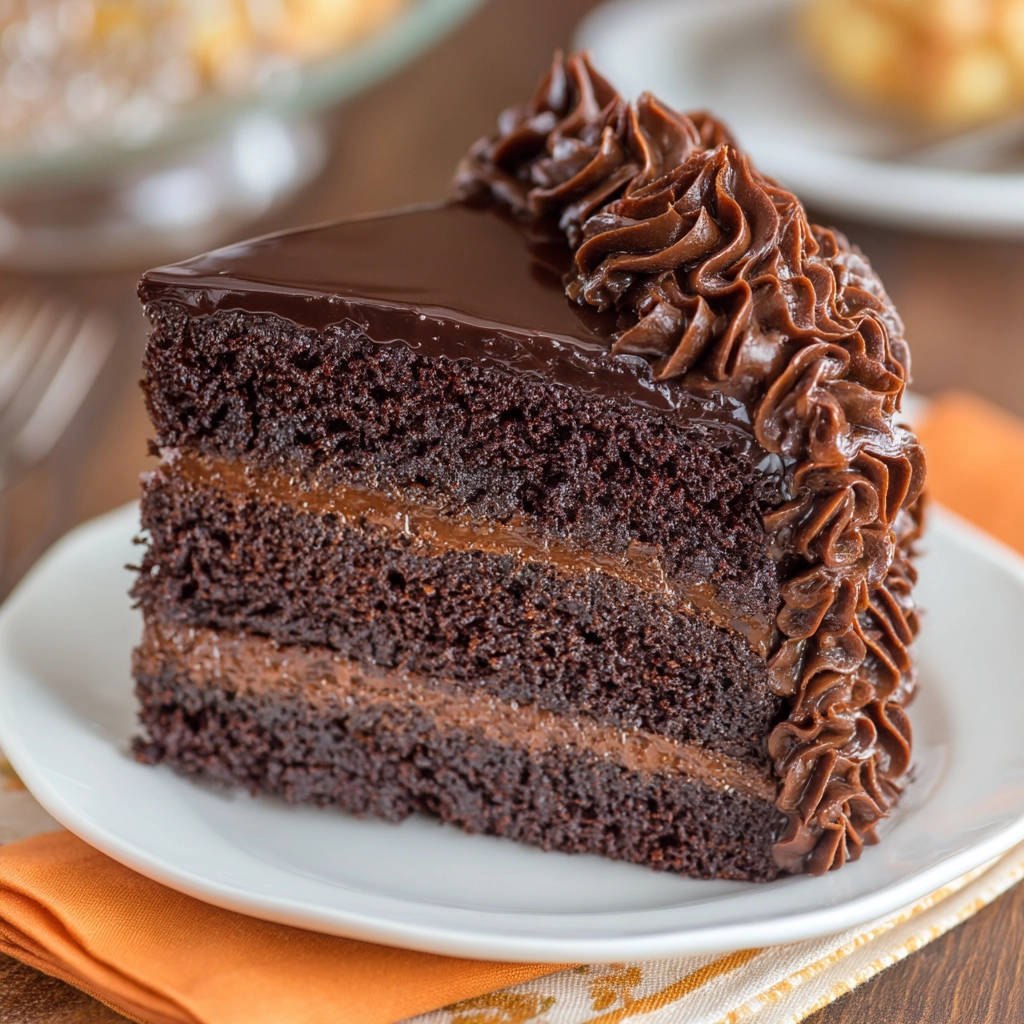
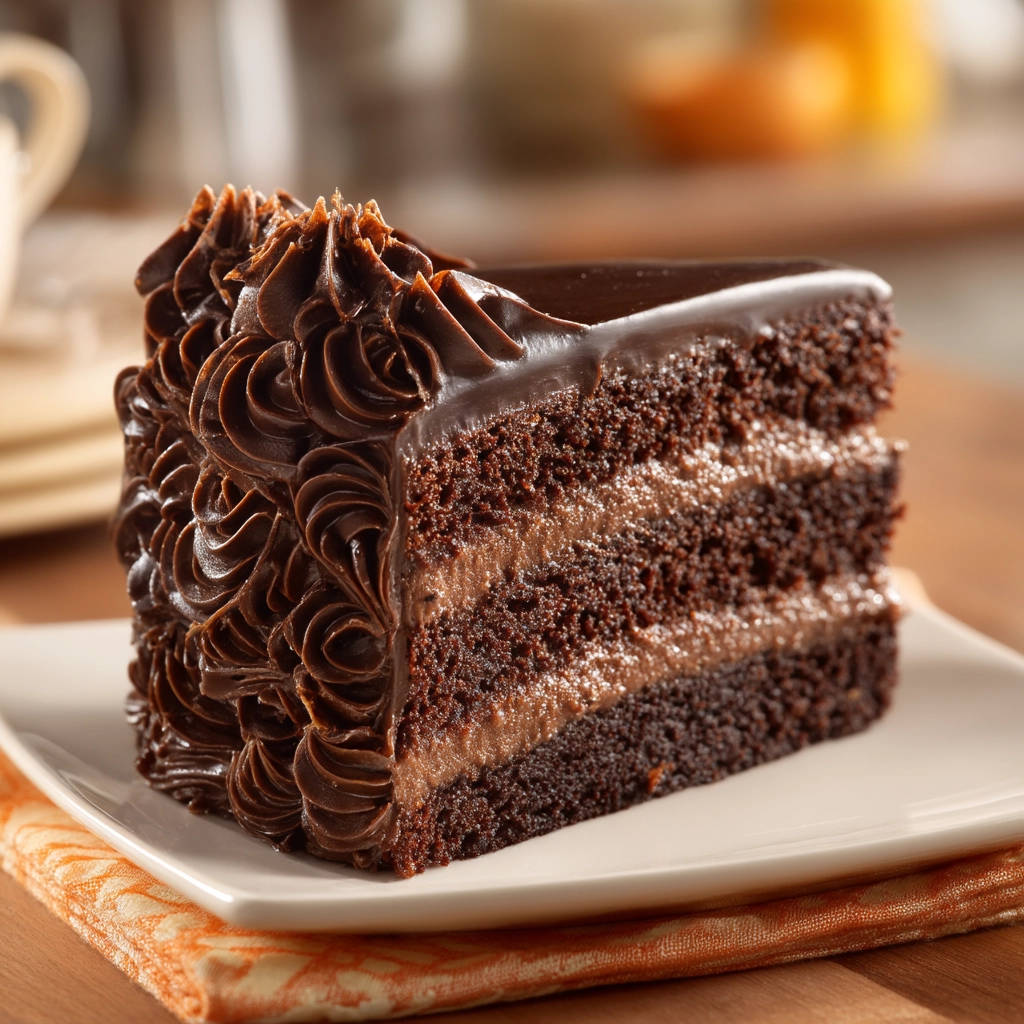
- Assemble Your Masterpiece: Once the cakes are completely cool, place one layer onto your serving plate or cake stand. Spread about half of the rich chocolate frosting evenly over the top of the first layer. Carefully place the second cake layer on top, aligning it as best you can. Use the remaining frosting to generously cover the top and sides of the cake. Smooth it out or create swirls – whatever look you love! You can then decorate further if desired with sprinkles, chocolate shavings, or fresh berries.
Tips for a Flawlessly Decadent Chocolate Cake
Achieving that perfect, moist crumb and rich flavor is easy with this recipe, but a few extra tips can elevate your baking game even further:
- Room Temperature Ingredients: This is vital for the cake batter. Cold eggs, buttermilk, and even the butter in the frosting don’t emulsify properly, leading to a less smooth batter and potentially a tougher cake. Plan ahead and take them out of the fridge about 30-60 minutes before you start.
- Don’t Overmix: I mentioned it in the steps, but it’s worth repeating. Overmixing develops gluten, which is great for bread, but bad for tender cake. Mix the wet and dry ingredients and the hot liquid just until combined.
- Quality Cocoa Matters: Since chocolate flavor is key, using a high-quality unsweetened cocoa powder will make a difference in the depth and richness of your cake. Both natural and Dutch-process cocoa will work here, but natural cocoa (like Hershey’s or Ghirardelli) is often preferred in recipes using baking soda as it’s acidic. This recipe uses both leaveners, so either is generally fine, but consistency in your usual brand helps.
- The Hot Liquid is Non-Negotiable: Seriously, this is the secret to preventing a dry cake and enhancing the chocolate flavor. Whether you use hot coffee or hot water, make sure it’s hot when you add it to the batter.
- Cool Completely Before Frosting: Patience is a virtue, especially in cake decorating! Frosting a warm cake will result in a melted, messy disaster. Make sure those layers are fully cooled on a wire rack.
Serving Suggestions for Your Chocolate Masterpiece
This Decadent Chocolate Cake is absolutely divine on its own, but pairing it with a few simple accompaniments can take it to the next level. A scoop of vanilla bean ice cream is a classic for a reason – the cool creaminess is a perfect contrast to the rich chocolate. Fresh berries, especially raspberries or strawberries, add a lovely tartness that cuts through the sweetness. A simple dusting of powdered sugar or extra cocoa powder is also an elegant finish.
Consider serving a slice alongside a warm beverage. A classic cup of tea or even a rich Homemade Pumpkin Spice Latte (when in season!) makes for a cozy pairing. If you’re looking for other ways to enjoy chocolatey treats, you might also love our recipe for Classic Chocolate Cream Pie or Fudgy Brownies.
Decadent Chocolate Cake FAQs
Got questions about this moist and delicious chocolate cake? Here are some common queries to help you bake with confidence.
Can I make this Decadent Chocolate Cake into cupcakes?
Absolutely! This batter makes fantastic cupcakes. Simply line cupcake tins with liners and fill them about two-thirds full. They will bake much faster, typically 18-22 minutes. Test for doneness with a toothpick inserted into the center; it should come out clean.
Why is hot coffee or water used instead of cold liquid?
This is the magic step! Hot liquid does two things: it helps to “bloom” the cocoa powder, intensifying the chocolate flavor, and it creates a very thin batter initially. This thin batter helps ensure a fine, moist crumb structure as it bakes, preventing the cake from becoming dense or dry.
Can I substitute something else for buttermilk?
Buttermilk is strongly recommended for this recipe because its acidity is crucial for reacting with the baking soda and tenderizing the cake. However, if you’re in a pinch, you can make a substitute: add 1 tablespoon of white vinegar or lemon juice to a liquid measuring cup, then add enough milk (dairy or non-dairy) to equal 1 cup. Let it sit for 5-10 minutes until it curdles slightly, then use it as directed. The results may vary slightly compared to real buttermilk.
How should I store leftover chocolate cake? Can I freeze it?
Store leftover cake in an airtight container at room temperature for 2-3 days, or in the refrigerator for up to a week. To freeze, cool the cake completely. You can freeze unfrosted layers wrapped tightly in plastic wrap and then foil for up to 2-3 months. Frosted cake can also be frozen; place it on a baking sheet in the freezer until the frosting is firm, then wrap well in plastic wrap and foil. Thaw frozen cake in the refrigerator overnight before serving.
My frosting is too thick/thin. How can I fix it?
If your frosting is too thick, add milk one tablespoon at a time, beating well after each addition, until it reaches your desired consistency. If it’s too thin, gradually add more powdered sugar, a quarter cup at a time, beating until smooth, until it thickens up.
Enjoy Your Homemade Decadent Chocolate Creation!
There you have it – the key to a truly moist, rich, and absolutely decadent chocolate cake that will impress everyone who takes a bite. This recipe is a game-changer, turning the potential disappointment of a dry cake into the pure joy of a perfect dessert. It’s simple enough for a weeknight treat but special enough for any celebration.
Give this Decadent Chocolate Cake a try, and I promise you’ll add it to your permanent recipe collection. Don’t forget to leave a comment below and let me know how yours turns out! Happy baking!
Chocolate Cake
Course: DessertCuisine: AmericanDifficulty: medium850
kcalSay goodbye to dry cake! This Decadent Chocolate Cake recipe uses a simple secret for an incredibly moist, rich crumb every single time. Easy & delicious!
Ingredients
For the cake:
1 and 3/4 cups all purpose flour
1 and 3/4 cups granulated sugar
3/4 cup unsweetened cocoa powder
1 teaspoon baking soda
1/2 teaspoon baking powder
1 teaspoon salt
2 large eggs
1 cup buttermilk
1/2 cup vegetable oil
2 teaspoons vanilla extract
1 cup hot brewed coffee or hot water
For the frosting:
1 cup unsalted butter softened
1 and 1/2 cups unsweetened cocoa powder
5 cups powdered sugar
1/2 cup milk
2 teaspoons vanilla extract
1/2 cup melted semi sweet chocolate or ganache (optional, for gloss)
Directions
- Preheat your oven to 350 degrees F (175 degrees C). Grease and flour two 8 inch round cake pans.
- In a large bowl, whisk together the flour, sugar, cocoa powder, baking soda, baking powder, and salt. Ensure there are no lumps.
- In a separate medium bowl, whisk together the eggs, buttermilk, vegetable oil, and vanilla extract.
- Pour the wet ingredients into the dry ingredients and mix on low speed until just combined. Do not overmix.
- This is the key step for moisture: Carefully pour in the hot brewed coffee or hot water. The batter will be thin; this is normal and crucial for a moist cake. Mix until just incorporated.
- Divide the batter evenly between the prepared cake pans.
- Bake for 30 to 35 minutes, or until a wooden skewer inserted into the center comes out clean.
- Let the cakes cool in the pans for 10 minutes before inverting them onto a wire rack to cool completely.
- While the cakes cool, prepare the frosting. In a large bowl, beat the softened butter until creamy. Gradually add the cocoa powder and powdered sugar, alternating with the milk, beating until smooth and fluffy. Stir in the vanilla extract. If using, beat in the melted chocolate or ganache for extra richness and gloss.
- Once the cakes are completely cool, place one layer on a serving plate. Spread about half of the frosting over the first layer. Place the second cake layer on top and spread the remaining frosting over the top and sides of the cake. Decorate as desired.


