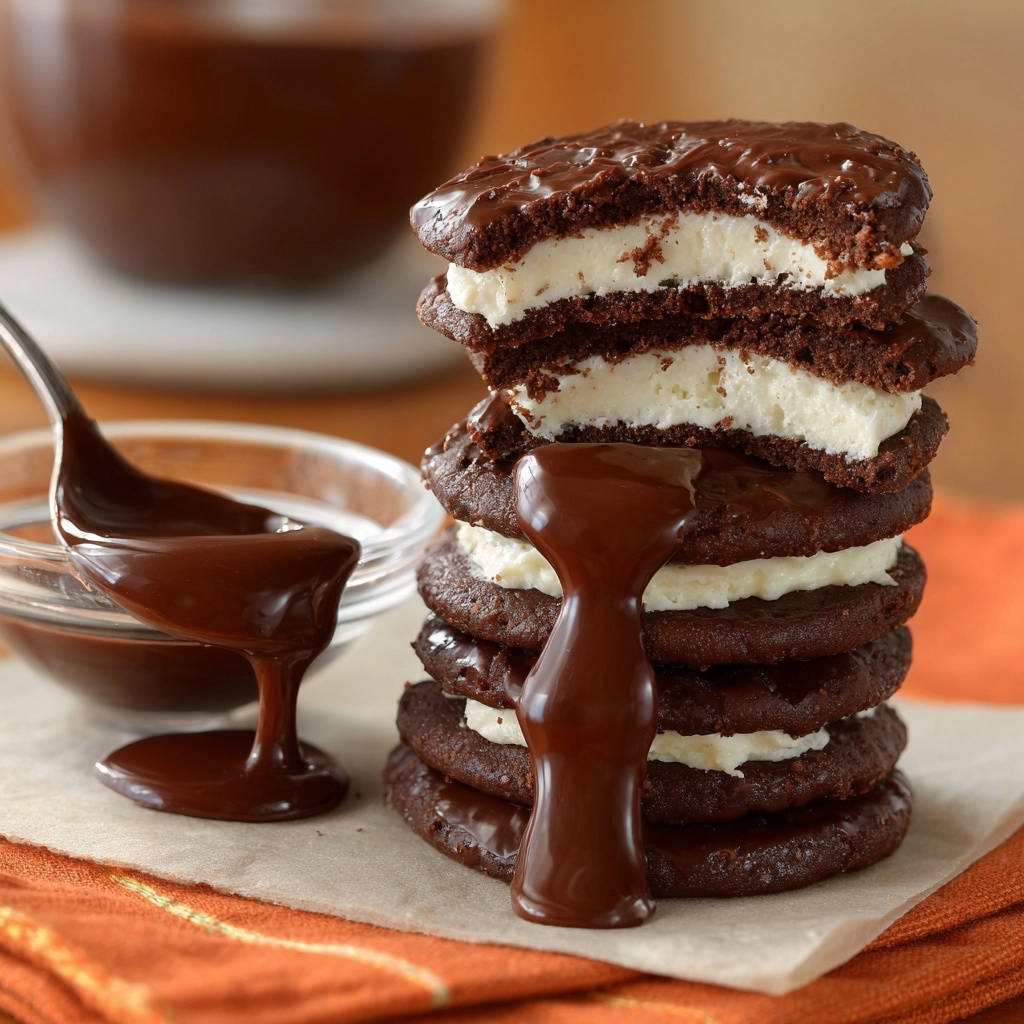
I remember countless times baking chocolate cookies, only to pull them from the oven, anticipating soft perfection, and finding them disappointingly crumbly. It’s a common frustration for home bakers. That’s why I perfected this recipe for Decadent Chocolate Cream Sandwich Cookies, designed to deliver a consistently soft, chewy texture every single time.
These aren’t just any cookies; they are the ultimate sweet escape, featuring rich chocolate cookies embracing a dreamy cream filling, all finished with a glossy chocolate glaze. Get ready to bake a truly irresistible treat that will impress everyone.
Why These Decadent Chocolate Cream Sandwich Cookies Will Be Your New Favorite
This recipe transforms the humble chocolate cookie into a culinary masterpiece, ensuring they are always perfectly tender. The secret lies in a carefully balanced ingredient ratio and precise baking techniques that prevent dryness.
Each bite offers a symphony of textures: the yielding cookie, the velvety smooth cream, and a delicate snap from the chocolate glaze. This layered experience elevates a simple cookie into a truly memorable dessert.
Beyond their incredible taste, these cookies are surprisingly achievable for any home baker. With clear guidance on chilling the dough and recognizing the perfect baking point, you’ll achieve professional results.
Gather Your Gear: Essential Tools for Cookie Success
Having the right equipment makes all the difference when crafting these delightful cookies. Here’s what you’ll need for a smooth baking experience:

Electric Mixer (Stand or Handheld): Essential for creaming butter and sugar until light and fluffy, ensuring a tender cookie texture.
Large Mixing Bowls: You’ll need separate bowls for wet and dry ingredients, plus one for the cream filling and another for the glaze.
Rubber Spatula: Perfect for scraping down the sides of the bowl and gently folding ingredients, preventing overmixing.
Parchment Paper: Lining your baking sheets with parchment prevents sticking and ensures even baking and easy cleanup.
Baking Sheets: Flat baking sheets are ideal for uniform cookie spreading and baking.
Wire Cooling Racks: Crucial for allowing cookies to cool completely and for setting the chocolate glaze without condensation.
Measuring Cups and Spoons: Accurate measurements are fundamental for consistent baking results.
Microwave-Safe Bowl: For safely melting the chocolate glaze ingredients.
The Building Blocks: Key Ingredients for Decadent Chocolate Cream Sandwich Cookies
For the Irresistibly Soft Chocolate Cookies
Achieving that signature soft chew starts with high-quality ingredients and understanding their function.
Unsalted Butter: Softened, it creams beautifully with sugar, creating air pockets for a light texture. Unsalted butter gives you control over the salt content.
Granulated Sugar: Not only sweetens but also contributes to the cookie’s spread and tenderness, creating a crisp edge that transitions to a soft center.
Large Eggs: Act as a binder, adding moisture and richness, and helping the cookies hold their shape.
Vanilla Extract: Essential for enhancing the overall chocolate flavor and adding aromatic depth.
All-Purpose Flour: Provides structure. Proper measurement is crucial to avoid a tough cookie.
Unsweetened Cocoa Powder: The star of the show, delivering deep chocolate flavor. Dutch-processed cocoa can give a darker color and mellower flavor.
Baking Soda: A leavening agent that helps the cookies rise slightly and contributes to their soft texture.
Salt: Balances the sweetness and enhances all the other flavors in the cookie.
Crafting the Velvety Cream Filling
This simple filling elevates the sandwich cookie experience, offering a delightful contrast to the rich chocolate.
Unsalted Butter: Again, softened butter is key for a smooth, creamy base that whips up beautifully.
Powdered Sugar: Its fine consistency ensures a lump-free, silky smooth filling that dissolves easily.
Vanilla Extract: Provides a classic, comforting flavor profile that complements chocolate perfectly.
Milk: Used sparingly, milk helps achieve the desired fluffy, spreadable consistency for the cream.
The Glossy Chocolate Glaze Perfection
The final touch, this glaze adds an extra layer of chocolatey goodness and a beautiful sheen.
Semi-Sweet Chocolate Chips: Offer a balanced chocolate flavor that isn’t overly bitter or sweet. Quality chips melt more smoothly.
Unsalted Butter: Contributes to the glaze’s richness and helps it achieve a smooth, glossy finish.
Milk: Thins the glaze to a dip-able consistency and aids in its smooth texture.
Your Path to Cookie Perfection: Step-by-Step Directions
Follow these steps closely to ensure your Decadent Chocolate Cream Sandwich Cookies turn out perfectly every time.
Baking the Perfectly Soft Chocolate Cookies
-
Cream Butter and Sugar: In a large bowl, combine the softened unsalted butter and granulated sugar. Beat them together with an electric mixer on medium speed for about 2-3 minutes until the mixture is visibly light and fluffy. This step incorporates air, which is vital for a tender cookie.
-
Incorporate Wet Ingredients: Add the large eggs one at a time, beating well after each addition to fully incorporate. Stir in the vanilla extract. Ensure everything is well combined before moving on.
-
Whisk Dry Ingredients: In a separate medium bowl, whisk together the all-purpose flour, unsweetened cocoa powder, baking soda, and salt. Whisking ensures these ingredients are evenly distributed, preventing pockets of leavening or salt.
-
Combine Wet and Dry: Gradually add the dry ingredients to the wet mixture. Mix on low speed with your electric mixer until just combined. It is crucial to avoid overmixing here, as it develops gluten and can lead to tough, dry cookies.
-
Chill the Dough: Cover the cookie dough bowl tightly with plastic wrap and chill it in the refrigerator for at least 30 minutes. This chilling period is essential; it firms up the butter in the dough, preventing the cookies from spreading too much during baking and ensuring a thicker, softer cookie.
-
Prepare for Baking: Preheat your oven to 375°F (190°C). Line two baking sheets with parchment paper to prevent sticking and ensure easy release.
-
Shape and Flatten Cookies: Roll the chilled dough into 1-inch balls. Place them about 2 inches apart on the prepared baking sheets. Gently flatten each ball slightly with the palm of your hand; this helps them bake evenly and gives them a good surface for the filling.
-
Bake to Perfection: Bake for 8 to 10 minutes. This is the most critical step for softness. You want the edges to look set, but the centers should still appear slightly soft and not fully firm. They will continue to set as they cool on the hot baking sheet. Never overbake if you want soft cookies!
-
Cool Cookies: Allow the baked cookies to cool on the baking sheets for 5 minutes. This brief rest helps them firm up enough to be transferred without breaking. Then, carefully move them to a wire rack to cool completely before filling.
Whipping Up the Dreamy Cream Filling
-
Beat Butter: In a medium bowl, beat the softened butter with an electric mixer until it’s light and creamy. This aerates the butter, contributing to a fluffy filling.
-
Add Powdered Sugar: Gradually add the powdered sugar, beating until the mixture is smooth and well combined. Start on low speed to avoid a cloud of sugar.
-
Finish Filling: Stir in the vanilla extract and milk until the filling is light, fluffy, and perfectly spreadable. Adjust milk a few drops at a time if you need a slightly thinner consistency.
Creating the Silky Chocolate Glaze
-
Combine Glaze Ingredients: In a microwave-safe bowl, combine the semi-sweet chocolate chips, unsalted butter, and milk.
-
Melt Glaze: Microwave on high in 30-second intervals, stirring thoroughly after each interval, until the mixture is smooth and glossy. Be very careful not to overheat the chocolate, as it can seize or burn. Stirring actively helps distribute heat and melt the chips evenly.
Assembling Your Decadent Chocolate Masterpieces
-
Fill Cookies: Once the chocolate cookies are completely cool (this is important to prevent the filling from melting), spread a generous amount of cream filling onto the flat side of half of the cookies.
-
Form Sandwiches: Gently top the filled cookies with the remaining half of the cookies, pressing down lightly to form neat sandwich cookies.
-
Glaze or Drizzle: Dip the top of each sandwich cookie into the warm chocolate glaze, allowing any excess to drip off back into the bowl. Alternatively, you can use a spoon to artistically drizzle the glaze over the tops of the cookies for a different look.
-
Set Glaze: Place the glazed cookies on a wire rack or parchment paper. Allow the glaze to set completely, which usually takes about 15-20 minutes, before serving. Enjoy your beautifully assembled soft and chewy chocolate cookies!
Unlock the Secrets: Pro Tips for Decadent Chocolate Cream Sandwich Cookies
Achieving truly exceptional homemade chocolate cookies comes down to a few expert tricks.
The Importance of Chilling Dough
Chilling the cookie dough for at least 30 minutes is not optional; it’s fundamental. Cold butter melts slower in the oven, preventing excessive spreading and ensuring your cookies retain a thicker, chewier texture.
This also allows the flour to fully hydrate, which contributes to a more tender crumb and richer flavor development.
The Golden Rule: Do NOT Overbake!
Overbaking is the number one culprit for dry, hard cookies. Your chocolate cookies are done when the edges are set and slightly firm, but the centers still look a bit soft or even slightly underbaked.
They will continue to cook and firm up as they cool on the hot baking sheet. Trust this process, and you’ll be rewarded with ultimate softness.
Achieving the Perfect Creamed Butter and Sugar
When creaming butter and sugar, aim for a light, fluffy, and pale yellow consistency. This process incorporates air, which creates a lighter texture in the finished cookies.
Beat for the full 2-3 minutes, scraping down the bowl frequently, to ensure uniform aeration.
The Art of Glazing (and Drizzling!)
For a smooth, even glaze, ensure your melted chocolate mixture is thoroughly stirred and free of lumps. Dip quickly and allow excess to drip off for a clean finish.
If dipping feels too messy, a simple drizzle with a fork or a small piping bag creates an elegant look and still delivers that extra chocolate layer. You can also get creative and add some sprinkles right after glazing for a festive touch.
Troubleshooting Your Chocolate Cream Sandwich Cookie Bakes
Even seasoned bakers encounter challenges. Here’s how to tackle common issues with your cream-filled cookies.
Why Are My Cookies Spreading Too Much?
Excessive spreading is usually due to insufficient chilling of the dough, butter that was too soft to begin with, or using warm baking sheets. Ensure your butter is softened but still cool to the touch, and always chill your dough as directed.
If you’re baking multiple batches, make sure your baking sheets are cool before placing new dough on them; warm sheets will cause immediate spreading.
Cookies Turned Out Too Hard or Dry?
This is almost always a sign of overbaking or overmixing the dough. Stick to the recommended baking time and look for the visual cues of doneness (set edges, slightly soft centers).
When combining wet and dry ingredients, mix only until just combined to avoid developing too much gluten, which results in a tough texture.
My Glaze Is Too Thick/Thin!
If your chocolate glaze is too thick, add a tiny bit more milk (1/2 teaspoon at a time) and stir well until it reaches your desired consistency. If it’s too thin, you can try stirring in a few more chocolate chips and remelting briefly, or let it cool slightly to thicken.
Serving Suggestions: Elevate Your Decadent Chocolate Bites
These Decadent Chocolate Cream Sandwich Cookies are a showstopper on their own, but here are some ideas to make them even more special:
Coffee Companion: They pair wonderfully with a hot cup of coffee, espresso, or a glass of cold milk.
Dessert Platter: Arrange them on a platter with fresh berries or a scoop of vanilla bean ice cream for an elegant presentation.
Party Treat: These are perfect for potlucks, birthdays, or holiday gatherings, always disappearing quickly.
Gift Giving: Package a few in a decorative box for a thoughtful homemade gift. They travel well and are always appreciated.
Keeping Them Fresh: Storage Tips for Your Delicious Cookies
Proper storage ensures your sandwich cookie perfection stays fresh and delightful.
Store assembled cookies in an airtight container at room temperature for up to 3 days. The cream filling helps keep them moist.
For longer storage, refrigerate in an airtight container for up to 5 days. Let them come to room temperature for about 15 minutes before serving for optimal texture.
You can also freeze the baked, un-filled cookies for up to 1 month. Thaw at room temperature, then fill and glaze as directed.
Can I Make These Decadent Chocolate Cream Sandwich Cookies Ahead?
Absolutely! These cookies are great for make-ahead convenience, making entertaining a breeze.
You can prepare the cookie dough up to 3 days in advance and store it, covered, in the refrigerator. Just be sure to let it soften slightly at room temperature (about 15-20 minutes) before rolling and baking.
Baked, unfilled cookies can be stored at room temperature in an airtight container for up to 3 days, or frozen for up to a month. The cream filling can be made 1-2 days ahead and stored in the fridge, then re-whipped briefly before assembling.
Your Most Asked Questions About These Decadent Chocolate Delights
Can I Use Different Flavors for the Cream Filling?
Yes, absolutely! The cream filling is very versatile. You can swap out the vanilla extract for peppermint, almond, or even orange extract for a different twist. For a richer chocolate experience, try adding a tablespoon of cocoa powder to the filling. If you’re looking for other dessert ideas, explore making a delightful decadent chocolate pecan layered dessert which offers another level of chocolate richness.
Are There Gluten-Free or Dairy-Free Substitutions?
While this recipe is designed with traditional ingredients, you can experiment with gluten-free all-purpose flour blends (look for blends that contain xanthan gum for best results) and dairy-free butter sticks and milk alternatives. Results may vary slightly in texture and spread, so a small test batch is recommended. For more gluten-free inspiration, you might enjoy making some easy chocolate lava cake which is naturally gluten-free if using cornstarch as a thickener.
How Many Cookies Does This Recipe Yield?
This recipe yields approximately 12 chocolate cream sandwich cookies, meaning 24 individual cookies before assembly. The exact number can vary slightly based on the size you roll your cookie dough balls.
What’s the Best Way to Measure Flour and Cocoa Powder?
For accurate measurements, use the spoon-and-level method for flour and cocoa powder. Spoon the flour/cocoa into your measuring cup until it overflows, then use a straight edge (like a knife handle) to level off the excess. Do not scoop directly from the bag or pack it down, as this can add too much, resulting in dry cookies.
Ready to Bake? Share Your Decadent Chocolate Cream Sandwich Cookies!
Now that you have all the secrets to crafting the most irresistible Decadent Chocolate Cream Sandwich Cookies, it’s time to get baking! These treats are perfect for sharing, bringing joy to any gathering, or simply indulging in a moment of pure chocolate bliss.
I encourage you to try this recipe, trust the process, and savor every soft, chewy bite. Don’t forget to share your cookie creations with us! Happy baking!

Decadent Chocolate Cream Sandwich Cookies
Course: DessertCuisine: American CuisineDifficulty: easy12
sandwich cookies30
minutes10
minutes40
minutesAmerican Cuisine
Ingredients
For the Cookies:
1 cup unsalted butter, softened
1 3/4 cups granulated sugar
2 large eggs
1 teaspoon vanilla extract
1 1/2 cups all-purpose flour
3/4 cup unsweetened cocoa powder
1 teaspoon baking soda
1/2 teaspoon salt
For the Cream Filling:
1/2 cup unsalted butter, softened
2 cups powdered sugar
1 teaspoon vanilla extract
2 tablespoons milk
For the Chocolate Glaze:
1 cup semi-sweet chocolate chips
2 tablespoons unsalted butter
1 tablespoon milk
Directions
- For the Cookies:
- In a large bowl, cream together the softened butter and granulated sugar until light and fluffy. This should take about 2-3 minutes with an electric mixer.
- Beat in the eggs one at a time, mixing well after each addition. Stir in the vanilla extract.
- In a separate medium bowl, whisk together the all-purpose flour, unsweetened cocoa powder, baking soda, and salt.
- Gradually add the dry ingredients to the wet ingredients, mixing on low speed until just combined. Be careful not to overmix the dough. Overmixing can lead to tough cookies.
- Cover the dough and chill in the refrigerator for at least 30 minutes. Chilling helps the cookies maintain their shape and keeps them from spreading too thin, contributing to a softer texture.
- Preheat your oven to 375 degrees Fahrenheit (190 degrees Celsius). Line baking sheets with parchment paper.
- Roll the dough into 1-inch balls and place them about 2 inches apart on the prepared baking sheets. Gently flatten each ball slightly with the palm of your hand.
- Bake for 8 to 10 minutes. This is the crucial step for preventing dry cookies. You want them to be set around the edges but still appear slightly soft and not fully firm in the center. They will continue to set as they cool. Do not overbake!
- Let the cookies cool on the baking sheets for 5 minutes before transferring them to a wire rack to cool completely.
- For the Cream Filling:
- In a medium bowl, beat the softened butter until creamy.
- Gradually add the powdered sugar, beating until smooth.
- Stir in the vanilla extract and milk until the filling is light and fluffy.
- For the Chocolate Glaze:
- In a microwave-safe bowl, combine the semi-sweet chocolate chips, unsalted butter, and milk.
- Microwave on high for 30-second intervals, stirring after each, until the mixture is smooth and glossy. Be careful not to overheat the chocolate.
- Assembly:
- Once the cookies are completely cool, spread a generous amount of cream filling on the flat side of half of the cookies.
- Top with the remaining cookies, forming sandwich cookies.
- Dip the top of each sandwich cookie into the prepared chocolate glaze, allowing excess to drip off. You can also drizzle the glaze over the top.
- Place the glazed cookies on a wire rack or parchment paper until the glaze sets, about 15-20 minutes. Enjoy your perfectly soft and chewy chocolate cream sandwich cookies!
Notes
- Chilling dough is crucial for shape and soft texture. Do not overbake cookies; they will continue to set as they cool.