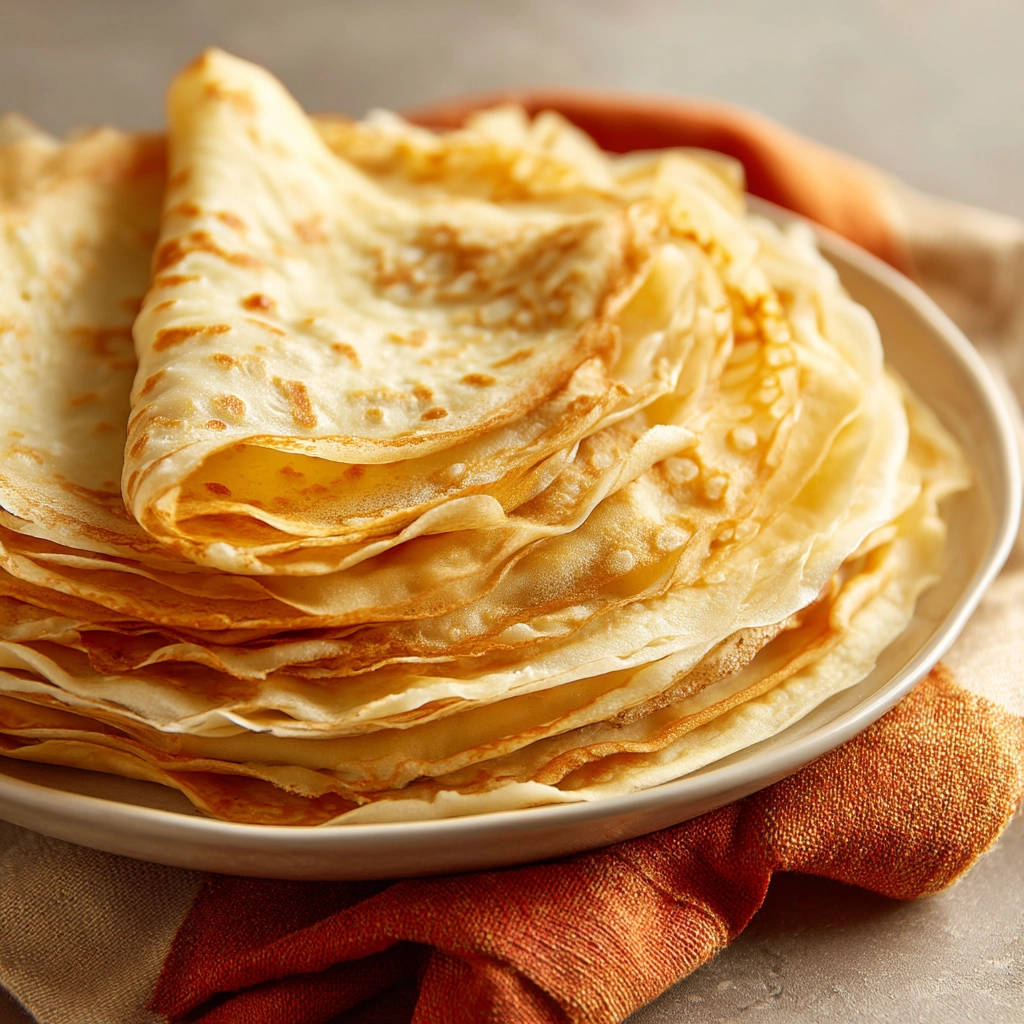
Making crepes at home can feel like a culinary tightrope walk. One wrong move and rip! Your delicate creation is suddenly a holey mess, destined for the scrap heap. But don’t despair! I’m sharing my foolproof crepe recipe that guarantees success, even for beginners. Get ready to stack those perfect, golden crepes high and enjoy a truly delightful breakfast, brunch, or dessert!
Why You’ll Love This Crepe Recipe
This isn’t just another crepe recipe; it’s a game-changer! Here’s why you’ll be making these again and again:
- Never Tear: The secret’s in the resting! This simple step prevents tears and ensures perfectly pliable crepes.
- Quick & Easy: With just a few pantry staples and minimal effort, you can whip up a batch of these in no time.
- Versatile: From sweet to savory, these crepes are a blank canvas for your culinary creativity.
- Impressive: Elevate your breakfast or brunch game with these elegant and delicious treats.
Gathering Your Ingredients for Perfect Crepes
Let’s talk ingredients! The beauty of crepes lies in their simplicity. We’re aiming for a delicate balance of structure and flavor. Think of it as a symphony, where each ingredient plays its part in creating the perfect harmony. These ingredients will give you a perfect texture and a subtle sweetness that complements any filling. Now, let’s dive into the specifics:
- All-Purpose Flour: The backbone of our crepes, providing structure and body. Using all-purpose flour gives us a tender yet sturdy base.
- Large Eggs: Eggs are essential for binding the ingredients, adding richness, and contributing to that beautiful golden color.
- Milk: Adds moisture and helps create a smooth, pourable batter. You can experiment with different types of milk to vary the flavor, but whole milk provides the best richness.
- Water: Lightens the batter and helps achieve the desired thin consistency.
- Salt: Enhances the sweetness and balances the flavors.
- Sugar: Adds a touch of sweetness, complementing both sweet and savory fillings.
- Melted Butter: Contributes to the richness, flavor, and prevents the crepes from sticking to the pan.
Crafting Your Crepes: Step-by-Step
Alright, crepe-makers, let’s get started! Don’t be intimidated; this recipe is easier than you think. The most crucial part is the resting period – trust me, it’s worth the wait! Follow these steps, and you’ll be enjoying perfectly cooked crepes in no time.
- Combine Dry Ingredients: In a medium bowl, whisk together the flour, sugar, and salt. This ensures that the dry ingredients are evenly distributed, preventing any clumps in the final batter. Think of it as giving your crepe foundation a solid start.
- Whisk Wet Ingredients: In a separate bowl, whisk together the eggs, milk, and water until well combined. Whisking ensures everything is properly emulsified before we add it to the dry ingredients, and the eggs will create a smooth batter.
- Combine Wet and Dry: Gradually add the wet ingredients to the dry ingredients, whisking continuously. This is important to prevent lumps from forming. Keep whisking until you have a smooth batter with no visible clumps. Then, stir in the melted butter, which adds richness and helps prevent sticking.
- Rest the Batter (The Secret!): Cover the bowl and let the batter rest for at least 30 minutes at room temperature. For even better results, you can refrigerate it for up to 2 days (bring it back to room temperature before cooking). This resting period allows the gluten in the flour to relax, resulting in tender, less tear-prone crepes. This is the key to those “never tear” crepes!
- Heat the Pan: Heat a 7 to 8 inch non-stick or well-seasoned crepe pan or skillet over medium heat. The pan must be hot enough, but not smoking. Test the heat by flicking a tiny bit of water into the pan; if it sizzles and evaporates instantly, it’s ready. A proper temperature is key to evenly cooked, golden crepes.
- Grease the Pan: Lightly grease the hot pan with butter or cooking spray, then wipe out any excess with a paper towel. A thin, even layer of fat is key to a clean release and prevents the crepes from sticking.
- Pour and Swirl: Pour about 1/4 cup of batter into the center of the pan. Immediately tilt and swirl the pan in a circular motion so the batter spreads thinly and evenly across the entire bottom. Speed is key here so you get a thin and even crepe.
- Cook First Side: Cook for about 1 to 2 minutes, or until the edges begin to look dry and start to pull away slightly from the pan, and the surface of the crepe looks set and not wet. This is your sign that the crepe is cooked enough on the first side and ready to flip without tearing.
- Loosen and Flip: Gently slide a thin spatula under one edge of the crepe to loosen it completely. Carefully slide the spatula under the center of the crepe. A thin, flexible spatula is your best friend here!
- Cook Second Side: Using a swift and confident but gentle motion, flip the crepe over. Cook for another 30 to 60 seconds until the second side is lightly golden brown. This side cooks much faster, so keep a close eye on it.
- Stack and Serve: Slide the finished crepe onto a plate. Stack them as you make them; the steam will keep them pliable. Lightly grease the pan again between crepes if needed. These are best served immediately so everyone can enjoy a warm crepe.
Tips for Perfect Crepes Every Time
Want to take your crepe game to the next level? Here are a few extra tips and tricks to ensure crepe perfection:
- Batter Consistency: The batter should be thin and pourable, similar to heavy cream. If it seems too thick, add a tablespoon of water at a time until you reach the desired consistency.
- Pan Temperature: Finding the right pan temperature is crucial. If the pan is too hot, the crepes will burn. If it’s too cold, they’ll stick.
- Don’t Overcook: Crepes cook quickly, so keep a close eye on them. Overcooked crepes will be dry and brittle.
- Storage: Cooked crepes can be stored in the refrigerator for up to 2 days. Stack them between layers of parchment paper to prevent sticking. Reheat them in a skillet or microwave before serving.
What to Serve With Crepes
The possibilities are endless! For a sweet treat, try filling them with fresh fruit, whipped cream, chocolate sauce, or a dusting of powdered sugar. Savory options include cheese, sauteed vegetables, or even a hearty stew. For a unique dessert, try our caramel nut dessert jars recipe spread thinly inside the crepe.
Your Crepe Questions Answered (FAQ)
Why are my crepes tearing?
The most common reason for tearing is that the gluten in the flour hasn’t relaxed enough. Be sure to rest the batter for at least 30 minutes, or even better, refrigerate it for a few hours.
Can I make crepes ahead of time?
Absolutely! Cooked crepes can be stored in the refrigerator for up to 2 days. Stack them between layers of parchment paper to prevent sticking. Reheat them in a skillet or microwave before serving.
Can I freeze crepes?
Yes, you can freeze crepes for up to 2 months. Stack them between layers of parchment paper in a freezer-safe bag or container. Thaw them in the refrigerator overnight or at room temperature before reheating.
Can I make gluten-free crepes?
Yes! You can substitute the all-purpose flour with a gluten-free all-purpose blend. Be sure to check the blend for any added gums or starches, as these can affect the texture of the crepes. You can also use buckwheat flour for a nutty, rustic flavor. If you’re looking for another sweet gluten-free treat, you might enjoy our chocolate-covered apple dessert cups.
Why are my crepes sticking to the pan?
Make sure your pan is properly heated and greased. Use a non-stick pan or a well-seasoned crepe pan. Wipe out any excess grease with a paper towel after greasing the pan to ensure a thin, even layer.
Enjoy Your Homemade Crepes!
Congratulations! You’ve mastered the art of crepe-making. These delicate and delicious treats are perfect for any occasion. Whether you’re enjoying a leisurely breakfast or impressing guests with a sophisticated dessert, these crepes are sure to be a hit. Now, go ahead and experiment with different fillings and toppings, and let your culinary creativity shine! Don’t forget to leave a comment below and let me know what your favorite crepe fillings are. And if you loved this recipe, please share it with your friends and family!
Crepes (Never Tear!)
Ingredients
- 1 cup All-purpose flour
- 2 large eggs
- 1/2 cup Milk
- 1/2 cup Water
- 1/4 teaspoon Salt
- 2 tablespoons Sugar
- 2 tablespoons Melted butter
Directions
- Whisk together the flour, sugar, and salt in a medium bowl.
- In a separate bowl, whisk together the eggs, milk, and water.
- Gradually add the wet ingredients to the dry ingredients, whisking continuously until you have a smooth batter with no lumps. Stir in the melted butter.
- This step is critical for preventing tears: Cover the bowl and let the batter rest for at least 30 minutes at room temperature. You can also refrigerate it for up to 2 days; bring it back to room temperature before cooking. Resting allows the gluten to relax, making the crepes less prone to tearing.
- Heat a 7 to 8 inch non-stick or well-seasoned crepe pan or skillet over medium heat. The pan must be hot enough but not smoking. Flick a tiny bit of water into the pan; if it sizzles and evaporates instantly, it’s ready.
- Lightly grease the hot pan with butter or cooking spray, then wipe out any excess with a paper towel. A thin, even layer of fat is key to a clean release.
- Pour about 1/4 cup of batter into the center of the pan. Immediately tilt and swirl the pan in a circular motion so the batter spreads thinly and evenly across the entire bottom.
- Cook for about 1 to 2 minutes, or until the edges begin to look dry and start to pull away slightly from the pan, and the surface of the crepe looks set and not wet. This is your sign that the crepe is cooked enough on the first side and ready to flip without tearing.
- Gently slide a thin spatula under one edge of the crepe to loosen it completely. Carefully slide the spatula under the center of the crepe.
- Using a swift and confident but gentle motion, flip the crepe over. Cook for another 30 to 60 seconds until the second side is lightly golden brown.
- Slide the finished crepe onto a plate. Stack them as you make them; the steam will keep them pliable. Lightly grease the pan again between crepes if needed.

