
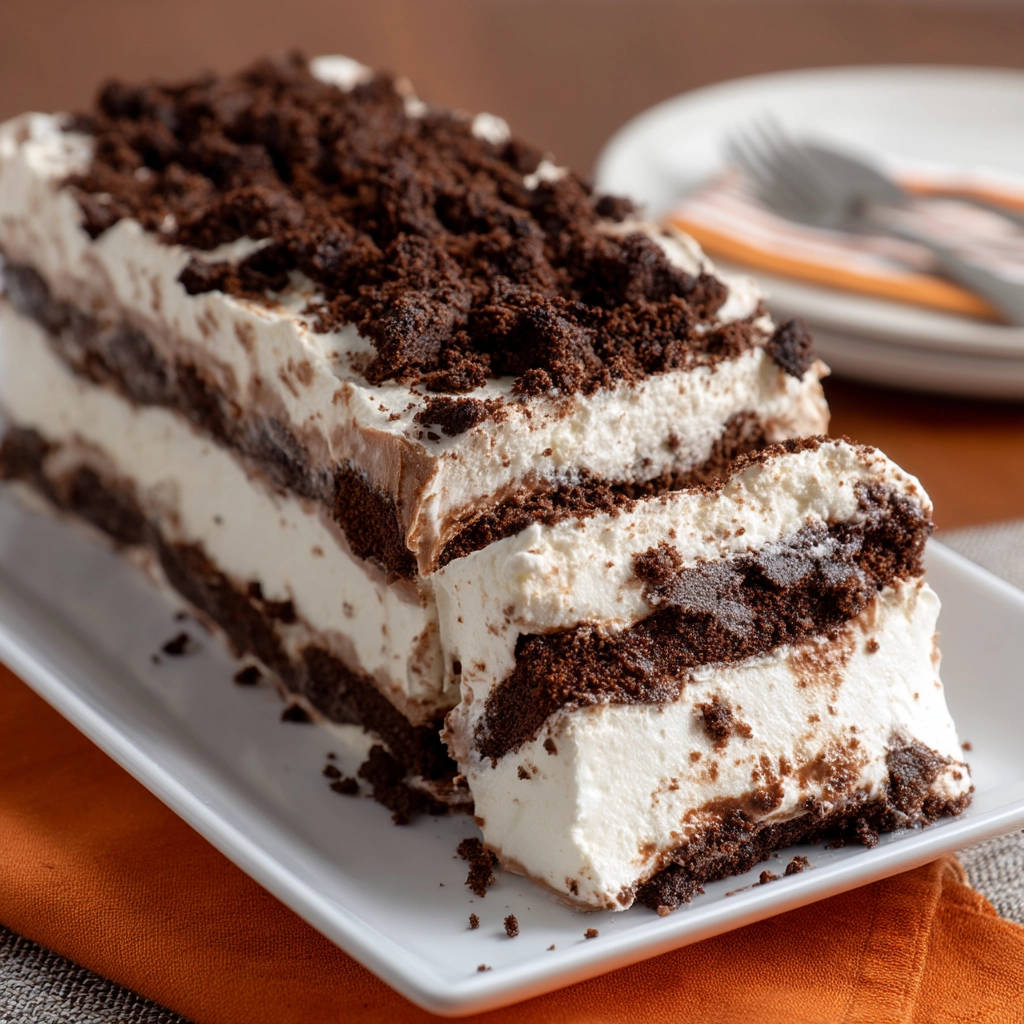
Craving a show-stopping dessert that requires absolutely no baking? Look no further! This Easy No-Bake Chocolate Cream Loaf is a total game-changer. Imagine layers of perfectly softened chocolate sandwich cookies embraced by a cloud of sweet whipped cream. The best part? It’s incredibly simple to make and always a crowd-pleaser. If you have a sweet tooth and love easy recipes, this no-bake dessert is calling your name!
Why You’ll Love This Chocolate Cream Loaf
This isn’t just another dessert; it’s an experience! Here’s why you’ll fall head over heels for this chocolate cream loaf:
- No Baking Required: Perfect for hot days or when you simply don’t want to turn on the oven.
- Simple Ingredients: You likely already have most of these ingredients in your pantry.
- Impressive Presentation: This loaf looks absolutely stunning when sliced, making it ideal for parties or special occasions.
- Perfect Texture: No more hard or mushy cookies! The secret refrigeration technique ensures a perfectly tender bite every time.
- Customizable: Endless possibilities for variations and flavor additions to suit your taste.
Gathering Your Ingredients for Chocolate Cream Loaf
Before we dive into the recipe, let’s talk about the ingredients that make this chocolate cream loaf so irresistible. The combination of classic chocolate sandwich cookies and a light, airy whipped cream creates a symphony of textures and flavors that’s simply divine. We will be using chocolate sandwich cookies, whipping cream, powdered sugar and vanilla extract.
- Chocolate Sandwich Cookies: The star of the show! One standard 14.3-ounce package is all you need. Feel free to use your favorite brand. The classic variety works best, providing that iconic chocolate and cream flavor.
- Heavy Whipping Cream: This is what creates the luscious, creamy layers. It’s essential to use heavy whipping cream, not just regular whipping cream, for the best results and stable peaks. Aim for a fat content of 36% or higher.
- Powdered Sugar: Also known as confectioners’ sugar, this fine sugar dissolves easily into the whipping cream, creating a smooth and sweet frosting. The sweetness balances the richness of the chocolate cookies perfectly.
- Vanilla Extract: A touch of vanilla enhances the overall flavor profile, adding a warm and inviting aroma to the dessert. Use pure vanilla extract for the best taste; imitation vanilla can have a slightly artificial flavor.
Crafting Your Chocolate Cream Loaf: Step-by-Step
Ready to create this delightful no-bake treat? Don’t be intimidated; it’s much easier than it looks! The key to success lies in the layering and the chilling process, which allows the cookies to soften to the perfect consistency. Let’s get started!
- Prepare the Loaf Pan: First, grab a standard loaf pan (approximately 9×5 inches) and line it with plastic wrap. Make sure to leave plenty of overhang on all sides. This “sling” will be your best friend when it’s time to unmold the loaf. Think of it as a gift-wrapping technique for deliciousness!
- Crush Some Cookies: Next, take about ½ cup of the chocolate sandwich cookies and place them in a zip-top bag. Seal the bag tightly, then use a rolling pin or the bottom of a glass to crush the cookies into coarse crumbs. These crumbs will serve as a beautiful and flavorful topping for the finished loaf. Set them aside for now.
- Whip Up the Cream: Now, it’s time to make the whipped cream. In a large bowl, combine the heavy whipping cream, powdered sugar, and vanilla extract. Using an electric mixer (either a stand mixer or a hand mixer), beat the mixture on high speed until stiff peaks form. This means that when you lift the beaters, the whipped cream will hold its shape. Be careful not to overbeat, or you’ll end up with butter!
- Start Layering: Spread a thin layer of the whipped cream mixture on the bottom of the prepared loaf pan. This creates a nice base for the cookies and prevents them from sticking.
- Create the First Cookie Layer: Arrange a single layer of whole chocolate sandwich cookies over the cream. You may need to break a few cookies to fit snugly into the pan, especially around the edges. Don’t worry about perfection; just make sure the entire layer is covered.
- Add More Cream: Top the cookie layer with about one-third of the remaining whipped cream mixture, spreading it evenly over the cookies. This layer of cream will start the softening process for the cookies.
- Repeat the Layers: Repeat the layers of cookies and cream two more times, ending with a final layer of cream on top. This layering process is what gives the loaf its beautiful and delicious structure.
- Wrap It Up: Cover the loaf pan tightly with the overhanging plastic wrap. This is important to prevent the surface of the cream from drying out and to help the cookies soften evenly.
- Chill and Soften: This is the most crucial step for achieving that perfect cookie texture. Refrigerate the loaf for at least 8 hours, or preferably overnight. This slow, cold process allows the moisture from the cream to gently soften the cookies without turning them into mush. Patience is key!
- Unmold and Serve: When you’re ready to serve, unwrap the loaf and use the plastic wrap “handles” to lift it out of the pan and onto a serving plate. Gently remove the plastic wrap.
- Garnish: Sprinkle the reserved crushed cookie crumbs evenly over the top of the loaf. This adds a lovely visual appeal and a bit of extra crunch.
- Slice and Enjoy: Slice the chocolate cream loaf with a sharp knife and serve immediately. Get ready for rave reviews!
Tips for Perfect Chocolate Cream Loaf Every Time
Want to ensure your chocolate cream loaf is a resounding success? Here are a few extra tips and tricks:
- Don’t Overbeat the Whipped Cream: Overbeating can cause the cream to become grainy or even turn into butter. Stop beating as soon as stiff peaks form.
- Use Cold Ingredients: Make sure your heavy whipping cream is well-chilled before whipping. This will help it whip up faster and hold its shape better.
- Get Creative with Flavors: Add a drop or two of peppermint extract to the whipped cream for a festive holiday treat. Or, try adding a tablespoon of coffee liqueur for a mocha-flavored loaf.
- Make it Gluten-Free: Use gluten-free chocolate sandwich cookies to make this dessert gluten-free.
- Storage: Store any leftover chocolate cream loaf in an airtight container in the refrigerator for up to 3 days. The cookies will continue to soften over time, so it’s best enjoyed sooner rather than later.
What to Serve With Chocolate Cream Loaf
This chocolate cream loaf is delicious on its own, but it also pairs well with a variety of other desserts. Consider serving it with fresh berries, such as strawberries or raspberries, for a burst of fresh flavor. A scoop of vanilla ice cream or a drizzle of chocolate sauce would also be a delightful addition. Or you can try our easy caramel nut dessert jars recipe
Your Chocolate Cream Loaf Questions Answered (FAQ)
Can I use regular whipping cream instead of heavy whipping cream?
While you can use regular whipping cream, heavy whipping cream is highly recommended. Heavy whipping cream has a higher fat content, which allows it to whip up into a much more stable and voluminous frosting. Regular whipping cream may not hold its shape as well and could result in a softer, less structured loaf.
Can I use a different type of cookie?
Absolutely! Feel free to experiment with different types of cookies. Vanilla wafers, chocolate chip cookies, or even peanut butter cookies would all be delicious in this recipe. Just keep in mind that the texture and flavor of the loaf will change depending on the type of cookie you use.
Can I freeze the chocolate cream loaf?
While you can technically freeze the chocolate cream loaf, it’s not highly recommended. Freezing can alter the texture of the whipped cream and the cookies, making them slightly soggy when thawed. If you do freeze it, wrap it tightly in plastic wrap and then foil, and thaw it in the refrigerator overnight before serving.
How can I prevent the cookies from getting too soggy?
The key to preventing soggy cookies is to chill the loaf for the right amount of time. Eight hours is the minimum, but overnight is ideal. This allows the cookies to soften without becoming mushy. Also, make sure to cover the loaf tightly with plastic wrap to prevent excess moisture from getting in.
Enjoy Your Homemade Chocolate Cream Loaf!
There you have it – a simple, elegant, and utterly delicious Easy No-Bake Chocolate Cream Loaf that’s guaranteed to impress. This is a perfect dessert to make with kids or for a last-minute gathering. The best part is the pure joy on everyone’s faces when they taste that perfect blend of creamy sweetness and tender chocolate. So go ahead, give it a try and let me know how it turns out in the comments below! Don’t forget to share this recipe with your friends and family – they’ll thank you for it!


