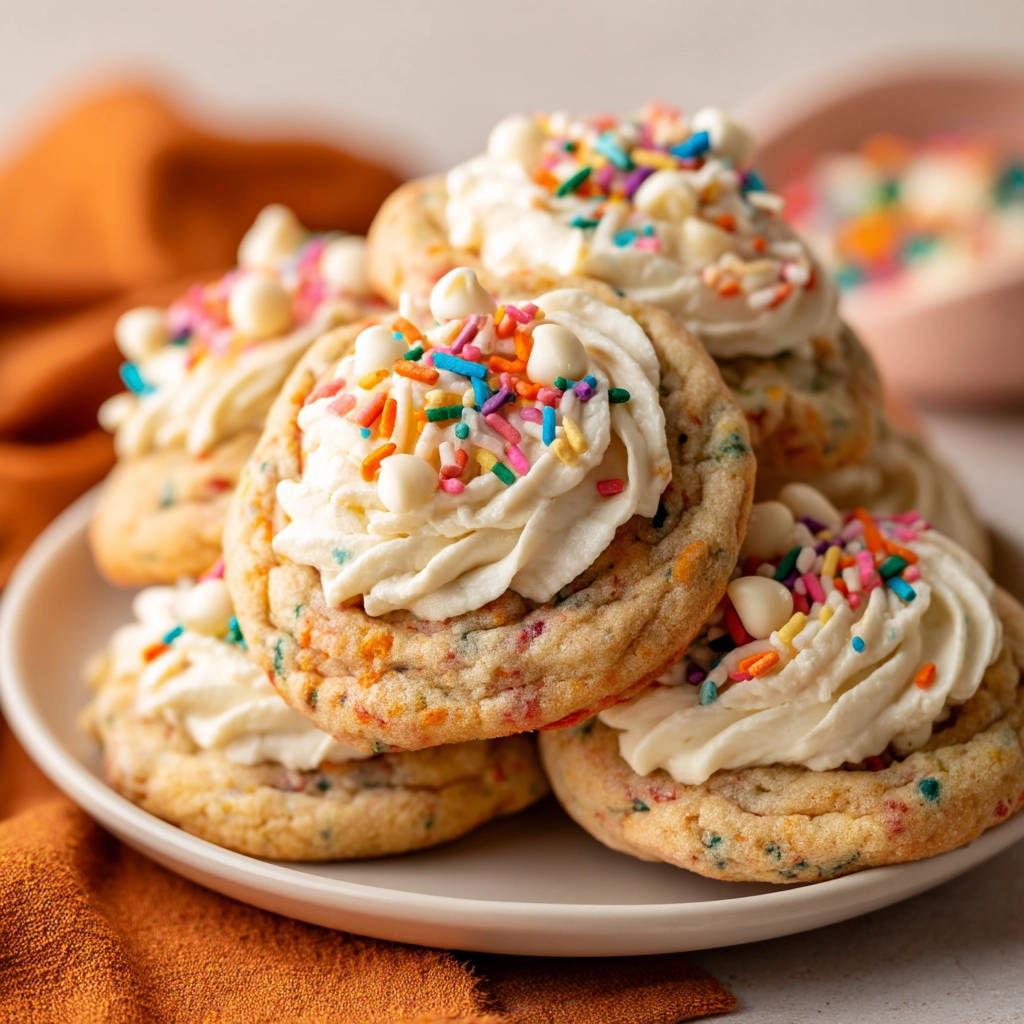
Is there anything more cheerful than a batch of Funfetti Frosted Cookies? These aren’t just any cookies; they’re soft, thick, and bursting with colorful sprinkles. If you’ve ever battled with cookies that spread too thin, ending up as flat, crispy disappointments, you’re in the right place! This recipe features a simple, yet crucial, trick to ensure your cookies bake up perfectly every single time. Get ready to enjoy bakery-worthy Funfetti Cookies that are as delicious as they are delightful!
Why You’ll Love These Funfetti Cookies
These Funfetti Cookies are more than just a sweet treat; they’re a guaranteed mood booster! Here’s why you’ll keep coming back to this recipe:
- Perfectly Thick and Soft: Say goodbye to flat, crispy cookies! This recipe delivers a consistently soft and chewy texture.
- Bursting with Fun: The rainbow sprinkles add a playful touch and a delightful crunch.
- Easy to Make: With simple ingredients and straightforward instructions, anyone can bake these cookies.
- Customizable: Easily adapt the recipe with different sprinkles or frosting flavors to suit your taste.
- Kid-Friendly: These cookies are a hit with kids of all ages, making them perfect for parties and celebrations.
Gathering Your Ingredients for Funfetti Frosted Cookies
The key to amazing Funfetti Cookies lies in using quality ingredients and understanding how they work together. We’re aiming for a balance of sweetness, tenderness, and a delightful burst of fun from the sprinkles. Let’s dive into what you’ll need.
First, for the base of our cookies, we’ll need:
- 1 cup (2 sticks) Unsalted Butter, softened: Using unsalted butter allows you to control the amount of salt in the recipe, ensuring a balanced flavor. Softened butter is crucial for creating a smooth and creamy cookie dough. Make sure it’s softened, not melted!
- 1.5 cups Granulated Sugar: Granulated sugar provides the primary sweetness and contributes to the cookies’ crisp edges.
- 2 large Eggs: Eggs bind the ingredients together, add moisture, and contribute to the cookies’ structure. Use large eggs for consistent results.
- 2 teaspoons Vanilla Extract: Vanilla extract enhances the overall flavor profile, adding a touch of warmth and complexity. Use a high-quality extract for the best results.
Next, we’ll need the dry ingredients that provide structure and lift:
- 3 cups All-Purpose Flour: All-purpose flour provides the structure for the cookies. Measure it accurately using the spoon-and-level method to avoid dry, dense cookies.
- 1 teaspoon Baking Soda: Baking soda is a leavening agent that helps the cookies rise, creating a light and airy texture.
- 0.5 teaspoon Salt: Salt enhances the sweetness and balances the overall flavor of the cookies.
And finally, the ingredients that bring the fun and finishing touches:
- 0.5 cup Rainbow Sprinkles (for dough): Rainbow sprinkles add a festive touch and a delightful crunch to the cookies. Use your favorite type of sprinkles – jimmies or confetti sprinkles both work well.
- 1 can (16 ounces) Vanilla Frosting: Vanilla frosting adds a creamy sweetness to the cookies. You can use store-bought or homemade frosting.
- 0.25 cup Rainbow Sprinkles (for topping): More sprinkles! These are for decorating the frosted cookies and adding an extra pop of color.
- 0.25 cup White Chocolate Chips: White chocolate chips add a touch of richness and sweetness to the cookies. You can substitute them with other types of chocolate chips or chopped nuts if desired.
Crafting Your Funfetti Cookies: Step-by-Step
Ready to bake some amazing Funfetti Cookies? Don’t be intimidated! This recipe is designed to be easy and fun. The most important step is chilling the dough – this prevents the cookies from spreading too thin and ensures a perfectly thick and soft texture. Follow these steps carefully, and you’ll be rewarded with delicious, bakery-worthy cookies!
- Cream Butter and Sugar: In a large bowl, combine the softened butter and granulated sugar. Use an electric mixer to cream them together until light and fluffy. This process incorporates air into the mixture, which is essential for creating a tender cookie. Aim for a pale and airy mixture.
- Incorporate Eggs and Vanilla: Beat in the eggs one at a time, ensuring each egg is fully incorporated before adding the next. Then, stir in the vanilla extract. The vanilla enhances the sweetness and adds a warm note to the cookie dough.
- Whisk Dry Ingredients: In a separate medium bowl, whisk together the all-purpose flour, baking soda, and salt. Whisking ensures that the ingredients are evenly distributed, preventing clumps and ensuring proper leavening.
- Combine Wet and Dry Ingredients: Gradually add the dry ingredients to the wet ingredients, mixing on low speed until just combined. Be careful not to overmix the dough. Overmixing can develop the gluten in the flour, resulting in tough cookies. Mix until the flour is just incorporated.
- Fold in Sprinkles: Gently fold in the 0.5 cup of rainbow sprinkles using a spatula. Folding ensures that the sprinkles are evenly distributed throughout the dough without breaking or bleeding their color.
- Chill the Dough (The Secret Step!): Cover the cookie dough tightly with plastic wrap and chill in the refrigerator for at least 1 hour. This is the key step for preventing spread! Chilling the dough solidifies the butter, which helps the cookies maintain their shape and thickness while baking. For even better results, chill for 2-3 hours or even overnight.
- Preheat and Prepare: Preheat your oven to 350 degrees F (175 degrees C). Line baking sheets with parchment paper. Parchment paper prevents the cookies from sticking and makes cleanup a breeze.
- Scoop and Arrange: Scoop rounded tablespoons of the chilled dough onto the prepared baking sheets, placing them about 2 inches apart. Using a cookie scoop ensures that the cookies are uniform in size, which helps them bake evenly.
- Bake to Perfection: Bake for 9-11 minutes, or until the edges are lightly golden and set, but the centers still look slightly soft. The baking time may vary depending on your oven, so keep a close eye on the cookies.
- Cool and Transfer: Let the cookies cool on the baking sheet for a few minutes before carefully transferring them to a wire rack to cool completely. This allows the cookies to firm up slightly, preventing them from breaking.
- Frost and Decorate: Once the cookies are entirely cool, frost generously with the vanilla frosting. Get creative and use different frosting techniques for a visually appealing result.
- Sprinkle and Enjoy: Decorate the frosted cookies with the remaining sprinkles and white chocolate chips before serving. These are best enjoyed fresh!
Tips for Perfect Funfetti Cookies Every Time
Want to ensure your Funfetti Cookies are a smashing success every time you bake them? Here are a few pro tips to keep in mind:
- Don’t Overmix: Overmixing the dough develops the gluten in the flour, resulting in tough cookies. Mix until the flour is just incorporated.
- Chill the Dough: Chilling the dough is crucial for preventing spread and creating a thick, soft cookie. Don’t skip this step! For a truly decadent dessert, you could try some of our other delicious dessert recipes! Perhaps the chocolate covered apple dessert cups?
- Use Parchment Paper: Parchment paper prevents the cookies from sticking and makes cleanup a breeze.
- Bake at the Right Temperature: Baking the cookies at the correct temperature ensures that they bake evenly and don’t spread too thin.
- Don’t Overbake: Overbaking the cookies will result in dry, crispy cookies. Bake until the edges are lightly golden and the centers still look slightly soft.
- Storage: Store the cookies in an airtight container at room temperature for up to 3 days.
What to Serve With Funfetti Cookies
Funfetti cookies are great alone, but they are even better with a refreshing drink such as milk or juice. They are also perfect for gatherings, such as birthdays!
Your Funfetti Cookies Questions Answered (FAQ)
Still have questions about making Funfetti Cookies? Here are some common questions and answers to help you bake with confidence.
Why did my cookies spread too thin?
The most common reason for cookies spreading too thin is that the butter was too warm or the dough wasn’t chilled long enough. Make sure your butter is softened but not melted, and chill the dough for at least 1 hour (or longer for even better results). Another culprit could be overmixing the dough, which develops the gluten and leads to spreading. Be sure to measure your flour correctly; too little flour can also cause excessive spreading. Consider trying our delicious and easy chocolate sheet cake recipe if you are looking to serve it alongside your cookies.
Can I use different types of sprinkles?
Absolutely! Feel free to experiment with different types of sprinkles to customize your Funfetti Cookies. Jimmies (the long, thin sprinkles) and confetti sprinkles both work well. Just be aware that some sprinkles may bleed their color into the dough, so test a small batch first. You could even match the sprinkles to a specific holiday or theme!
Can I make these cookies gluten-free?
Yes, you can! Substitute the all-purpose flour with a gluten-free all-purpose flour blend. Be sure to choose a blend that contains xanthan gum or add it separately (about 1/2 teaspoon per cup of flour) to help bind the ingredients together. Gluten-free cookies may require a slightly longer baking time.
Can I freeze the cookie dough?
Yes, you can freeze the cookie dough for up to 2 months. Scoop the dough into individual cookies and place them on a baking sheet lined with parchment paper. Freeze until solid, then transfer the cookies to a freezer-safe bag or container. When ready to bake, you can bake from frozen but make sure to add 1-2 minutes to the baking time. This helps avoid having flat cookies.
Can I make these cookies ahead of time?
Yes, you can make the cookie dough ahead of time and store it in the refrigerator for up to 2 days. Just be sure to wrap it tightly in plastic wrap to prevent it from drying out. You can also bake the cookies ahead of time and store them in an airtight container at room temperature for up to 3 days. It is best to decorate the cookies with frosting right before serving.
Enjoy Your Homemade Funfetti Cookies!
Congratulations! You’ve just baked a batch of perfectly thick, soft, and cheerful Funfetti Frosted Cookies. These cookies are guaranteed to bring a smile to everyone’s face. Now it’s time to share your creations with friends and family (or keep them all to yourself – we won’t judge!). Don’t forget to leave a comment below and let us know how your cookies turned out! And if you loved this recipe, be sure to share it on social media. Happy baking!
Funfetti Frosted Cookies (Stop Cookies Spreading Flat!)

Ingredients
- 1 cup (2 sticks) Unsalted Butter, softened
- 1.5 cups Granulated Sugar
- 2 large Eggs
- 2 teaspoons Vanilla Extract
- 3 cups All-Purpose Flour
- 1 teaspoon Baking Soda
- 0.5 teaspoon Salt
- 0.5 cup Rainbow Sprinkles (for dough)
- 1 can (16 ounces) Vanilla Frosting
- 0.25 cup Rainbow Sprinkles (for topping)
- 0.25 cup White Chocolate Chips
Directions
- Cream softened butter and sugar in a large bowl using an electric mixer until light and fluffy.
- Beat in eggs one at a time, then stir in vanilla extract.
- In a separate medium bowl, whisk together the all-purpose flour, baking soda, and salt.
- Gradually add the dry ingredients to the wet ingredients, mixing on low speed until just combined. Be careful not to overmix the dough.
- Gently fold in the 0.5 cup of rainbow sprinkles using a spatula.
- **This is the key step for preventing spread:** Cover the cookie dough tightly with plastic wrap and **chill in the refrigerator for at least 1 hour**. Chilling the dough solidifies the butter, which helps the cookies maintain their shape and thickness while baking.
- Preheat your oven to 350 degrees F (175 degrees C). Line baking sheets with parchment paper.
- Scoop rounded tablespoons of the chilled dough onto the prepared baking sheets, placing them about 2 inches apart.
- Bake for 9-11 minutes, or until the edges are lightly golden and set, but the centers still look slightly soft.
- Let the cookies cool on the baking sheet for a few minutes before carefully transferring them to a wire rack to cool completely.
- Once the cookies are entirely cool, frost generously with the vanilla frosting.
- Decorate the frosted cookies with the remaining sprinkles and white chocolate chips before serving.