Have you ever dreamt of pulling a perfectly golden loaf of bread out of your own oven, only for it to turn out disappointingly dense? We’ve all been there! Spending precious time and ingredients, hoping for that soft, airy crumb, but ending up with something closer to a doorstop. It’s incredibly frustrating!
For years, I tinkered, tweaked, and sighed over sad loaves. But through trial and error, I finally discovered the secrets to consistently achieving that light, cloud-like texture we all crave in a simple homemade loaf bread. It’s not as complicated as you might think, and I’m thrilled to share the techniques that make all the difference. Get ready to bake bread that’s truly guaranteed fluffy every time!
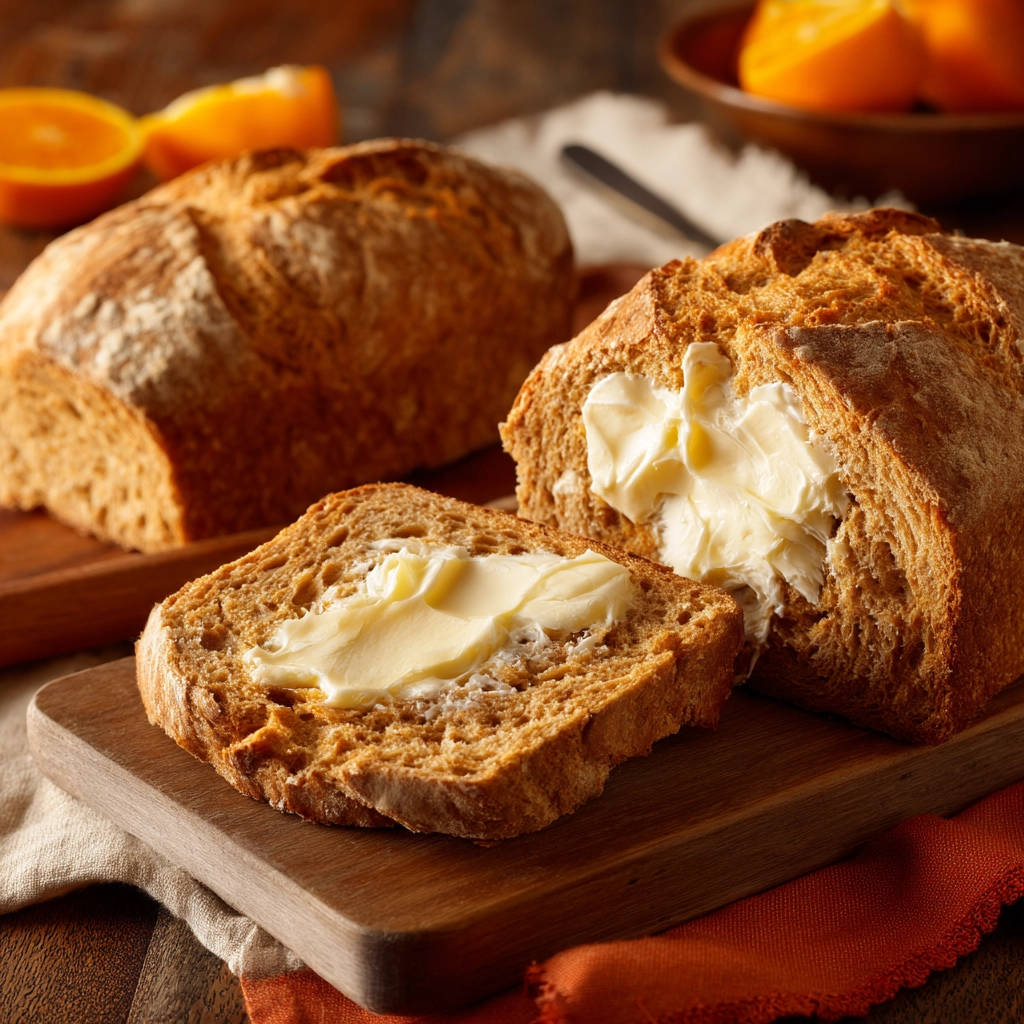
Why You’ll Absolutely Love This Homemade Loaf Bread
This isn’t just another bread recipe; it’s a blueprint for success in your home kitchen. Here’s why this method for creating fluffy homemade loaf bread will become your go-to:
- Consistently Fluffy Texture: We focus on the steps that specifically promote a light, airy crumb, leaving dense loaves in the past.
- Simple Ingredients: You likely have everything you need in your pantry right now. No fancy flours or additives required!
- Deeply Satisfying Aroma & Taste: The smell of baking bread is pure comfort, and the taste of a fresh, warm slice is unmatched.
- Versatile Canvas: This is the perfect base for sandwiches, toast, or dipping into your favorite soup.
Gathering Your Ingredients for Fluffy Loaf Bread
Making a beautiful, fluffy loaf starts with understanding the role each simple ingredient plays. Quality counts, but pantry staples are truly the heroes here.
- Warm Water (1 cup, 105-115°F): This is the wake-up call for your yeast. The temperature is crucial – too cold, and the yeast won’t activate; too hot, and you’ll kill it. Aim for warm bathwater temperature.
- Active Dry Yeast (2 1/4 teaspoons): The leavening agent that creates all those lovely air pockets for fluffiness! Ensure your yeast is fresh by checking the expiration date.
- Granulated Sugar (1 tablespoon): A little bit of sugar gives the yeast some food to feast on, helping it become active and bubbly quickly.
- Neutral Oil (1 tablespoon, plus extra for greasing): A neutral oil like vegetable, canola, or light olive oil adds tenderness to the crumb and keeps the dough from sticking.
- Salt (1 teaspoon): Don’t skip the salt! It’s vital for flavor and also helps control the yeast’s activity and strengthens the gluten structure.
- All-Purpose Flour (2 1/2 to 3 cups): The backbone of your loaf. All-purpose flour has the right protein content for developing gluten, which is key for that chewy yet light texture. You can absolutely use a mix with whole wheat flour if you prefer a slightly heartier loaf, but all-purpose is your best bet for maximum fluffiness the first few times you make this.
Crafting Your Homemade Loaf Bread: Step-by-Step for Maximum Fluffiness
Ready to transform these simple ingredients into a bakery-worthy loaf? Follow these steps closely, paying attention to the ‘why’ behind each action, and you’ll be rewarded with bread that’s wonderfully soft inside.
-
Activate the Yeast: In a large mixing bowl, pour in the warm water (making sure it’s within that 105-115°F range). Sprinkle the active dry yeast and the tablespoon of sugar over the water. Give it a gentle stir just to combine. Now, walk away and let it rest for 5 to 10 minutes. What you’re looking for is a visible layer of foam or bubbles on the surface. This “proofing” step is your confirmation that the yeast is alive and ready to work its magic. If it doesn’t foam, your water might have been the wrong temperature, or your yeast might be expired. Start over with fresh yeast!
-
Add Wet Ingredients & Salt: Once your yeast is bubbly and happy, stir the tablespoon of neutral oil and the teaspoon of salt into the mixture. These dissolve easily and distribute throughout the dough from the beginning.
-
Begin Adding Flour: Now, it’s time to introduce the flour. Add about 2 1/2 cups of the all-purpose flour gradually, perhaps 1/2 cup at a time, mixing with a sturdy wooden spoon or using the dough hook attachment on your stand mixer on low speed. Continue mixing until the dough starts to come together in a loose, shaggy mass. It will look rough and sticky at this stage, with floury bits still visible – that’s exactly what you want initially.
-
The Crucial Kneading Step: Turn the shaggy dough out onto a lightly floured surface (or continue with your stand mixer). This is where you develop the gluten, which is the network that traps the air produced by the yeast, making the bread fluffy. Knead the dough by hand for 8 to 10 minutes. Push the dough away from you with the heels of your hands, fold it back over itself, rotate, and repeat. If using a stand mixer with a dough hook, knead on medium speed for 6 to 8 minutes.
Proper kneading is the key to avoiding a dense loaf. The dough should transform from sticky and shaggy to smooth, elastic, and less sticky to the touch. A great test is the “windowpane test”: carefully stretch a small piece of dough between your fingers. If you can stretch it thin enough to see light through it without it tearing, the gluten is well-developed. This elasticity is what allows the bread to rise beautifully.
-
First Rise (Bulk Fermentation): Lightly grease a clean large bowl with a little neutral oil. Place the kneaded dough in the bowl, turning it once to coat the surface with oil. This prevents it from sticking to the bowl as it rises. Cover the bowl snugly with plastic wrap or a clean, damp kitchen towel. Place the bowl in a warm place. A warm oven (turned off, but maybe heated slightly beforehand to about 75-80°F/24-27°C) or simply a warm spot in your kitchen away from drafts works well.
Let the dough rise for 1 to 1 1/2 hours, or until it has clearly doubled in size. This first rise is called bulk fermentation and contributes significantly to both the flavor and texture. Don’t try to rush this; sufficient time allows the yeast to create plenty of air pockets.
-
Deflate the Dough: Once the dough has doubled, gently punch it down in the bowl. This deflates the large air bubbles, redistributes the yeast and temperature throughout the dough, and prepares it for shaping.
-
Shape the Loaf: Turn the dough out onto a lightly floured surface. Flatten the dough gently into a rectangle shape. Imagine the size of your loaf pan. Fold the two shorter ends of the rectangle in towards the center, overlapping slightly. Then, starting from one long end, roll the dough up tightly like a jelly roll. As you roll, gently pinch the seam closed with your fingers. This tight shaping helps create a nice structure and prevents the loaf from spreading too much during the second rise and baking.
-
Second Rise (Proofing in the Pan): Lightly grease a standard 9×5 inch loaf pan. Place the shaped loaf into the pan, seam-down. Cover the pan again with plastic wrap or a damp towel. Let it rise in a warm place for another 45 to 60 minutes. The dough should rise until it’s about 1 inch above the rim of the pan. This second rise is just as vital as the first for achieving a truly light and airy texture.
-
Preheat the Oven: About 15-20 minutes before you expect the second rise to be finished, preheat your oven to 375°F (190°C). This gives the oven time to come to the correct temperature and ensures even baking.
-
Bake Your Loaf: Place the loaf pan in the preheated oven. Bake for 30 to 40 minutes. The bread is ready when the crust is a beautiful golden brown and the internal temperature, measured with an instant-read thermometer inserted into the center of the loaf, reaches 200-210°F (93-99°C). If you notice the top of the loaf is browning too quickly before the inside is done, you can loosely tent the pan with aluminum foil to prevent further darkening.
-
Cool Completely: This step requires patience, but it’s essential for the final texture! Carefully remove the hot loaf from the pan immediately after baking and place it on a wire rack to cool completely. Slicing into hot bread can compress the delicate crumb structure, making it seem denser than it is. Let it cool for at least 1-2 hours before slicing.
Tips for Perfect Homemade Loaf Bread Every Time
Even with a solid recipe, a few extra tips can elevate your bread-baking game from good to consistently great.
- Measure Flour Accurately: Don’t scoop flour directly from the bag with your measuring cup, as this compacts it. Spoon the flour lightly into your measuring cup and then level it off with a straight edge. Too much flour is a common culprit for dense bread.
- Water Temperature is Key: Seriously, use a thermometer if you can! Water that’s too cold won’t activate the yeast; water that’s too hot will kill it. The 105-115°F range is perfect for active dry yeast.
- Find a Warm Spot for Rising: Yeast loves warmth. Places like on top of the refrigerator, in a slightly warmed (then turned off) oven, or near a sunny window are great options, especially in cooler kitchens.
- Listen to Your Dough: The amount of flour needed can vary slightly based on humidity and how you measure. Start with the lower amount (2 1/2 cups) and add more flour just until the dough is elastic and only slightly sticky after kneading.
- Test for Doneness: Relying solely on visual cues can be tricky. An instant-read thermometer is your best friend for perfectly baked bread. The 200-210°F internal temperature range guarantees it’s cooked through.
- Storage: Store cooled bread in an airtight container or bread bag at room temperature for up to 3-4 days. For longer storage, slice the cooled loaf and freeze the slices in a freezer-safe bag.
What to Serve With Your Fluffy Loaf Bread
Now that you have a magnificent, fluffy loaf, the possibilities are endless! Its simple, comforting flavor makes it incredibly versatile.
Use it for the ultimate sandwich, classic French toast, or simply slathered with butter and jam. It’s the perfect companion for soaking up sauces from savory dishes. Imagine tearing off a warm piece to dunk into a hearty stew like our Hearty Beef Stew, or using it to scoop up the creamy goodness from a pasta dish like our Creamy Carbonara. It’s also fantastic served alongside a vibrant salad like our Easy Kale Salad.
Your Homemade Loaf Bread Questions Answered (FAQ)
Let’s troubleshoot some common bread-baking queries so you can confidently bake your best loaf.
Why didn’t my bread rise?
The most common culprits are inactive yeast or incorrect water temperature. Double-check the expiration date on your yeast and ensure your water is within the 105-115°F range when you activate it. A cold environment can also significantly slow down or prevent rising.
My bread turned out dense. What went wrong?
Denseness is usually a result of either under-kneading or insufficient rising time. Kneading develops the gluten network needed to trap air; without it, the bread can’t hold its shape as it expands. Rushing the proofing steps means the yeast hasn’t had enough time to produce the necessary gas. Ensure you knead until the dough passes the windowpane test and allow the dough to truly double in size during the first rise and rise noticeably above the pan during the second.
Can I use instant yeast instead of active dry yeast?
Yes, you can! Instant yeast is more potent and doesn’t require proofing in water first. You can typically add it directly to your dry ingredients, then add the warm water and wet ingredients. However, active dry yeast is used here to build confidence by ensuring your yeast is alive before you commit to the whole recipe.
Can I substitute some of the all-purpose flour with whole wheat?
Absolutely! The recipe notes mention this. You can start by substituting a portion, perhaps 1/2 to 1 cup, with whole wheat flour. Keep in mind that whole wheat flour absorbs liquid differently and the dough might feel slightly heavier. You may need to adjust the total amount of flour slightly.
How do I know when the bread is fully baked?
A golden brown crust is a good indicator, but the most reliable method is checking the internal temperature with an instant-read thermometer. It should read between 200-210°F (93-99°C) in the center. Another traditional test is tapping the bottom of the loaf; it should sound hollow.
Enjoy Your Perfectly Fluffy Homemade Loaf Bread!
There’s something incredibly rewarding about making bread from scratch, and biting into a slice of perfectly fluffy homemade loaf bread you made yourself is pure bliss. Forget those past brick-like failures; with the right techniques, guaranteed fluffy bread is within your reach.
Give this recipe a try and experience the simple joy of warm, tender, homemade bread. Whether it’s for sandwiches, toast, or just because, you’ll be so proud of the results!
Did you try this recipe? Let me know in the comments how your loaf turned out! Happy Baking!
Homemade Loaf Bread

Ingredients
- 1 cup warm water (105-115°F)
- 2 1/4 teaspoons active dry yeast
- 1 tablespoon granulated sugar
- 1 tablespoon neutral oil, plus extra for greasing
- 1 teaspoon salt
- 2 1/2 to 3 cups all-purpose flour (or a mix with whole wheat, as desired)
Directions
- In a large mixing bowl, combine the warm water, yeast, and sugar. Let stand for 5-10 minutes until foamy. This confirms your yeast is active.
- Stir in the oil and salt into the yeast mixture.
- Gradually add the flour, 1/2 cup at a time, mixing with a wooden spoon or stand mixer until a shaggy dough forms.
- Turn the dough out onto a lightly floured surface and knead for 8-10 minutes, or knead in a stand mixer with a dough hook on medium speed for 6-8 minutes. The key to avoiding denseness is proper kneading: the dough should become smooth, elastic, and no longer sticky when pressed. It should pass the windowpane test (a small piece of dough can be stretched thin enough to see light through it without tearing). This develops the gluten structure needed for a fluffy crumb.
- Lightly grease a clean bowl with oil. Place the kneaded dough in the bowl, turning to coat. Cover with plastic wrap or a damp kitchen towel.
- Let the dough rise in a warm place for 1 to 1 1/2 hours, or until doubled in size. This is the first proof and is crucial for texture. Don’t rush this step; sufficient rise creates air pockets.
- Gently punch down the dough to deflate it. Turn it out onto a lightly floured surface.
- Shape the dough into a loaf by flattening it into a rectangle, then folding the short ends into the center, and finally rolling it up tightly from one long end. Pinch the seam closed.
- Place the loaf seam-down into a greased 9×5 inch loaf pan. Cover again and let rise for another 45-60 minutes, or until the dough has risen about 1 inch above the rim of the pan. This second rise (proofing in the pan) is just as important for a light texture.
- Preheat your oven to 375°F (190°C) while the dough finishes rising.
- Bake for 30-40 minutes, or until the crust is golden brown and the internal temperature reaches 200-210°F (93-99°C). If the top browns too quickly, you can loosely tent it with foil.
- Remove from the pan and let cool completely on a wire rack before slicing. Slicing hot bread can compress the crumb, making it seem less fluffy. Enjoy your perfectly fluffy loaf!