Let’s be honest, is there anything more rewarding than pulling a loaf of homemade bread from your oven? The aroma, the crackling crust, the warmth… it’s pure magic! But if you’ve ever tried to bake bread at home, you might also know the frustration of slicing into what you hoped would be an airy, open crumb only to find it’s a little denser than you imagined. We follow the steps, we wait patiently, and yet that elusive bakery-style texture sometimes feels just out of reach.
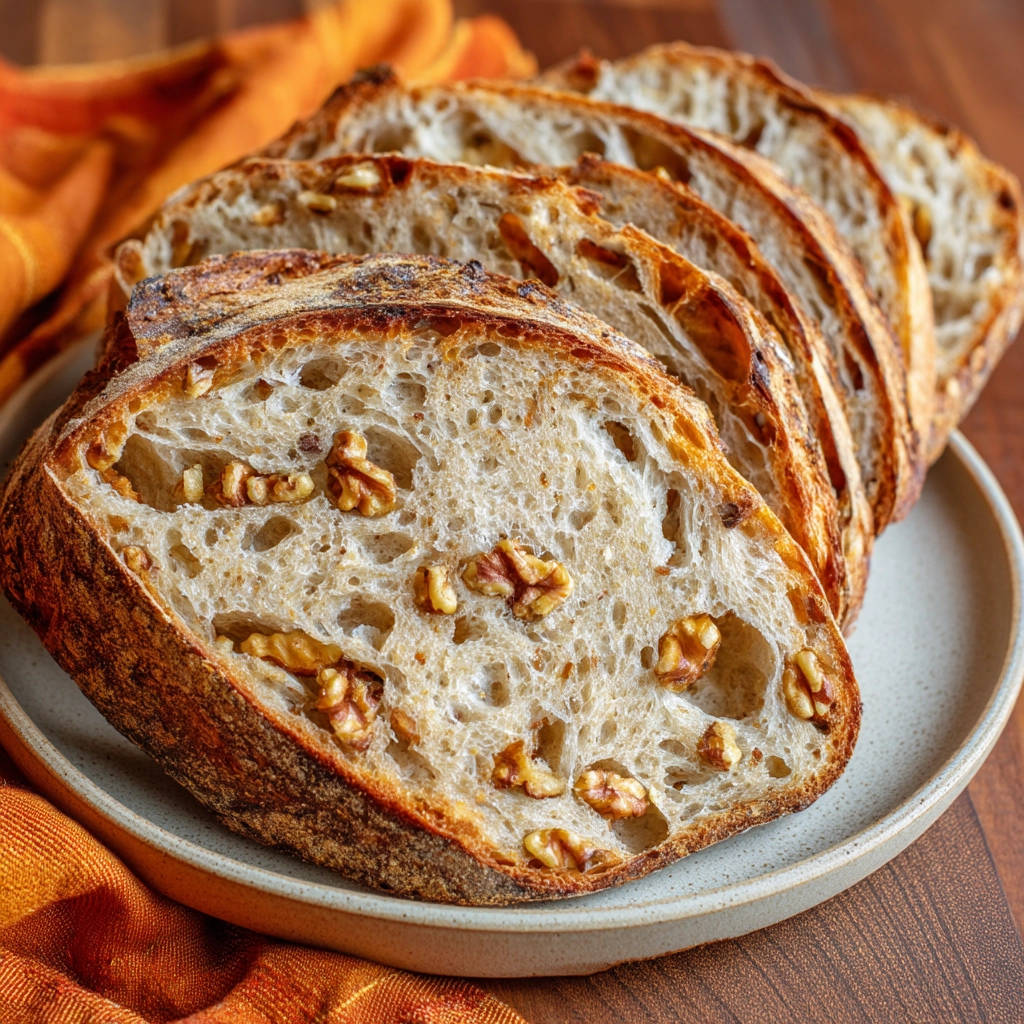
After countless baking experiments, trials, and yes, a few dense loaves, I finally cracked the code for achieving that beautiful, airy open crumb in a delicious Homemade Walnut Bread. It’s not about mastering incredibly complex techniques; it turns out there’s one crucial tweak that makes all the difference, unlocking that gorgeous structure every single time. Get ready to bake a loaf that looks and tastes like it came from your favorite local bakery!
Why This Homemade Walnut Bread is a Keeper
Beyond the incredible satisfaction of baking your own loaf, this specific walnut bread recipe offers so much to love:
- That Perfect Open Crumb: We tackle the common problem of dense bread head-on, guiding you through the specific techniques that promote those lovely, airy pockets.
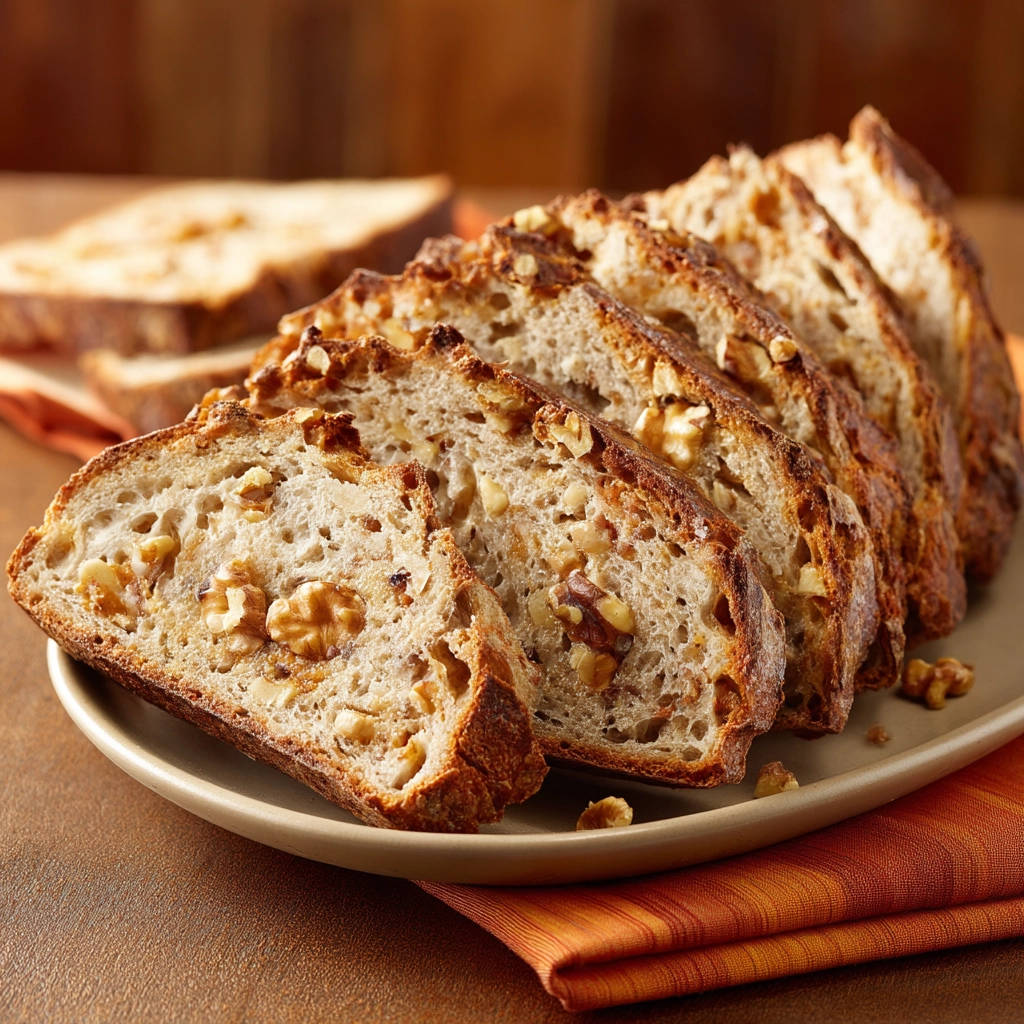
- Incredible Flavor: Walnuts add a delightful nuttiness and subtle crunch that elevates simple bread to something truly special. They toast slightly during baking, enhancing their rich flavor.
- Rewarding Process: While there’s passive time involved, the active steps are simple and satisfying. Watching the dough transform is part of the joy.
- Versatile Use: This isn’t just slicing bread; it’s perfect for toast, sandwiches, served with soup, or enjoyed simply with butter.
- Customizable: Once you master the base technique, you can easily adapt it with other nuts or additions.
Gathering Your Ingredients for Amazing Walnut Bread
Creating a beautiful loaf of bread starts with understanding the role each ingredient plays. For this Homemade Walnut Bread, we rely on a few key components working together to build flavor and structure.
Here are the essential ingredients you’ll need:
- Bread Flour: Using bread flour is key because it has a higher protein content compared to all-purpose flour. This higher protein means more gluten development, which is absolutely crucial for building the strong, elastic network needed to trap the gasses that create that desired open crumb structure. Don’t be tempted to swap this out if you can help it! You’ll need 3 and 3/4 cups.
- Warm Water: Water isn’t just for hydration; its temperature is important. Warm water, around 95-100°F (35-38°C), is the ideal temperature to activate yeast or help your sourdough starter become lively and bubbly. You’ll need 1 cup.
- Active Leavening: You have two options here! You can use either 1/4 cup of active, bubbly sourdough starter, which brings complex tangy flavors developed during its fermentation. Or, if you’re new to sourdough or prefer a more consistent rise, 1/2 teaspoon of instant dry yeast combined with 1 teaspoon of sugar will work beautifully. The sugar gives the commercial yeast a little food boost to get started.
- Salt: Salt is more than just a flavor enhancer in bread baking; it also helps control the rate of fermentation and strengthens the gluten structure. It’s essential for both taste and texture. We’ll use 2 teaspoons.
- Walnuts: The star addition! Roughly chopped walnuts add bursts of nutty flavor and wonderful texture throughout the loaf. Choose fresh, high-quality walnuts for the best taste. You’ll need 1 cup, roughly chopped.
Crafting Your Walnut Bread: Step-by-Step to Open Crumb Success
Baking this bread is a process that rewards patience. While the total time might look long, much of it is hands-off rising. Let’s walk through each stage to ensure you get that stunning open crumb.
- Wake Up Your Leavening (If Using Yeast): If you’re using instant dry yeast instead of sourdough starter, your first move is to get it active. Combine the yeast and the small amount of sugar with the warm water in a small bowl. Give it a gentle stir and let it sit for about 5 to 10 minutes. You’ll know it’s ready when the surface becomes visibly foamy – that means your yeast is alive and ready to work! If you’re using sourdough starter, you can skip this activation step and simply mix your starter directly into the warm water.
- Combine Dry and Wet Ingredients: In a large mixing bowl, measure out your bread flour and add the salt, whisking them together briefly to distribute the salt evenly. Pour the activated yeast-water mixture (or the starter-water mixture) into the center of the flour.
- Initial Mix & The Rest: Grab a wooden spoon or sturdy spatula and begin mixing everything together. Stir until you no longer see any dry pockets of flour. At this point, the dough will look quite rough, shaggy, and feel very sticky – this is exactly what you want! Don’t try to make it smooth yet. Cover the bowl tightly with plastic wrap or a damp kitchen towel. Let this shaggy dough rest for a crucial 30 minutes. This rest, often called autolyse when just flour and water, allows the flour to fully absorb the water, kicking off the gluten development process with minimal effort from you. This initial hydration and brief rest are foundational for building strength and contributing to that sought-after open crumb.
- First Set of Gentle Folds: After the 30-minute rest, it’s time for the first set of ‘stretch and folds’ – a gentle technique that builds dough strength without the aggressive tearing of traditional kneading. Wet your hands slightly (this helps prevent sticking). Imagine the dough is a square and the bowl has four corners. Grab one edge of the dough, stretch it upwards gently, and fold it over the center of the mass. Rotate the bowl a quarter turn and repeat this stretching and folding motion three more times until you’ve worked your way around the bowl. The dough will still be sticky but should feel a little smoother and slightly more cohesive.
- Second Rest and Folds: Cover the bowl again and let the dough rest for another 30 minutes. This allows the gluten network you just started to relax and strengthen further. Following this rest, perform the second set of stretch and folds exactly as you did in Step 4. This process of gentle folding spaced out by rests is key to developing a strong, elastic gluten structure, which is essential for trapping the gases produced during fermentation and creating those beautiful airy pockets in the final loaf.
- Adding the Walnuts: After the second set of folds and another 30-minute rest, scatter the roughly chopped walnuts evenly over the surface of the dough. Now, perform a third set of stretch and folds. As you fold the dough over, the walnuts will be incorporated and distributed throughout the dough. Try to ensure they are reasonably spread out during this folding step.
- The Long, Cold Fermentation – The Secret Weapon!: Cover the bowl tightly once more. This is where the magic truly happens! Place the covered bowl in the refrigerator for a slow, cold fermentation. Let it ferment for anywhere from 12 to 24 hours. This extended time in a cool environment does wonders: it dramatically develops the flavor of the bread (especially if you’re using sourdough) and, most importantly for that open crumb, it strengthens the dough structure and allows gases to accumulate slowly and consistently, building incredible air pockets. This long, cold proof is arguably the single most crucial tweak for achieving that bakery-quality texture.
- Prepare for Shaping: The next day (or after your desired cold fermentation time), lightly flour your work surface. Be gentle when handling the dough at this stage. Carefully scrape the dough out of the bowl onto the floured surface. The dough will be bubbly and soft. The key here is to avoid unnecessarily degassing the dough – we want to preserve all those wonderful air bubbles that have developed during the cold fermentation. Treat it kindly!
- Gentle Shaping: Shape the dough into your desired loaf shape, typically a round (boule) or an oval (batard). To do this, gently pull the edges of the dough into the center, creating tension on the surface. Once you have a neat bundle, flip it over so the seam is underneath. Gently cup your hands around the loaf, using the friction against the surface to tighten the ball or oval shape slightly. The goal is to create just enough surface tension to help the loaf hold its shape during proofing and baking.
- Final Proof and Oven Preheat: Generously flour a proofing basket (banneton) or line a bowl with a clean kitchen towel and flour the towel thoroughly. Place the shaped loaf into the proofing basket or lined bowl, seam-side up (this is important because you’ll flip it out later). Cover the loaf. Let it proof at room temperature for 60 to 90 minutes. The exact time will depend on the temperature of your kitchen and how active your dough is, but it should look slightly puffy and expanded, yet still hold its shape without spreading excessively. While your loaf is having its final proof, preheat your oven to a hot 450°F (230°C). Place a Dutch oven (with its lid) inside the oven as it preheats. Heating the pot for at least 30 minutes ensures it’s scorching hot. This intense initial heat, combined with the steam trapped by the lid, is absolutely essential for maximum oven spring – the rapid expansion of the dough in the oven – which contributes significantly to a light, open crumb before the crust hardens.
- Transfer and Score: Carefully remove the screaming hot Dutch oven from the oven (use thick oven mitts!). Gently, but confidently, flip the proofed loaf out of its proofing basket/bowl directly into the hot Dutch oven. Take a sharp knife or a razor blade (a bread lame is ideal) and quickly score the top of the loaf. A single, deep slash down the center is classic and allows the loaf to expand predictably as it bakes.
- Bake Covered: Place the lid back onto the Dutch oven, ensuring it’s seated properly. Carefully return the lidded pot to the preheated oven. Bake with the lid on for the first 20 minutes. The lid traps the moisture released from the bread, creating a steamy environment inside the pot. This steam keeps the crust soft initially, allowing the dough to rise and expand to its fullest potential (that oven spring!), maximizing the development of the open crumb.
- Bake Uncovered for Crust: After 20 minutes, carefully remove the lid from the Dutch oven. The bread should have expanded beautifully and look pale but puffy. Now, continue baking for another 20 to 25 minutes, or until the crust develops a deep, rich golden brown color and the internal temperature of the loaf, checked with an instant-read thermometer, is between 200-210°F (93-99°C). Baking uncovered allows the steam to escape and the direct heat to crisp up the crust beautifully, creating that satisfying crunch.
- Cool Completely: Carefully remove the hot Dutch oven from the oven and use oven mitts to transfer the finished loaf to a wire rack. This is perhaps the hardest step of all – you MUST let the bread cool completely before slicing into it! Slicing warm bread can actually compress the open, airy structure you’ve worked so hard to create. Waiting allows the internal structure to set fully. Once cool, slice it up and admire that gorgeous open crumb you achieved!
Tips for Baking the Perfect Open Crumb Walnut Bread
Achieving that coveted open crumb is a rewarding process. Here are a few extra pointers to help ensure your success:
- Know Your Dough: Pay attention to how your dough feels at each stage. It should be sticky after the initial mix, gain strength and smoothness after the folds, and be bubbly after the cold fermentation. Developing an intuition for dough consistency is key in bread baking.
- Temperature Matters: Room temperature can significantly impact proofing times. If your kitchen is cold, the final proof might take longer. If it’s warm, it might go faster. Watch the dough, not just the clock, during the final proof.
- Don’t Fear the Stick: Wet hands during folding are your friend! Embrace the stickiness; it means your dough is properly hydrated, which is important for an open structure.
- Gentleness is Key Post-Cold Proof: Once the cold fermentation is done, handle the dough as little and as gently as possible during shaping and transferring. Every time you handle it roughly, you risk deflating those precious air bubbles.
- Score with Confidence: A quick, decisive score allows the bread to expand where you want it to. Don’t hesitate!
- Dutch Oven Alternatives: No Dutch oven? You can simulate the steamy environment by placing a baking stone or heavy baking sheet in the oven while it preheats. When you add the loaf, place it on the hot stone/sheet and quickly place a metal roasting pan or oven-safe bowl over the bread for the first 20 minutes, then remove it to finish baking. You can also place a pan of hot water on the rack below the bread for the first part of the bake.
What to Serve With Your Homemade Walnut Bread
Once your beautiful loaf of Homemade Walnut Bread is cooled and ready, the possibilities are endless! It’s fantastic on its own, but it also pairs wonderfully with a variety of dishes.
Consider serving slices alongside a comforting bowl of soup, like our Creamy Tomato Tortellini Soup or a hearty vegetable stew. It’s also perfect for soaking up sauces from main courses. A warm slice slathered with butter is pure bliss, or try it toasted for breakfast. For a delightful appetizer, pair it with a cheese board, a drizzle of honey, or even a dollop of our popular Whipped Feta Dip with Walnuts and Honey – the flavors complement each other beautifully!
Your Homemade Walnut Bread Questions Answered (FAQ)
Baking bread can sometimes bring up questions. Here are answers to some common queries about this recipe:
Can I use all-purpose flour instead of bread flour?
While you can technically make bread with all-purpose flour, you will likely not achieve the same level of open crumb structure as with bread flour. Bread flour’s higher protein content is specifically designed for strong gluten development needed for airy loaves. For the best results and that impressive open crumb, stick with bread flour.
What if my sourdough starter isn’t very active?
If your sourdough starter isn’t bubbly and active (meaning it hasn’t been fed recently or isn’t doubling in size reliably), it’s best to feed it and wait until it shows signs of good activity before using it in this recipe. An inactive starter won’t provide enough leavening power, resulting in a dense loaf. You can always use the instant dry yeast option if your starter isn’t ready.
My dough isn’t getting smooth after the folds. What’s wrong?
The dough won’t become perfectly smooth like a kneaded dough right away. The magic of stretch and folds is that they build strength over time with rests. After the first couple of sets, it should start to look less shaggy and a bit more cohesive, but it will remain quite soft and sticky. If it’s still completely falling apart or hasn’t gained any tension after the second set of folds, your flour might need more time to hydrate, or your leavening might be weak.
Can I add other things besides walnuts?
Absolutely! This technique is versatile. You could try pecans, hazelnuts, dried cranberries, raisins, or even a mix of seeds like sunflower or pumpkin seeds. Ensure any additions are roughly the same size or smaller than chopped walnuts and are incorporated gently during the third set of folds.
How should I store the finished walnut bread?
Once completely cooled, store the bread at room temperature. The best way to keep the crust crisp for as long as possible is to store it cut-side down on a cutting board, uncovered. For longer storage or to keep it softer, you can wrap it in a linen bag or loosely in plastic wrap once it’s fully cooled. It’s best enjoyed within 2-3 days.
What is “oven spring” and why is the Dutch oven important?
Oven spring is the final, rapid rise that occurs when bread is first placed into a hot oven. The sudden heat causes the gases inside the dough to expand quickly. A hot Dutch oven creates a very hot, steamy environment around the loaf initially. This steam keeps the crust soft and flexible for the first 20 minutes, allowing the dough to expand upwards and outwards dramatically before the crust hardens. This rapid expansion during oven spring is critical for maximizing the volume and creating a lighter, more open crumb.
Enjoy Your Homemade Walnut Bread!
Baking this Homemade Walnut Bread is a journey, not just a recipe. It teaches patience and observation, and the reward is absolutely delicious. The nutty warmth of the walnuts combined with the satisfying chew and airy texture of that beautiful open crumb is truly something special. Share it, savor it, and feel proud of the incredible loaf you created right in your own kitchen!
Did you try this recipe? What did you serve it with? Let us know in the comments below!
Homemade Walnut Bread

Ingredients
- 3 and 3/4 cups Bread Flour
- 1 cup Warm Water (about 95-100°F)
- 1/4 cup Active Sourdough Starter OR 1/2 teaspoon Instant Dry Yeast plus 1 teaspoon Sugar
- 2 teaspoons Salt
- 1 cup Walnuts, roughly chopped
Directions
- If using instant dry yeast, dissolve the yeast and sugar in the warm water. Let stand 5-10 minutes until foamy. If using sourdough starter, skip this step and mix the starter directly into the water.
- In a large bowl, combine the flour and salt. Pour the yeast/water mixture (or starter/water) into the flour. Mix with a spoon or spatula until just combined and no dry flour remains. The dough will be shaggy and sticky.
- Cover the bowl with plastic wrap or a damp cloth and let the dough rest for 30 minutes. This resting period is crucial for allowing the flour to absorb the water fully and start gluten development, which contributes to the open crumb.
- After resting, perform the first set of folds. With wet hands, grab one edge of the dough, stretch it up, and fold it over the center. Repeat this process 3 more times, rotating the bowl each time, pulling all four “corners” to the center. The dough will become slightly smoother.
- Cover and let rest for another 30 minutes. Repeat the folding process (Step 4). This gentle folding, rather than aggressive kneading, builds strength in the dough without tearing the delicate gluten structure, which is key to creating those airy pockets.
- After the second set of folds and another 30 minute rest, scatter the chopped walnuts over the top of the dough. Perform a third set of folds, incorporating the walnuts as you fold the dough over itself. The walnuts should be distributed throughout the dough.
- Cover the bowl and place it in the refrigerator for a slow fermentation overnight, or for 12 to 24 hours. This long, cold fermentation develops flavor and structure slowly and consistently, greatly improving the open crumb.
- The next day, lightly flour your work surface. Gently scrape the dough out of the bowl onto the floured surface. Avoid degassing the dough unnecessarily; be gentle to preserve the air bubbles that have formed overnight.
- Shape the dough into a round or oval loaf. Pull the edges into the center to create surface tension, then flip it over and gently cup your hands around the dough to create a tight ball or oval.
- Place the shaped loaf seam-side up in a floured proofing basket or a bowl lined with a floured towel. Cover and let proof at room temperature for 60-90 minutes, or until slightly puffy but still holds its shape. While it proofs, preheat your oven to 450°F (230°C) with a Dutch oven inside for at least 30 minutes. Heating the pot first provides instant high heat and steam, which allows the crust to expand rapidly before hardening, essential for maximum oven spring and an open crumb.
- Carefully remove the hot Dutch oven from the oven. Gently flip the proofed loaf into the hot pot. Score the top of the loaf with a sharp knife or razor blade (a single slash is common).
- Place the lid back on the Dutch oven and carefully put it back in the oven. Bake with the lid on for 20 minutes.
- Remove the lid and continue baking for another 20-25 minutes, or until the crust is deep golden brown and the internal temperature is around 200-210°F (93-99°C). Baking covered creates steam, which keeps the crust soft initially, allowing the loaf to expand fully, then removing the lid lets the crust crisp up beautifully.
- Carefully remove the Dutch oven from the oven and transfer the bread to a wire rack to cool completely before slicing. Slicing warm bread can compress the crumb. Waiting ensures you see that gorgeous open structure you worked for!