If you’ve ever tried making homemade veggie bites only to have them fall apart or turn out dry and bland, you know the frustration. I’ve been there! After a lot of experimenting, I finally cracked the code to making these savory Lentil Power Bites perfectly moist on the inside with a lovely golden exterior, and they hold their shape beautifully.
This recipe transforms humble lentils into delicious, satisfying bites that are a joy to eat, proving that plant-based can be both simple and spectacularly flavorful.
Beyond the Basics: What Makes These Lentil Power Bites Stand Out?
The “No More Crumbles” Promise
The secret to perfectly formed veggie bites that don’t crumble lies in two critical steps: thoughtful mashing and a mandatory chilling period. This recipe guides you through achieving a cohesive, workable mixture that guarantees your Lentil Power Bites hold their shape flawlessly, both before and during baking.
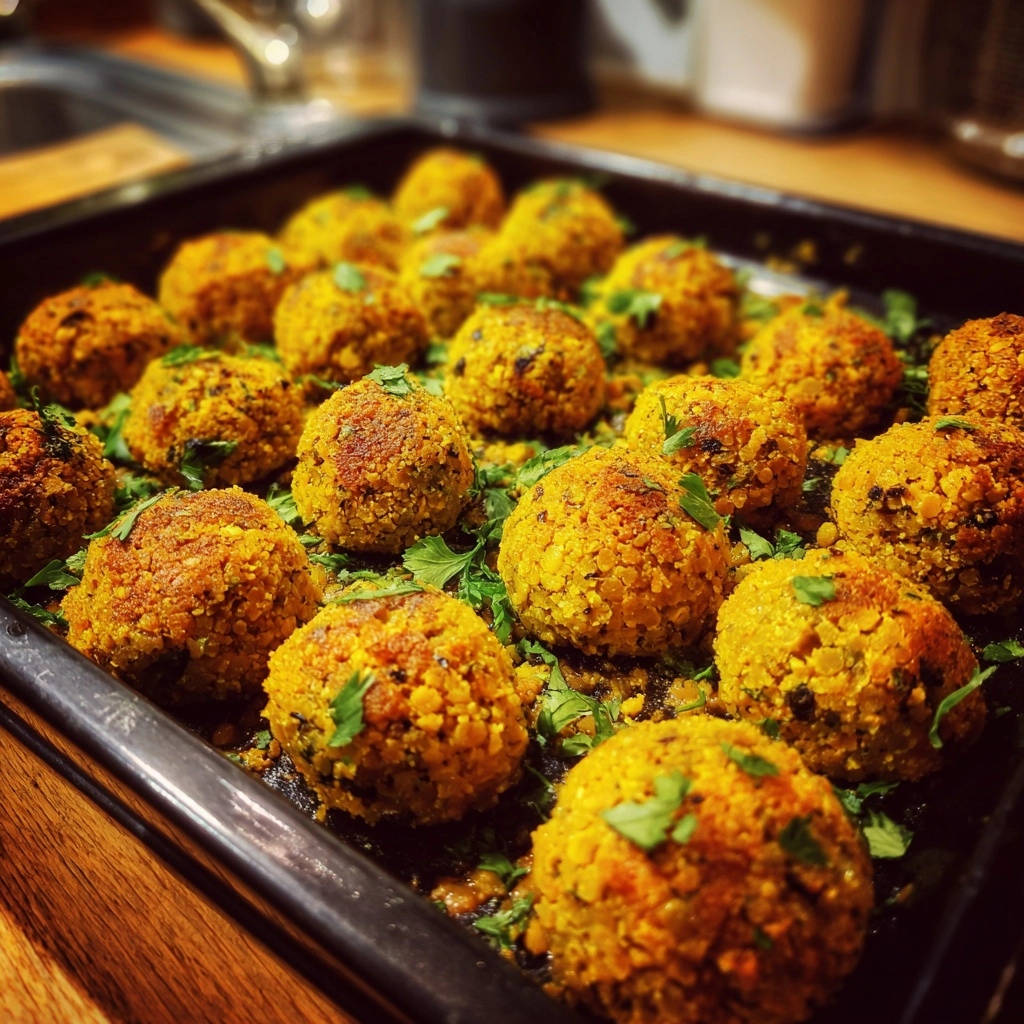
Golden, Moist Perfection, Every Time
Say goodbye to dry, lackluster lentil patties. Our method ensures each bite is wonderfully moist on the inside, while a simple olive oil coating and precise baking technique yield a consistently golden, slightly crispy exterior. It’s a texture balance that truly delights.
A Flavor Profile That Delights
These Lentil Power Bites boast a rich, savory flavor profile thanks to a carefully balanced blend of aromatic vegetables and warming spices. The cumin, coriander, and turmeric elevate the natural earthiness of the lentils, creating a harmonious and utterly addictive taste.
The Heart of the Bites: Essential Ingredients
Foundation: Lentils and Aromatics
Cooked Green or Brown Lentils: These varieties are ideal as they retain some texture after cooking and mash well without becoming overly mushy, providing the perfect base for your bites.

Yellow Onion & Garlic: Finely chopped onion and minced garlic form the aromatic backbone, sweetening and deepening the overall flavor. Sautéing them first unlocks their full fragrance.
The Spice Ensemble
Ground Cumin: Adds a warm, earthy, and slightly nutty flavor, characteristic of many Mediterranean and Indian dishes.
Ground Coriander: Contributes a mild, citrusy, and subtly sweet note that brightens the spice blend and complements the cumin beautifully.
Ground Turmeric: Besides lending a beautiful golden hue, turmeric offers a subtle, earthy flavor and provides an antioxidant boost.
Binders and Freshness: Breadcrumbs & Herbs
Plain Breadcrumbs: Essential for binding the mixture, absorbing excess moisture, and ensuring the bites hold their form. They contribute to the desired texture.
Fresh Parsley or Cilantro: Chopped fresh herbs are crucial for adding a burst of freshness and vibrant color, lifting the savory notes of the lentils and spices.
Essential Tools for Your Power Bite Prep
You don’t need fancy equipment to make these amazing bites. A few basic kitchen essentials are all it takes to get started.
From Mixing Bowls to Baking Sheets
-
Small Skillet: Perfect for sautéing your aromatics to develop their flavor before adding them to the main mixture.
-
Large Mixing Bowl: Necessary for combining and thoroughly mashing all your ingredients, allowing for proper integration.
-
Fork or Potato Masher: Key for achieving the correct textured mash for the lentils – cohesive enough to bind, but not a smooth paste.
-
Baking Sheet & Parchment Paper: Ensures even baking and easy cleanup. Parchment paper also prevents sticking, contributing to that golden crust.
Your Journey to Perfect Lentil Power Bites: Step-by-Step
- Step 1: Preheat & Prep Your Pan
Set your oven to 375°F (190°C). Line a baking sheet with parchment paper or lightly grease it. This preparation ensures your Lentil Power Bites bake evenly and don’t stick.
- Step 2: Sauté the Aromatics
In a small skillet, warm 1 tablespoon of olive oil over medium heat. Add the chopped onion and cook for 5-7 minutes until softened. Stir in the minced garlic and cook for another minute until fragrant. Cooking these first softens them and brings out their sweet, savory flavors, which will infuse the entire mixture.
- Step 3: Combine the Core Ingredients
In a large bowl, combine the well-drained cooked lentils, the sautéed onion and garlic mixture, ground cumin, ground coriander, ground turmeric, salt, and black pepper. Add the fresh chopped parsley or cilantro. Ensure everything is evenly distributed for consistent flavor.
- Step 4: The Key to Texture: Mashing the Mixture
This is a critical step for preventing crumbling and dryness: Using a fork or a potato masher, thoroughly mash the lentil mixture until it is mostly cohesive but still retains some texture. Do not mash it into a smooth paste. The goal is a mixture that holds together firmly when squeezed, indicating it will form well.
- Step 5: Incorporate the Breadcrumbs (Adjust as Needed)
Stir in the 1/2 cup of plain breadcrumbs. Now, assess the consistency: if the mixture still feels too wet to hold its shape, add another tablespoon or two of breadcrumbs until it feels firm enough to roll. If it feels too dry and isn’t holding together, add a teaspoon of water at a time until it’s just right and easily forms.
- Step 6: The Secret to Firmness: Chilling Time
Cover the bowl and refrigerate the mixture for at least 15 minutes. This chilling time is crucial as it helps the mixture firm up, making the bites much easier to roll and ensuring they hold their shape during baking, preventing crumbling. This step truly is the “secret” to perfect texture.
- Step 7: Form Your Bites
Once chilled, roll the mixture into approximately 18-20 small balls, about 1 inch in diameter. Aim for uniform size to ensure all your Lentil Power Bites bake evenly.
- Step 8: Lightly Coat with Olive Oil
In a small bowl, drizzle the remaining 1 tablespoon of olive oil over the formed lentil bites, tossing gently to coat them evenly. This helps them get beautifully golden and prevents dryness in the oven, contributing to that desirable crispy exterior.
- Step 9: Arrange for Baking
Arrange the lentil bites in a single layer on the prepared baking sheet. Ensure they have enough space between them for air to circulate, which is vital for even browning.
- Step 10: Bake to Golden Perfection
Bake for 20-25 minutes, flipping them gently halfway through. They are ready when they are golden brown and firm to the touch. Keep a close eye on them to avoid over-baking, which can lead to dryness.
- Step 11: Serve and Enjoy!
Allow them to cool slightly before serving warm with your favorite dipping sauce or as part of a meal. These Lentil Power Bites are delightful on their own or paired with a fresh salad.
Mastering the Art: Pro Tips for Your Lentil Power Bites
The Magic of Mashing: Texture is Key
Perfect Mash, Not Paste: Avoid over-processing your lentils. A slightly textured mash allows for the right bind without becoming gummy, which is essential for that perfect bite. You want some integrity to remain, not a baby food consistency.
The Chilling Advantage: Why It Matters So Much
Don’t Skip the Chill: Refrigerating the mixture firms it up, making it significantly easier to roll and ensuring the Lentil Power Bites hold their shape flawlessly during baking. It’s the ultimate anti-crumble secret, providing stability and preventing frustration.
Achieving the Perfect Golden Crisp
Even Coating, Even Crisp: The light toss in olive oil before baking is crucial for that desirable golden exterior and to keep the bites moist. Ensure they are coated evenly, as this fat aids in the browning process.
Flip for Uniformity: Flipping halfway through baking ensures both sides get beautifully browned and firm, contributing to an appealing and consistent texture. This also helps prevent one side from becoming too crispy while the other remains pale. For another recipe that nails the crispy texture, check out our Crispy Zucchini Fritters.
Common Questions & Quick Fixes for Your Power Bites
My Lentil Power Bites are Crumbly! What Went Wrong?
If your bites are crumbling, the most common culprits are insufficient mashing, not chilling the mixture, or a dry consistency. Ensure the lentil mixture is cohesive when squeezed before forming, and absolutely do not skip the refrigeration step.
My Bites Feel Too Wet/Too Dry After Mixing!
If too wet, gradually add an extra tablespoon or two of breadcrumbs until the mixture feels firm enough to roll without sticking excessively to your hands. If too dry, add water a teaspoon at a time until it’s just right and holds together easily when pressed.
Why Aren’t My Lentil Power Bites Getting Golden?
Ensure your oven is preheated correctly and that the bites are lightly coated with olive oil, as the oil helps with browning. Also, make sure they are arranged in a single layer on the baking sheet, allowing for proper air circulation and browning. Extend baking time slightly if needed, keeping a close watch.
Versatility & Longevity: Enjoying Your Lentil Power Bites
Creative Ways to Enjoy Your Bites
These Lentil Power Bites are incredibly versatile! Serve them warm with a cooling tzatziki, a zesty lemon-tahini sauce, spicy sriracha mayo, or a classic marinara. They also make fantastic additions to fresh salads, savory wraps, or even as mini sliders on small buns with your favorite fixings.
Meal Prep & Make-Ahead Tips
You can prepare the entire lentil mixture up to 2 days in advance and store it covered in the refrigerator. This allows the flavors to meld and makes assembling and baking a breeze when you’re ready for fresh bites, simplifying your meal prep routine.
Storing Leftovers Like a Pro
Cooked Lentil Power Bites can be stored in an airtight container in the refrigerator for up to 3-4 days. For reheating, gently warm them in the oven at 300°F (150°C) until warmed through, or use an air fryer for extra crispness. Microwaving is an option, but may result in a softer texture.
Lentil Power Bites: Your Questions, Answered
Can I Make These Lentil Power Bites Gluten-Free?
Absolutely! Simply substitute the plain breadcrumbs with your favorite gluten-free breadcrumbs. Always double-check labels to ensure all other ingredients are naturally gluten-free.
What Kind of Lentils Work Best for This Recipe?
Green or brown lentils are ideal for these Lentil Power Bites as they hold their shape well after cooking and provide a good base for mashing. Red lentils tend to be too soft and might result in a mushier, less firm texture, which isn’t what we’re aiming for here.
Can I Freeze Cooked Lentil Power Bites?
Yes, cooked Lentil Power Bites freeze beautifully! Once completely cooled, place them in a single layer on a baking sheet and freeze until solid. Then, transfer to an airtight freezer-safe bag or container for up to 3 months. Reheat from frozen in the oven or air fryer until hot and warmed through.
What Are Some Alternative Spices I Could Use?
Feel free to get creative with the spices! Smoked paprika adds a lovely depth and a hint of smokiness, a pinch of cayenne pepper can introduce some pleasant heat, or you could explore a mild curry powder blend for a different flavor profile. If you’re a lentil lover looking for more comforting dishes, you might also enjoy our recipe for Amazing Hearty Lentil Soup with Secret Flavor.
Ready to Create Your Own Lentil Power Bite Success?
Armed with these simple steps and expert tips, you’re now ready to conquer the kitchen and create a batch of Lentil Power Bites that are perfectly golden, wonderfully firm, and bursting with flavor. Say goodbye to crumbly, bland veggie bites and hello to your new favorite go-to recipe for healthy, satisfying meals or snacks.
Don’t forget to share your creations with us! We love seeing your culinary triumphs and how these Lentil Power Bites become a staple in your home. Happy cooking!

Lentil Power Bites
Course: AppetizerCuisine: International CuisineDifficulty: easy4
servings20
minutes25
minutes45
minutesInternational Cuisine
Ingredients
1.5 cups cooked green or brown lentils, very well drained
1/2 yellow onion, finely chopped
2 cloves garlic, minced
2 tablespoons olive oil, divided
1/2 teaspoon ground cumin
1/2 teaspoon ground coriander
1/4 teaspoon ground turmeric
Salt to taste
Black pepper to taste
1/2 cup plain breadcrumbs
1/4 cup chopped fresh parsley or cilantro
Directions
- Preheat your oven to 375°F (190°C). Line a baking sheet with parchment paper or lightly grease it.
- In a small skillet over medium heat, warm 1 tablespoon of olive oil. Add the chopped onion and cook until softened, about 5-7 minutes. Add the minced garlic and cook for another minute until fragrant. Remove from heat.
- In a large bowl, combine the well-drained cooked lentils, sautéed onion and garlic, ground cumin, ground coriander, ground turmeric, salt, and black pepper. Add the fresh chopped parsley or cilantro.
- This is a key step for preventing crumbling and dryness: Using a fork or a potato masher, thoroughly mash the lentil mixture until it is mostly cohesive but still retains some texture. Do not mash it into a smooth paste. Alternatively, you can pulse it briefly in a food processor, being careful not to over-process. The goal is a mixture that holds together when squeezed.
- Stir in the 1/2 cup of plain breadcrumbs. If the mixture still feels too wet to hold its shape, add another tablespoon or two of breadcrumbs until it feels firm enough to roll. If it feels too dry and isn’t holding together, add a teaspoon of water at a time until it’s just right.
- Now for the secret to perfect texture: Cover the bowl and refrigerate the mixture for at least 15 minutes. This chilling time is crucial as it helps the mixture firm up, making the bites much easier to roll and ensuring they hold their shape during baking, preventing crumbling.
- Once chilled, roll the mixture into approximately 18-20 small balls, about 1 inch in diameter.
- In a small bowl, drizzle the remaining 1 tablespoon of olive oil over the formed lentil bites, tossing gently to coat them evenly. This helps them get beautifully golden and prevents dryness in the oven.
- Arrange the lentil bites in a single layer on the prepared baking sheet.
- Bake for 20-25 minutes, flipping them gently halfway through, until they are golden brown and firm to the touch.
- Serve warm with your favorite dipping sauce or as part of a meal.
Notes
- Chilling the mixture for at least 15 minutes is crucial for firmness and preventing crumbling.