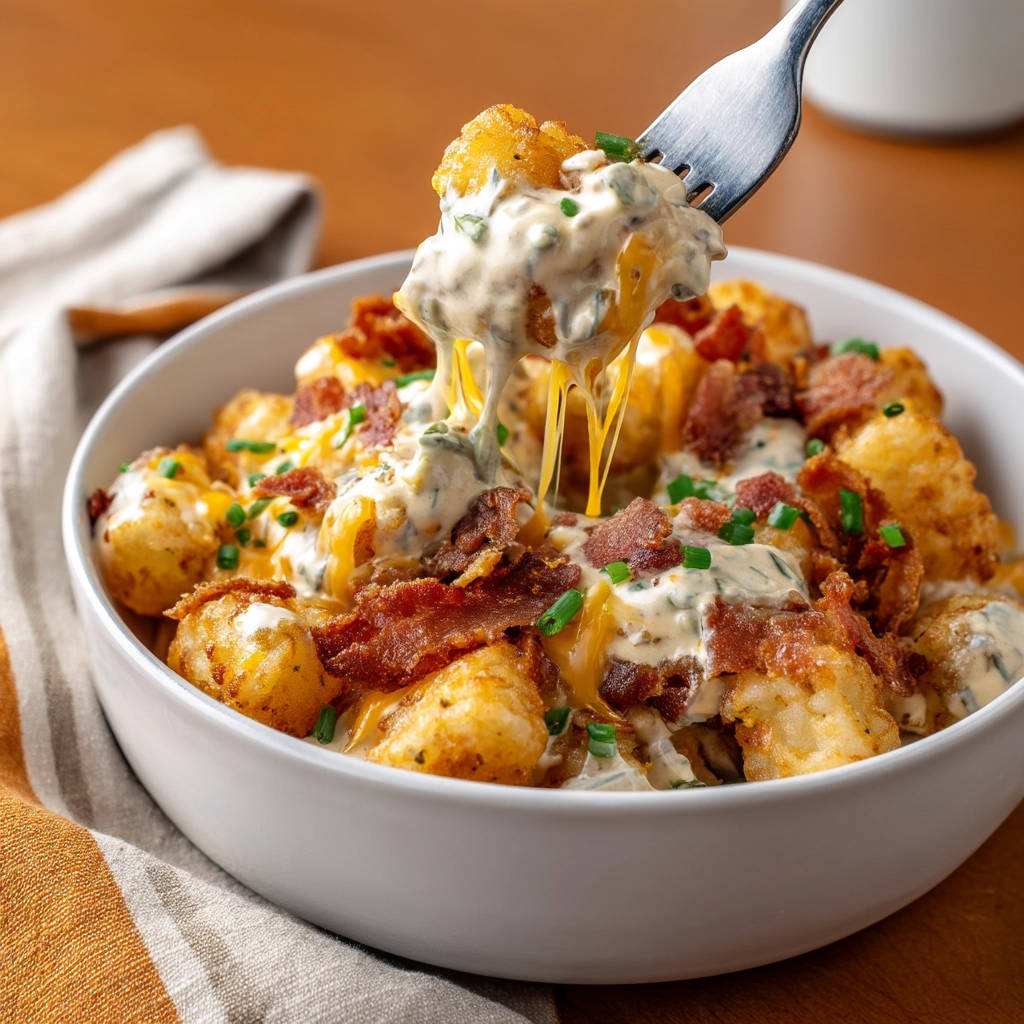
Okay, hands up if you’ve ever dreamt of a loaded tater tot bowl, piled high with cheesy goodness and crispy bacon, only to be met with…soggy disappointment? Yeah, me too. That’s why I’m beyond excited to share this recipe for a Loaded Tater Tot Bowl where the tots actually stay crispy! The secret? Baking them until they’re perfectly golden and firm before you load them up. Get ready for a flavor explosion that’s guaranteed to become a new family favorite!
Why You’ll Love This Loaded Tater Tot Bowl
This isn’t just another snack; it’s a meal in a bowl! Here’s why this recipe is a total winner:
- Crispy Tots, Always: Say goodbye to soggy bottoms! The baking technique ensures maximum crispiness.
- Customizable: Easily adapt the toppings to your liking.
- Crowd-Pleaser: Perfect for parties, game nights, or a fun family dinner.
- Quick & Easy: Ready in under an hour with minimal prep.
- Comfort Food Heaven: Cheesy, bacon-y, and oh-so-satisfying!
Gathering Your Ingredients for the Ultimate Loaded Tater Tot Bowl
This recipe is all about simple ingredients coming together in perfect harmony. The foundation, of course, is perfectly cooked tater tots, but the toppings are what really take it to the next level. Let’s break down what you’ll need to create this masterpiece.
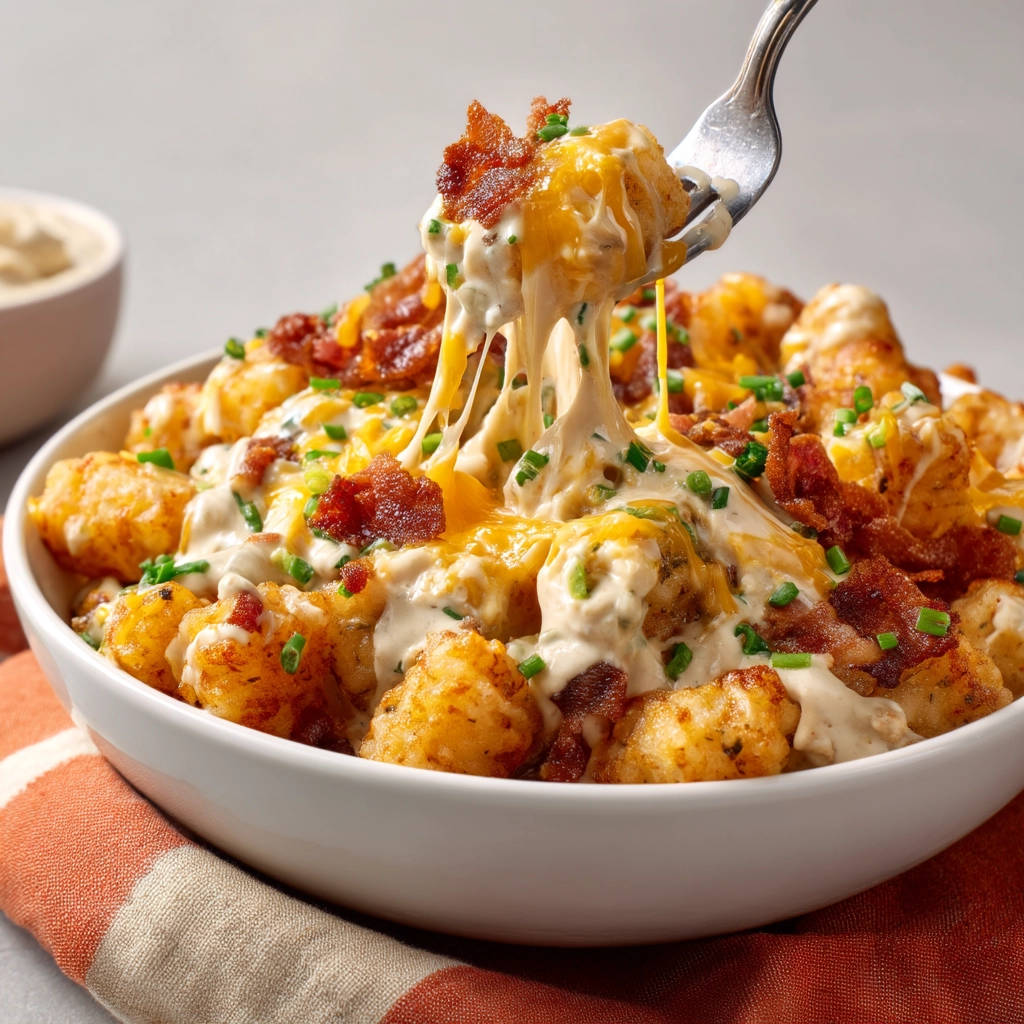
For that classic cheesy, bacony flavor, we’re relying on sharp cheddar cheese and crispy bacon. The cheddar provides that comforting, melty base, while the bacon adds a smoky, salty crunch. But the real magic happens with the creamy dill sauce, which balances the richness of the cheese and bacon with a touch of freshness and tang. Here’s the full list:
- Frozen Tater Tots: 1 bag. The better quality the tots, the better the final result. Look for a brand that you enjoy and that crisps up well.
- Shredded Cheddar Cheese: 1 cup. I recommend sharp cheddar for the best flavor, but you can use any kind you like. A pre-shredded bag works great, but freshly grated cheese melts even better!
- Bacon: 4 slices. Cooked until crispy, of course! Use your favorite cut of bacon; thick-cut adds extra heartiness.
- Fresh Chives: 2 tablespoons, finely chopped. These add a fresh, oniony flavor that really brightens up the dish.
- Sour Cream: 1/2 cup. Provides a tangy base for the creamy sauce. Full-fat sour cream will give you the richest flavor, but you can use low-fat if you prefer.
- Mayonnaise: 2 tablespoons. Adds creaminess and richness to the sauce.
- Dried Dill: 1 teaspoon. This herb adds a distinct flavor that complements the other ingredients beautifully. Fresh dill can also be used – use about 1 tablespoon if substituting.
- Garlic Powder: 1/2 teaspoon. For that subtle garlic kick that enhances everything.
- Onion Powder: 1/4 teaspoon. Adds depth and complexity to the sauce.
- Salt and Black Pepper: To taste. Seasoning is key to bringing out all the flavors!
Crafting Your Loaded Tater Tot Bowl: Step-by-Step
Ready to turn these ingredients into a bowl of crispy, cheesy deliciousness? Don’t be intimidated! This recipe is super straightforward, and I’ll walk you through each step. The most important thing is to make sure those tater tots get nice and crispy – that’s the key to avoiding the dreaded soggy bowl!
- Preheat Your Oven: Set your oven to 400 degrees F (200 degrees C). Getting the oven nice and hot is crucial for achieving crispy tater tots.
- Arrange the Tots: Spread the frozen tater tots in a single layer on a baking sheet. Make sure they aren’t overcrowded; this will allow them to bake evenly and get crispy all over. If necessary, use two baking sheets.
- Bake for Crispy Perfection: This is the most important step! Bake the tater tots for 25 to 30 minutes, or even longer, until they are deeply golden brown and feel firm and crunchy when you test one. Don’t be afraid to let them bake longer if needed. For extra crispiness, flip them halfway through baking. Undercooked tots are the enemy of a good loaded bowl!
- Cook the Bacon: While the tots are baking, cook the bacon until it’s crispy. You can fry it in a pan, bake it in the oven, or even use the microwave. Once it’s cooked, crumble it and set it aside.
- Chop the Chives: Finely chop the fresh chives. Set aside for topping.
- Whisk Together the Creamy Sauce: In a small bowl, whisk together the sour cream, mayonnaise, dried dill, garlic powder, onion powder, salt, and pepper. Taste and adjust the seasoning as needed. This sauce is the perfect complement to the crispy tots and cheesy toppings.
- Transfer to a Serving Bowl: Once the tater tots are very crispy, immediately transfer them to a serving bowl. Don’t let them sit on the baking sheet, as they can start to steam and lose their crispness.
- Scatter the Cheese: Sprinkle the shredded cheddar cheese generously over the hot tater tots. The residual heat will melt the cheese slightly, creating a gooey, cheesy base for the other toppings.
- Drizzle with Creamy Sauce: Drizzle the creamy dill sauce generously over the tots and cheese.
- Top with Bacon and Chives: Sprinkle the crumbled bacon and fresh chives over the top. These add a burst of flavor and texture that takes the bowl to the next level.
- Serve Immediately: Enjoy your Loaded Tater Tot Bowl immediately while the tots are still hot and crispy! This is best served fresh.
Tips for Perfect Loaded Tater Tot Bowls Every Time
Want to ensure your Loaded Tater Tot Bowls are a guaranteed success? Here are a few extra tips and tricks:
- Don’t overcrowd the baking sheet: Giving the tater tots space to breathe is essential for achieving maximum crispiness.
- Bake them long enough: Don’t be afraid to bake the tater tots for longer than the recommended time. The key is to get them deeply golden brown and firm.
- Warm the serving bowl: Warming the serving bowl slightly before adding the hot tater tots will help keep them warm and crispy for longer.
- Customize your toppings: Feel free to get creative with your toppings! Add your favorite veggies, sauces, or other proteins.
- If you love crispy potatoes, you might enjoy learning how to make creamy spiced potatoes, which offer a similar satisfying texture.
What to Serve With Loaded Tater Tot Bowls
While this Loaded Tater Tot Bowl is a meal in itself, here are a few ideas for complementary dishes:
Your Loaded Tater Tot Bowl Questions Answered (FAQ)
Got questions about making the best Loaded Tater Tot Bowl ever? Here are some common questions and answers:
Can I use a different kind of cheese?
Absolutely! While cheddar is a classic choice, you can use any cheese that melts well, such as mozzarella, Monterey Jack, or pepper jack. Experiment with different cheese blends to find your favorite combination.
Can I make this vegetarian?
Yes! Simply omit the bacon and add other vegetarian toppings, such as black beans, corn, or avocado. You can even try adding a sprinkle of smoked paprika to give it a smoky flavor similar to bacon.
How do I store leftovers?
Leftovers are best stored in an airtight container in the refrigerator. Keep in mind that the tater tots will lose some of their crispness. Reheat in the oven or air fryer to help restore some of the crispness.
Can I prepare this ahead of time?
You can cook the bacon and make the creamy sauce ahead of time. Store them separately in the refrigerator. However, it’s best to bake the tater tots and assemble the bowl just before serving to ensure maximum crispiness.
For another great side dish to serve at a party, why not consider making our slow cooker cheesy potatoes.
Enjoy Your Homemade Loaded Tater Tot Bowl!
There you have it – the ultimate recipe for a Loaded Tater Tot Bowl that’s guaranteed to be a hit! With crispy tots, cheesy goodness, and flavorful toppings, this is the perfect comfort food for any occasion. So, gather your ingredients, follow these tips, and get ready to enjoy a bowl of pure deliciousness! Don’t forget to leave a comment below and let me know how yours turned out. And if you loved this recipe, please share it with your friends!