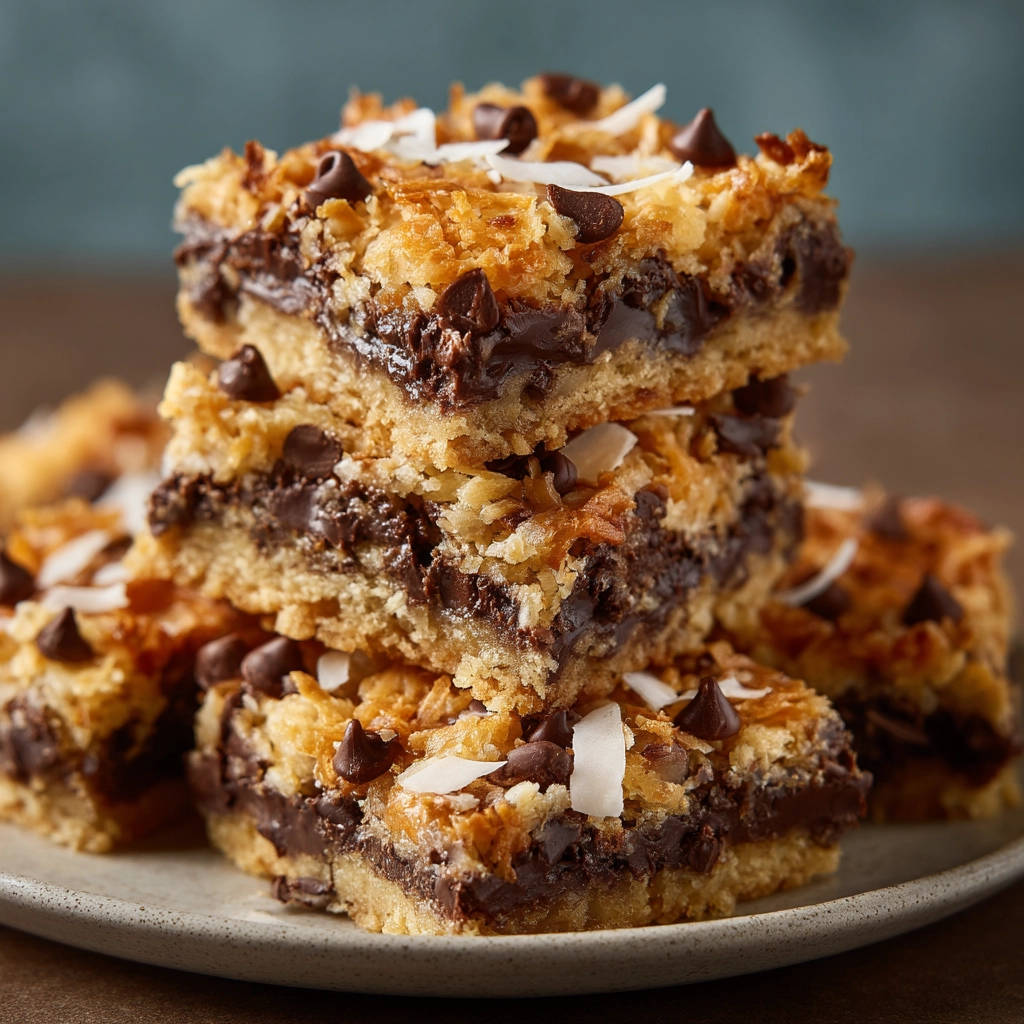
Oh, Magic Cookie Bars. Just the name conjures up images of chewy, gooey, layered perfection. They’re a timeless classic for a reason! That sweet graham cracker crust, piled high with chocolate chips, sweet coconut, crunchy nuts, and bound together by rich, luscious sweetened condensed milk. What’s not to love?
They’re deceptively simple to make, requiring no fancy techniques or equipment. You pretty much just layer everything into a pan and bake. But if you’ve ever tried to cut into a fresh batch right out of the oven, you know the struggle is real! You end up with a sticky, crumbly mess instead of those beautiful, neat squares you see in pictures. It’s enough to make a baker weep!
For years, I faced the same frustration. Delicious bars, but serving them felt like dismantling a very tasty, very stubborn brick. I tried sharper knives, letting them cool longer, even dipping the knife in hot water (which helps, but isn’t the full answer!). But I finally cracked the code, and it’s simpler than you might think. With just two key tricks, you can transform your Magic Cookie Bars from a sticky situation into bars that cut like a dream, leaving you with bakery-worthy slices every single time. Ready to learn the secrets?
Why These Magic Cookie Bars Are a Keeper
Beyond the sheer deliciousness that comes from the combination of chocolate, coconut, nuts, and that signature gooey layer, these Magic Cookie Bars stand out because this recipe focuses on perfecting the often-overlooked step: cutting!
- Effortlessly Easy: Seriously, assembly is a breeze. If you can melt butter and layer ingredients, you can make these.
- Classic Crowd-Pleaser: This flavor combination is a universally loved treat. Perfect for parties, bake sales, holidays, or just a Tuesday afternoon pick-me-up.
- Perfect Texture: You get the satisfying crunch of the graham cracker crust, the melty goodness of chocolate, the chewy texture of coconut, and the delightful bite of nuts, all held together by that sweet, creamy binder.
- Cuts Like a Dream: Thanks to our simple tricks, you’ll finally achieve those clean, sharp edges, making serving simple and showcasing their beautiful layers. No more crumbling frustration!
- Minimal Cleanup: Our first secret to perfect cuts also happens to make pan cleanup practically non-existent. Win-win!
Gathering Your Ingredients for Perfect Magic Cookie Bars
The magic truly happens when these simple pantry staples come together. Each ingredient plays a vital role in creating the iconic flavor and texture of these beloved bars. There’s no need for exotic items here, just everyday goodness.
Let’s take a look at what you’ll need:
- Melted Butter: Half a cup of unsalted butter, melted. Butter is the foundation of our crust, binding the graham cracker crumbs together and adding that essential richness. Using melted butter makes mixing the crust quick and easy.
- Graham Cracker Crumbs: You’ll need 1 and a half cups. These form the classic, slightly sweet, and crumbly base that holds everything together. You can buy pre-made crumbs or make your own by crushing graham crackers in a food processor or in a bag with a rolling pin. A finely ground crumb works best for a solid, pressable crust.
- Sweetened Condensed Milk: One 14-ounce can of this thick, sweet elixir is the key to the gooey, chewy layer that gives these bars their “magic.” As it bakes, it caramelizes slightly and melds all the other ingredients together into pure bliss. Make sure you grab sweetened condensed milk, not evaporated milk!
- Chocolate Chips: One cup of semi-sweet chocolate chips is standard, providing those pockets of melted chocolate goodness. Feel free to experiment with milk chocolate or dark chocolate chips if you have a preference, though semi-sweet offers a nice balance to the overall sweetness.
- Shredded Sweetened Coconut: You’ll need 1 and a third cups. Sweetened coconut adds a wonderful chewy texture and tropical flavor that’s essential to classic Magic Cookie Bars. Make sure it’s sweetened shredded coconut for the right moisture level and sweetness. If you’re not a fan of coconut, you can adjust (see our tips section!).
- Chopped Pecans or Walnuts: One cup of your favorite chopped nuts. Pecans or walnuts are traditional and add a crucial layer of crunch that contrasts beautifully with the soft, gooey layers. Toasting them lightly before adding can enhance their flavor, but it’s not necessary for this recipe. If you have a nut allergy or simply prefer not to use nuts, they can be omitted or substituted (again, check the tips!).
Gathering everything before you start makes the assembly process even faster – remember, the prep time for these bars is only 10 minutes!
Crafting Your Magic Cookie Bars: Step-by-Step for Perfection
Making these bars is incredibly straightforward, but paying attention to a couple of key steps will ensure not only a delicious outcome but also guarantee those perfectly cut squares we’re aiming for.
- Prepping Your Oven: Begin by preheating your oven to 350 degrees Fahrenheit (175 degrees Celsius). Getting your oven to the correct temperature before you put the pan in ensures even baking from the start. This temperature is ideal for allowing the condensed milk to bubble and caramelize without burning the coconut or nuts.
- The First Secret: Pan Preparation: This is arguably the most critical step for achieving bars that don’t stick and lift out beautifully. You absolutely must line your 9×13 inch baking pan. Use either parchment paper or aluminum foil. Make sure it completely covers the bottom and goes up the sides, pressing it smoothly into the corners. Leave a generous overhang on the longer sides – these will be your “handles” later! This barrier creates a nonstick surface that allows you to lift the entire finished slab of bars right out of the pan, making cutting and serving a breeze. Don’t skip this!
- Building a Solid Base: In a medium-sized mixing bowl, combine the melted butter with the graham cracker crumbs. Stir them together until all the crumbs are moistened by the butter; the mixture should resemble wet sand. Now, transfer this mixture to your prepared baking pan. Using the bottom of a glass or a flat measuring cup, press the crumb mixture down firmly and evenly across the bottom of the pan. A well-compacted crust is essential for clean cuts later, providing a stable foundation. Make sure it’s packed tight!
- Adding the Gooey Foundation: Carefully pour the entire can of sweetened condensed milk evenly over the pressed graham cracker crust. Try to get it as uniform as possible, ensuring that gooey goodness coats the entire base. This layer is what binds everything together as it bakes.
- Layering the “Magic”: Now comes the fun part – layering the classic toppings! Sprinkle the chocolate chips evenly over the condensed milk layer. Next, add the shredded sweetened coconut, distributing it in an even layer. Finally, scatter the chopped pecans or walnuts over the coconut. Resist the urge to stir or mix the layers! They are designed to stay distinct and then meld beautifully as the bars bake, creating those signature stripes of flavor and texture.
- Baking to Golden Perfection: Place the pan in your preheated oven. Bake for 20 to 25 minutes. Keep an eye on them; they are done when the edges of the bars are visibly golden brown and the coconut and nuts on top are lightly toasted. The center might still look a little soft, but it will set as it cools. Don’t overbake, or they can become dry.
- Cooling Patience: Remove the baked bars from the oven and place the pan on a wire rack to cool completely. This step is crucial! The bars need to cool down gradually in the pan to begin setting up. Rushing this process will lead to crumbling. Let them reach room temperature undisturbed in the pan.
- The Second Secret: Chill Power: Once the bars have cooled completely to room temperature in the pan, cover the pan tightly with plastic wrap or foil. Now, here is the second secret to perfect slices: refrigeration! Place the covered pan in the refrigerator for at least 2 hours. For the absolute best results, chill them until they are quite firm, which might take 3-4 hours or even overnight. This chilling time allows the gooey condensed milk layer to firm up significantly, making slicing incredibly clean and easy.
- Lifting and Slicing: Once fully chilled and firm, use the overhang of the parchment paper or foil handles you created in step 2 to lift the entire baked and chilled slab of bars out of the pan. Place the slab onto a cutting board. Use a sharp knife to cut the bars into squares of your desired size (the recipe yields 16 bars, which is typically 4×4 cuts). For the cleanest possible edges, wipe the knife blade clean with a warm, damp cloth between each cut, especially after cutting through the gooey center. This removes sticky residue and prevents dragging it through the next cut. Store any leftover bars in an airtight container. They keep well at room temperature for a few days or in the refrigerator for longer.
Following these steps, especially the pan lining and the chilling, will guarantee beautiful, perfectly cut Magic Cookie Bars every single time you make them!
Tips for Perfect Magic Cookie Bars Every Time
While the recipe is straightforward, a few extra tips can help you achieve the ultimate Magic Cookie Bar experience.
- Butter Quality Matters: Using good quality butter will enhance the flavor of your crust. Melt it gently, either on the stovetop over low heat or in the microwave in 30-second intervals.
- Crumb Consistency: If making your own graham cracker crumbs, ensure they are finely ground. Large pieces can make the crust harder to press and more prone to crumbling.
- Press That Crust Firmly: Don’t be shy when pressing the crust into the pan. The firmer it is, the better it will hold together when sliced. Use a flat-bottomed cup or even your hands covered in plastic wrap.
- Even Layers: While you don’t stir the layers, try to distribute the toppings as evenly as possible. This ensures every bar has a good mix of all the delicious components.
- Toasting Nuts: For an extra layer of flavor, lightly toast the chopped nuts in a dry skillet over medium heat for a few minutes until fragrant before adding them to the layers. Let them cool completely before adding.
- Don’t Rush Cooling & Chilling: We’ve said it before, but it bears repeating. Patience during cooling and chilling is the absolute key to easy, clean slicing.
- Knife Technique: When cutting, use a sharp, non-serrated knife. Press straight down rather than sawing back and forth. Wiping the blade clean between cuts, as mentioned in the instructions, is a game-changer for neatness.
- Storage: Store cooled bars in a single layer in an airtight container between sheets of parchment or wax paper to prevent sticking. They can be stored at room temperature for 3-4 days or in the refrigerator for up to a week. For longer storage, they freeze beautifully for up to 3 months. Wrap individual bars or the whole slab tightly in plastic wrap, then foil, before freezing.
Customizing Your Magic Cookie Bars (Variations!)
The classic combination is fantastic, but Magic Cookie Bars are incredibly versatile! Here are a few ideas to mix things up:
- Nut-Free: Simply omit the pecans or walnuts entirely. You can increase the amount of chocolate chips or coconut slightly to compensate, or leave them out for a simpler bar.
- Different Chips: Swap the semi-sweet chips for milk chocolate, dark chocolate, white chocolate chips, or even peanut butter chips. A mix of different chip types can also be fun!
- Add Caramel: Drizzle some store-bought or homemade caramel sauce over the condensed milk layer before adding the other toppings. This adds another level of gooey deliciousness.
- Butterscotch Bliss: Replace the chocolate chips with butterscotch chips for a different sweet profile.
- Pretzel Crunch: Add a layer of crushed pretzels along with or instead of the nuts for a salty crunch.
- Dried Fruit: A sprinkle of dried cranberries or cherries can add a chewy, tart element.
- Tropical Twist: Use macadamia nuts instead of pecans/walnuts and maybe add some chopped dried pineapple along with the coconut for an even more tropical feel.
- Other Crusts: While graham cracker is classic, you could potentially use crushed vanilla wafers, shortbread cookies, or even chocolate cookies for a different base.
Feel free to get creative with your mix-ins, keeping the core structure of crust, condensed milk, and roughly 3-4 cups of mix-ins (chips, coconut, nuts, etc.) the same.
Serving Suggestions for Magic Cookie Bars
These rich, sweet bars are often enjoyed on their own as a simple dessert or snack. Their portability makes them perfect for potlucks, picnics, or lunchboxes.
However, you can elevate them slightly for a more special occasion. Serve a square warm with a scoop of vanilla ice cream – the melting ice cream against the warm, gooey bar is divine! A light dusting of powdered sugar just before serving adds a touch of elegance. They also pair wonderfully with a glass of cold milk or a hot cup of coffee or tea.
If you’re hosting a dessert spread, these bars fit right in alongside other favorites like a classic baked cheesecake, fudgy brownies, or easy no-bake chocolate cream loaf. They offer a different texture and flavor profile compared to cakes or pies.
Your Magic Cookie Bar Questions Answered (FAQ)
Let’s tackle some common questions that come up when making these delightful bars.
Can I make Magic Cookie Bars in a different size pan?
The recipe is written for a standard 9×13 inch baking pan. Using a smaller pan will result in thicker bars which will require a longer baking time and possibly a lower temperature to cook through without burning the top. A larger pan will make thinner bars that bake faster. For best results with the listed bake time and ingredient ratios, stick to a 9×13 inch pan.
Do I have to use nuts and coconut?
Nope! You can omit the nuts entirely if you have allergies or just don’t like them. You can also omit the coconut. Many variations exist. Just keep the total volume of “toppings” (chips, nuts, coconut, etc.) roughly the same as listed in the ingredients to maintain the correct ratio with the condensed milk and crust. If omitting both, you might use about 2 and 1/3 cups of chocolate chips and/or other desired mix-ins like pretzels or dried fruit.
My bars crumbled when I tried to cut them. What went wrong?
This is usually due to two main culprits: not pressing the crust firmly enough (step 3) or not letting the bars cool completely AND chilling them sufficiently (steps 7 & 8). The chilling step is absolutely key for the gooey layer to firm up enough to allow for clean slices. Make sure they are truly cold and firm before attempting to cut.
Why do you wipe the knife between cuts?
The sweetened condensed milk layer becomes very sticky when cooled. As you cut, this sticky residue builds up on the knife blade. If you don’t wipe it off, you drag that sticky residue through the next cut, creating messy, uneven edges. Wiping with a warm, damp cloth (or even dipping in hot water and drying) keeps the blade clean and allows it to glide through the layers for crisp edges.
How long do Magic Cookie Bars last?
Stored properly in an airtight container, they will last about 3-4 days at room temperature or up to a week in the refrigerator. For longer storage, they freeze very well.
Can I make these gluten-free?
Yes! You would need to use gluten-free graham cracker crumbs for the base. The other ingredients (butter, condensed milk, chocolate chips, coconut, nuts) are typically gluten-free, but always check the packaging to be sure.
Enjoy Your Homemade Magic Cookie Bars!
There you have it – the not-so-secret secrets to making Magic Cookie Bars that are not only incredibly delicious and gooey but also a joy to slice and serve. No more wrestling with a sticky, crumbly mess! With a little patience during cooling and chilling, and the simple trick of lining your pan with overhangs, you’ll be presenting perfectly cut squares that will impress everyone.
These bars are perfect for sharing, but we won’t tell anyone if you keep a batch all to yourself! Give this recipe a try and see the magic for yourself. If you make them, let us know how they turn out in the comments below! Happy baking!
Magic Cookie Bars

Details
- Prep time: 10 minutes
- Cook time: 25 minutes
- Servings: 16 bars
Ingredients
- 1/2 cup butter, melted
- 1 and 1/2 cups graham cracker crumbs
- 1 (14 ounce) can sweetened condensed milk
- 1 cup chocolate chips
- 1 and 1/3 cups shredded sweetened coconut
- 1 cup chopped pecans or walnuts
Directions
- Preheat oven to 350 degrees F (175 degrees C).
- The secret to bars that cut beautifully is simple pan preparation. Line a 9×13 inch baking pan completely with parchment paper or aluminum foil, pressing it smoothly into the corners. Leave enough overhang on the sides to use as handles later. This creates a nonstick surface that allows the entire baked sheet of bars to be easily lifted from the pan.
- In a medium bowl, combine the melted butter and graham cracker crumbs. Press this mixture evenly and firmly into the bottom of the prepared pan. A solid crust is key to clean cuts, so make sure it’s well-compacted.
- Pour the sweetened condensed milk evenly over the crust.
- Layer the chocolate chips, shredded coconut, and chopped nuts over the condensed milk in that order. Do not stir; the layers will meld together as they bake.
- Bake in the preheated oven for 20 to 25 minutes, or until the edges are golden brown and the top is lightly toasted.
- Remove from oven and let cool completely in the pan on a wire rack.
- Now for the second trick to perfect slices: chilling. Once cooled, cover the pan tightly and refrigerate for at least 2 hours, or preferably until firm. This sets the gooey layers and makes slicing clean and easy.
- Use the overhang of the parchment or foil to lift the entire slab of bars out of the pan onto a cutting board. Cut into squares using a sharp knife, wiping the knife clean with a warm, damp cloth between cuts for the cleanest edges. Store any leftover bars in an airtight container at room temperature or in the refrigerator.