Picture this: you’ve spent time creating a beautiful, elegant dessert, carefully layering flavors and chilling it to perfection. You reach for the mold, heart fluttering with anticipation, ready to reveal your masterpiece… only for it to stubbornly cling to the sides, collapsing into a heartbreaking mess. We’ve all been there, right? That frustrating moment when a molded dessert refuses to unmold cleanly.
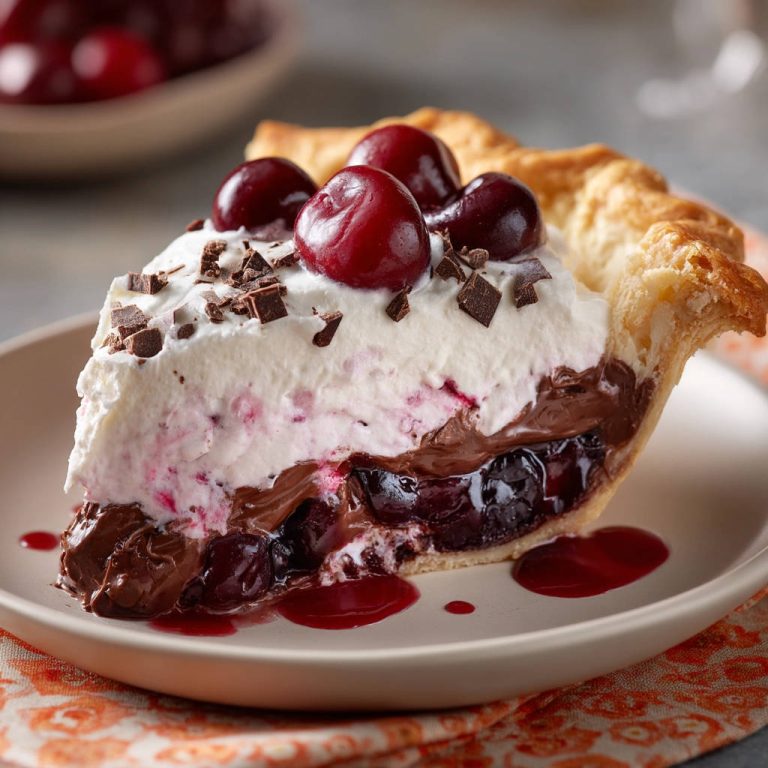
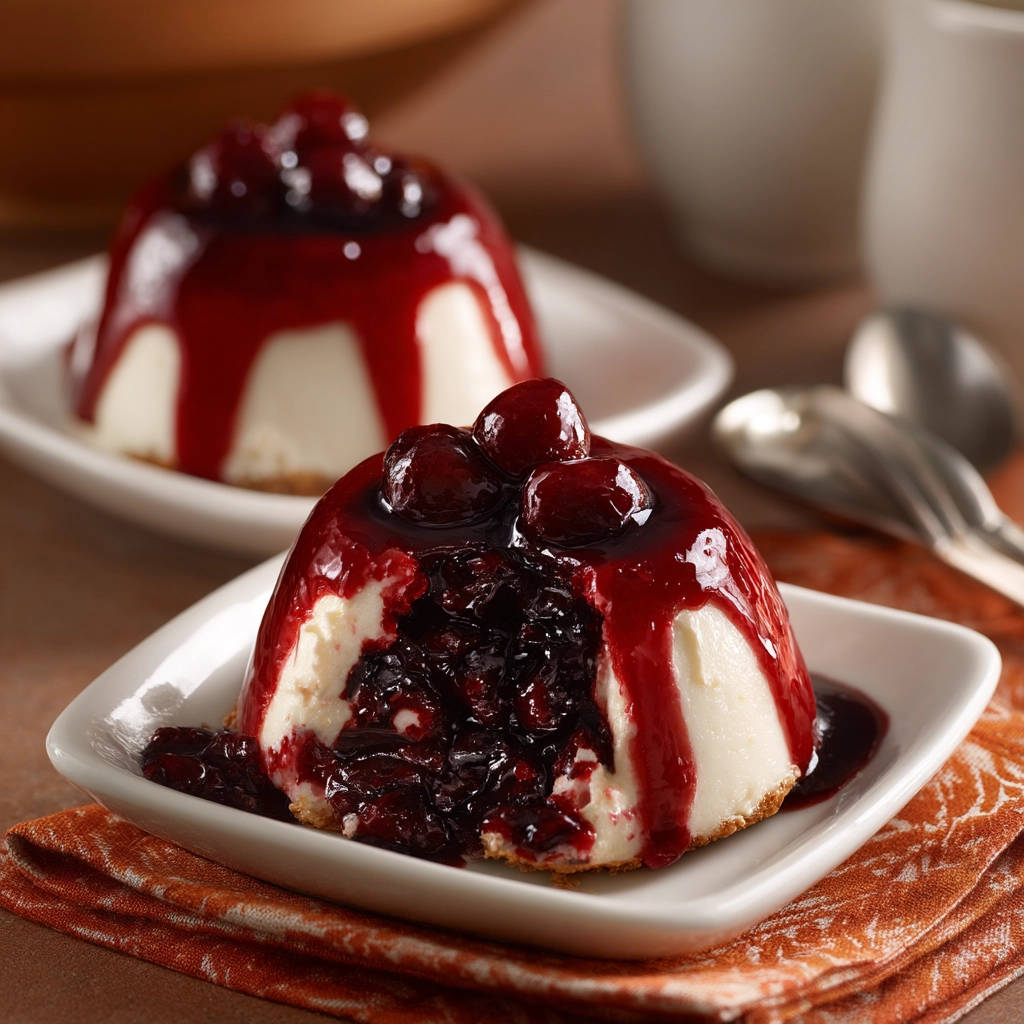
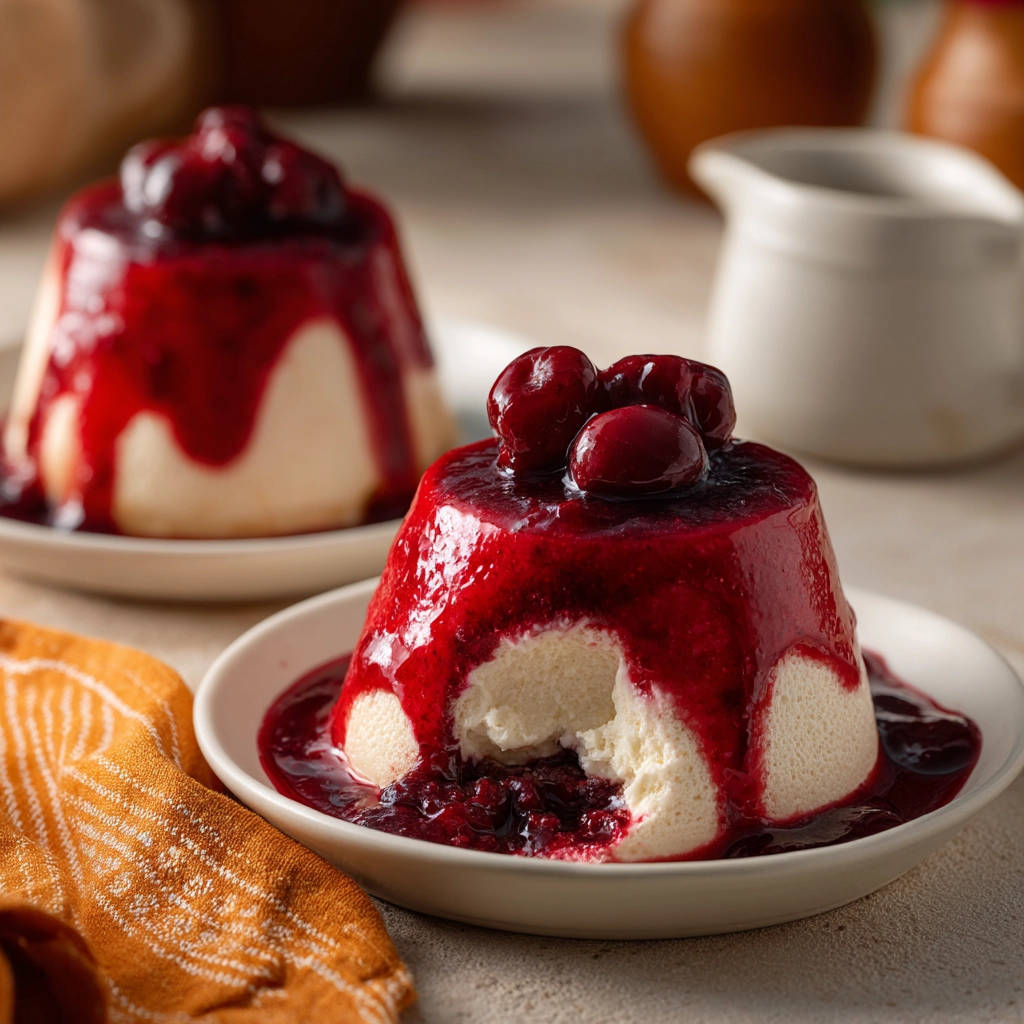
Well, I’m here to tell you that those days are officially over! I’ve cracked the code to perfectly releasing delicate molded treats, and I’m sharing the secret with you today in this incredible recipe for Mini Cherry Cream Domes. These stunning individual desserts feature a buttery graham cracker base, a smooth, creamy filling studded with sweet cherry compote, and a vibrant berry sauce topping. And thanks to one simple trick, they pop out of their molds flawlessly, every single time.
Get ready to impress yourself and your guests with these gorgeous and delicious Mini Cherry Cream Domes!
Why You’ll Adore These Cherry Cream Domes
Beyond the sheer satisfaction of a clean unmolding, these cherry cream domes offer a delightful combination of textures and flavors.
- Effortless Elegance: They look incredibly sophisticated but are surprisingly simple to make.
- Creamy & Fruity Bliss: The rich, tangy cream cheese filling pairs beautifully with the sweet-tart cherry and berry layers.
- The Perfect Portion: Served in individual molds, they are ideal for entertaining or portion control.
- That Never-Fail Unmolding Trick: Seriously, this technique is a game-changer for any molded dessert.
- Make Ahead Magic: These domes need chilling time, making them the perfect dessert to prepare in advance for parties or busy weeknights.
Gathering Your Ingredients for Your Cherry Domes
Creating these stunning mini cherry cream domes requires a few key components, each playing a vital role in the final structure and flavor profile. We start with a simple, sturdy base, build layers of creamy indulgence and bright fruit, and finish with a vibrant sauce.
For the delightful base layer, you’ll need:
- Graham Cracker Crumbs: The classic choice for a no-bake crust. Their slightly sweet, toasty flavor is the perfect counterpoint to the creamy filling.
- Melted Butter: This is what binds the graham cracker crumbs together, creating a firm base that holds its shape once chilled.
The star of the show, the creamy filling, relies on:
- Cream Cheese, Softened: Make sure your cream cheese is truly softened to room temperature. This is crucial for achieving a lump-free, perfectly smooth filling.
- Granulated Sugar: Provides just the right amount of sweetness to balance the tang of the cream cheese.
- Vanilla Extract: A touch of vanilla enhances all the other flavors and adds a warm, comforting note to the cream layer.
- Heavy Cream, Whipped to Medium Peaks (or Unflavored Gelatin): You have a choice here! Whipped cream provides a lighter, airier mousse-like texture, while unflavored gelatin dissolved in hot water gives the cream a firmer set, which some prefer for molded desserts. The gelatin option involves dissolving one packet in 1/4 cup hot water and letting it cool slightly before whisking it into the cream cheese mixture.
The luscious fruit layers require:
- Pitted Fresh or Frozen Cherries, Roughly Chopped: Cherries are the star here, providing bursts of juicy flavor. Using fresh or frozen works equally well. If using frozen, thaw and drain them first.
- Sugar (for the filling): Sweetens the cherries and helps create a syrupy compote.
- Cornstarch: This is our thickening agent for the cherry filling, ensuring it holds its shape within the creamy dome and doesn’t bleed excessively.
- Water or Cherry Juice: Provides the liquid needed to cook the cornstarch and cherries into a thick filling. Cherry juice would amplify the cherry flavor!
- Fresh or Frozen Mixed Berries (Cherries, Raspberries, etc.): For the vibrant sauce, a mix of berries adds complexity and color. Raspberries add a lovely tartness.
- Sugar (for the sauce): Sweetens the berry sauce.
- Water (for the sauce): Helps create the desired sauce consistency.
- Extra Fresh Cherries for Topping: For that final, beautiful garnish.
Crafting Your Perfect Mini Domes: The Steps
Alright, let’s walk through creating these show-stopping mini cherry cream domes. The process involves a few different components, but they all come together beautifully. Pay special attention to the mold preparation – that’s where the magic happens!
-
Build Your Crust Base: Start by combining the graham cracker crumbs and melted butter in a small bowl. Stir until the crumbs are evenly coated and resemble wet sand. This mixture is the foundation of your domes. Take your four individual dome-shaped molds (small bowls, ramekins, or specific dessert molds work perfectly) and press a portion of the crumb mixture firmly into the very bottom of each one. You want a compact, even layer. Once pressed, pop these into the refrigerator for about 15 minutes. This quick chill helps the butter solidify, setting the crust before we add the wet fillings.
-
Prepare Your Molds for Foolproof Unmolding (The Game Changer!): This is the secret step that guarantees success. Tear off four pieces of plastic wrap. Each piece should be generously sized – large enough to easily line the entire inside of your mold and have significant excess hanging over the rim. Gently press one piece of plastic wrap into each chilled mold, smoothing it against the contours to eliminate as many wrinkles as possible. You want it to conform tightly to the dome shape. Leave all that excess plastic wrap hanging over the sides; this overhang is what you’ll use to lift the finished dessert out. This plastic wrap barrier is the key to preventing any sticking whatsoever.
-
Simmer the Cherry Filling: In a small saucepan, combine your roughly chopped cherries (fresh or thawed frozen), 1/4 cup of sugar, the cornstarch, and the 1/4 cup of water or cherry juice. Place the saucepan over medium heat. You need to stir this mixture constantly to prevent the cornstarch from clumping and sticking to the bottom. As it heats, it will thicken and start to bubble. Continue cooking and stirring for about 5 to 7 minutes, or until it has a glossy, thickened consistency. Remove from the heat and transfer the filling to a separate bowl or dish. It’s crucial to let this cherry filling cool completely before using it; adding warm filling to the cream mixture will cause it to melt and become messy.
-
Prepare the Creamy Layer: In a large mixing bowl, take your softened cream cheese, the 1/2 cup of granulated sugar, and the vanilla extract. Beat this mixture with an electric mixer (or by hand with a whisk) until it’s wonderfully smooth and creamy with no lumps. Now it’s time to incorporate your chosen stabilizer. If using whipped cream, gently fold in the cream you’ve already whipped to medium peaks using a spatula. Be careful not to deflate the whipped cream; you want to keep that airy texture. If you opted for gelatin, whisk the cooled dissolved gelatin into the cream cheese mixture until it is fully combined and the mixture is uniform.
-
Assemble Your Domes: Now for the layering! Take your prepared molds with the plastic wrap lining and chilled crusts. Spoon a layer of the creamy mixture into each mold, filling it approximately one-third of the way full. Next, carefully place a spoonful (or two, depending on the size of your mold) of the cooled cherry filling right in the center of the cream layer. Try to avoid letting the cherry filling touch the plastic wrap sides too much, as this helps maintain a cleaner look in the final dome. Spoon more of the creamy mixture over the cherry filling, filling the mold completely and smoothing the top with the back of a spoon or an offset spatula.
-
Time to Chill: Once the domes are assembled, take the excess plastic wrap that’s hanging over the sides and fold it neatly over the top of each dome, covering the surface completely. This helps prevent a skin from forming and keeps the dessert fresh. Place the filled molds back into the refrigerator. They need to chill for at least 4 hours to become completely firm and set. For the best results and easiest unmolding, chilling them overnight is highly recommended.
-
Whip Up the Berry Sauce: While the domes are chilling (or closer to serving time), make your vibrant berry sauce. In a small saucepan, combine the mixed berries (fresh or frozen), the remaining 1/2 cup of sugar, and 1/4 cup of water. Bring this mixture to a boil over medium-high heat, stirring occasionally. Once boiling, reduce the heat to low or medium-low and let it simmer gently for 5 to 10 minutes. As it simmers, the berries will soften and break down, and the sauce will thicken slightly. For a smoother sauce, you can press it through a fine-mesh sieve after cooking to remove seeds and solids; otherwise, leave it chunky for a more rustic feel. Let the sauce cool completely before serving.
-
Unmold Your Perfect Domes: The moment of truth! When you’re ready to serve, take a chilled dome from the refrigerator. Simply grasp the plastic wrap overhang with both hands and gently lift the dessert straight up and out of the mold. Place the beautifully formed dome onto a serving plate. Carefully and slowly peel away the plastic wrap from the sides and top of the dome. Marvel at your perfectly unmolded dessert!
-
Serve and Enjoy: Generously spoon the cooled berry sauce over the top of each mini cherry cream dome. Garnish with extra fresh cherries if you like for an extra pop of color and freshness. Serve immediately and enjoy the combination of creamy, fruity, and crunchy textures!
Tips and Tricks for Success
Achieving perfect mini cherry cream domes is easy with a few key tips in mind. Paying attention to ingredient temperatures and chilling times is paramount for that beautiful, smooth texture and clean unmolding.
First and foremost, ensure your cream cheese is properly softened. If it’s cold or even slightly firm, you’ll end up with lumps in your creamy layer, no matter how long you beat it. Take it out of the fridge well in advance, or use a quick softening method like placing the unwrapped blocks on a plate in a microwave on low power for just 10-15 seconds at a time.
The quality of your molds matters too. While small bowls or ramekins work, using actual dome-shaped silicone molds can sometimes make the plastic wrap lining even easier, though the plastic wrap trick works wonders regardless of mold material.
Don’t rush the chilling time! That minimum of 4 hours, or preferably overnight, is essential for the cream cheese mixture to set fully and for the crust to firm up. A properly chilled dome is much easier to unmold and holds its shape beautifully. Think of it like waiting for a classic baked cheesecake or mini cheesecakes to set before slicing – patience is key!
When folding in the whipped cream, use a gentle hand. Over-mixing after adding the whipped cream will deflate the air you worked to incorporate, resulting in a denser filling instead of a light, airy one. If you’re concerned about the dessert holding its shape, especially if transporting, the gelatin option provides a much firmer set.
Feeling adventurous with the fruit? This recipe is quite adaptable! While cherry is classic, you could easily swap the chopped cherries in the filling for other fruits like blueberries, raspberries, or even finely diced mango for a tropical twist. Similarly, the berry sauce can be customized with your favorite mix of berries. You could even try a different topping entirely, like a chocolate ganache (if pairing with a different filling) or a simple drizzle of caramel sauce.
What to Serve With Your Mini Cherry Cream Domes
These Mini Cherry Cream Domes are a dessert centerpiece all on their own, but if you’re looking to complete the experience, consider pairing them with:
- A dollop of extra whipped cream (because you can never have too much!).
- A sprinkle of toasted almonds or graham cracker crumbs for added crunch.
- A sprig of fresh mint for a pop of color and freshness.
- A light, complementary beverage like iced tea or sparkling cider.
Your Mini Cherry Cream Domes Questions Answered (FAQ)
Got questions? We’ve got answers to help you master these delightful molded desserts!
Can I make one large cherry cream dome instead of minis?
Yes, absolutely! You can scale this recipe up to make one larger dome. You’ll need a larger dome-shaped bowl or mold (like a 6-cup capacity). The chilling time might need to be extended slightly, potentially 6-8 hours or overnight, to ensure the center is fully set. The plastic wrap trick is even more essential for a larger dome!
How long do these mini domes last in the refrigerator?
Stored properly covered (either in their molds with the plastic wrap or gently transferred to an airtight container once fully set), these mini cherry cream domes will last in the refrigerator for 3-4 days. The crust might soften slightly over time, but the flavor will still be great.
Can I freeze Mini Cherry Cream Domes?
While you can freeze cream cheese-based desserts, the texture can sometimes change upon thawing, potentially becoming a bit grainy. The fruit layers might also become slightly watery. If you choose to freeze, wrap them individually very well after they are fully set and unmolded. Thaw slowly in the refrigerator. I recommend enjoying them fresh for the best texture.
Can I use a different type of cookie for the crust?
Definitely! Feel free to experiment. Vanilla wafers, shortbread cookies, or even chocolate cookies would make delicious alternatives to graham crackers for the crust, offering a slightly different flavor profile. Just ensure you have the same amount of fine crumbs and adjust the melted butter if needed to get that “wet sand” consistency.
My cherry filling didn’t thicken. What went wrong?
The most common reasons for a filling not thickening are not cooking it long enough, not stirring constantly (which can prevent the cornstarch from activating properly), or not using enough cornstarch. Make sure you bring the mixture to a full simmer, see those gentle bubbles, and stir continuously for the recommended 5-7 minutes until it visibly thickens and coats the back of a spoon.
Enjoy Your Homemade Mini Cream Domes!
There you have it! Elegant, delicious, and perfectly unmolded Mini Cherry Cream Domes that are sure to impress. The combination of creamy, fruity, and crunchy layers is simply divine, and the foolproof plastic wrap trick means you can make these with confidence every single time. They’re the perfect dessert for a special occasion or just because you deserve a little beautiful treat.
Give this recipe a try, and let me know how your domes turn out! What’s your favorite part – the creamy filling, the sweet cherry center, or that vibrant berry sauce? Leave a comment below and share your experience. Happy baking (or rather, no-baking and chilling)!
Mini Cherry Cream Domes

Ingredients
- 1 1/2 cups graham cracker crumbs
- 1/4 cup melted butter
- 16 ounces cream cheese, softened
- 1/2 cup granulated sugar
- 1 teaspoon vanilla extract
- 1 cup heavy cream, whipped to medium peaks (or 1 packet unflavored gelatin dissolved in 1/4 cup hot water, cooled slightly, for firmer set)
- 1 cup pitted fresh or frozen cherries, roughly chopped
- 1/4 cup sugar
- 1 tablespoon cornstarch
- 1/4 cup water or cherry juice
- 1 cup fresh or frozen mixed berries (cherries, raspberries, etc.)
- 1/2 cup sugar
- 1/4 cup water
- Extra fresh cherries for topping
Directions
- Make the crust: Combine graham cracker crumbs and melted butter. Press firmly into the bottom of 4 individual dome-shaped molds (like small bowls or specific dessert molds). Chill for 15 minutes.
- Prepare your molds for foolproof unmolding: Tear off four pieces of plastic wrap large enough to generously line each mold, with plenty of overhang. Press the plastic wrap smoothly into each mold, ensuring it conforms tightly to the shape with no major wrinkles. Leave the excess plastic wrap hanging over the sides. This is the key to preventing sticking.
- Make the cherry filling: In a small saucepan, combine chopped cherries, 1/4 cup sugar, cornstarch, and 1/4 cup water or cherry juice. Cook over medium heat, stirring constantly, until thickened and bubbly, about 5-7 minutes. Let cool completely.
- Make the cream layer: In a large bowl, beat softened cream cheese, 1/2 cup sugar, and vanilla extract until smooth and creamy. Gently fold in the whipped cream (or whisk in the cooled dissolved gelatin until fully combined).
- Assemble the domes: Spoon a layer of the cream mixture into each prepared mold, filling it about one-third full. Place a spoonful of the cooled cherry filling in the center of each mold, being careful not to let it touch the plastic wrap sides too much. Spoon more cream mixture over the filling, filling the mold completely and smoothing the top.
- Chill: Fold the excess plastic wrap over the top of each dome. Refrigerate for at least 4 hours, or preferably overnight, until completely firm.
- Make the berry sauce: In a small saucepan, combine mixed berries, 1/2 cup sugar, and 1/4 cup water. Bring to a boil, then reduce heat and simmer for 5-10 minutes, stirring occasionally, until berries break down and sauce thickens slightly. For a smoother sauce, you can strain it, discarding the solids. Let cool.
- Unmold the perfect domes: To serve, simply grasp the plastic wrap overhang and lift the dessert out of the mold. Place on a serving plate. Carefully peel and discard the plastic wrap.
- Top each dome generously with the cooled berry sauce and extra fresh cherries before serving.