There’s nothing quite as disappointing as a lime cake that promises zest but delivers dryness, or worse, a bland flavor. After countless batches and a relentless pursuit of perfection, I’ve finally cracked the code to truly exceptional Mini Glazed Lime Loaves.
These loaves are not just perfectly moist and tender; they burst with such vibrant, fresh lime flavor that they’ll instantly become your go-to recipe. Trust me, this method guarantees success, ensuring every bite is pure citrus bliss.
The Zesty Secret: Why These Mini Glazed Lime Loaves Stand Out
Many lime cakes fall short, often ending up dry or lacking that intense, bright citrus punch. This recipe for Mini Glazed Lime Loaves solves those common frustrations by focusing on moisture retention and flavor infusion.
My secret lies in how we treat the lime zest, ensuring maximum flavor extraction, combined with a precise balance of wet and dry ingredients. The result is an incredibly tender crumb that remains moist for days.
Every element, from the careful mixing to the perfect glaze, is designed to deliver consistently delightful Mini Glazed Lime Loaves that are both easy to make and irresistibly delicious.
Crafting Flavor: Essential Ingredients for Your Mini Lime Loaves
Quality ingredients are the foundation of any great bake, and these Mini Glazed Lime Loaves are no exception. Each component plays a vital role in achieving their signature moist texture and bright, zesty flavor.
The Loaf’s Foundation: Dry Ingredients
The dry ingredients provide the structure and lift for our tender loaves.
-
All-Purpose Flour: This forms the bulk of the loaf, giving it body and structure. Proper measurement is crucial for preventing a dense or dry crumb.
-
Baking Powder: Our primary leavening agent, baking powder reacts with liquids to create air bubbles, ensuring a light and airy texture. It’s key for a fluffy loaf.
-
Salt: While a small amount, salt balances the sweetness and enhances the overall flavor profile of the lime loaves, making every ingredient shine brighter.
Liquid Gold: Wet Ingredients & The Lime Punch
These ingredients are what bring our loaves to life, contributing moisture, richness, and that coveted vibrant lime flavor.
-
Granulated Sugar: Beyond sweetness, sugar helps tenderize the crumb and aids in moisture retention. It’s also essential for our flavor-infusing zest rub.
-
Lime Zest: The true flavor powerhouse! The essential oils in the zest are where most of the lime’s aroma and intense flavor reside. Fresh zest is non-negotiable for vibrant results.
-
Neutral Oil: Using a neutral oil like vegetable or canola ensures a consistently moist and tender crumb that stays soft over time, unlike butter which can sometimes lead to a drier texture in loaves.
-
Large Eggs: Eggs provide structure, richness, and act as an emulsifier, binding all the ingredients together smoothly. They contribute to the moistness and golden hue of our mini loaves.
-
Milk (any kind): Adds crucial moisture and helps create a tender, soft texture. Any milk will work well here, from dairy to plant-based alternatives.
-
Fresh Lime Juice: Provides tartness and moisture to the batter, complementing the zest for a balanced and bright citrus profile. Always opt for fresh for the best flavor.
The Dazzling Finale: Glaze & Garnish Essentials
The glaze and garnish elevate these mini loaves from delicious to truly showstopping.
-
Powdered Sugar: The base for our smooth, quick-setting glaze. Its fine texture ensures a silky finish without graininess.
-
Fresh Lime Juice (for glaze): This adds a potent lime kick to the glaze, ensuring every bite of your Mini Glazed Lime Loaves is bursting with flavor. It also provides the perfect tart contrast to the sweetness.
-
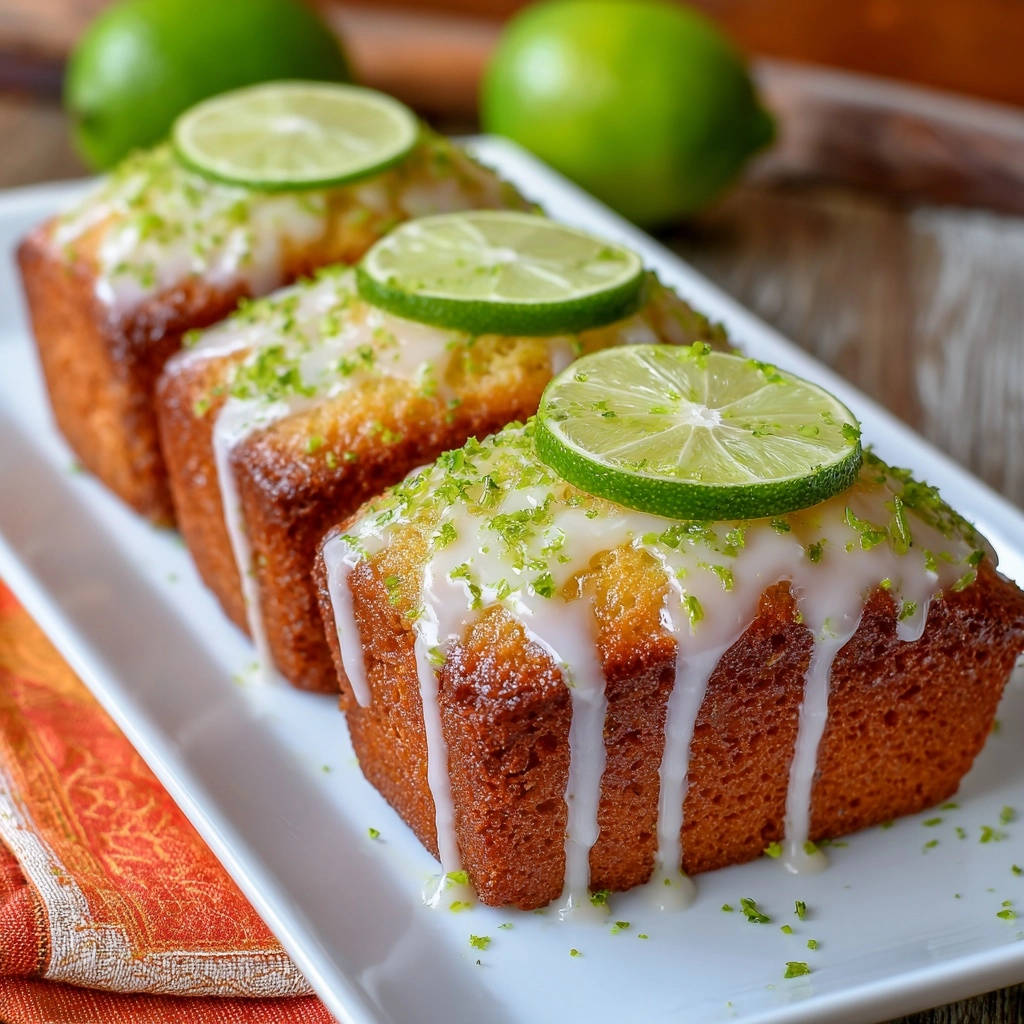
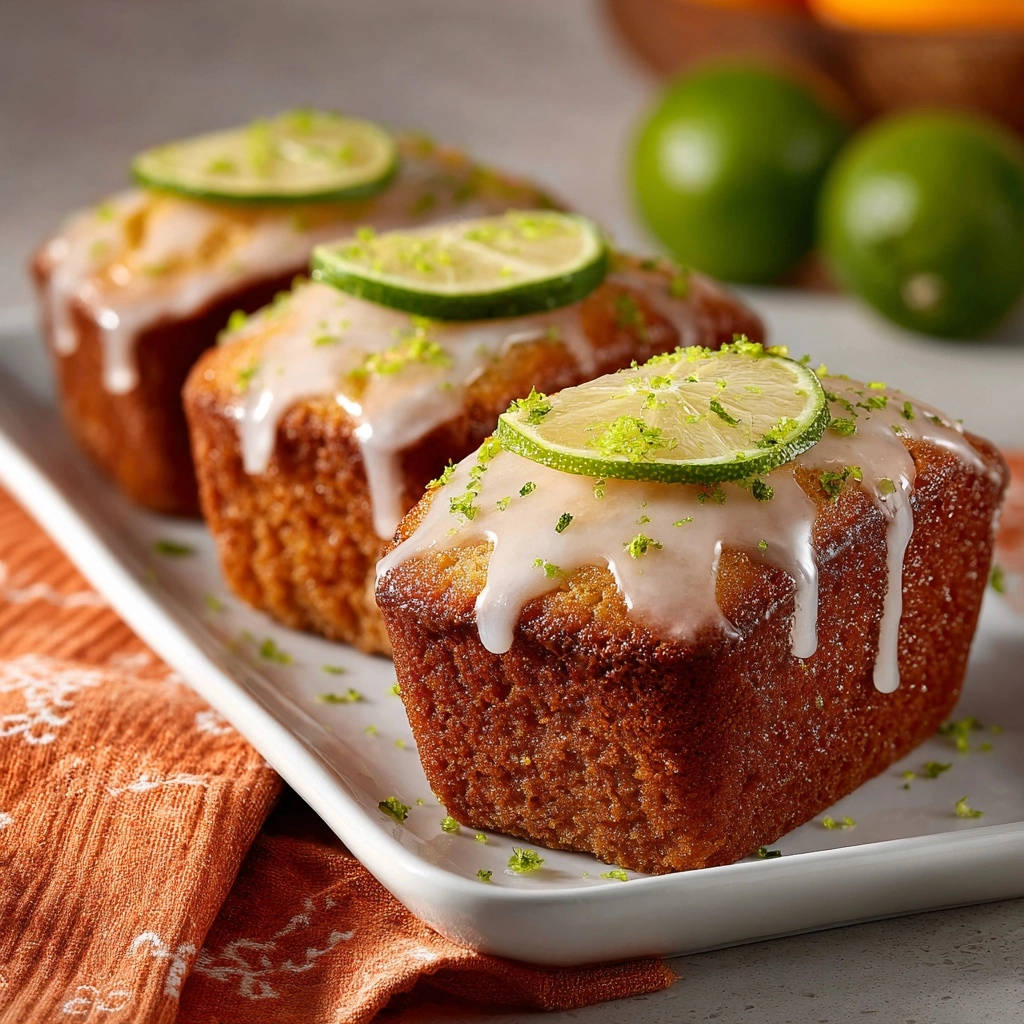
Lime Zest & Thin Lime Slices (for garnish): These are not just for looks! The fresh zest adds another layer of aroma, and thin lime slices make for an elegant and inviting presentation.
Essential Baking Companions: Tools for Perfect Mini Loaves
Having the right tools on hand makes the baking process smoother and ensures the best results for your Mini Glazed Lime Loaves.
-
Mini Loaf Pans: Essential for achieving the perfectly portioned individual loaves this recipe is known for. A 6-cavity pan or individual mini pans will work.
-
Mixing Bowls (Large & Medium): You’ll need separate bowls for your dry and wet ingredients to ensure proper mixing and ingredient distribution.
-
Whisk: Ideal for combining dry ingredients evenly and for making a smooth, lump-free glaze. An electric mixer is helpful for the wet ingredients but not strictly necessary.
-
Citrus Zester/Grater & Juicer: Crucial for extracting fresh lime zest and juice, which are central to the vibrant flavor of these loaves.
-
Wire Rack: Allows air to circulate around the loaves as they cool, preventing sogginess and ensuring an even set.
Your Step-by-Step Guide to Baking Zesty Mini Loaves
Follow these detailed steps carefully to achieve perfectly moist and flavorful Mini Glazed Lime Loaves every time.
-
Prepping Your Pans & Oven: Begin by preheating your oven to 350°F (175°C). Lightly grease and flour your 6 mini loaf pans, or use paper inserts for easier removal. Proper preparation prevents sticking and ensures your loaves come out cleanly.
-
Combining the Dry Ingredients: In a medium bowl, whisk together the all-purpose flour, baking powder, and salt until thoroughly combined. This step ensures the leavening agent and salt are evenly distributed throughout the batter, promoting an even rise.
-
The Flavor Infusion Secret: Zest & Sugar Magic: In a large mixing bowl, combine the granulated sugar and lime zest. Use your fingertips to vigorously rub the zest into the sugar for about 1 minute until it becomes incredibly fragrant. This simple technique releases the lime’s essential oils directly into the sugar, intensifying the flavor throughout your Mini Glazed Lime Loaves.
-
Building the Wet Batter: Pour the neutral oil into the fragrant sugar mixture and whisk well until fully combined and slightly emulsified. Then, beat in the eggs one at a time, ensuring each is fully incorporated before adding the next. This creates a smooth and cohesive base for the wet ingredients.
-
Integrating Liquids into Dry: Gently stir in the milk and 1/4 cup fresh lime juice into the wet mixture until just combined. Gradually add the whisked dry ingredients to the wet mixture, mixing on low speed with an electric mixer or by hand until just combined.
Do not overmix! Overmixing develops gluten, leading to a tough and dry loaf. A few small lumps are perfectly fine and indicate you’ve achieved the ideal tenderness.
-
Filling the Loaf Pans: Divide the batter evenly among your prepared mini loaf pans. Aim for roughly equal amounts in each to ensure consistent baking and uniform loaf sizes.
-
Baking to Golden Perfection: Bake for 20-25 minutes, or until a wooden skewer inserted into the center of a loaf comes out with only moist crumbs attached, or completely clean. Crucially, avoid overbaking! Mini loaves cook quickly, and even a few extra minutes can lead to a dry outcome.
-
Cooling Before Glazing: Let the baked loaves cool in their pans for 10 minutes. This allows them to firm up slightly, making them less likely to break when transferred. Then, carefully transfer them to a wire rack to cool completely before glazing. Glazing warm loaves will cause the glaze to melt and soak in.
-
Crafting the Irresistible Glaze: While the loaves cool, prepare your glaze. In a small bowl, whisk together the powdered sugar and 2 tablespoons of fresh lime juice until perfectly smooth. Add more lime juice, a teaspoon at a time, if a thinner, more pourable consistency is desired.
-
Glazing & Garnishing for Showstopping Appeal: Once your Mini Glazed Lime Loaves are completely cool, generously spoon or drizzle the prepared glaze over the top of each. For an extra touch of elegance and fresh aroma, immediately garnish with additional lime zest and a thin lime slice on top of each loaf. Serve and enjoy!
Mastering the Magic: Advanced Tips for Luscious Lime Loaves
Unlock even greater success with these expert tips for your Mini Glazed Lime Loaves.
Unlocking Maximum Lime Flavor: The Zest-Sugar Rub
The natural oils in lime zest contain the most potent flavor compounds. When you vigorously rub the zest into the granulated sugar, these aromatic oils are released and thoroughly infused directly into the sugar crystals.
This simple yet powerful technique ensures the vibrant lime flavor permeates every part of your loaf, delivering a truly intense and authentic citrus experience that goes beyond simply adding zest to the batter.
The Art of Not Overmixing: Ensuring a Tender Crumb
Overmixing is a common pitfall in baking that can quickly transform a potentially moist loaf into a tough, rubbery one. When flour is overmixed, the gluten develops excessively, leading to a dense crumb.
For these Mini Glazed Lime Loaves, mix only until the dry ingredients are just incorporated into the wet. A few small lumps in the batter are a positive sign that you’ve avoided overmixing, guaranteeing a melt-in-your-mouth tender texture.
Bake to Perfection: Avoiding the “Overbaked” Trap
Mini loaves bake much faster than standard-sized cakes, making them particularly susceptible to overbaking. Even a few minutes too long in the oven can strip away their precious moisture, resulting in a dry and crumbly texture.
Look for a beautiful golden-brown color and edges that are just beginning to pull away from the pan. The most reliable test is inserting a wooden skewer or toothpick into the center: it should come out with only moist crumbs attached, or completely clean, indicating perfect doneness.
Glaze Goals: Achieving the Perfect Drizzle Consistency
The ideal glaze for these Mini Glazed Lime Loaves should be thick enough to provide an opaque coating, yet thin enough to drizzle beautifully. Achieving this perfect consistency is straightforward but requires attention.
Start with the minimum amount of lime juice for the glaze and gradually add more, a tiny bit at a time, until it reaches a thick, pourable consistency. If your glaze becomes too thick, add a few more drops of lime juice; if it’s too runny, whisk in a tablespoon of powdered sugar until it thickens up perfectly.
Enjoying Your Mini Glazed Lime Loaves: Serving, Storage & Prep
These delightful Mini Glazed Lime Loaves are wonderful in many contexts, and knowing how to serve and store them properly ensures maximum enjoyment.
Presentation Pointers: Creative Serving Ideas
These individual Mini Glazed Lime Loaves are naturally charming and versatile for serving.
-
Elegant Dessert Spread: Arrange them on a platter with fresh berries or a dollop of whipped cream for a stunning presentation.
-
Morning Coffee or Tea Companion: Their bright, zesty flavor makes them an ideal accompaniment to your favorite hot beverage, perfect for a special breakfast or afternoon treat.
-
Thoughtful Gifts: Wrap individual loaves in cellophane and tie with a ribbon for delightful homemade gifts that are sure to be appreciated.
Keeping Them Fresh: Storage Tips for Longevity
Proper storage is key to maintaining the moistness and vibrant flavor of your Mini Glazed Lime Loaves.
Store them in an airtight container at room temperature for up to 3-4 days. For longer freshness, you can also refrigerate them, though they are best enjoyed closer to room temperature for optimal flavor and texture.
Plan Ahead: Make-Ahead Options for Busy Bakers
While the batter is best baked immediately for optimal rise, you can certainly plan ahead with these mini loaves.
The baked and completely cooled loaves can be frozen before glazing. Wrap each loaf tightly in plastic wrap, then in aluminum foil, and store in a freezer-safe bag for up to 3 months. Thaw at room temperature before preparing and applying the glaze.
Common Questions & Solutions: Troubleshooting Your Loaves
Even experienced bakers can encounter issues. Here are solutions to common problems with Mini Glazed Lime Loaves.
Why Are My Loaves Dry or Crumbly?
This is the most common issue! The likely culprits are overbaking, overmixing the batter, or inaccurate dry ingredient measurements. Mini loaves bake quickly, so pulling them from the oven at the right moment is essential.
Ensure you mix only until the ingredients are just combined, and always level your flour properly to avoid adding too much. These steps will result in a beautifully moist crumb.
My Mini Loaves Sank in the Middle! What Happened?
A sunken center often indicates underbaking – the interior didn’t quite set. It could also be due to an oven that runs too cool, causing the leavener to act too quickly before the structure is firm.
Invest in an oven thermometer to ensure accurate temperature, and next time, extend the baking time by a few minutes, carefully monitoring doneness with the skewer test.
The Glaze is Too Runny or Too Thick!
Glaze consistency is all about balance. If your glaze is too runny, simply whisk in an additional tablespoon of powdered sugar at a time until the desired thickness is achieved. For a glaze that’s too thick, add 1/4 teaspoon of fresh lime juice at a time, whisking well after each addition, until it’s pourable but still opaque and clings beautifully to the loaves.
Your Mini Glazed Lime Loaves Questions Answered
Let’s address some common queries about these delightful lime treats.
Can I Use Bottled Lime Juice Instead of Fresh?
While convenient, bottled lime juice simply cannot replicate the vibrant, nuanced, and bright flavor of freshly squeezed lime juice. For the truly exceptional zest and zing in these Mini Glazed Lime Loaves, I highly recommend using fresh limes.
The difference in taste is significant and contributes immensely to the overall appeal of these delightful treats.
Can I Make These in a Different Pan Size, Like a Muffin Tin or Standard Loaf Pan?
Yes, you absolutely can adapt this recipe! For a standard 9×5 inch loaf pan, which shares some structural similarities with my perfect orange glazed loaf that’s never dense, you’ll want to double the recipe ingredients.
The baking time for a standard loaf will increase to approximately 45-55 minutes, or until a wooden skewer inserted into the center comes out clean. If using a muffin tin, fill liners about two-thirds full and bake for 15-20 minutes, checking for doneness.
Are These Mini Glazed Lime Loaves Freezer-Friendly?
Absolutely! These Mini Glazed Lime Loaves are wonderfully freezer-friendly. To freeze, ensure they are completely cooled after baking. Wrap each loaf tightly in plastic wrap, then follow with a layer of aluminum foil to prevent freezer burn.
They can be stored in the freezer for up to 3 months. When ready to enjoy, simply thaw them at room temperature for a few hours before applying the glaze. You can also freeze them already glazed if desired, just ensure the glaze is fully set.
Can I Make This Recipe Gluten-Free or Dairy-Free?
Yes, with a few simple substitutions, you can enjoy these Mini Glazed Lime Loaves with dietary modifications. For a gluten-free version, substitute the all-purpose flour with a 1:1 gluten-free baking blend that contains xanthan gum.
To make the recipe dairy-free, simply use your preferred non-dairy milk alternative, such as almond, soy, or oat milk, in place of regular milk. The results will still be wonderfully moist and flavorful!
Share Your Mini Glazed Lime Loaves Success!
There’s immense satisfaction in baking something truly special, and these Mini Glazed Lime Loaves are designed to bring joy with every bite. The vibrant citrus aroma filling your kitchen, the tender texture, and the bright, tangy glaze all come together in a perfectly balanced treat.
I encourage you to try this recipe and experience the magic for yourself. Don’t forget to share your beautiful creations on social media – tag us and let us see your zesty masterpieces! Your comments and ratings on this recipe page are always appreciated and help fellow bakers discover this delightful experience.

Mini Glazed Lime Loaves
Course: DessertCuisine: American CuisineDifficulty: easy6
mini loaves15
minutes20
minutes35
minutesAmerican Cuisine
Ingredients
For the Loaves:
1 1/2 cups all-purpose flour
1 teaspoon baking powder
1/4 teaspoon salt
1 cup granulated sugar
Zest of 2 large limes (about 1 1/2 tablespoons)
1/2 cup neutral oil (like vegetable or canola)
2 large eggs
1/2 cup milk (any kind)
1/4 cup fresh lime juice (from 1-2 limes)
For the Glaze:
1 cup powdered sugar
2-3 tablespoons fresh lime juice
For Garnish:
Lime zest
Thin lime slices
Directions
- Preheat your oven to 350°F (175°C). Lightly grease and flour 6 mini loaf pans, or line with paper inserts if preferred.
- In a medium bowl, whisk together the flour, baking powder, and salt. Set aside.
- In a large mixing bowl, add the granulated sugar and lime zest. Use your fingertips to rub the zest into the sugar for about 1 minute until fragrant. This infuses the sugar with intense lime flavor and releases its oils.
- Pour the oil into the sugar mixture and whisk well until combined. Beat in the eggs one at a time until fully incorporated.
- Stir in the milk and 1/4 cup fresh lime juice until just combined.
- Gradually add the dry ingredients to the wet ingredients, mixing on low speed or by hand until just combined. Be careful not to overmix, as this can lead to a dry loaf. A few small lumps are fine.
- Divide the batter evenly among the prepared mini loaf pans.
- Bake for 20-25 minutes, or until a wooden skewer inserted into the center of a loaf comes out with only moist crumbs attached, or clean. Do not overbake! Mini loaves cook quickly, and overbaking is the main cause of dryness.
- Let the loaves cool in the pans for 10 minutes before carefully transferring them to a wire rack to cool completely.
- While the loaves cool, prepare the glaze: In a small bowl, whisk together the powdered sugar and 2 tablespoons of fresh lime juice until smooth. Add more lime juice, a teaspoon at a time, if a thinner consistency is desired.
- Once the loaves are completely cool, spoon or drizzle the glaze generously over the top of each.
- Garnish immediately with extra lime zest and a thin lime slice on top of each loaf for a beautiful finish. Serve and enjoy!
Notes
- Be careful not to overmix the batter or overbake the loaves to ensure optimal moisture.