There’s nothing more frustrating than spending precious time on a beautiful layered dessert, only for it to collapse into a messy heap when you try to slice it. I’ve been there! But I’ve cracked the code to making sure every single layer sets perfectly, giving you those truly picture-perfect, defined slices of this incredible No-Bake Strawberry Dream Cake every single time.
This recipe delivers pure magic, combining creamy textures, fresh fruit, and a delightful crumble. It’s a reliable showstopper that promises elegance and ease, leaving you with more time to enjoy the compliments.
Beyond Basic: The No-Bake Strawberry Dream Cake That Always Holds Its Shape
This isn’t just another dessert; it’s a testament to how simple ingredients, combined with expert techniques, can create something truly extraordinary. Our No-Bake Strawberry Dream Cake stands apart.
Effortless Elegance: Why “No-Bake” Is Your New Best Friend
The “no-bake” aspect of this cake is a game-changer, especially during warm months when turning on the oven feels like a chore. It means less active cooking time and a refreshing, cool dessert perfect for any gathering.
This approach simplifies the process, making it accessible even for novice bakers. You get a sophisticated dessert without the fuss of traditional baking.
Unlocking Picture-Perfect Slices: The Secret to Layered Success
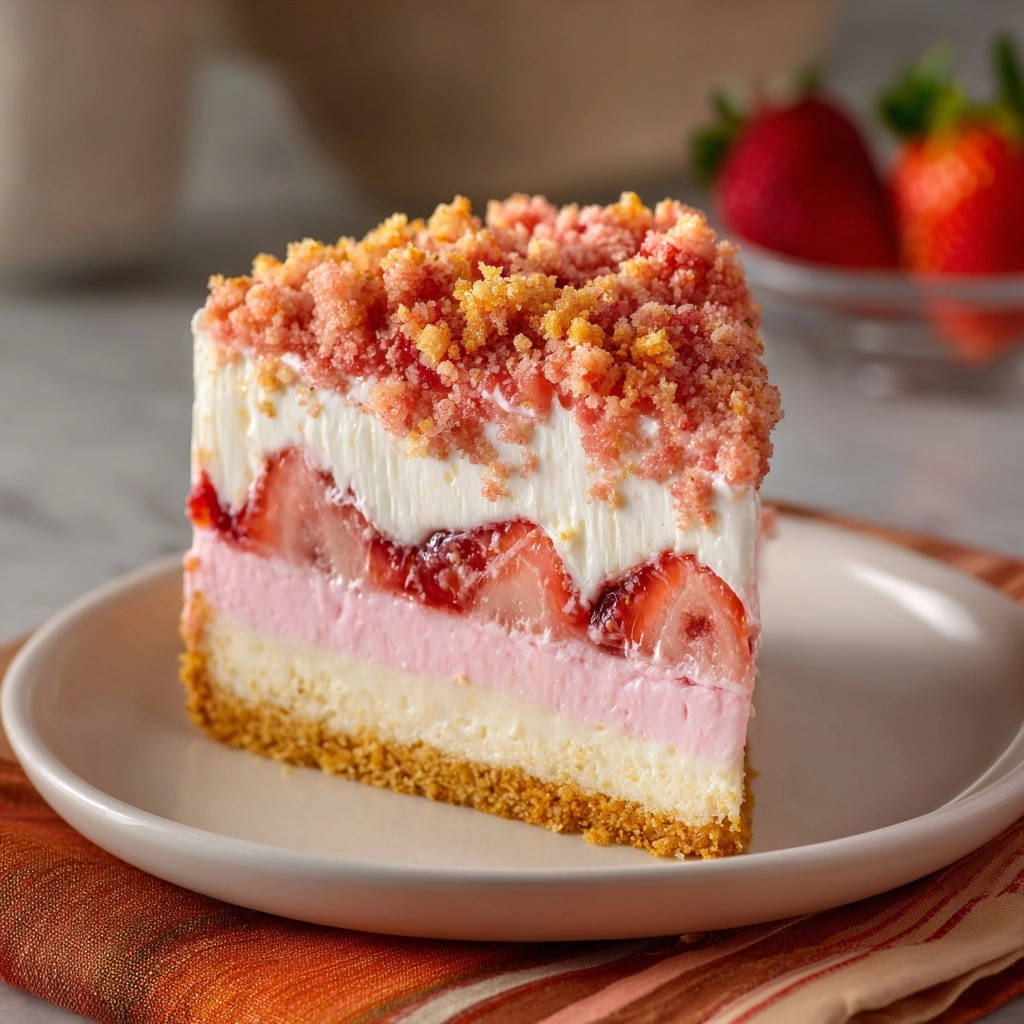
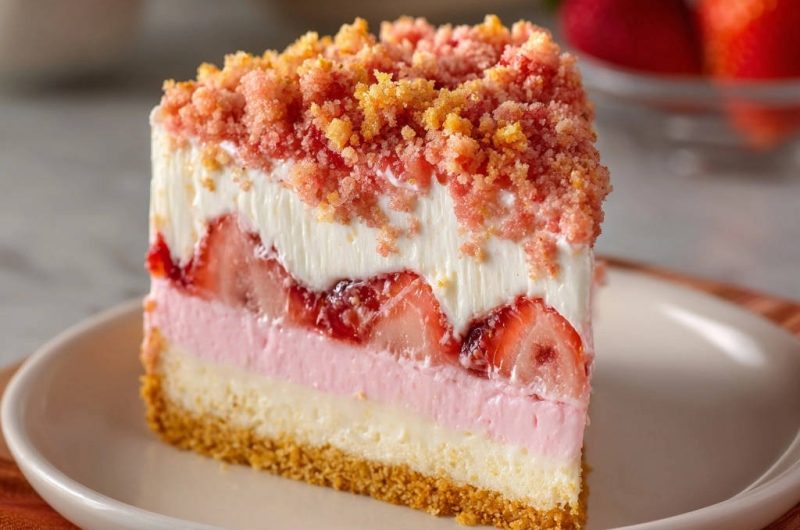
The hallmark of this recipe is its ability to produce incredibly clean, distinct layers. Each component, from the crumbly base to the airy mousse, is designed to set firmly.
Strategic chilling periods after each layer are absolutely crucial. This patient approach ensures structural integrity, guaranteeing your No-Bake Strawberry Dream Cake holds its magnificent form when sliced.
A Symphony of Flavors: What Makes This Cake Irresistible
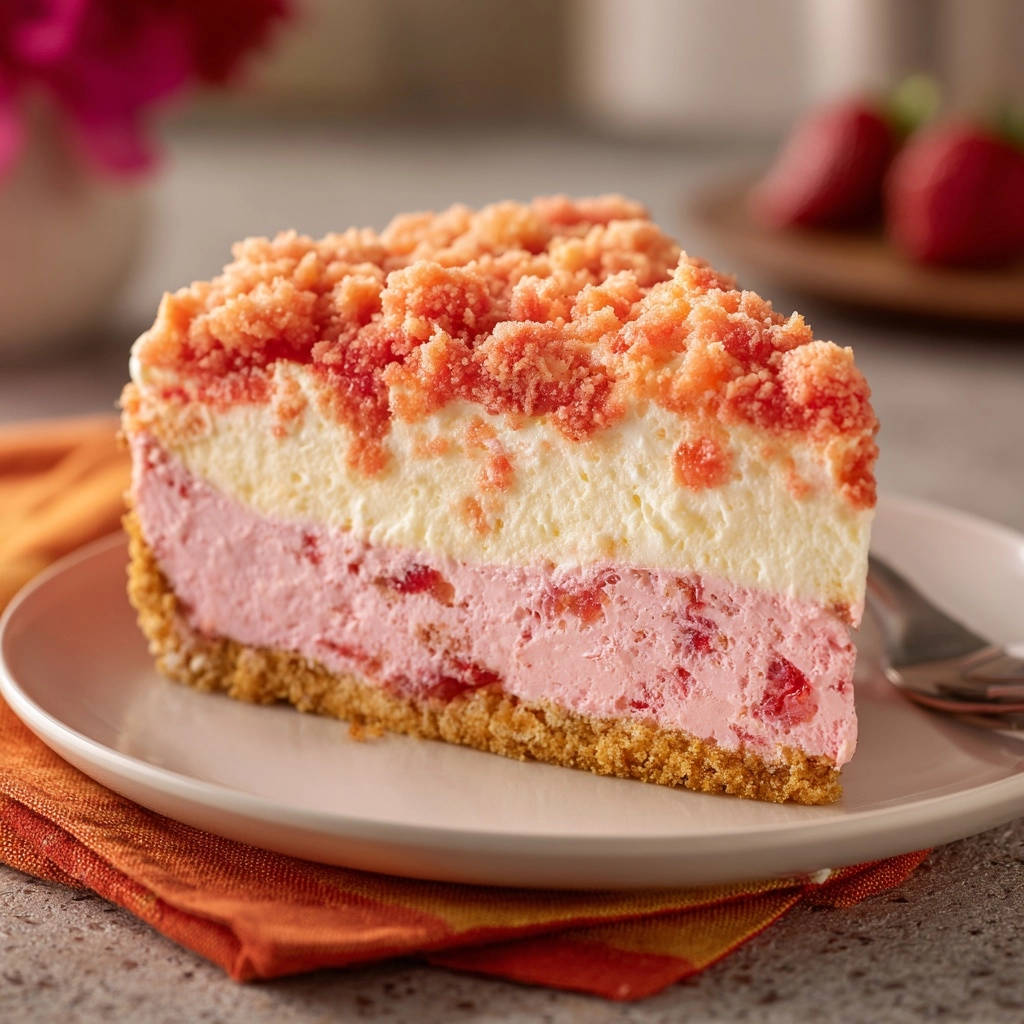
This cake is a delightful interplay of textures and tastes. You’ll experience the rich creaminess of the cheesecake, the light airiness of the strawberry mousse, and the satisfying crunch of the crumble.
Fresh strawberries tie all these elements together, providing a burst of bright, natural sweetness. It’s a harmonious blend that pleases every palate.
Gathering Your Dream Team: Essential Ingredients for Layered Bliss
High-quality ingredients are the foundation of any exceptional dessert. Choosing the right components ensures your No-Bake Strawberry Dream Cake not only tastes incredible but also achieves its signature structure.
The Foundation: Crust & Cheesecake Base
-
Graham Cracker Crumbs: These form the classic, buttery base. Their fine texture helps create a compact, stable crust.
-
Unsalted Butter: Melted butter binds the crumbs, ensuring the crust holds together without being too hard or too crumbly.
-
Cream Cheese: Use full-fat, block cream cheese, softened to room temperature. This is key for a smooth, lump-free cheesecake layer and proper aeration.
-
Powdered Sugar & Vanilla Extract: Powdered sugar dissolves seamlessly for a silky texture, while vanilla adds a warm, classic flavor dimension to the creamy cheesecake.
-
Cold Heavy Cream: Essential for whipping into stiff peaks, providing the light, airy consistency for both the cheesecake and mousse layers. Ensure it’s very cold for optimal volume.
The Star Attraction: Strawberry Mousse & Fresh Fruit
-
Fresh Strawberries: Choose ripe, fragrant berries for pureeing. Their natural sweetness and vibrant color are the heart of the mousse layer.
-
Cream Cheese (for Mousse): Again, softened cream cheese ensures a smooth base for blending with the fruit puree.
-
Powdered Sugar & Cold Heavy Cream: These provide the sweetness and structure needed for a light, stable strawberry mousse.
-
Red Food Coloring (Optional): A drop or two can enhance the visual vibrancy of your strawberry mousse, making it a more striking pink.
-
Sliced Fresh Strawberries: These add a refreshing layer of natural fruit flavor and a beautiful visual element between the creamy components.
Finishing Touches: Whipped Cream & Crumble
-
Heavy Cream, Powdered Sugar, Vanilla (for Topping): Whip these together to create a cloud-like topping. The cold temperature of the cream is vital for stiff peaks.
-
All-Purpose Flour, Granulated Sugar, Cold Unsalted Butter (for Crumble): These form the base for a crisp, golden crumble. Cold butter is crucial for creating distinct crumbs rather than a paste.
-
Freeze-Dried Strawberry Powder (Optional): This concentrated powder boosts strawberry flavor and imparts a lovely pink hue to your crumble, making it even more special.
Tools for Success: Your Kitchen Arsenal for a Flawless Cake
Having the right tools at hand makes the process of creating your No-Bake Strawberry Dream Cake smooth and enjoyable. Precision tools contribute significantly to the cake’s final presentation.
Must-Have Equipment
-
9-inch Springform Pan: This is non-negotiable for easy removal of a multi-layered cake. The removable sides allow for a clean, undamaged presentation.
-
Electric Mixer: Handheld or stand mixer, it’s essential for achieving smooth cream cheese batters and perfectly whipped cream with stiff peaks. This saves significant arm work and ensures consistency.
-
Large Mixing Bowls: You’ll need several for preparing different layers simultaneously. Chilling a metal bowl for whipping cream helps maintain its cold temperature.
-
Rubber Spatulas: Ideal for gently folding in whipped cream without deflating it, and for spreading layers smoothly. They help ensure every bit of mixture is incorporated.
Helpful Extras for Precision
-
Fine-Mesh Strainer: Crucial for straining strawberry puree, ensuring a silky-smooth mousse free of seeds or pulp. This refines the texture beautifully.
-
Offset Spatula: This flat, angled spatula is perfect for spreading layers evenly and smoothly across the pan. It provides a professional, polished finish.
-
Sharp Knife & Tall Glass of Hot Water: For serving, a hot, clean knife ensures each slice of your No-Bake Strawberry Dream Cake is perfectly neat, preventing drag and messy edges.
Crafting Your Masterpiece: A Step-by-Step Guide to Layered Perfection
Creating this stunning No-Bake Strawberry Dream Cake is a journey of simple steps, each contributing to its ultimate success. Follow these phases for impeccable results.
Phase 1: Building the Base & Bakeable Crumble
Prepare the Crumble Topping: Preheat your oven to 350 degrees F. In a medium bowl, combine the flour, sugar, and the optional freeze-dried strawberry powder. Add the cold, cubed butter.
Use your fingertips to quickly rub the butter into the dry ingredients. Continue until coarse, pea-sized crumbs form. Spread these crumbs evenly on a small baking sheet.
Bake for 12-15 minutes, or until the crumbs are golden brown and deliciously crisp. This texture is key for contrast. Let the crumble cool completely to maintain crunch.
Prepare the Crust: In a separate medium bowl, combine the graham cracker crumbs and granulated sugar. Pour in the melted butter and stir until the crumbs are thoroughly moistened and well combined.
Press this mixture firmly and evenly into the bottom of a 9-inch springform pan. Use the flat bottom of a glass or your knuckles for a compact base. Place the pan in the freezer for 15 minutes to allow the crust to set properly.
Phase 2: The Creamy Core – No-Bake Cheesecake Layer
Make the No-Bake Cheesecake Layer: In a large bowl, using an electric mixer, beat the softened cream cheese until it’s incredibly smooth and creamy. This takes about 2-3 minutes; ensure no lumps remain.
Gradually add the powdered sugar and vanilla extract, continuing to beat until fully incorporated and the mixture is light and fluffy. In a separate, chilled bowl, whip the very cold heavy cream until stiff peaks form. This means the cream holds its shape firmly when the beater is lifted.
Gently fold the whipped cream into the cream cheese mixture using a rubber spatula. Use a “cut and fold” motion until no white streaks of whipped cream remain. Avoid overmixing, which can deflate the mixture.
Pour this luxurious cheesecake mixture over your chilled crust in the springform pan. Spread it evenly using an offset spatula. Chill the pan in the refrigerator for at least 1 hour; this firming step is absolutely critical for achieving clean, distinct layers.
Phase 3: Infusing Fruity Delight – Strawberry Mousse Layer
Prepare the Strawberry Mousse Layer: In a large bowl, beat the softened cream cheese until smooth and creamy again. This ensures a consistent texture for the mousse.
Stir in the pureed and strained strawberries along with the powdered sugar until everything is well combined and smooth. If you desire a more vibrant pink color, now is the time to add 1-2 drops of red food coloring, mixing until evenly distributed.
In another separate, chilled bowl, whip the cold heavy cream until stiff peaks form, similar to the previous step. Gently fold this whipped cream into the strawberry cream cheese mixture until smooth and uniform. Take care not to deflate the air you’ve incorporated.
Carefully spread this light and airy strawberry mousse layer over the firmly chilled cheesecake layer. Return the pan to the refrigerator and chill for at least 1.5 hours, allowing this mousse layer to set completely.
Phase 4: The Freshness Factor & Whipped Topping
Add Fresh Strawberry Layer: Once your strawberry mousse layer is firm to the touch, arrange the neatly sliced fresh strawberries over the top. Try to cover the entire surface for a beautiful effect and consistent flavor.
Prepare the Whipped Cream Topping: In a final chilled large bowl, whip the remaining cold heavy cream with powdered sugar and vanilla extract until stiff peaks form. This will be your elegant, cloud-like topping.
Gently spread this freshly whipped cream over the layer of sliced strawberries, covering them completely. Ensure an even, appealing distribution.
The Grand Finale: Chilling for Flawless Slices
Final Chill: Loosely cover the springform pan with plastic wrap to prevent any surface drying. Refrigerate the entire No-Bake Strawberry Dream Cake for a minimum of 4 hours.
For truly optimal results and the most beautiful, clean slices, chilling overnight is highly recommended. This extended period allows all the layers to fully set, bond, and become perfectly firm.
Serving Your Masterpiece
Serve: Before serving, carefully release and remove the sides of the springform pan. This unveils your perfectly layered creation. Sprinkle the completely cooled strawberry crumble topping generously over the cake just before slicing.
For guaranteed clean slices, especially important with layered desserts, use a very sharp knife. Dip the knife in hot water and wipe it clean with a towel before each cut. This technique ensures smooth, professional-looking slices every time. Enjoy your magnificent No-Bake Strawberry Dream Cake!
Chef’s Secrets & Pro Tips for No-Bake Strawberry Dream Cake Success
Achieving a truly exceptional No-Bake Strawberry Dream Cake goes beyond just following the steps. These expert tips will elevate your results and simplify the process.
Temperature Matters: Softened Cream Cheese & Cold Cream
Always ensure your cream cheese is at true room temperature (softened) before beating. This prevents lumps and ensures a smooth, airy consistency. Similarly, heavy cream and the bowl you whip it in must be very cold to achieve firm, stable peaks quickly.
Pureeing Perfection: Getting the Most from Your Strawberries
Use very ripe, fragrant strawberries for the best flavor in your puree. After blending, straining the puree through a fine-mesh sieve removes tiny seeds and fibrous bits, resulting in an incredibly smooth, luxurious mousse texture. You can taste the puree before mixing and adjust sweetness slightly if your berries are particularly tart or sweet.
Mastering the Chill: Why Patience Pays Off
The chilling times specified for each layer are non-negotiable. Rushing this process is the number one reason layers fail to set, leading to a messy cake. The final, longer chill of 4 hours or overnight is absolutely crucial for the layers to fully bond, ensuring that beautiful, clean slice when serving. Think of it as the cake’s setting time to become perfectly firm.
Slicing Smarter: Achieving Bakery-Quality Cuts
For those picture-perfect slices, a warm, clean knife is your best friend. The heat from the water helps the blade glide through the layers without dragging or sticking. Wiping the blade clean between each cut prevents cross-contamination of layers and keeps your slices looking pristine, just like they came from a bakery.
Customizing Your Crumble: Flavor Variations
While the strawberry crumble is fantastic, feel free to experiment! You could use a simple vanilla crumble without freeze-dried powder, or incorporate other flavors like finely ground pistachios, almonds, or even a hint of lemon zest. Consider a chocolate drizzle instead of crumble for a different kind of layered dessert experience.
Troubleshooting Your Dream Cake: Common Questions Answered
Even with the best intentions, sometimes questions arise. Here are solutions to common challenges when making your No-Bake Strawberry Dream Cake.
Crust Too Crumbly or Too Hard?
If your crust is too crumbly, you likely needed a bit more melted butter to bind the graham cracker crumbs properly. If it’s too hard, you might have packed it too densely into the pan, or used too much butter. Ensure your butter is fully incorporated, and press firmly but not excessively.
Layers Not Setting Firmly?
The most common culprit is insufficient chilling time between layers or for the final cake. Each chilling step allows the dairy fats and sugars to firm up. Another reason could be over-mixing the whipped cream, which causes it to lose its air, or under-mixing, leading to a runny consistency. Ensure your heavy cream is very cold before whipping.
Strawberry Mousse Lacking Color or Flavor?
This often comes down to the ripeness of your strawberries. For a richer flavor and color, use deeply red, ripe berries. If they’re a bit pale, the optional red food coloring will instantly boost the visual appeal. For more intense flavor, a tiny drop of strawberry extract can be added, but taste as you go.
Why Did My Whipped Cream Fall Flat?
The key to stable whipped cream is coldness. Ensure your heavy cream, mixing bowl, and beaters are all very cold before you start. Over-whipping can also cause it to become grainy and then collapse, while under-whipping will leave it too loose. Stop as soon as stiff peaks form.
Enjoying Your Creation: Serving, Storing, and Planning Ahead
Once your stunning No-Bake Strawberry Dream Cake is complete, knowing how to serve and store it properly ensures maximum enjoyment.
Serving Suggestions for Every Occasion
This elegant cake is perfect for celebrations, summer parties, or simply as a special weeknight treat. Beyond the crumble, consider garnishing with a few extra fresh strawberry slices, a sprig of fresh mint, or delicate chocolate shavings for added visual appeal. A light dusting of powdered sugar can also elevate its presentation.
Storing Leftovers: Keeping Your Cake Fresh
Store any leftover No-Bake Strawberry Dream Cake loosely covered with plastic wrap in the refrigerator. It will remain fresh and delicious for 3-4 days. While technically freezable, the texture of the whipped cream and fresh strawberries can change upon thawing, so it’s best enjoyed fresh.
Can You Make It Ahead? Yes, and Here’s How!
This cake is an ideal make-ahead dessert. You can prepare the entire cake up to 24 hours in advance, keeping it covered and chilled in the refrigerator. In fact, an overnight chill enhances the setting and flavor marriage, making it even better. Simply add the crumble topping just before serving to maintain its crispness.
Your No-Bake Strawberry Dream Cake Questions Answered
Here are answers to some common questions that arise when preparing this delightful dessert.
Can I Use Frozen Strawberries?
Yes, you can use frozen strawberries for the puree, but they must be thawed completely first. Crucially, drain any excess liquid that accumulates during thawing. This prevents your mousse from becoming watery, which could affect its set and flavor. Fresh strawberries always yield the best results for the sliced layer.
What Can I Substitute for Graham Crackers?
If graham crackers aren’t available or preferred, excellent alternatives for the crust include vanilla wafers, shortbread biscuits, or digestive biscuits. Simply crush them into fine crumbs and proceed with the recipe instructions for the crust.
Is This Recipe Gluten-Free?
This recipe can easily be made gluten-free by substituting gluten-free graham cracker crumbs for the crust. For the crumble topping, use a high-quality gluten-free all-purpose flour blend. Always double-check ingredient labels to ensure they are certified gluten-free if strict dietary requirements are needed.
Can I Make This Dairy-Free?
While possible, results may vary slightly. You can substitute dairy-free cream cheese alternatives and plant-based heavy whipping cream (such as coconut cream or specific dairy-free whipping creams). Be aware that dairy-free options may have different setting properties and flavor profiles, so a test batch might be wise.
How Long Does It Last in the Refrigerator?
For optimal freshness and texture, your No-Bake Strawberry Dream Cake is best enjoyed within 3 to 4 days when stored properly covered in the refrigerator. The fresh strawberries and whipped cream are at their peak during this time.
Ready to Create Your Own No-Bake Strawberry Dream?
Now that you have all the insider tips and a meticulously detailed guide, you’re perfectly equipped to create a truly unforgettable No-Bake Strawberry Dream Cake. Say goodbye to messy slices and hello to layered perfection!
Dive into this delightful recipe, enjoy the process, and savor every beautiful, clean slice. We’d love to see your creations and hear how much you loved it – share your photos and comments below!
No-Bake Strawberry Dream Cake
Course: DessertCuisine: American CuisineDifficulty: easy8
servings45
minutes15
minutes240
minutesAmerican Cuisine
Ingredients
For the Graham Cracker Crust:
1 ½ cups graham cracker crumbs
¼ cup granulated sugar
½ cup unsalted butter, melted
For the No-Bake Cheesecake Layer:
16 ounces cream cheese, softened at room temperature
1 cup powdered sugar
1 teaspoon vanilla extract
1 cup heavy cream, cold
For the Strawberry Mousse Layer:
8 ounces cream cheese, softened at room temperature
1 cup fresh strawberries, pureed and strained
½ cup powdered sugar
1 cup heavy cream, cold
Optional: 1-2 drops red food coloring
For the Fresh Strawberry Layer:
2 cups fresh strawberries, sliced
For the Whipped Cream Topping:
2 cups heavy cream, cold
½ cup powdered sugar
1 teaspoon vanilla extract
For the Strawberry Crumble Topping:
½ cup all-purpose flour
¼ cup granulated sugar
¼ cup cold unsalted butter, cubed
1 tablespoon freeze dried strawberry powder (optional, for pink color and flavor)
Directions
- Prepare the Crumble Topping: Preheat oven to 350 degrees F. In a medium bowl, combine flour, sugar, and freeze dried strawberry powder (if using). Add the cold cubed butter. Use your fingertips to rub the butter into the dry ingredients until coarse crumbs form. Spread crumbs evenly on a small baking sheet. Bake for 12-15 minutes, or until golden brown and crisp. Let cool completely.
- Prepare the Crust: In a medium bowl, combine graham cracker crumbs and granulated sugar. Pour in the melted butter and stir until well combined. Press the mixture firmly and evenly into the bottom of a 9-inch springform pan. Place in the freezer for 15 minutes to set.
- Make the No-Bake Cheesecake Layer: In a large bowl, using an electric mixer, beat the softened cream cheese until smooth and creamy. Gradually add the powdered sugar and vanilla extract, beating until fully incorporated. In a separate chilled bowl, whip the cold heavy cream until stiff peaks form. Gently fold the whipped cream into the cream cheese mixture until no streaks remain. Pour this mixture over the chilled crust in the springform pan and spread evenly. Chill in the refrigerator for at least 1 hour to allow this layer to firm up. This is critical for clean layers.
- Prepare the Strawberry Mousse Layer: In a large bowl, beat the softened cream cheese until smooth. Stir in the pureed strawberries and powdered sugar until well combined. If desired, add 1-2 drops of red food coloring for a more vibrant pink. In a separate chilled bowl, whip the cold heavy cream until stiff peaks form. Gently fold the whipped cream into the strawberry cream cheese mixture until smooth. Carefully spread this strawberry mousse layer over the chilled cheesecake layer. Return the pan to the refrigerator and chill for at least 1.5 hours until this layer is firm.
- Add Fresh Strawberry Layer: Once the strawberry mousse is firm, arrange the sliced fresh strawberries neatly over the top of the strawberry mousse layer.
- Prepare the Whipped Cream Topping: In a chilled large bowl, whip the cold heavy cream with powdered sugar and vanilla extract until stiff peaks form. Spread this whipped cream gently over the layer of sliced strawberries.
- Final Chill: Loosely cover the springform pan with plastic wrap. Refrigerate the entire cake for a minimum of 4 hours, or preferably overnight. This extended chilling period is crucial for all the layers to fully set and bond, ensuring beautiful, clean slices.
- Serve: Before serving, carefully remove the sides of the springform pan. Sprinkle the cooled strawberry crumble topping over the cake. For guaranteed clean slices, use a very sharp knife, dipping it in hot water and wiping it clean before each cut. Enjoy!
Notes
- Extended chilling is crucial for firm, clean layers and easy slicing.