Cooking octopus can feel like stepping into intimidating territory in the kitchen. You might have visions of elegant restaurant dishes, but let’s be honest, many of us have faced the disappointment of a rubbery, tough texture instead of that wonderfully tender bite you crave. For the longest time, achieving restaurant-quality perfect seared octopus at home felt like an impossible culinary feat.
But what if I told you there’s a simple technique that changes everything? A method that guarantees your octopus will be incredibly melt-in-your-mouth tender before it even hits the pan for that glorious, slightly crispy sear? This recipe isn’t just about searing octopus; it’s about unlocking the secret to tenderness first, making the final sear a breeze. It truly is easier than you think, and the results are absolutely worth it!
Why You’ll Love This Perfect Seared Octopus Recipe
This isn’t just another octopus recipe; it’s a game-changer. Here are a few reasons why this method will become your go-to for preparing beautiful, tender octopus:
- Guaranteed Tenderness: The core technique focuses on slow, gentle simmering, which is the absolute key to breaking down the connective tissues without toughening the meat. Say goodbye to rubber bands!
- Restaurant Quality Finish: After achieving that perfect tenderness, a quick, hot sear gives the exterior a delicious caramelization and slight crispness, just like you’d find in your favorite seafood restaurant.
- Simple Ingredients, Big Flavor: You don’t need a long list of fancy items. Basic aromatics infuse the octopus during cooking, creating a subtle, clean flavor that shines through.
- Versatile Serving: While delightful on its own with a simple finish, tender seared octopus is a fantastic base for salads, pasta dishes, or as part of a larger seafood platter.
Gathering Your Ingredients for Perfect Seared Octopus
Creating truly tender and perfectly seared octopus starts with selecting the right components. Each ingredient in this simple lineup plays a crucial role, from tenderizing the octopus during its initial simmer to providing that final burst of freshness and flavor on your plate. You’ll notice we focus on just a few core items to let the star ingredient, the octopus, truly shine.
For the initial tenderizing phase, we rely on a few basic aromatics added to the cooking liquid. An onion, simply quartered, brings a mild, sweet undertone. Bay leaves contribute a subtle, earthy, almost floral note that complements seafood beautifully. Black peppercorns add a gentle warmth and slight pungency to the simmering bath. And, of course, a generous pinch of salt is essential to season the water and help penetrate the octopus as it cooks low and slow.
Once the octopus is wonderfully tender and ready for its transformation, we shift focus to the searing. High-quality olive oil is key here. Its relatively high smoke point is suitable for getting a good, quick sear, and its flavor pairs naturally with seafood. Finally, for the finishing touch, thinly sliced red onion provides a crisp bite and a pop of color, while a handful of vibrant microgreens adds delicate texture and a fresh, slightly peppery lift. It’s a minimal approach that yields maximum impact.
- 1 pound octopus, cleaned (fresh or frozen and thawed)
- 1 large onion, quartered
- 2 bay leaves (dried are fine)
- 1 teaspoon black peppercorns (whole)
- Salt, to taste (for simmering liquid and seasoning later)
- Olive oil, for searing (use a good quality extra virgin or standard olive oil suitable for medium-high heat)
- 1/4 small red onion, thinly sliced
- 1 cup microgreens (or other delicate greens like arugula or watercress)
Crafting Your Perfect Seared Octopus: Step-by-Step
Now for the magic! The process of making incredibly tender, perfectly seared octopus involves two key phases: a gentle simmer to break down the muscle fibers and a quick, hot sear to crisp the exterior. Follow these steps carefully, and you’ll achieve results you can be truly proud of.
- Prepare the Octopus: Start by making sure your octopus is thoroughly cleaned. Most octopus you buy will already be cleaned, but it’s always a good idea to rinse it under cold water and check for anything that might still be attached. If you’re using frozen octopus, ensure it is completely thawed before you begin. Pat it relatively dry at this stage, though it will get wet again in the pot.
- Set Up the Tenderizing Pot: Grab a large pot, one big enough to easily hold the octopus and plenty of water. Place the cleaned octopus inside. Add the quartered onion, bay leaves, and black peppercorns. These aromatics are simple but effective in subtly flavoring the octopus as it tenderizes. Add a generous pinch of salt – this isn’t for final seasoning, but to help season the octopus throughout its long cook time. Pour in enough cold water to completely submerge the octopus. Starting with cold water allows the octopus to heat up gradually.
- Begin the Gentle Simmer: Place the pot over medium heat. Your goal here is to bring the water to a gentle simmer. This is crucial! Watch the pot carefully. You want just a few lazy bubbles occasionally rising to the surface, NOT a rolling, vigorous boil. Boiling octopus aggressively is a surefire way to make it tough and rubbery. The low, slow temperature is the secret weapon for tenderizing those dense muscle fibers.
- Simmer Until Tender: Once you’ve reached that gentle simmer, cover the pot. Continue to cook, maintaining that low simmer, for anywhere from 45 to 90 minutes. The exact time depends heavily on the size and thickness of your specific octopus. A smaller, younger octopus might be done closer to 45 minutes, while a larger one could take up to 90 minutes or even slightly longer. To test for doneness, carefully remove the lid (steam will escape!) and gently try to pierce the thickest part of a tentacle with a fork. It should slide in easily, with little to no resistance, much like testing a perfectly baked potato. Check periodically after the 45-minute mark.
- Cool in the Liquid: This is another key step for maximum tenderness and moisture. Once the octopus is fork-tender, remove the pot from the heat, but leave the octopus right there in the hot cooking liquid. Allow it to cool completely in the pot. As the liquid cools, the octopus continues to absorb moisture and the textures further relax. Don’t rush this step; letting it cool completely in the liquid makes a noticeable difference in the final result.
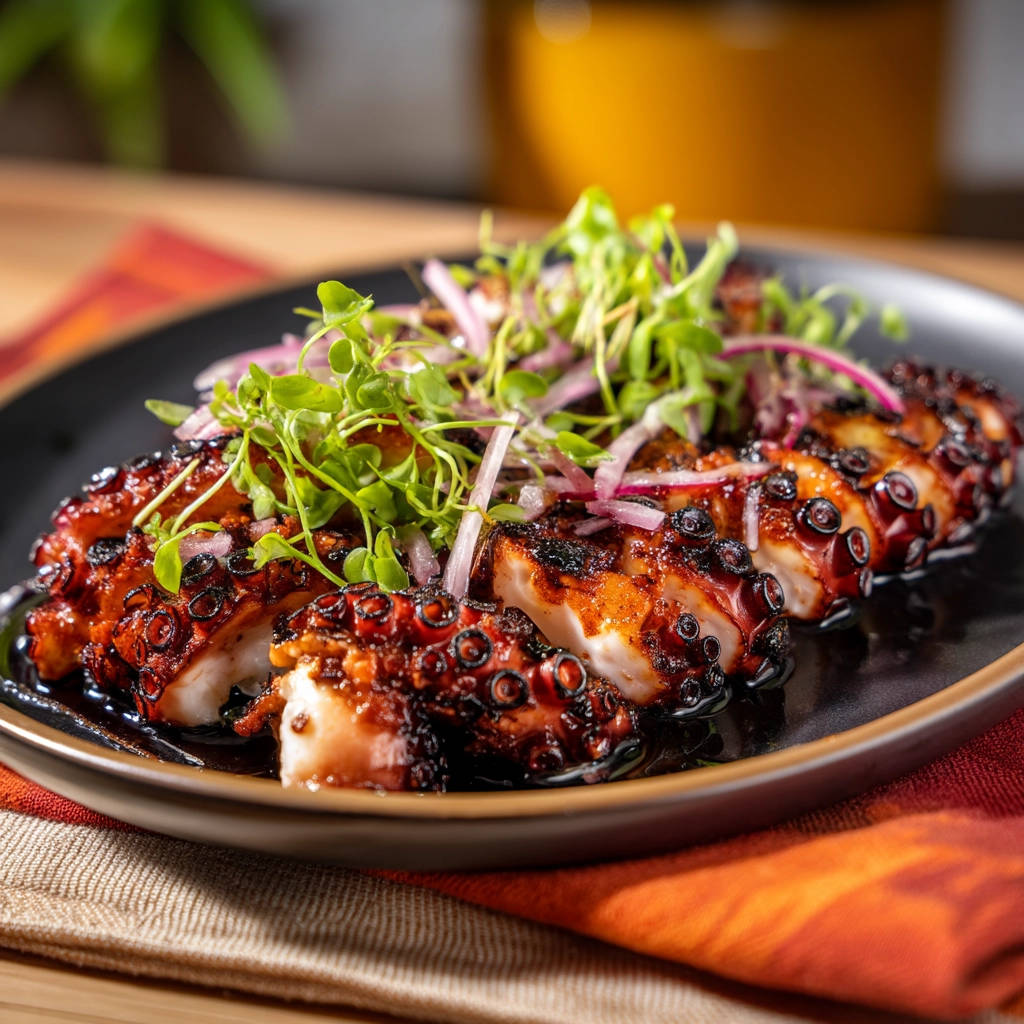
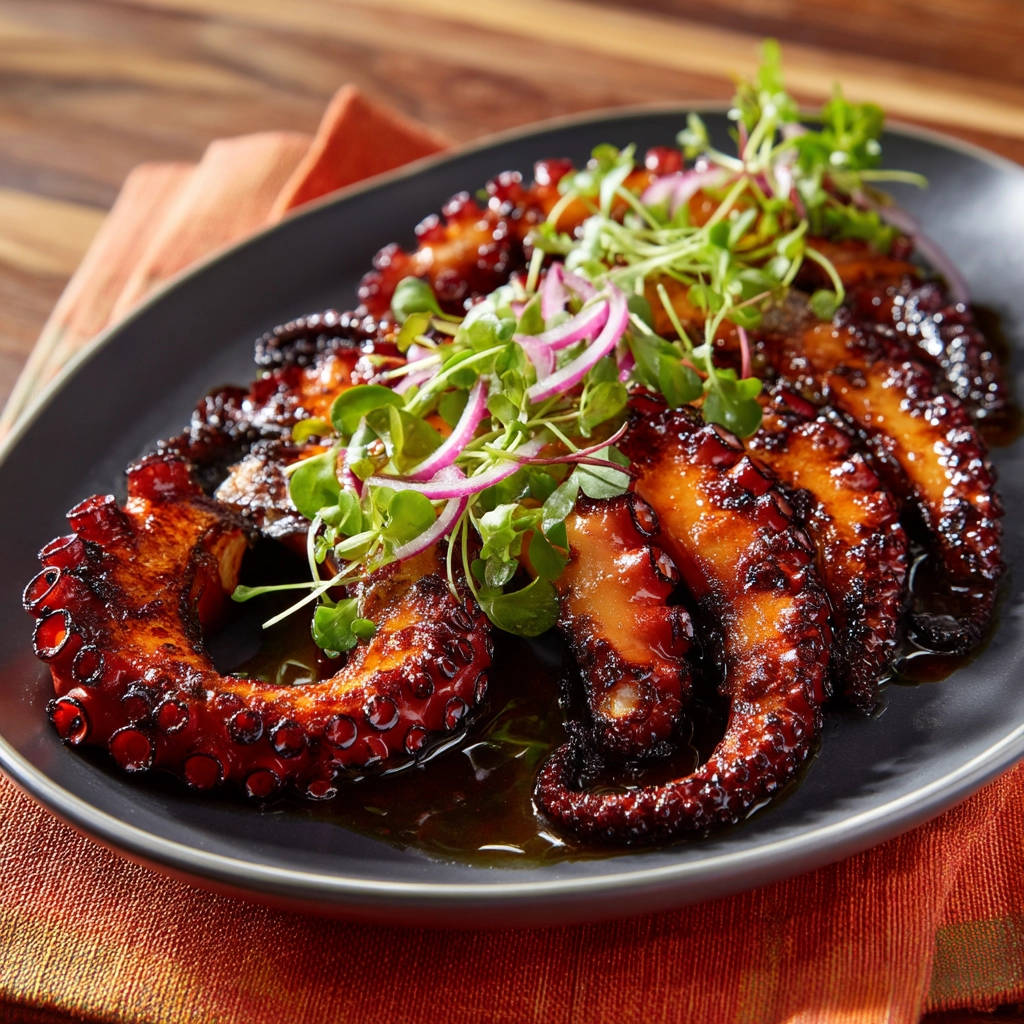
- Prepare for Searing: Once the octopus is completely cool (you can speed this up by placing the pot in an ice bath if needed, though room temperature cooling is fine), carefully remove it from the cooking liquid. Discard the cooking liquid and all the solids (the onion, bay leaves, and peppercorns have done their job). Pat the octopus tentacles very, very dry using paper towels. This is essential for getting a good sear later – any excess moisture will cause it to steam instead of brown and crisp. You can leave the tentacles whole for a dramatic presentation or cut them into 1 to 2-inch segments, as shown in the picture, which makes searing easier and creates more surface area for that delicious crispiness. Season the dry octopus lightly with salt and pepper at this stage.
- Heat the Skillet: Get your skillet ready for searing. Place it over medium-high heat. This is where we build the crispy crust. Add a generous drizzle of olive oil to the hot pan. You want enough oil to coat the bottom well.
- Execute the Perfect Sear: Once the oil is hot and shimmering – almost to the point of smoking but not quite – carefully add the dried octopus segments or whole tentacles to the pan. Do not overcrowd the pan! Cook the octopus in batches if necessary. Crowding the pan will lower the temperature and prevent that coveted sear, causing it to steam instead. Sear for 2 to 3 minutes per side. Watch for the edges to brown beautifully and develop those slightly crispy spots you see in restaurant dishes. It happens relatively quickly!
- Rest and Arrange: As each batch of octopus finishes searing, remove it from the pan and arrange it immediately on a serving plate. Keep subsequent batches coming until all the octopus is seared.
- Finish and Serve: The final touches bring freshness and balance. Top the warm, seared octopus with the thinly sliced red onion and a generous scattering of microgreens. Serve immediately while the octopus is still warm and the sear is at its best. This perfect seared octopus is ready to impress!
Tips for Perfect Seared Octopus Every Time
Achieving tender, flavorful seared octopus might seem daunting, but armed with a few key tips, you can master it at home. These pointers build on the core technique to ensure success.
- Octopus Size Matters: The cooking time for the initial simmering phase is directly related to the size of the octopus. A smaller 1-pound octopus might be done in under an hour, while a larger one (2-3 pounds) could take significantly longer, maybe 1.5 to 2 hours or even more. Always use the fork-tenderness test (Step 4) as your guide, not just the clock.
- Don’t Skip the Simmering Liquid: Cooling the octopus in its cooking liquid is a non-negotiable step for maximum tenderness and moisture retention. As the liquid cools, the octopus reabsorbs some of that flavorful moisture, preventing it from drying out.
- Dry, Dry, Dry Before Searing: I cannot stress this enough! Patting the octopus tentacles completely dry after cooling is critical. Any surface moisture will turn your hot skillet into a steaming environment, and you won’t get that beautiful brown crust.
- Hot Pan, Single Layer: For the sear, ensure your pan is adequately hot and that you are not crowding the octopus. Cook in batches if necessary. This ensures each piece makes direct contact with the hot surface and browns instead of steaming.
- Adding More Flavor to the Sear: While the recipe is simple, you can add extra flavor during the searing stage. A smashed clove of garlic or a sprig of fresh thyme or rosemary added to the oil just before searing can infuse subtle flavor into the octopus as it browns. Just be careful not to burn the garlic or herbs.
- Storage: Cooked and seared octopus is best enjoyed immediately. However, leftover tender octopus (before searing) can be stored in an airtight container in the refrigerator for up to 2-3 days, ideally with a little bit of the cooking liquid. Seared octopus can also be stored, but the crispy texture will soften.
- Reheating Seared Octopus: Reheating seared octopus can be tricky as you risk making it tough again. The best way to reheat is a quick sear in a hot, oiled pan for just a minute or two per side, enough to warm it through and try to revive some crispness without overcooking. Microwaving is not recommended.
What to Serve With Perfect Seared Octopus
Perfect seared octopus is a dish that feels elegant yet is surprisingly versatile. It can be the star of the show or part of a larger culinary experience. Because its flavor is clean and the texture is so appealing, simple accompaniments often work best to let it shine.
Consider serving your beautiful seared octopus over a light and refreshing salad. A simple bed of arugula, mixed greens, or even a bright kale salad with a lemon vinaigrette makes a wonderful pairing. The crisp greens and tangy dressing cut through the richness of the olive oil-seared octopus.
Starch sides can also work well. Think about simple crispy roasted potatoes, fluffy quinoa, or even a small portion of pasta tossed in a light garlic and olive oil sauce. If you enjoy seafood rice, a small portion of perfectly cooked seafood rice could also be a lovely base.
Ultimately, keep the sides relatively light and fresh to complement the delicate flavor and tender texture of the octopus.
Your Perfect Seared Octopus Questions Answered (FAQ)
Even with a straightforward method, questions can pop up when cooking something new like octopus. Here are some common queries and their answers to help you confidently make perfect seared octopus.
Can I use frozen octopus for this recipe?
Absolutely! Frozen octopus is often more readily available and is usually cleaned before freezing. Ensure it is completely thawed in the refrigerator before starting the recipe. Frozen octopus can sometimes be even more tender than fresh, as the freezing process can help break down some of the fibers.
How do I know when the octopus is truly tender?
The best test is the fork test described in Step 4. The thickest part of the tentacle should be easily pierced with a fork with minimal resistance. If it feels even slightly firm or difficult to pierce, it needs more simmering time. Don’t guess; test!
Why is cooling in the cooking liquid so important?
Cooling the octopus in its liquid allows it to gradually cool down and reabsorb moisture. This step helps prevent the octopus from becoming dry and ensures that the fibers stay relaxed after the long simmering process, contributing significantly to the final tender texture.
Do I have to sear the octopus? Can I just eat it after simmering?
You certainly can eat octopus after it’s been simmered until tender. It will have a lovely, soft texture. However, the searing step adds a completely different dimension – a browned, slightly crispy exterior with concentrated flavor that is characteristic of many popular restaurant preparations. It adds texture contrast and depth that boiled-only octopus doesn’t have. For “perfect seared octopus,” the sear is essential!
Can I add other flavorings to the simmering liquid?
Yes, you can experiment! Adding a lemon half, a carrot, celery stalks, or even a splash of vinegar (which some believe helps tenderize, although the long, slow simmer is the main driver) are common additions to octopus poaching liquid in various cuisines. Keep it simple the first time, but feel free to explore once you’ve mastered the basic technique.
Enjoy Your Homemade Perfect Seared Octopus!
You’ve done it! You’ve taken a potentially intimidating ingredient and transformed it into a dish that boasts incredible tenderness and a delightful sear. This perfect seared octopus recipe proves that restaurant-quality results are achievable in your own kitchen with just a little patience and the right technique.
Impress your friends, treat yourself, or simply enjoy the satisfaction of mastering this beautiful seafood. Give this recipe a try, and you might just find yourself making octopus more often than you ever thought possible. We’d love to hear how it turns out! Leave a comment below and share your experience.
Perfect Seared Octopus

Ingredients
- 1 pound octopus, cleaned
- 1 onion, quartered
- 2 bay leaves
- 1 teaspoon black peppercorns
- Salt, to taste
- Olive oil, for searing
- 1/4 small red onion, thinly sliced
- 1 cup microgreens
Directions
- Prepare the octopus by ensuring it is cleaned thoroughly. If frozen, thaw completely.
- In a large pot, combine the octopus, onion quarters, bay leaves, peppercorns, and a generous pinch of salt. Add enough cold water to cover the octopus completely.
- Bring the water to a gentle simmer over medium heat. Do NOT let it boil vigorously, just a very low simmer. This slow, low-temperature cooking is the secret to tenderizing the octopus fibers.
- Cover the pot and continue to simmer gently for 45 to 90 minutes, or until a fork can easily pierce the thickest part of the octopus tentacles. The time will vary depending on the size of the octopus. Check periodically.
- Once tender, remove the pot from the heat and let the octopus cool completely in the cooking liquid. This helps keep it moist.
- Once cool, remove the octopus from the liquid and discard the solids. Pat the octopus tentacles very dry with paper towels. Cut the tentacles into 1 to 2 inch segments if desired, or leave them whole. Season lightly with salt and pepper.
- Heat a skillet over medium-high heat. Add a generous drizzle of olive oil.
- Once the oil is hot and shimmering, add the octopus segments in a single layer, ensuring not to crowd the pan. Sear for 2 to 3 minutes per side, or until beautifully browned and slightly crispy in spots, just like you see in the picture.
- Remove the seared octopus from the pan and arrange on a serving plate.
- Top with thinly sliced red onion and microgreens before serving immediately.