There’s nothing quite like a luscious strawberry cake, but the heartbreak of a soggy slice after all that effort is truly disappointing. I’ve faced that challenge countless times, which led me to perfect this recipe for a truly Perfect Strawberry Layer Cake that remains tender and moist without ever becoming waterlogged.
This recipe incorporates a simple, yet game-changing technique that ensures every forkful is divine, delivering bright strawberry flavor encased in cloud-like cake. Get ready to bake a showstopper that will earn you endless compliments!
Why Our Perfect Strawberry Layer Cake is Your New Favorite
The “Soggy-Proof” Secret Revealed: Tender Every Time
The innovative use of a simple syrup is the cornerstone of this recipe’s success. It acts as a subtle barrier, preventing the juicy fruit and rich whipped cream from making your cake layers mushy.
This technique allows the cake to absorb just the right amount of moisture, ensuring a consistently tender crumb with every delightful bite.
Bright, Bold Strawberry Flavor: Beyond Just Sweetness
Our recipe doesn’t just add strawberries; it elevates their flavor through maceration. This process draws out their natural juices, creating an intensely flavorful, natural syrup that permeates the filling.
The result is a concentrated strawberry experience that brightens the entire cake, rather than just acting as a watery addition.
Effortless Elegance: Impress Without the Stress
Despite its impressive, bakery-quality appearance, this Perfect Strawberry Layer Cake is surprisingly straightforward to prepare. Each step is designed for clarity and success, making it achievable for home bakers of all skill levels.
You’ll confidently create a dessert that looks and tastes like it took hours, saving you time and frustration while still delivering maximum “wow” factor.
Gathering Your Culinary Palette: Ingredients for Perfect Strawberry Layer Cake
For the Cake Layers: Building a Fluffy Foundation
All-Purpose Flour: This provides the fundamental structure for your cake, ensuring it holds its shape while remaining soft.
Baking Powder & Salt: Baking powder is our leavening agent, providing the necessary lift for a light and airy cake. Salt enhances all the flavors, balancing the sweetness.
Unsalted Butter & Granulated Sugar: Creaming these together is crucial; it incorporates air, which contributes significantly to the cake’s tender texture.
Large Eggs (Room Temperature): Using room temperature eggs is vital as they emulsify better with other ingredients, creating a smoother, more uniform batter and a richer cake.
Vanilla Extract: A foundational flavor enhancer that complements the sweetness and brightens the overall taste.
Whole Milk (Room Temperature): Whole milk adds essential moisture and richness without making the cake dense. Like the eggs, ensure it’s at room temperature for optimal batter consistency.
The Simple Syrup: Your Secret Moisture Shield
This simple combination of sugar and water, once cooked and cooled, is the unsung hero. It gently moistens the cake layers and creates a barrier, preventing the cake from absorbing too much liquid from the fruit.
Fresh Strawberries: Flavorful Filling Perfection
Opt for ripe, vibrant fresh strawberries for the most intense flavor and beautiful color. Macerating them with sugar draws out their natural essence, transforming them into a juicy, flavorful filling.
Cloud-Like Whipped Cream: The Essential Topping
Cold heavy cream, combined with powdered sugar and vanilla, whips into a stable, airy topping. The powdered sugar helps stabilize the cream, giving it that luxurious, cloud-like texture that pairs so beautifully with fresh berries.
Tools for Your Perfect Strawberry Layer Cake Masterpiece
9×13 Inch Baking Pan: This standard size is ideal for baking the single cake layer that will be easily split into two.
Large Mixing Bowls: You’ll need at least two: one for whisking dry ingredients and another for creaming butter and sugar, as well as whipping the cream.
Electric Mixer (Stand or Handheld): Indispensable for efficiently creaming the butter and sugar, and whipping the heavy cream to perfect peaks.
Wire Rack: Essential for cooling your cake completely and evenly, preventing condensation from forming on the bottom, which can lead to a gummy texture.
Small Saucepan: For quickly preparing the simple syrup, ensuring the sugar dissolves completely.
Pastry Brush: Critical for evenly applying the simple syrup to your cake layers, guaranteeing consistent moisture and protection against sogginess.
Long Serrated Knife: The best tool for cleanly and accurately slicing your cooled cake horizontally into two even layers.
Offset Spatula: This baker’s friend makes spreading the whipped cream and strawberry filling smooth and effortless, achieving that professional finish.
Fine-Mesh Sieve: Perfect for creating a delicate, even dusting of powdered sugar over your finished cake, adding an elegant touch.
Step-by-Step Guide: Crafting Your Perfect Strawberry Layer Cake
- Preheat & Prep Pan:
Preheat your oven to 350°F (175°C). Thoroughly grease and flour a 9×13 inch baking pan. This ensures your cake releases easily without sticking.
- Combine Dry Ingredients:
In a medium bowl, whisk together the all-purpose flour, baking powder, and salt until well combined. Set this mixture aside for later use.
- Cream Wet Ingredients:
In a large bowl, use an electric mixer to cream together the softened unsalted butter and granulated sugar until the mixture is light, fluffy, and noticeably pale in color. This creaming step is vital for incorporating air, which contributes to the cake’s tender crumb.
- Add Eggs & Vanilla:
Beat in the large eggs one at a time, ensuring each egg is fully incorporated into the mixture before adding the next. Then, stir in the vanilla extract, ensuring it’s evenly distributed for consistent flavor.
- Alternate Dry & Wet:
Gradually add the whisked dry ingredients to the wet ingredients, alternating with the room temperature whole milk. Always begin and end with the dry ingredients. Mix only until the batter is just combined; overmixing will develop gluten, leading to a tough cake texture.
- Bake & Cool:
Pour the prepared batter evenly into your greased and floured pan. Bake for 25 to 30 minutes, or until a wooden skewer inserted into the center comes out clean, indicating it’s fully cooked. Let the cake cool completely in the pan on a wire rack. Full cooling is crucial for easy slicing and to prevent crumbling.
- Prepare Syrup:
In a small saucepan, combine 1/4 cup granulated sugar and 1/4 cup water. Place over medium heat, stirring continuously until all the sugar has completely dissolved. This ensures a smooth syrup.
- Simmer & Cool:
Bring the sugar mixture to a gentle simmer, then immediately remove it from the heat. Allow the simple syrup to cool completely to room temperature before applying it to the cake. This syrup is your ultimate defense against a soggy cake, providing moisture without excess wetness.
- Combine & Toss:
In a medium bowl, gently combine the hulled and sliced fresh strawberries with 1/4 cup granulated sugar. Toss them gently until all the berries are coated.
- Macerate:
Let the strawberry and sugar mixture sit for about 15 to 20 minutes. This process, known as maceration, naturally draws out the strawberries’ intensely flavorful juices, creating a delicious, natural syrup that is crucial for managing the moisture of the filling and enhancing flavor.
- Chill Bowl & Whip Cream:
For the best results, ensure your large mixing bowl and whisk attachment (if using a stand mixer) are thoroughly chilled before you begin. Pour the cold heavy cream into the chilled bowl. Whip the cream on medium-high speed until it reaches the soft peaks stage.
- Add Sweeteners:
Gradually add the powdered sugar and vanilla extract to the soft-peaked cream. Continue whipping until stiff peaks form, meaning the cream holds its shape firmly. Be very careful not to over-whip, as this can quickly turn your cream grainy.
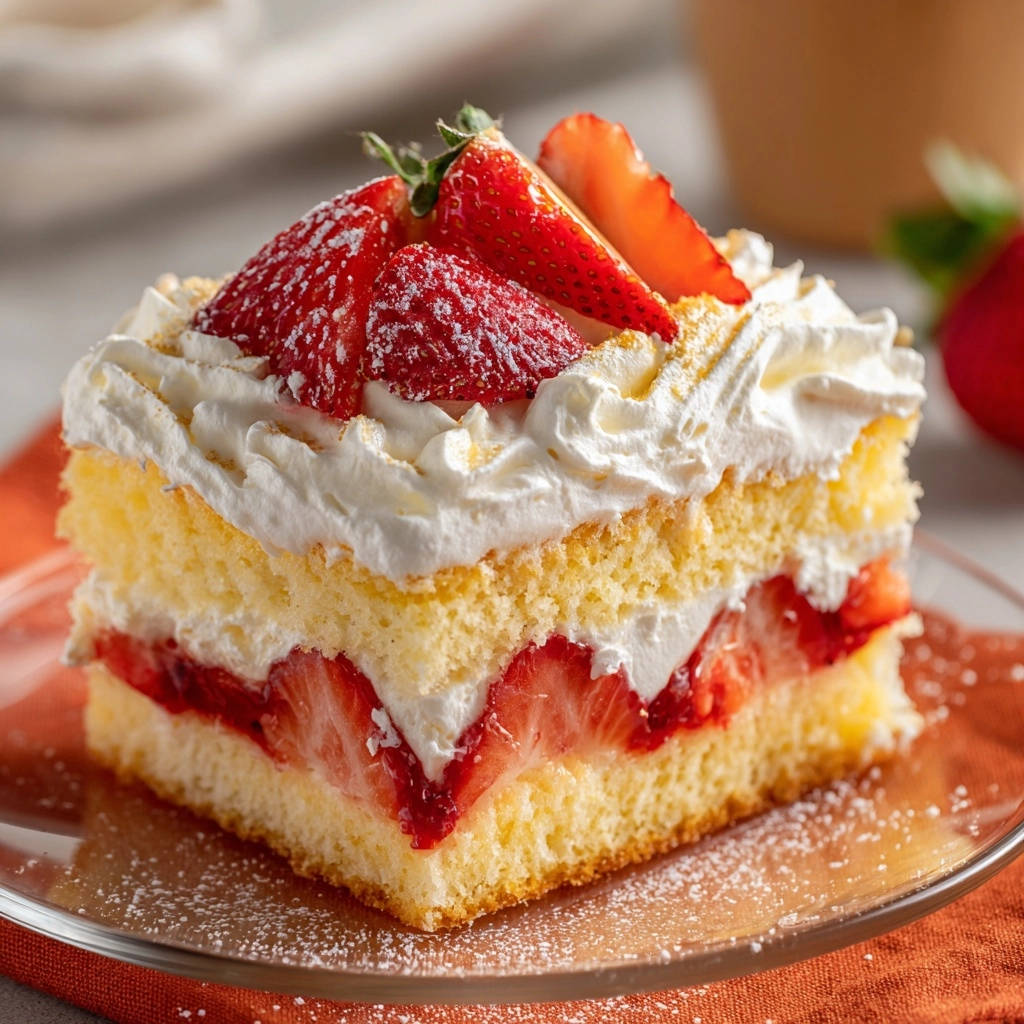
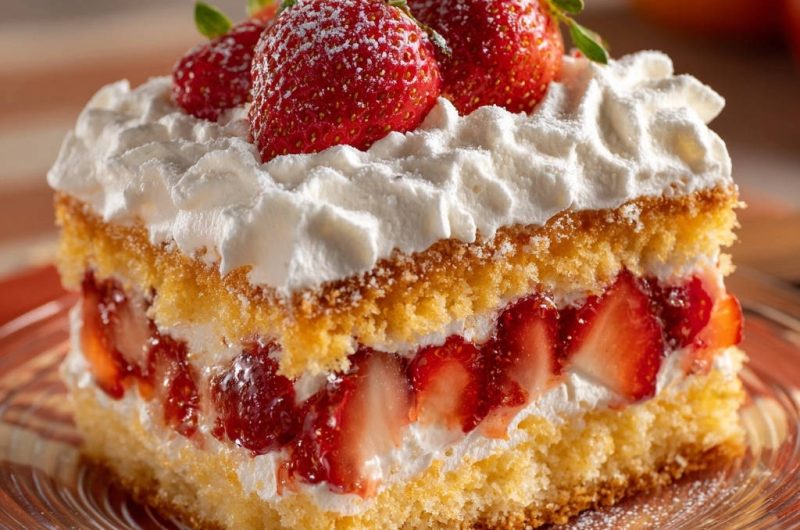
- Slice Cake:
Once the cake is completely cool, carefully slice it horizontally into two even layers using a long serrated knife. Take your time with this step to ensure clean, level cuts for a stable cake.
- Syrup First Layer:
Place the bottom cake layer on your chosen serving plate. Using a pastry brush, lightly and evenly brush about half of the cooled simple syrup over the entire top surface of this layer. This critical step infuses the cake with subtle moisture and acts as a barrier against the wet filling.
- First Cream & Berry Layer:
Spread half of the whipped cream evenly over the bottom cake layer, extending almost to the edges. Arrange half of the macerated strawberries over the whipped cream. For extra sogginess prevention, spoon slightly less of the strawberry juice directly onto the cake, favoring the berries themselves.
- Second Layer & Syrup:
Carefully place the second cake layer on top of the strawberry-cream layer, aligning it as best as possible. Lightly brush the top surface of this layer with the remaining simple syrup, just as you did the first layer.
- Final Cream & Berry Layer:
Spread the remaining whipped cream evenly over the top layer of cake. Artfully arrange the remaining macerated strawberries on top of the whipped cream, creating a beautiful presentation.
- Garnish:
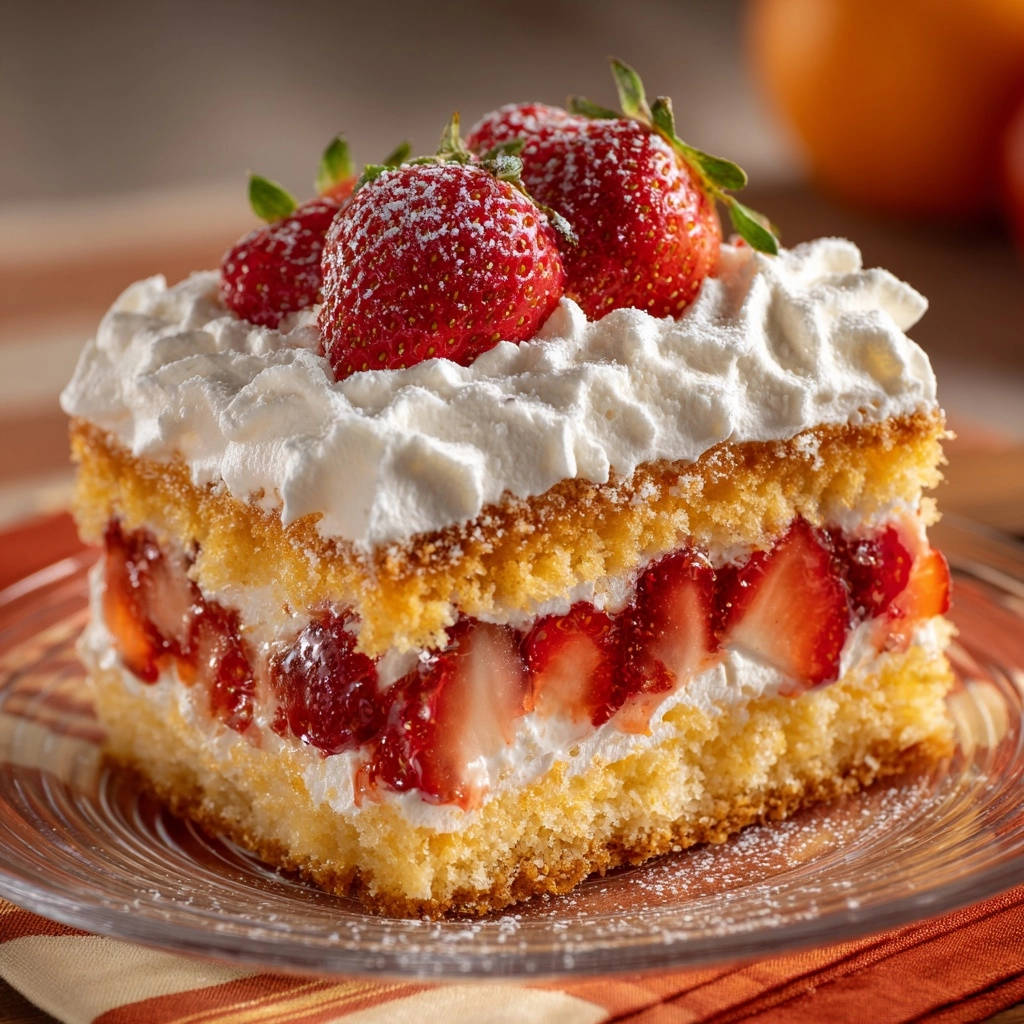
For a truly professional and appealing presentation, top your cake with a few whole fresh strawberries. As a final elegant touch, lightly dust the entire cake with powdered sugar using a fine-mesh sieve, creating a delicate, snowy finish.
- Chill for Perfection:
For the very best texture and to allow all the layers to set properly, ensuring no sogginess, chill the cake in the refrigerator for at least 30 minutes before serving. This step is non-negotiable for optimal results and easier slicing!
Part 1: Preparing the Fluffy Cake Layers
Part 2: The Essential Simple Syrup for Moisture Control
Part 3: Macerating Strawberries for Intense Flavor
Part 4: Whipping Cream to Cloud-Like Perfection
Part 5: Assembling Your Stunning Strawberry Layer Cake
Part 6: The Finishing Touches & Chilling for Success
Expert Tips & Tricks for a Flawless Strawberry Layer Cake
Room Temperature Ingredients are Key: Always ensure your butter, eggs, and milk are at room temperature before mixing. This allows them to emulsify properly, creating a smooth, homogenous batter that bakes evenly and yields an incredibly tender cake. Cold ingredients can cause the batter to curdle and result in a less uniform texture.
Don’t Overmix the Batter: Once you’ve added the dry ingredients, mix only until they are just combined and no streaks of flour remain. Overmixing develops gluten, which leads to a tough, dry, and chewy cake texture, rather than the desired light and fluffy one.
The Power of Simple Syrup: Do not skip this step! The simple syrup is your ultimate defense against a soggy cake. It creates a subtle barrier that prevents the juicy macerated strawberries from making the cake layers mushy, while simultaneously adding a delicate, uniform moisture throughout.
Maceration for Flavor & Moisture Control: Allowing the strawberries to sit with sugar (maceration) not only draws out their intense, concentrated flavor but also helps manage the amount of free liquid. By doing this, you control the moisture, preventing excessive wetness. Use the berries, and some, but not all, of their released juice for the filling.
Chill Your Whipped Cream Bowl & Tools: For perfectly stable, airy whipped cream that holds its shape, make sure your mixing bowl and whisk attachment are thoroughly chilled in the freezer for 10-15 minutes before whipping. Cold tools help the cream whip faster and hold stiff peaks without deflating.
The Crucial Chilling Time Post-Assembly: After assembling your Perfect Strawberry Layer Cake, chilling it for at least 30 minutes (or ideally longer, up to a few hours) is paramount. This allows the layers to set, the flavors to meld beautifully, and the cake’s structure to firm up, making it much easier to slice neatly and preventing any potential “sogginess” from the moist filling.
Even Cake Layers for Stability: When slicing your cooled cake horizontally, use a long serrated knife and a steady hand. Aim for layers of equal thickness. Even layers not only contribute significantly to the aesthetic appeal of your finished cake but also to its structural integrity, making it less likely to shift or collapse.
Troubleshooting Your Strawberry Layer Cake: Common Challenges Solved
Cake Turns Out Dry or Crumbly?
This often happens from overmixing the batter, which develops too much gluten, or from overbaking. Ensure you mix only until the ingredients are just combined, and always check for doneness with a wooden skewer or toothpick inserted into the center. If it comes out clean, the cake is ready.
Strawberries Make the Cake Soggy?
The simple syrup and maceration steps are your primary defenses against this common issue. Ensure the cake is completely cool before assembling, use the simple syrup generously on the cake layers as instructed, and be mindful of adding too much excess strawberry juice from the maceration directly onto the cake layers.
Whipped Cream Won’t Hold Its Shape?
This usually indicates the heavy cream wasn’t cold enough, the mixing bowl and whisk weren’t chilled, or the cream was over-whipped. Ensure all components are very cold before whipping, and stop whipping as soon as stiff peaks form to avoid grainy or deflated cream.
Cake Layers Are Uneven After Slicing?
Practice truly makes perfect with slicing! Use a long serrated knife and try to keep it level as you slice through the cake. For more precise and even cuts, consider investing in a simple cake leveler tool.
Your Perfect Strawberry Layer Cake Questions Answered
Can I make this Perfect Strawberry Layer Cake ahead of time?
Yes, you can certainly prepare components in advance. The cake layers can be baked a day or two ahead and stored, wrapped tightly in plastic wrap, at room temperature. The simple syrup can also be made and stored in the refrigerator. For the freshest taste and best texture, assemble the cake no more than 12-24 hours before you plan to serve it, and ensure it’s thoroughly chilled once assembled.
How should I store leftover Perfect Strawberry Layer Cake?
Store any leftover slices of your Perfect Strawberry Layer Cake in an airtight container in the refrigerator for up to 3-4 days. The chilling helps maintain its structure, prevents sogginess, and keeps the whipped cream fresh.
Can I use frozen strawberries?
While fresh, ripe strawberries are highly recommended for the best flavor and texture, you can use frozen ones as an alternative. Make sure to thaw them completely and drain them very, very well before macerating with sugar, as frozen berries release significantly more liquid. This extra moisture management is key to preventing a soggy cake. For a fantastic use of fresh berries, you might also enjoy our recipe for No-Bake Strawberry Dessert.
What if I don’t have whole milk?
You can substitute 2% milk, but whole milk provides the best richness and moisture for this cake, contributing to its tender crumb. Dairy-free milks like almond or oat milk can also work, but be aware they may slightly alter the final texture and flavor of the cake. For another delightful berry treat that uses different milks, consider our Easy Creamy Berry Crumble Cheesecake Bars.
Is this Perfect Strawberry Layer Cake recipe gluten-free friendly?
This specific recipe is designed and tested for use with standard all-purpose wheat flour. While some gluten-free all-purpose blends may work as a direct substitute, results can vary significantly in texture and structure. For optimal results, it’s generally best to look for a recipe that has been specifically developed and tested for gluten-free baking.
Serving Suggestions & Creative Variations for Your Strawberry Masterpiece
Elegant Presentation Ideas
Beyond the simple dusting of powdered sugar, consider adding fresh mint sprigs on top of the strawberries for a vibrant pop of color and freshness. For a sophisticated touch, a very light drizzle of a high-quality balsamic glaze (used sparingly!) over the berries can offer a delightful sweet-tart flavor contrast.
Delicious Pairings
This exquisite Perfect Strawberry Layer Cake is delightful on its own, a true star dessert. However, it pairs wonderfully with a freshly brewed cup of robust coffee, a delicate black tea, or even a chilled glass of sparkling rosé wine for a more celebratory occasion. The fruitiness of the wine complements the strawberries beautifully.
Fun Flavor Twists
To infuse a bright citrus note into your cake, add 1-2 teaspoons of finely grated lemon zest to the cake batter along with the wet ingredients. For a more adult-friendly dessert, consider adding a tablespoon of your favorite liqueur, such as Grand Marnier or Kirsch, to the simple syrup after it cools.
You could also experiment with adding a thin layer of tangy cream cheese frosting as an additional layer, perhaps just under the top layer of whipped cream, for a richer and more complex flavor profile that balances the sweetness of the strawberries.
Bake, Share, and Savor: Your Perfect Strawberry Layer Cake Awaits!
Ready to Impress?
Now that you have all the insider secrets and expert tips to crafting a truly perfect, never-soggy strawberry layer cake, it’s time to unleash your inner baker! This recipe is more than just a dessert; it’s a delightful experience waiting to be created and savored. Gather your ingredients, embrace the simple syrup magic, and get ready for rave reviews from everyone who tastes it.
Don’t forget to share your beautiful baking triumphs with us on social media! We absolutely love seeing your culinary creations come to life. Happy baking, and enjoy every tender, fruit-filled bite of your incredible Perfect Strawberry Layer Cake!
Perfect Strawberry Layer Cake
Course: DessertCuisine: American CuisineDifficulty: easy8
servings30
minutes30
minutes60
minutesAmerican Cuisine
Ingredients
For the Cake:
1 and 3/4 cups all purpose flour
1 and 1/2 teaspoons baking powder
1/2 teaspoon salt
1/2 cup unsalted butter softened
1 and 1/2 cups granulated sugar
2 large eggs room temperature
1 teaspoon vanilla extract
1 cup whole milk room temperature
For the Simple Syrup:
1/4 cup granulated sugar
1/4 cup water
For the Strawberry Filling:
4 cups fresh strawberries hulled and sliced
1/4 cup granulated sugar
For the Whipped Cream:
2 cups heavy cream cold
1/2 cup powdered sugar
1 teaspoon vanilla extract
For Garnish:
Whole fresh strawberries
Powdered sugar for dusting
Directions
- Prepare the Cake: Preheat your oven to 350 degrees Fahrenheit. Grease and flour a 9×13 inch baking pan. In a medium bowl, whisk together the flour, baking powder, and salt. In a large bowl, cream together the softened butter and 1 and 1/2 cups granulated sugar until light and fluffy. Beat in the eggs one at a time, then stir in the vanilla extract. Gradually add the dry ingredients to the wet ingredients, alternating with the milk, beginning and ending with the dry ingredients. Mix until just combined. Pour the batter into the prepared pan and spread evenly. Bake for 25 to 30 minutes, or until a wooden skewer inserted into the center comes out clean. Let the cake cool completely in the pan on a wire rack.
- Make the Simple Syrup (Your Soggy-Proof Secret): While the cake cools, combine 1/4 cup granulated sugar and 1/4 cup water in a small saucepan. Heat over medium heat, stirring until the sugar dissolves. Bring to a gentle simmer, then remove from heat and let cool completely. This simple syrup will lightly moisten your cake layers and act as a subtle barrier, controlling moisture absorption from the fruit and cream.
- Prepare the Strawberries: In a medium bowl, combine the sliced strawberries with 1/4 cup granulated sugar. Gently toss and let the mixture sit for about 15 to 20 minutes. This process, called maceration, draws out natural juices from the strawberries, creating a rich, flavorful syrup. This is key for developing flavor and also managing the wetness for your cake.
- Whip the Cream: In a large, chilled bowl using a stand mixer or hand mixer, whip the cold heavy cream on medium high speed until soft peaks form. Gradually add the powdered sugar and vanilla extract, continuing to whip until stiff peaks form. Be careful not to over whip.
- Assemble the Cake: Once the cake is completely cool, carefully slice it horizontally into two even layers. Place the bottom layer on your serving plate. Using a pastry brush, lightly and evenly brush the top surface of this cake layer with about half of the cooled simple syrup. This step is crucial for moisture balance.
- Spread half of the whipped cream evenly over the bottom cake layer. Arrange half of the macerated strawberries over the whipped cream. For extra sogginess prevention, you can spoon a little less of the strawberry juice directly onto the cake, favoring the berries themselves.
- Carefully place the second cake layer on top. Lightly brush the top surface of this layer with the remaining simple syrup.
- Spread the remaining whipped cream evenly over the top layer of cake. Arrange the remaining macerated strawberries on top of the whipped cream.
- Garnish and Serve: Top the cake with whole fresh strawberries. For a beautiful finish, lightly dust the entire cake with powdered sugar using a small sieve. For the very best texture, chill the cake for at least 30 minutes before serving. This allows the layers to set and further prevents sogginess. Enjoy your perfectly tender and never soggy strawberry delight!
Notes
- Chilling time is crucial for optimal texture and preventing sogginess.