There’s nothing more disappointing than eagerly anticipating a delicious chicken dish, only to take a bite and discover dry, lackluster pieces. Trust me, I’ve been there! For years, I struggled with keeping chicken juicy and tender, especially when it was coated in wonderful, sticky sauces. It felt like a culinary mystery I just couldn’t solve.
But then, something clicked. Through lots of testing and tweaking, I finally cracked the code to perfectly tender chicken bathed in a vibrant, sweet and savory glaze. This pineapple chicken and rice recipe is the result of that journey, and it consistently delivers juicy, flavorful chicken every single time. It’s become a weeknight staple in our house, and I can’t wait for you to try it!
Why You’ll Absolutely Love This Juicy Pineapple Chicken
This isn’t just another chicken stir-fry. It’s a method designed to keep your chicken moist while building incredible flavor. Here’s why I think this pineapple chicken will quickly become a family favorite:
- Say Goodbye to Dry Chicken: We use chicken thighs, which are inherently more forgiving, and a specific searing technique that locks in juices before they have a chance to escape in the sauce.
- Flavor Explosion: The combination of tangy pineapple, savory soy sauce, sweet brown sugar, and aromatic ginger and garlic creates a glaze that is simply irresistible.
- Quick & Easy: This dish comes together relatively fast, making it perfect for a busy weeknight dinner. You can have a delicious, homemade meal on the table in under 30 minutes once your ingredients are prepped.
- Versatile and Adaptable: While amazing over rice, it’s also great with other grains or even noodles. Plus, you can easily adjust the spice level or add more veggies.
- A Crowd-Pleaser: The balanced sweet and savory profile appeals to just about everyone, including picky eaters!
Gathering Your Ingredients for This Sweet and Savory Chicken
The magic of this dish lies in a harmonious blend of simple ingredients that work together to create that signature sweet and savory flavor with a delightful tropical twist from the pineapple. Choosing quality ingredients makes a difference, but nothing here is complicated. Let’s break down what you’ll need and why each component is important.
We start with the star: the chicken. For ultimate juiciness, we’re using boneless, skinless chicken thighs. Their slightly higher fat content compared to chicken breasts means they stay moist and tender even when cooked at higher heat or briefly simmered in sauce. Cut them into roughly 1-inch pieces so they cook quickly and evenly, and have plenty of surface area for that glorious glaze.
The heart of our flavor comes from the marinade and subsequent sauce. You’ll need soy sauce, which provides the essential salty, umami base. If you or someone you’re cooking for needs to avoid gluten, a good quality gluten-free soy sauce works perfectly here. Brown sugar is our primary sweetener; its molasses content adds a deeper, richer sweetness than white sugar and contributes to the beautiful caramelization on the chicken.
To balance the sweetness and richness, we introduce acidity with rice vinegar. It provides a clean, bright tang that cuts through the sauce. A touch of sesame oil adds a wonderful nutty aroma that is characteristic of many Asian-inspired dishes.
Fresh aromatics are non-negotiable for vibrant flavor. Minced garlic provides pungency and depth, while grated fresh ginger adds a warm, slightly peppery note. If you don’t have fresh ginger on hand, you can use ground ginger in a pinch, but fresh truly makes a difference!
To achieve that perfect, glossy glaze that coats every piece of chicken and pineapple, we rely on a cornstarch slurry. This simple mixture of cornstarch and water thickens the sauce beautifully without making it cloudy or pasty, provided it’s whisked well and added correctly.
You’ll also need a bit of cooking oil – vegetable or canola works fine – for searing the chicken. And of course, the pineapple! You can use either fresh pineapple chunks for a brighter, more acidic punch or canned pineapple chunks for convenience and consistent sweetness. Both work wonderfully.
Finally, for serving, hot cooked white rice is the classic choice, providing a neutral base to soak up all that delicious sauce. And don’t forget the garnish! Sliced green onions add a fresh, slightly pungent finish and a pop of vibrant green.
Here’s a quick list for your shopping or prep:
- 2 boneless, skinless chicken thighs, cut into 1-inch pieces
- 1/4 cup soy sauce (use gluten-free if needed)
- 2 tablespoons brown sugar
- 1 tablespoon rice vinegar
- 1 teaspoon sesame oil
- 1 clove garlic, minced
- 1/2 teaspoon grated fresh ginger (optional, but great!)
- 1 tablespoon cornstarch
- 2 tablespoons water
- 1 tablespoon cooking oil (vegetable or canola)
- 1 cup fresh or canned pineapple chunks
- Cooked white rice, for serving
- Green onions, sliced, for garnish
Crafting Your Pineapple Chicken and Rice: Step-by-Step
Now that we have our wonderful ingredients ready, let’s walk through the process of turning them into a spectacular meal. Don’t worry, even if you’ve struggled with dry chicken before, these steps are designed for success!
Our approach focuses on building flavor and texture in layers, ensuring everything cooks perfectly and the sauce becomes a luscious glaze.
-
The Marinade Magic: Grab a medium-sized bowl. This is where our flavor foundation begins. Whisk together the soy sauce, brown sugar, rice vinegar, and sesame oil. See how the brown sugar is dissolving? That sweetness is crucial. Now, stir in your minced garlic and the grated ginger, if you’re using it. Give it another good whisk to combine everything thoroughly. This liquid is bursting with potential!
-
Give the Chicken a Flavor Bath: Add your 1-inch chicken pieces to the marinade you just made. Toss them gently with your hands or a spoon, making sure every piece is well coated. Don’t be shy! This is where the chicken starts absorbing all that wonderful sweet, salty, and tangy goodness. Let this sit and marinate for at least 15 minutes. This minimum time is enough to start infusing flavor, but don’t feel rushed! You can let it go longer, up to 30 minutes or even a couple of hours in the fridge if you’re prepping ahead. Use this time to get your rice cooking, slice your green onions, or get out the skillet.
-
Prep the Thickener: While the chicken is soaking up flavor, grab a small bowl. This is for our cornstarch slurry, the secret to a beautiful, glossy sauce. Whisk together the cornstarch and the 2 tablespoons of water until there are absolutely no lumps. It should look like milky water. Set this aside for now; you’ll need to give it another quick whisk right before you add it to the pan, as cornstarch tends to settle.
-
Heat Things Up: Place a large skillet or a wok over medium-high heat on your stove. You want this pan to get nice and hot before adding the chicken. Add the tablespoon of cooking oil and let it heat until it shimmers slightly. This hot pan is crucial for getting a good sear on the chicken, which is a key step in preventing dryness.
-
Sear for Success (The Dry Chicken Slayer!): This is arguably the most important step for juicy chicken! Carefully remove the marinated chicken pieces from the bowl, letting any excess marinade drip back into the bowl (we are definitely saving that marinade!). Place the chicken pieces in the hot skillet in a single layer. It’s essential not to overcrowd the pan here. If you put too much chicken in at once, the temperature of the pan will drop, and the chicken will steam instead of searing. Steam means grey, sad chicken; sear means golden-brown, flavorful chicken! Cook for about 3-4 minutes per side. You’re looking for beautiful browning and caramelization. The high heat cooks the outside quickly, creating a barrier that helps keep the juices in. Cook until the chicken is just cooked through and no longer pink inside. You can cut into one piece to check. Remove the perfectly seared chicken from the pan and set it aside on a plate. Don’t worry if it’s not cooked 100% through yet; it will finish cooking briefly in the sauce.
-
Sauce Foundation: With the chicken removed, carefully pour the reserved marinade into the hot skillet. Be mindful as it might bubble up! Bring this marinade to a simmer over medium heat. Use a wooden spoon or spatula to scrape up any delicious browned bits stuck to the bottom of the pan – those are tiny flavor bombs that will make your sauce even better!
-
Pineapple Party: Add the pineapple chunks to the simmering marinade. Let them cook for just 2-3 minutes. This helps them heat through and allows their sweet and tangy juices to mingle with the marinade flavors.
-
The Glorious Glaze: Now it’s time to thicken the sauce into that beautiful glaze. Give your cornstarch slurry another quick whisk – remember how it settled? While stirring the simmering sauce continuously (this is important!), slowly pour the whisked slurry into the pan. Keep stirring! You’ll notice the sauce start to thicken quite quickly, transforming into a glossy, clingy glaze right before your eyes. Stop adding slurry when it reaches your desired thickness. If it gets too thick, you can add a tablespoon or two of water or chicken broth.
-
Reunite and Coat: Gently return the cooked chicken pieces to the skillet with the thickened sauce and pineapple. Toss everything carefully with a spoon or spatula to ensure every piece of chicken and pineapple is evenly coated in the gorgeous glaze. Cook for just 1 more minute at a gentle simmer. This is only to heat the chicken back through and make sure it’s fully coated. Resist the urge to let it simmer for longer at this stage, as prolonged simmering in the sauce can cause the chicken to toughen up, undoing all our hard work to keep it juicy!
-
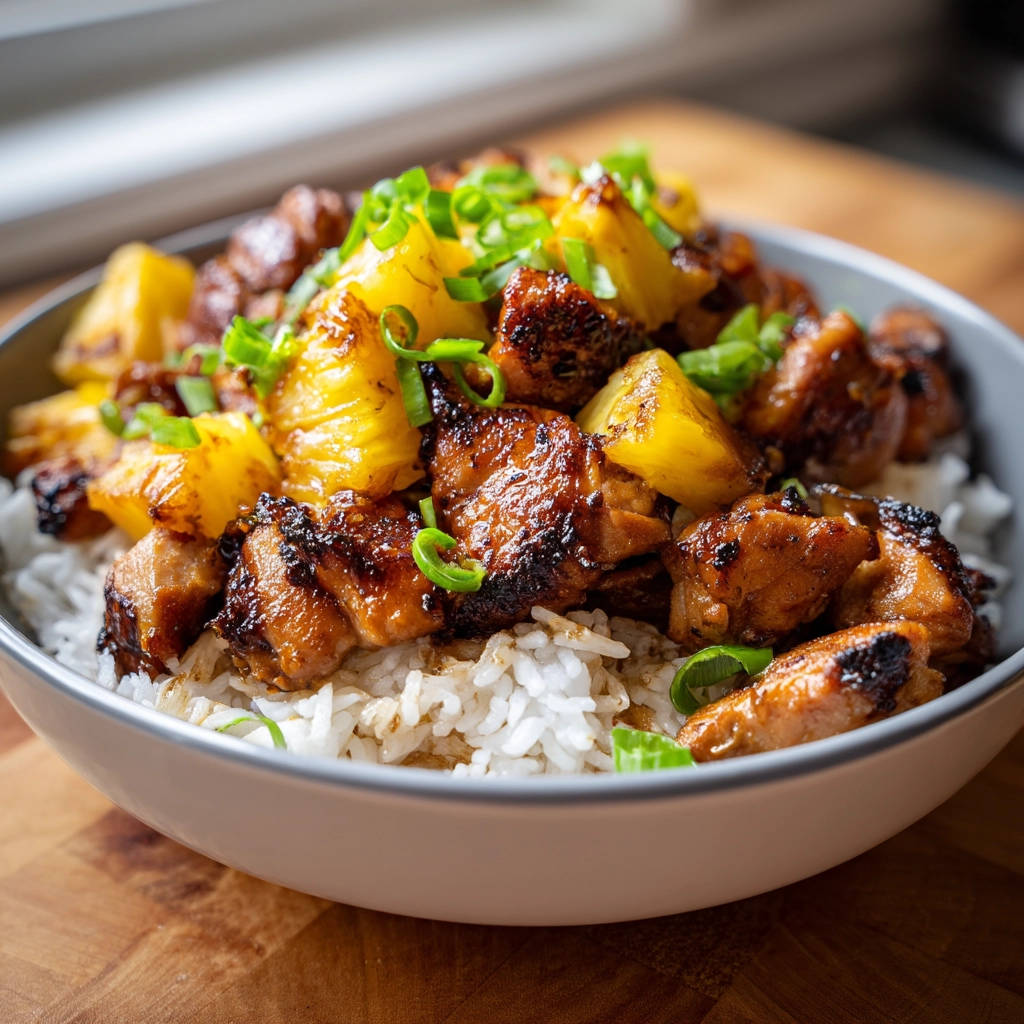
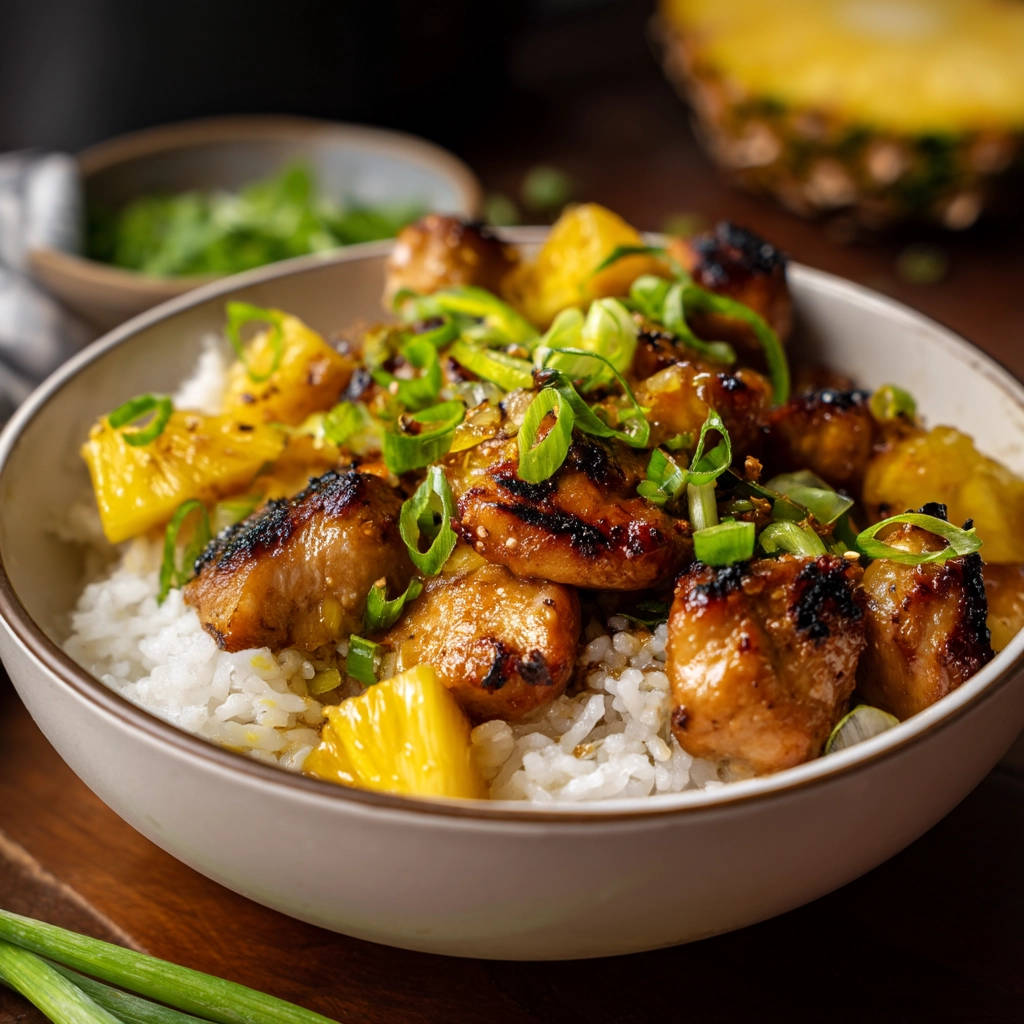
Serve Immediately: Your spectacular pineapple chicken and rice is ready! Spoon generous portions of the chicken, pineapple, and that amazing glaze over hot, fluffy cooked white rice. Finish with a generous scattering of sliced green onions for freshness and color. Enjoy every tender, flavorful bite!
Tips for Perfect Pineapple Chicken Every Time
While the steps above are your roadmap to success, here are a few extra tips and tricks to make sure your pineapple chicken and rice turns out absolutely perfect:
- Chicken Prep is Key: Make sure your chicken pieces are roughly the same size (about 1 inch). This ensures even cooking. Patting the chicken dry with paper towels before adding it to the marinade can also help you achieve a better sear later on. More surface moisture hinders browning!
- Don’t Rush the Sear: Patience during the searing step (Step 5) is crucial for flavor and texture. Make sure the pan is hot and give the chicken space. If you have a small skillet, cook the chicken in batches rather than crowding it. It’s worth the extra minute!
- Marination Time: While 15 minutes is the minimum, letting the chicken marinate for 30 minutes allows the flavors to penetrate a bit more deeply. Avoid marinating for too long (more than 2-3 hours), especially with the acidic components, as it can start to break down the chicken’s texture.
- Pineapple Choice: Both fresh and canned pineapple work. Fresh pineapple will have a brighter, slightly more acidic flavor, while canned will be sweeter and softer. Choose based on your preference and what you have on hand.
- Grate vs. Mince Ginger/Garlic: While mincing garlic is standard, grating both garlic and ginger on a microplane creates a finer pulp that disperses flavor more evenly throughout the marinade and sauce.
- Adjust Sweetness and Saltiness: Taste the marinade before adding the chicken (or a tiny bit of the sauce before thickening). You can slightly adjust the brown sugar for sweetness or add a tiny pinch of salt if needed, although the soy sauce usually provides enough saltiness.
- Controlling Sauce Thickness: If your sauce is too thin after adding the slurry, whisk a little more cornstarch and water in a separate tiny bowl and add it gradually, stirring constantly, until it reaches the desired thickness. If it’s too thick, stir in a tablespoon of water or chicken broth.
- Serving Temperature: This dish is best served immediately after the chicken is returned to the pan. The glaze is at its prime thickness and glossiness.
- Spice it Up: Want a little heat? Add a pinch of red pepper flakes to the marinade or sauce, or drizzle with a little sriracha before serving.
Serving Suggestions for Your Pineapple Chicken Delight
This sweet and savory chicken with its luscious glaze is fantastic over plain white rice, allowing the chicken’s flavors to shine. But don’t feel limited! Here are a few other ideas to complete your meal:
Instead of white rice, consider serving it over fluffy jasmine rice for added fragrance or brown rice for a nuttier flavor and more fiber. You could even serve it over
for a different texture and nutritional boost. If you’re looking for other chicken and rice options, you might also enjoy our
.
To add some vegetables, consider steaming some broccoli or green beans to serve alongside. A quick stir-fry of bell peppers and snap peas would also be a colorful and delicious addition, perhaps inspired by the techniques used in our
.
A simple side salad can also be a refreshing counterpoint to the rich glaze. Something light like an
or a crisp cucumber salad would work beautifully.
Your Pineapple Chicken and Rice Questions Answered (FAQ)
Got questions? I’ve got answers! Here are some common inquiries about making this delightful pineapple chicken:
Can I use chicken breast instead of thighs?
Yes, you technically can use boneless, skinless chicken breast. However, chicken breast is much leaner and has a higher tendency to dry out, especially when cooked at high heat and then added back into a sauce. If you use breast, cut the pieces slightly larger (maybe 1.5 inches) and be extra careful not to overcook it during the searing step. Cook it until it’s just barely cooked through before removing it from the pan, as it will finish cooking in the sauce. The juicy texture truly comes from using thighs in this recipe.
Can I make the sauce less sweet?
Absolutely. The amount of brown sugar in the recipe creates a balanced sweet and savory flavor profile, but if you prefer less sweetness, you can reduce the brown sugar slightly (by a half tablespoon or tablespoon). Taste the sauce before thickening and adjust as needed. Using fresh pineapple might also result in a slightly less sweet sauce compared to canned.
What if I don’t have fresh ginger? Can I use ground ginger?
Fresh ginger is recommended for the best flavor, but you can substitute with ground ginger. Use about 1/4 teaspoon of ground ginger for every 1/2 teaspoon of fresh grated ginger. Keep in mind that dried spices are more concentrated, so start with less and add more if needed.
How can I make this dish spicier?
There are a few ways! You can add a pinch of red pepper flakes to the marinade. For more heat, add a tablespoon or two of your favorite chili garlic sauce or sriracha to the sauce along with the pineapple chunks. Taste as you go to control the spice level.
Can I add other vegetables to the skillet?
Yes, this is a great way to make it a one-pan meal! Add quick-cooking vegetables like sliced bell peppers, snap peas, broccoli florets, or sliced carrots to the skillet after you remove the chicken (Step 5). Cook them for a few minutes until they are tender-crisp before adding the reserved marinade (Step 6). Continue with the rest of the steps as written. Just make sure you don’t overcrowd the pan when cooking the vegetables either.
How long can I store leftovers?
Leftover pineapple chicken and rice can be stored in an airtight container in the refrigerator for 3-4 days. Reheat gently in a skillet over medium heat or in the microwave. Be careful not to overheat the chicken when reheating to maintain its tenderness.
Can I freeze this recipe?
Yes, you can freeze the cooked pineapple chicken and rice. Allow it to cool completely, then store it in a freezer-safe container or bag for up to 3 months. Thaw overnight in the refrigerator and reheat gently. The sauce texture might change slightly after freezing, but the flavor will still be great.
Why did my sauce not thicken?
Several reasons could cause this. Make sure you whisk the cornstarch slurry right before adding it, as cornstarch settles quickly. Ensure your sauce is simmering when you add the slurry – cornstarch needs heat to activate and thicken. Lastly, make sure you’re using the correct ratio of cornstarch to water for the slurry as specified in the recipe.
Enjoy Your Homemade Pineapple Chicken and Rice!
This pineapple chicken and rice recipe is more than just a meal; it’s a celebration of vibrant flavors and textures, and proof that you absolutely can make incredibly juicy and delicious chicken at home. The sweet and savory glaze clings perfectly to the tender chicken and tangy pineapple, creating a dish that’s comforting yet exciting.
Whether you’re whipping it up on a busy weeknight or making it for a casual weekend dinner, it’s guaranteed to bring smiles to the table. Give this recipe a try, and I promise you won’t be disappointed! Let me know in the comments how it turns out for you!
Pineapple Chicken and Rice

Ingredients
- 2 boneless, skinless chicken thighs, cut into 1-inch pieces
- 1/4 cup soy sauce (use gluten-free if needed)
- 2 tablespoons brown sugar
- 1 tablespoon rice vinegar
- 1 teaspoon sesame oil
- 1 clove garlic, minced
- 1/2 teaspoon grated fresh ginger (optional, but great!)
- 1 tablespoon cornstarch
- 2 tablespoons water
- 1 tablespoon cooking oil (vegetable or canola)
- 1 cup fresh or canned pineapple chunks
- Cooked white rice, for serving
- Green onions, sliced, for garnish
Directions
- In a medium bowl, whisk together the soy sauce, brown sugar, rice vinegar, sesame oil, minced garlic, and grated ginger (if using).
- Add the cut chicken pieces to the bowl and toss to coat. Let marinate for at least 15 minutes while you prepare other things.
- In a small bowl, whisk together the cornstarch and water to create a slurry. Set aside.
- Heat the cooking oil in a large skillet or wok over medium-high heat.
- Remove the chicken from the marinade, letting excess drip off slightly (reserve the marinade). Add chicken to the hot skillet in a single layer, being careful not to overcrowd. Cook for 3-4 minutes per side, or until well browned and caramelized. This quick, high-heat searing is key to locking in juices and getting that beautiful color without overcooking. Cook until the chicken is just cooked through and no longer pink inside. Remove the chicken from the pan and set aside.
- Pour the reserved marinade into the hot skillet. Bring to a simmer, scraping up any browned bits from the bottom of the pan.
- Add the pineapple chunks to the simmering marinade. Let cook for 2-3 minutes until heated through.
- Whisk the cornstarch slurry again and slowly pour it into the simmering sauce while stirring continuously. The sauce will thicken quickly and become a glossy glaze.
- Return the cooked chicken to the skillet with the sauce and pineapple. Toss gently to coat everything evenly in the glaze. Cook for just 1 more minute to heat the chicken back through and ensure it’s fully coated. Don’t simmer the chicken in the sauce for too long at this stage, as that can cause it to become tough.
- Serve the pineapple chicken and sauce immediately over hot cooked white rice. Garnish generously with sliced green onions.