Have you ever dreamed of baking a show-stopping layer cake, only to be defeated by the dreaded sinking middle? I know that feeling all too well! For years, I avoided layer cakes, convinced they were destined to be uneven, lopsided messes. But fear no more! This Raspberry Chocolate Layer Cake recipe not only delivers incredible flavor, but also incorporates a simple, almost unbelievable, trick to prevent that frustrating sinking issue. Get ready to bake a truly impressive dessert that will wow your friends and family!
Why You’ll Love This Raspberry Chocolate Layer Cake
This cake isn’t just about looks; it’s a symphony of flavors and textures that will have everyone begging for a second slice. Here’s why it’s a must-try:
- Rich Chocolate Flavor: The combination of cocoa powder and chopped chocolate creates a deep, decadent chocolate experience.
- Bursting with Fresh Raspberries: The tangy raspberries cut through the richness of the chocolate, providing a refreshing balance.
- Moist and Tender Cake: Buttermilk and hot coffee work together to create a cake that’s incredibly moist and stays fresh for days.
- No More Sinking! That’s right; the secret technique ensures a level, stable cake every time.
- Impressive Presentation: With its beautiful layers and fresh raspberry garnish, this cake is a showstopper.
Gathering Your Ingredients for Raspberry Chocolate Layer Cake
Before we dive into baking, let’s talk ingredients. We’re aiming for a balance of rich chocolate, tangy raspberry, and moist, tender cake layers. The quality of your ingredients will shine through in the final product, so choose wisely! The combination of cocoa and coffee together with the cream cheese produces an amazing flavor. You can also make different cake variation by using our decadent chocolate topped cream cake recipe.
For the Chocolate Cake Layers:
- 2 cups All-Purpose Flour: This provides the structure for our cake. Ensure it’s fresh for the best rise.
- 2 cups Granulated Sugar: Sweetness is key! Granulated sugar also helps to create a tender crumb.
- ¾ cup Unsweetened Cocoa Powder: Opt for a high-quality cocoa powder for a deep, rich chocolate flavor. Dutch-processed cocoa powder will give you a darker, more intense flavor, but natural cocoa powder works well too.
- 1 ½ teaspoons Baking Powder & 1 ½ teaspoons Baking Soda: These are our leavening agents, working together to create a light and airy cake. Make sure they are not expired!
- 1 teaspoon Salt: Salt enhances the other flavors in the cake and balances the sweetness.
- 1 cup Buttermilk: Buttermilk adds moisture and a slight tang that complements the chocolate perfectly. If you don’t have buttermilk, you can make a substitute by adding 1 tablespoon of lemon juice or vinegar to a cup of milk. Let it sit for 5 minutes before using.
- ½ cup Vegetable Oil: Oil helps to keep the cake moist and tender.
- 2 large Eggs: Eggs provide structure and richness to the cake.
- 2 teaspoons Vanilla Extract: Vanilla enhances the other flavors and adds a touch of warmth. Use pure vanilla extract for the best flavor.
- 1 cup Hot Coffee: This might seem like a surprising ingredient, but hot coffee intensifies the chocolate flavor and adds moisture to the cake. Don’t worry; you won’t taste the coffee itself.
For the Raspberry Chocolate Filling and Frosting:
- 16 ounces Fresh Raspberries: Fresh raspberries are essential for that vibrant, tangy flavor. You’ll use them both mashed and whole for different textures.
- 8 ounces Chocolate Bars, Chopped: Use your favorite chocolate for this! Dark chocolate will provide a more intense flavor, while milk chocolate will be sweeter.
- 2 cups Heavy Cream: Heavy cream is the base for our whipped cream frosting. Make sure it’s very cold for the best results.
- 1 cup Powdered Sugar: Powdered sugar sweetens the whipped cream and helps to stabilize it.
Crafting Your Raspberry Chocolate Layer Cake: Step-by-Step
Alright, let’s get baking! Don’t be intimidated by the multiple steps; each one is straightforward, and the results are well worth the effort. Remember our secret trick, and get ready for a perfectly level layer cake!
- Preheat and Prep: Start by preheating your oven to 350 degrees F (175 degrees C). This ensures that the cake bakes evenly. Next, grease and flour three 9-inch cake pans. This prevents the cake from sticking and allows for easy removal. A light dusting of cocoa powder instead of flour works well too, preventing any white residue on the baked cakes.
- Combine Dry Ingredients: In a large bowl, whisk together the flour, sugar, cocoa powder, baking powder, baking soda, and salt. Whisking is crucial here to evenly distribute the leavening agents and cocoa powder, preventing lumps and ensuring a uniform texture.
- Incorporate Wet Ingredients (Except Coffee): Add the buttermilk, oil, eggs, and vanilla extract to the dry ingredients. Beat with an electric mixer until well combined. Don’t overmix at this stage; just mix until everything is incorporated. Overmixing can lead to a tough cake.
- The Coffee Infusion: Gradually add the hot coffee to the batter, mixing until it is thin and smooth. The batter will be quite liquidy, which is perfectly normal. The hot coffee helps to bloom the cocoa powder, intensifying its flavor.
- Divide and Conquer: Divide the batter evenly among the prepared cake pans. Using a kitchen scale ensures that each layer is the same thickness, leading to a more even and visually appealing cake.
- The Sinking Secret: Bake for 25-30 minutes, or until a toothpick inserted into the center comes out clean. This is the crucial part! Immediately after removing the cakes from the oven, drop each pan from a height of about 6 inches onto a countertop covered with a thick towel. This releases trapped air and minimizes sinking and shrinking as the cake cools. Don’t be afraid to do this; it’s the key to a level cake!
- Cooling Time: Let the cakes cool in the pans for 10 minutes before inverting them onto a wire rack to cool completely. This allows the cakes to firm up slightly, preventing them from breaking when inverted. Ensure the cakes are completely cool before frosting.
- Raspberry Prep: While the cakes are cooling, prepare the raspberry filling. Gently mash half of the raspberries. Leave the remaining raspberries whole. The combination of mashed and whole raspberries provides a delightful textural contrast.
- Whip It Good: In a medium bowl, whip the heavy cream with the powdered sugar until stiff peaks form. Be careful not to overwhip the cream, as it can turn grainy.
- Level Up: Once the cakes are completely cool, use a serrated knife to level the tops if needed. This ensures that the layers stack evenly and creates a professional-looking cake.
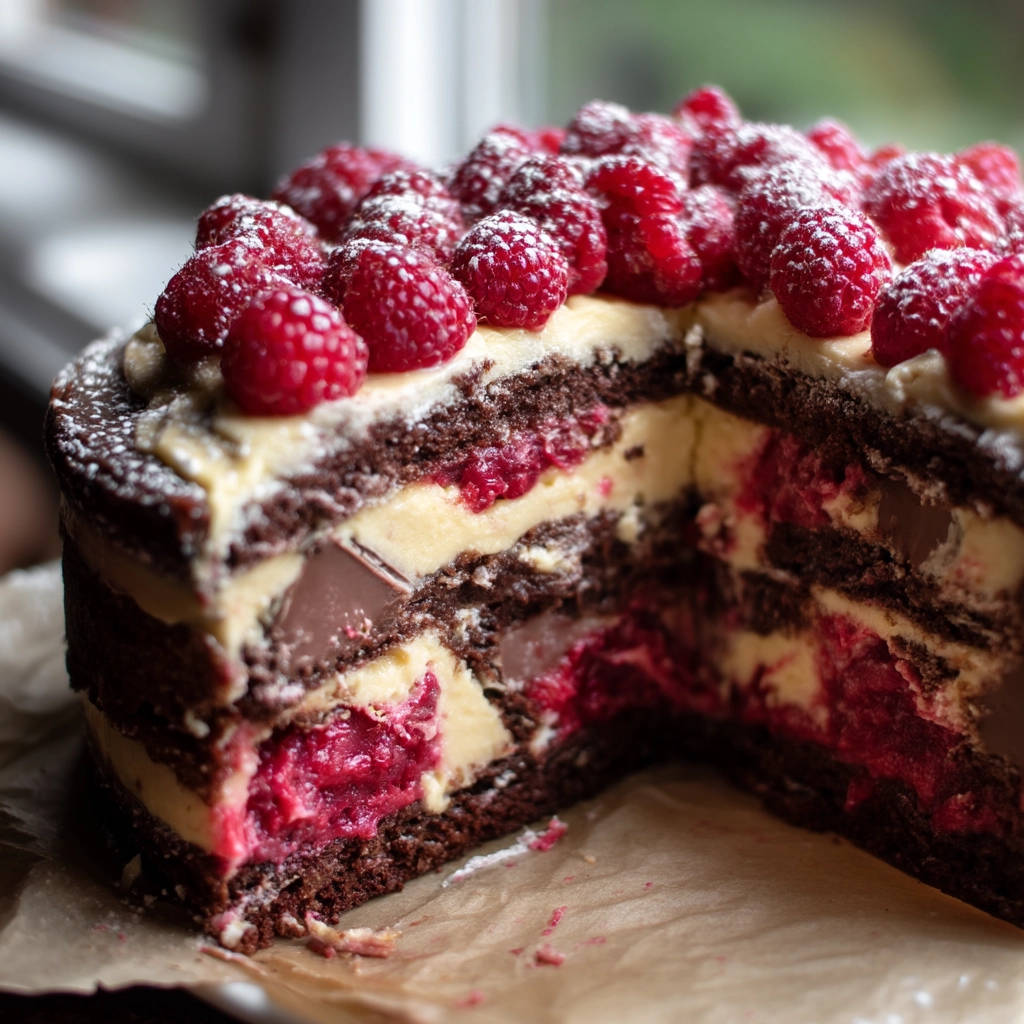
- Layer One: Place one cake layer on a serving plate. Spread half of the whipped cream over the cake layer.
- Raspberry Chocolate Extravaganza: Sprinkle half of the chopped chocolate over the whipped cream, then spread the mashed raspberries evenly over the chocolate. Top with half of the whole raspberries.
- Repeat Performance: Repeat layers: cake, whipped cream, chocolate, mashed raspberries, and whole raspberries.
- Final Flourish: Top with the final cake layer and the remaining whipped cream. Garnish with fresh raspberries and a dusting of powdered sugar.
- Chill Out: Chill the cake for at least 30 minutes before serving to allow the layers to set. This makes it easier to slice and serve.
Tips for Perfect Raspberry Chocolate Layer Cake Every Time
Here are a few extra tips to ensure your Raspberry Chocolate Layer Cake is a resounding success:
- Room Temperature Ingredients: While the coffee needs to be hot, using room temperature eggs and buttermilk can help create a smoother batter.
- Don’t Overbake: Overbaking will result in a dry cake. Start checking for doneness at 25 minutes and use a toothpick to test.
- Evenly Distribute Raspberries: Make sure the raspberries are evenly distributed in the filling layers to ensure every bite is bursting with flavor.
- Stabilized Whipped Cream: For a more stable whipped cream frosting, consider adding a tablespoon of mascarpone cheese or cream cheese before whipping.
- Storage: Store leftover cake in an airtight container in the refrigerator for up to 3 days.
- You can easily adapt this recipe into a delicious sheet cake recipe.
What to Serve With Raspberry Chocolate Layer Cake
This Raspberry Chocolate Layer Cake is a showstopper on its own, but here are a few ideas to complement it:
- Fresh Berries: A simple bowl of fresh berries will enhance the raspberry flavor of the cake.
- Vanilla Ice Cream: A scoop of vanilla ice cream is a classic pairing that complements the chocolate and raspberry perfectly.
- Coffee or Tea: A warm cup of coffee or tea is the perfect accompaniment to this decadent dessert.
Your Raspberry Chocolate Layer Cake Questions Answered (FAQ)
Can I use frozen raspberries instead of fresh?
While fresh raspberries are ideal, you can use frozen raspberries if necessary. Be sure to thaw them completely and drain any excess liquid before using. They may be a bit softer than fresh raspberries, so handle them gently.
Can I make this cake gluten-free?
Yes, you can substitute the all-purpose flour with a gluten-free all-purpose flour blend. Be sure to choose a blend that contains xanthan gum or add it separately, as it helps to bind the ingredients and provide structure to the cake.
Can I make the cake layers ahead of time?
Absolutely! The cake layers can be baked ahead of time and stored in an airtight container at room temperature for up to 2 days or in the freezer for up to a month. Just make sure they are completely cooled before storing.
Why did my whipped cream turn out runny?
Runny whipped cream is usually caused by not using cold enough heavy cream or overwhipping. Make sure your heavy cream is very cold and whip it just until stiff peaks form. You can also add a stabilizer like powdered sugar or cornstarch to help keep it from becoming runny.
Can I use a different type of chocolate?
Yes! Feel free to experiment with different types of chocolate. Dark chocolate will give you a more intense flavor, while milk chocolate will be sweeter. You can also use white chocolate for a completely different flavor profile.
Enjoy Your Homemade Raspberry Chocolate Layer Cake!
There you have it – a stunning Raspberry Chocolate Layer Cake that’s guaranteed to impress, without the sinking stress! This recipe is more than just a dessert; it’s a testament to the fact that anyone can bake a beautiful, professional-looking cake with the right guidance and a little secret trick. So, gather your ingredients, preheat your oven, and get ready to create a masterpiece. And don’t forget to share your creations and experiences in the comments below! We love hearing from you. Happy baking!
Raspberry Chocolate Layer Cake (Stops Cakes Sinking!)

Ingredients
- 2 cups all-purpose flour
- 2 cups granulated sugar
- 3/4 cup unsweetened cocoa powder
- 1 1/2 teaspoons baking powder
- 1 1/2 teaspoons baking soda
- 1 teaspoon salt
- 1 cup buttermilk
- 1/2 cup vegetable oil
- 2 large eggs
- 2 teaspoons vanilla extract
- 1 cup hot coffee
- 16 ounces fresh raspberries
- 8 ounces chocolate bars, chopped
- 2 cups heavy cream
- 1 cup powdered sugar
Directions
- Preheat oven to 350 degrees F. Grease and flour three 9-inch cake pans.
- In a large bowl, whisk together flour, sugar, cocoa powder, baking powder, baking soda, and salt.
- Add buttermilk, oil, eggs, and vanilla extract. Beat until well combined.
- Gradually add hot coffee, mixing until batter is thin and smooth.
- Divide batter evenly among the prepared cake pans.
- THE SECRET: Bake for 25-30 minutes, or until a toothpick inserted into the center comes out clean. IMMEDIATELY after removing the cakes from the oven, drop each pan from a height of about 6 inches onto a countertop covered with a thick towel. This releases trapped air and minimizes sinking and shrinking as the cake cools.
- Let cakes cool in pans for 10 minutes before inverting onto a wire rack to cool completely.
- While cakes are cooling, prepare the raspberry filling. Gently mash half of the raspberries. Leave the remaining raspberries whole.
- In a medium bowl, whip heavy cream with powdered sugar until stiff peaks form.
- Once the cakes are completely cool, level the tops if needed.
- Place one cake layer on a serving plate. Spread half of the whipped cream over the cake layer.
- Sprinkle half of the chopped chocolate over the whipped cream.
- Spread mashed raspberries evenly over the chocolate. Top with half of the whole raspberries.
- Repeat layers: cake, whipped cream, chocolate, mashed raspberries, and whole raspberries.
- Top with the final cake layer and the remaining whipped cream. Garnish with fresh raspberries and a dusting of powdered sugar.
- Chill for at least 30 minutes before serving to allow the layers to set.