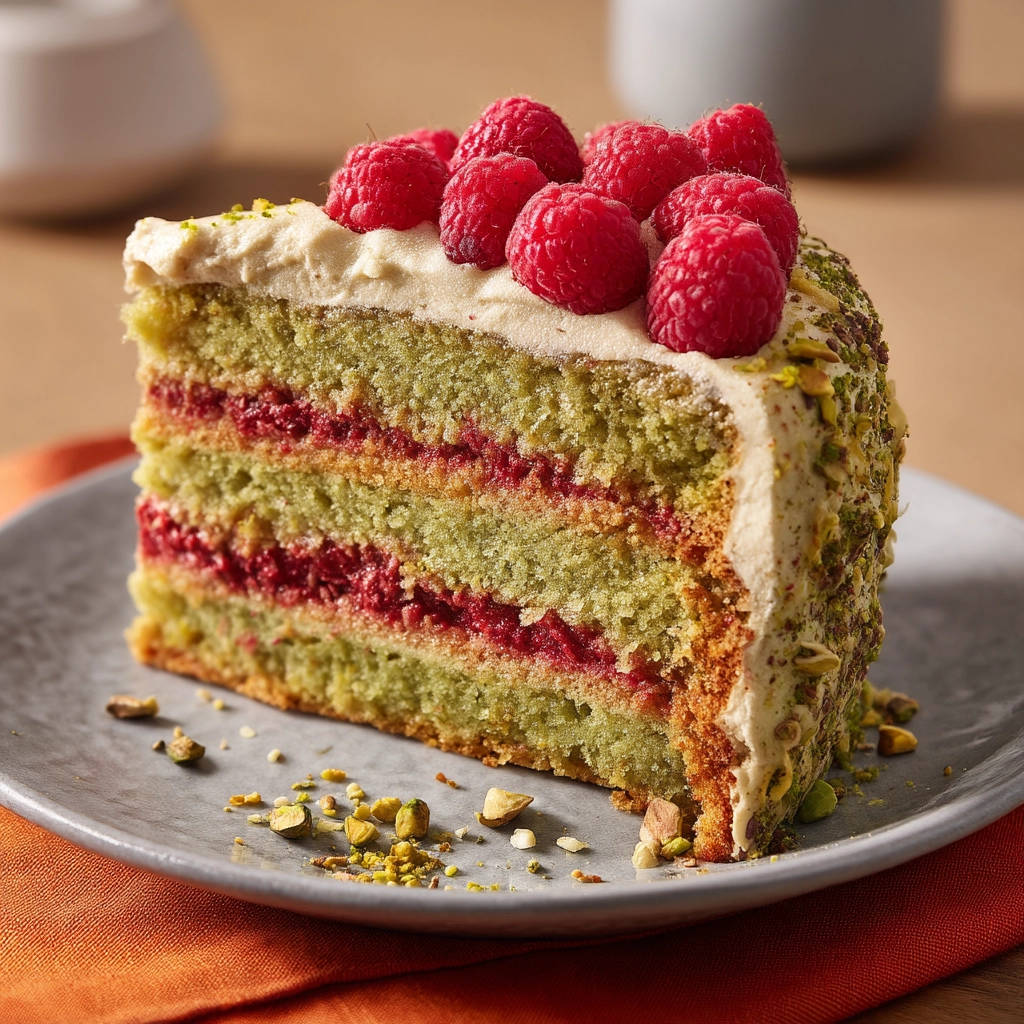
Is there anything more impressive than a beautifully layered cake? The delicate layers, the vibrant colors, the promise of a sweet, satisfying bite… It’s a showstopper! But let’s be honest, baking a layer cake can be intimidating. The biggest fear? That dreaded sinking middle! But fear not, my friends! This Raspberry Pistachio Layer Cake recipe is not only stunning and delicious but also comes with a foolproof secret to prevent sinking. Get ready to bake a cake that’s as impressive as it is tasty!
Why You’ll Love This Raspberry Pistachio Cake
This Raspberry Pistachio Layer Cake is more than just a pretty dessert; it’s a flavor explosion and a baking triumph! Here’s why you’ll fall in love with it:
- No More Sinking: Our simple secret ensures perfectly level cake layers every single time. Say goodbye to cake anxiety!
- Flavor Symphony: The combination of sweet raspberries, earthy pistachios, and creamy frosting is simply divine.
- Visually Stunning: The layers of pink jam, green cake (if you choose to add the optional coloring), and white frosting create a gorgeous presentation.
- Perfect for Any Occasion: Whether it’s a birthday, holiday, or just a special treat, this cake is guaranteed to impress.
- Surprisingly Simple: While it looks complex, this recipe is broken down into easy-to-follow steps, making it achievable for bakers of all skill levels.
Gathering Your Ingredients for Raspberry Pistachio Layer Cake
Before we dive into the baking process, let’s gather our ingredients. This Raspberry Pistachio Layer Cake boasts a delightful combination of flavors and textures, and each ingredient plays a crucial role in achieving the perfect balance. We’ll be building layers of delicate cake, bright raspberry filling, and a light, airy frosting. Here’s what you’ll need:
For the Cake Layers:
- 2 1/2 cups all-purpose flour: This forms the structure of our cake. Using all-purpose flour ensures a tender crumb.
- 1 teaspoon baking powder & 1/2 teaspoon baking soda: These are our leavening agents, responsible for creating a light and airy texture. The combination of both provides the perfect rise.
- 1/4 teaspoon salt: Salt enhances the flavors of all the other ingredients.
- 1 cup granulated sugar: For sweetness and moisture. We’re using granulated sugar for a classic cake texture.
- 1/2 cup unsalted butter, softened: Softened butter creams beautifully with sugar, creating a light and fluffy base for the cake. Make sure it’s softened, not melted!
- 1/2 cup vegetable oil: Oil adds moisture to the cake, resulting in a tender and moist crumb that stays fresh longer.
- 2 large eggs: Eggs bind the ingredients together and add richness and structure to the cake.
- 1 teaspoon vanilla extract: Vanilla extract enhances the overall flavor profile, adding a touch of warmth and complexity.
- 1 cup buttermilk: Buttermilk adds a subtle tang and contributes to a tender crumb. If you don’t have buttermilk on hand, you can make a substitute by adding 1 tablespoon of white vinegar or lemon juice to a liquid measuring cup, then filling the rest of the cup with milk. Let it sit for 5 minutes before using.
- 1/2 cup shelled pistachios, finely ground: These add a lovely nutty flavor and a subtle green hue to the cake. Be sure to grind them finely for even distribution.
- Green food coloring (optional): This is purely for aesthetics. If you want to enhance the green color of the cake, a few drops of food coloring will do the trick.
For the Filling & Frosting:
- 1 1/2 cups raspberry jam: This provides a burst of fruity sweetness and a beautiful pink layer between the cakes. Choose a high-quality jam with a good raspberry flavor.
- 1 cup heavy cream: The base of our light and airy whipped cream frosting. Make sure it’s cold for best results.
- 1/2 cup powdered sugar: For sweetening the whipped cream frosting. Powdered sugar dissolves easily, creating a smooth and creamy texture.
- 1/4 cup mascarpone cheese: This adds a touch of richness and tang to the whipped cream frosting. It also helps to stabilize the frosting, making it easier to work with.
- Fresh raspberries for topping: For a beautiful garnish and an extra burst of fresh raspberry flavor.
Crafting Your Raspberry Pistachio Layer Cake: Step-by-Step
Now for the fun part: baking! Don’t be intimidated by the layered look. We’ve broken down each step to make it easy to follow. The key to a successful layer cake is patience and attention to detail. And remember, our secret weapon is ensuring the cake is fully baked to prevent sinking! Let’s get started:
- Preheat and Prep: Start by preheating your oven to 350 degrees F (175 degrees C). This ensures even baking. While the oven heats, grease and flour three 8-inch round cake pans. This prevents the cakes from sticking and ensures easy removal. A light dusting of flour after greasing is crucial!
- Whisk the Dry Ingredients: In a large bowl, whisk together the flour, baking powder, baking soda, and salt. Whisking incorporates air and ensures that the leavening agents are evenly distributed throughout the flour. This step is essential for a light and airy cake.
- Cream the Wet Ingredients: In a separate bowl, cream together the sugar, softened butter, and oil until light and fluffy. This step incorporates air and creates a stable base for the batter. The mixture should be noticeably lighter in color and texture. Using an electric mixer makes this process much easier.
- Incorporate the Eggs and Vanilla: Beat in the eggs one at a time, allowing each egg to fully incorporate before adding the next. Then, stir in the vanilla extract. Adding the eggs one at a time helps to prevent the batter from curdling.
- Combine Wet and Dry: Gradually add the dry ingredients to the wet ingredients, alternating with the buttermilk, beginning and ending with the dry ingredients. Beat until just combined. This method prevents overmixing, which can result in a tough cake. It’s important to add the dry ingredients and buttermilk in alternating additions to maintain a smooth batter.
- Add the Pistachios and Coloring: Stir in the ground pistachios and green food coloring (if desired). Be careful not to overmix at this stage. We just want to evenly distribute the pistachios and coloring.
- Divide and Conquer: Evenly divide the batter among the prepared cake pans. Using a kitchen scale ensures that each layer is the same thickness, resulting in a visually appealing and evenly baked cake.
- The Secret to No Sinking: Bake It Right!: Bake for 25-30 minutes, or until a toothpick inserted into the center comes out clean. This is the most crucial step! Undercooking is the primary cause of sinking cakes. Ovens vary, so check for doneness slightly earlier than the suggested time. Don’t be afraid to leave the cakes in for a few extra minutes if needed. Better a slightly overbaked cake than a sunken one!
- Cool Down: Let the cakes cool in the pans for 10 minutes before inverting them onto a wire rack to cool completely. This prevents the cakes from breaking apart while still warm.
- Whip Up the Frosting: While the cakes are cooling, prepare the frosting. In a large bowl, beat the heavy cream and powdered sugar until stiff peaks form. Gently fold in the mascarpone cheese. Be careful not to overwhip the cream, as it can turn grainy.
- Assemble the Masterpiece: To assemble the cake, place one cake layer on a serving plate. Spread with raspberry jam. Repeat with the second cake layer. Top with the third cake layer.
- Frost and Flourish: Frost the top and sides of the cake with the whipped cream frosting. You can use a piping bag for a more decorative finish, or simply spread the frosting with a spatula.
- Garnish and Chill: Garnish with fresh raspberries and chopped pistachios. Refrigerate for at least 30 minutes before serving. This allows the frosting to set and the flavors to meld together.
Tips for Perfect Raspberry Pistachio Cake Every Time
Want to guarantee a show-stopping Raspberry Pistachio Layer Cake? Here are a few extra tips and tricks to ensure baking success:
- Room Temperature is Key: Ensure your butter, eggs, and buttermilk are at room temperature. This helps them emulsify properly, resulting in a smoother batter and a more even bake.
- Don’t Overmix: Overmixing develops the gluten in the flour, leading to a tough cake. Mix until just combined.
- Even Baking is Essential: Use oven thermometers to ensure your oven temperature is accurate. Rotate the cake pans halfway through baking for even browning.
- Leveling the Layers: If your cake layers aren’t perfectly level, you can use a serrated knife to trim the tops before frosting. This will create a more professional look.
- Chill Out: Chilling the cake layers before frosting makes them easier to handle and prevents the frosting from melting.
Optional Additions and Variations
Feel like getting creative? Here are some ways to customize this Raspberry Pistachio Layer Cake to your liking:
- Lemon Zest: Add the zest of one lemon to the cake batter for a brighter, more citrusy flavor.
- Almond Extract: Substitute 1/2 teaspoon of almond extract for half of the vanilla extract for a more pronounced nutty flavor.
- Different Berries: Use a mixed berry jam instead of raspberry jam, or garnish with a variety of fresh berries.
- Chocolate Shavings: Add some white chocolate shavings on top of the frosting along with the raspberries and pistachios. We also offer a decadent chocolate cake recipe if you are a chocolate fan.
If you’re interested in other recipes with Pistachios, you can search for “pistachio recipes” online to find a variety of cookies, muffins, and savory dishes incorporating pistachios.
Your Raspberry Pistachio Cake Questions Answered (FAQ)
Got questions? We’ve got answers! Here are some frequently asked questions about baking this Raspberry Pistachio Layer Cake:
Why did my cake sink in the middle?
The most common reason for a sunken cake is underbaking. Make sure to bake the cake until a toothpick inserted into the center comes out clean. Other possible causes include using old baking powder or baking soda, overmixing the batter, or opening the oven door too frequently during baking.
Can I make this cake gluten-free?
Yes, you can! Substitute the all-purpose flour with a gluten-free all-purpose flour blend. Be sure to use a blend that contains xanthan gum, which helps to bind the ingredients together and create a structure similar to gluten. Also, make sure all your ingredients are gluten-free.
Can I make the frosting ahead of time?
Yes, you can make the frosting ahead of time. Store it in an airtight container in the refrigerator for up to 2 days. When you’re ready to use it, rewhip it briefly to restore its texture.
How should I store the leftover cake?
Store leftover cake in an airtight container in the refrigerator for up to 3 days. The cake is best enjoyed within the first 24 hours, as the frosting may soften over time.
Enjoy Your Homemade Raspberry Pistachio Cake!
There you have it – a stunning and delicious Raspberry Pistachio Layer Cake that’s guaranteed to impress! With our simple secret to prevent sinking, you can bake this cake with confidence and enjoy the delightful combination of sweet raspberries, earthy pistachios, and creamy frosting. So, gather your ingredients, preheat your oven, and get ready to create a baking masterpiece. Don’t forget to leave a comment below and let us know how your cake turned out! And if you’re looking for another impressive dessert, why not try our easy caramel nut dessert jars? They’re another crowd-pleaser!
Raspberry Pistachio Layer Cake (Stops Cakes Sinking!)

Ingredients
- 2 1/2 cups all-purpose flour
- 1 teaspoon baking powder
- 1/2 teaspoon baking soda
- 1/4 teaspoon salt
- 1 cup granulated sugar
- 1/2 cup unsalted butter softened
- 1/2 cup vegetable oil
- 2 large eggs
- 1 teaspoon vanilla extract
- 1 cup buttermilk
- 1/2 cup shelled pistachios finely ground
- Green food coloring (optional)
- 1 1/2 cups raspberry jam
- 1 cup heavy cream
- 1/2 cup powdered sugar
- 1/4 cup mascarpone cheese
- Fresh raspberries for topping
Directions
- Preheat oven to 350 degrees F (175 degrees C). Grease and flour three 8-inch round cake pans.
- In a large bowl, whisk together flour, baking powder, baking soda, and salt.
- In a separate bowl, cream together sugar, butter, and oil until light and fluffy. Beat in eggs one at a time, then stir in vanilla extract.
- Gradually add dry ingredients to wet ingredients, alternating with buttermilk, beginning and ending with dry ingredients. Beat until just combined. Do not overmix.
- Stir in ground pistachios and green food coloring if desired.
- Evenly divide batter among prepared cake pans.
- **THE SECRET: Bake for 25-30 minutes, or until a toothpick inserted into the CENTER comes out CLEAN. This is crucial! Undercooking is the primary cause of sinking cakes. Ovens vary, so check for doneness slightly earlier than the suggested time.**
- Let cakes cool in pans for 10 minutes before inverting onto a wire rack to cool completely.
- While cakes are cooling, prepare the frosting. In a large bowl, beat heavy cream and powdered sugar until stiff peaks form. Gently fold in mascarpone cheese.
- To assemble cake, place one cake layer on a serving plate. Spread with raspberry jam. Repeat with the second cake layer. Top with the third cake layer.
- Frost the top and sides of the cake with the whipped cream frosting.
- Garnish with fresh raspberries and chopped pistachios.
- Refrigerate for at least 30 minutes before serving.