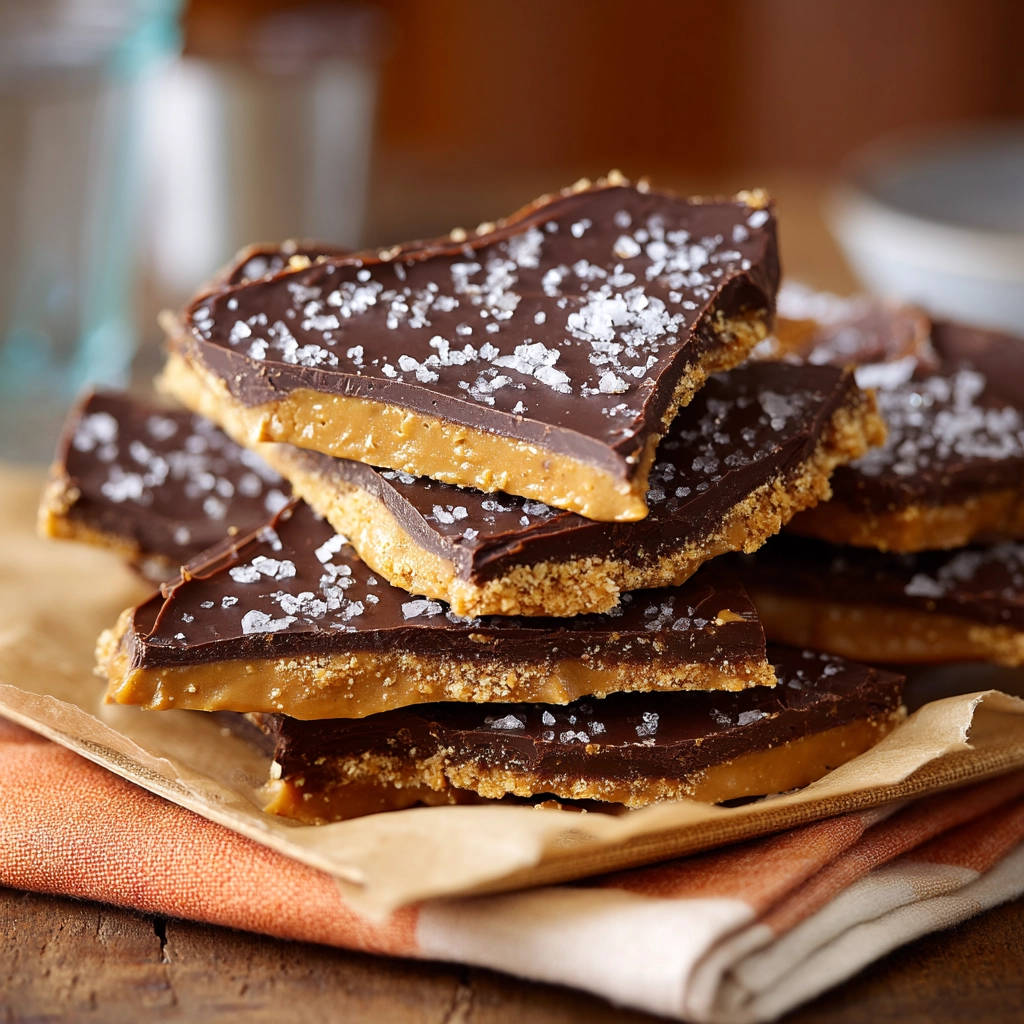
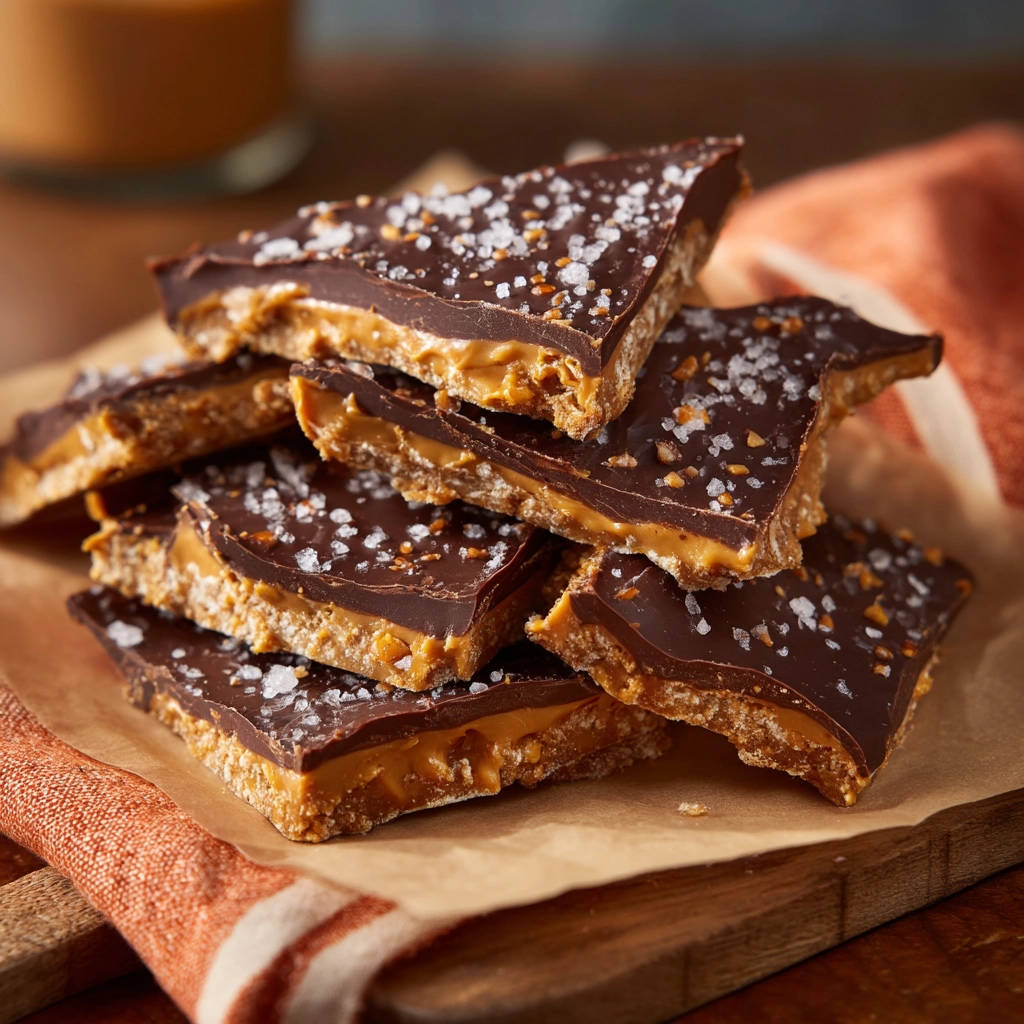
Oh, friend, do I have a treat for you today! We’re diving into the glorious world of Salted Chocolate Peanut Butter Bars. If you’re anything like me, you adore that classic combination: salty, sweet, creamy, and crunchy. These bars hit every single note beautifully. They’re a fan favorite for a reason – no baking required, simple ingredients, and utterly addictive.
But let’s be real. Layered bars, especially those with soft fillings and hard chocolate tops, can be notoriously tricky to slice. You dream of clean, distinct squares but often end up with a squishy, crumbly mess. Frustrating, right? For years, I struggled too! But through trial, error, and a few key discoveries, I’ve unlocked the secret to getting those picture-perfect slices every single time.
So, whether you’re a seasoned no-bake pro or just starting your kitchen adventures, get ready to make the most satisfyingly neat and delicious Salted Chocolate Peanut Butter Bars you’ve ever seen (and eaten!). Let’s get started!
Why You’ll Absolutely Love These Salted Chocolate Peanut Butter Bars
Besides the obvious answer (chocolate and peanut butter!), these bars are winners for so many reasons:
- Effortlessly Easy: No oven required means less fuss and a perfect recipe for warmer months or busy days.
- Texture Heaven: You get the satisfying crunch of the graham cracker base, the smooth, creamy peanut butter layer, and the crisp snap of chocolate, all finished with a sprinkle of flaky salt for contrast. It’s a party in your mouth!
- Crowd-Pleaser: Seriously, who doesn’t love this flavor combo? Take these to any gathering, and watch them disappear.
- Perfect Portions: Our method ensures you can cut neat squares or bars, making them easy to serve and share.
- Make-Ahead Magic: These bars need chill time, which makes them ideal for preparing in advance. Just slice before serving!
Gathering Your Ingredients for Salted Chocolate Peanut Butter Bars
Alright, let’s talk about the delicious building blocks for these incredible bars. The beauty here is that most of these items are probably already lurking in your pantry or are easily found at any grocery store. Using quality ingredients will elevate your bars, but standard pantry staples work wonderfully too.
Here’s what you’ll need, with a little detail on why each plays its part:
- Graham Cracker Crumbs: These form our sturdy, slightly sweet, and crunchy foundation. You can buy pre-crushed crumbs for convenience or crush whole graham crackers yourself (about 10-12 full sheets). The fine texture is key for a compact base.
- Melted Unsalted Butter: This binds the graham cracker crumbs together, giving the base structure. Using unsalted butter allows you to control the overall saltiness, especially since we’re adding flaky sea salt on top.
- Granulated Sugar: Just a touch to sweeten the base and complement the graham crackers.
- Creamy Peanut Butter: The star of the show! Use a standard creamy peanut butter for the best texture in the filling. Natural peanut butter can sometimes separate and make the filling too oily or grainy. This is the layer that brings that signature peanut butter flavor and creamy texture.
- Softened Unsalted Butter: This works alongside the peanut butter and powdered sugar to create that wonderfully smooth and rich middle layer. Make sure it’s truly softened, not melted, for the right consistency when beating.
- Powdered Sugar: Also known as confectioners’ sugar, this gives the peanut butter layer its sweetness and helps it set up firmly and smoothly.
- Vanilla Extract: A splash of vanilla enhances all the other flavors, adding depth to the peanut butter filling.
- Semi-Sweet Chocolate Chips: These provide the classic chocolatey top layer. Semi-sweet offers a good balance of sweetness that pairs perfectly with the peanut butter and salt. You could also use milk or dark chocolate chips if you prefer, though semi-sweet is the traditional choice here. Looking for other ways to use chocolate chips? Try these Easy Chocolate Clusters!
- Vegetable Oil or Shortening: A little bit of this added to the melted chocolate makes the chocolate topping smoother and easier to pour. Crucially, it also helps the chocolate cut cleanly once chilled, preventing cracking and shattering.
- Flaky Sea Salt: This is the finishing touch that ties everything together. The flaky texture and bursts of salt against the sweet chocolate and peanut butter are absolutely divine. Don’t skip this!
Crafting Your Salted Chocolate Peanut Butter Bars: Step-by-Step
Making these bars is a breeze, but paying attention to the simple details, especially chilling times and cutting technique, will make all the difference in achieving those neat layers and perfect slices we talked about. Let’s walk through it together.
-
Prepare Your Pan: Your first step is to line a standard 9×13 inch baking pan. Use parchment paper for this. Make sure you leave a generous overhang on the sides – think “handles.” This overhang is going to be your best friend later when it’s time to lift the entire chilled block out of the pan for easy cutting. Don’t skip the overhang; it makes life so much easier!
-
Create the Crunchy Base: Grab a medium-sized bowl. Combine your graham cracker crumbs, the melted unsalted butter, and the granulated sugar. Stir everything together until the crumbs are evenly moistened and look like wet sand. Now, pour this mixture into your prepared pan. Using the bottom of a glass or a flat spatula, press the mixture down firmly and evenly into the bottom of the pan. You want a compact layer that won’t crumble apart when you slice.
-
Whip Up the Peanut Butter Filling: In a separate, larger bowl, combine the creamy peanut butter and the softened unsalted butter. Beat them together with an electric mixer or a sturdy whisk until the mixture is smooth and creamy. Gradually add the powdered sugar, mixing on low speed at first to avoid a sugar cloud, then increasing the speed until everything is well combined and fluffy. Finally, mix in the vanilla extract until just incorporated. The goal is a thick, spreadable, yet firm peanut butter mixture.
-
Layer the Creamy Goodness: Carefully spread the peanut butter mixture evenly over the graham cracker base. Take your time here. Use an offset spatula or the back of a spoon to get it as smooth and level as possible from edge to edge. This layer should be distinct and even.
-
Chill the Peanut Butter Layer: This is the first crucial chilling step! Place the pan in the refrigerator for at least 30 minutes. This time allows the peanut butter layer to firm up significantly. If it’s too soft, the chocolate topping will sink into it or mix rather than sitting neatly on top, making clean cuts impossible.
-
Melt the Chocolate: While the peanut butter layer is getting nice and firm in the fridge, it’s time to handle the chocolate. In a microwave-safe bowl, combine your semi-sweet chocolate chips and the tablespoon of vegetable oil or shortening. Microwave on 50% power in 30-second intervals, stirring well after each, until the chocolate is completely melted and smooth. Alternatively, you can melt it gently over a double boiler, stirring constantly until silky. Adding the oil or shortening is key for a pourable, smooth chocolate layer that cuts beautifully later.
-
Pour and Spread the Chocolate: Retrieve your pan with the chilled peanut butter layer from the refrigerator. Pour the warm, melted chocolate evenly over the top. Use a spatula to quickly but gently spread the chocolate into a smooth, even layer, covering the peanut butter completely. Work relatively quickly as the cold peanut butter layer will cause the chocolate to start setting.
-
Add the Salty Sparkle: Immediately after spreading the chocolate, and while it’s still wet and shiny, generously sprinkle flaky sea salt over the entire surface. Don’t be shy! The salt is essential for balancing the sweetness and adding that perfect savory counterpoint. The flaky crystals provide lovely little bursts of saltiness.
-
The Final Chill (This is THE Trick!): This is arguably the most important step for clean cuts. Return the pan to the refrigerator and let it chill for at least 2 hours, or even better, until the chocolate layer is completely hard and firm. An extended chill allows all the layers to firm up properly, creating distinct boundaries that a knife can slice through cleanly. Don’t rush this step! For a great no-bake dessert that also benefits from chilling, check out our Easy No-Bake Chocolate Cream Loaf.
-
Slice for Perfection: This is where the magic happens. Use that parchment paper overhang to lift the entire chilled block of bars out of the pan and onto a cutting board. Now, grab your largest, sharpest knife. For the absolute cleanest cuts, dip your knife blade in hot water and wipe it completely dry with a paper towel before each cut. The warm, dry blade will glide through the chocolate without cracking it and slice cleanly through the other layers. Cut into squares or bars of your desired size. Wipe the knife clean between cuts for the neatest edges. Store the finished bars in an airtight container in the refrigerator.
Tips for Perfect Salted Chocolate Peanut Butter Bars Every Time
Follow these extra tips to ensure your bars turn out beautifully and slice like a dream:
- Use the Right Peanut Butter: As mentioned, creamy, conventional peanut butter works best for the filling’s texture. Natural peanut butter tends to separate, and while delicious, it can make the filling tricky to get perfectly smooth and firm.
- Don’t Skip the Chilling: I know we emphasized this in the steps, but it bears repeating! Both chilling periods are vital for achieving distinct layers and ensuring the bars are firm enough to cut without turning into a gooey mess. The final, longer chill is non-negotiable for clean slicing.
- Invest in Parchment Paper: It’s inexpensive and makes removal and cleanup a breeze. The overhang is truly key to easy transfer for cutting.
- Master the Warm Knife Trick: Seriously, heating your knife under hot water (and drying it thoroughly!) before each cut is a game-changer. It slightly warms the chocolate surface as you cut, preventing it from cracking or dragging the other layers.
- Quality Chocolate Matters (Mostly): While chocolate chips work perfectly fine, using higher quality melting chocolate or chopped chocolate bars can result in an even smoother, more luxurious chocolate top layer that might be slightly less prone to cracking. When working with chocolate, especially melting it, adding a little oil like we did helps achieve that smooth consistency, similar to techniques used for other easy chocolate treats like Easy Chocolate Clusters.
- Add Extra Flavor: Want to get fancy? Mix mini chocolate chips or chopped peanuts into the peanut butter layer before spreading. Just make sure it’s still spreadable.
Serving Suggestions for Your Delicious Bars
These Salted Chocolate Peanut Butter Bars are fantastic on their own, enjoyed straight from the fridge. Their rich flavor means a small square is often just enough to satisfy a sweet craving. However, here are a few ways to serve them:
- Enjoy with a tall glass of cold milk or your favorite non-dairy alternative.
- Serve alongside a cup of coffee or tea for an afternoon treat.
- Cut into smaller bites and arrange on a dessert platter for parties.
- Pair a square with a scoop of vanilla ice cream for an extra decadent dessert.
Your Salted Chocolate Peanut Butter Bar Questions Answered (FAQ)
Here are some common questions folks ask about making these irresistible bars:
Can I use crunchy peanut butter?
While creamy peanut butter is recommended for the smoothest texture in the filling, you can use crunchy. Just be aware that the filling won’t be perfectly smooth, but it will add another layer of satisfying crunch! It’s all about personal preference.
How long do these bars last?
When stored in an airtight container in the refrigerator, these bars will typically stay fresh and delicious for 7-10 days. The cold environment helps maintain their structure and flavor.
Can I freeze Salted Chocolate Peanut Butter Bars?
Absolutely! Cut the bars into squares, then place them in a single layer on a baking sheet lined with parchment paper and freeze until solid. Once frozen, transfer them to an airtight, freezer-safe container or freezer bag, placing parchment paper between layers to prevent sticking. They can be frozen for up to 2-3 months. Thaw them in the refrigerator for a few hours before serving.
Why did my chocolate layer crack when cutting?
This is a common issue! It’s usually because the chocolate was too hard and brittle when you tried to cut it. The key solutions are ensuring the chocolate has a little oil or shortening added before melting (as the recipe instructs) and using the warm, dry knife technique described in step 10. Also, make sure the bars aren’t too cold – letting them sit at room temperature for just 5-10 minutes before cutting can help, though the warm knife method is often enough on its own.
Can I use different types of chocolate?
Yes! Semi-sweet is classic, but feel free to use milk chocolate for a sweeter bar or dark chocolate for a richer, less sweet option. Keep in mind that different chocolates might require slight adjustments to the amount of oil needed for melting and might have slightly different setting points, but the overall process remains the same.
What if I don’t have graham cracker crumbs?
You can easily make your own! Place whole graham crackers in a food processor and pulse until fine crumbs form. Or, put them in a zip-top bag, seal it, and crush them using a rolling pin. If graham crackers aren’t available, other crisp cookies like shortbread, vanilla wafers, or even some types of digestive biscuits can work as a substitute base. For other recipes that use a graham cracker base, check out our Graham Cracker Toffee.
Enjoy Your Homemade Salted Chocolate Peanut Butter Bars!
There you have it! A simple, no-bake recipe for Salted Chocolate Peanut Butter Bars that are not only incredibly delicious but also slice beautifully, leaving you with perfect, impressive layers. That combination of salty, sweet, crunchy, and creamy is truly unbeatable.
Whip up a batch for your next get-together, a special occasion, or just because you deserve a fantastic treat. Once you see how easy they are and taste the result, they’re sure to become a regular in your dessert rotation. Happy slicing and even happier eating!
If you try this recipe, I’d love to hear how it turned out! Leave a comment below and let me know your favorite part. Happy baking (or rather, no-baking)!
Salted Chocolate Peanut Butter Bars

Ingredients
- 1 and 1/2 cups graham cracker crumbs
- 1/2 cup melted unsalted butter
- 1/4 cup granulated sugar
- 1 and 1/2 cups creamy peanut butter
- 1/2 cup unsalted butter softened
- 2 cups powdered sugar
- 1 teaspoon vanilla extract
- 12 ounces semi-sweet chocolate chips
- 1 tablespoon vegetable oil or shortening
- Flaky sea salt for topping
Directions
- Line a 9×13 inch baking pan with parchment paper, leaving some overhang on the sides for easy removal.
- In a medium bowl, combine the graham cracker crumbs, melted butter, and granulated sugar. Press this mixture firmly and evenly into the bottom of the prepared pan to form the base layer.
- In a separate large bowl, beat together the creamy peanut butter and softened butter until smooth. Gradually add the powdered sugar and vanilla extract, mixing until well combined and creamy.
- Spread the peanut butter mixture evenly over the graham cracker base. Use an offset spatula or the back of a spoon to smooth the top.
- Place the pan in the refrigerator for at least 30 minutes to allow the peanut butter layer to firm up. This step is crucial for creating distinct layers.
- While the peanut butter layer chills, melt the chocolate chips with the vegetable oil or shortening in a microwave safe bowl or over a double boiler. Stir until completely smooth.
- Pour the melted chocolate evenly over the chilled peanut butter layer. Smooth the top with a spatula.
- Immediately sprinkle flaky sea salt generously over the melted chocolate.
- Return the pan to the refrigerator and chill for at least 2 hours, or until the chocolate layer is completely set and firm. This extended chilling is key to clean cuts.
- To cut cleanly, remove the chilled bars from the pan using the parchment paper overhang. Place the block of bars on a cutting board. Use a large, sharp knife. For the cleanest cuts, you can heat the knife slightly by running it under hot water and wiping it dry before each cut. Cut into squares or bars. Store in an airtight container in the refrigerator.