
Are you tired of mushy, bland peas that taste like they came straight from a can? I know I used to be! For years, I struggled to make peas a side dish I actually looked forward to. But after some experimenting, I discovered the secret: caramelized onions and perfectly timed sautéing. This Sautéed Peas with Caramelized Onions recipe transforms humble peas into a vibrant and flavorful side that will brighten any meal. Get ready to say goodbye to mush and hello to deliciousness!
Why You’ll Love This Sautéed Peas Recipe
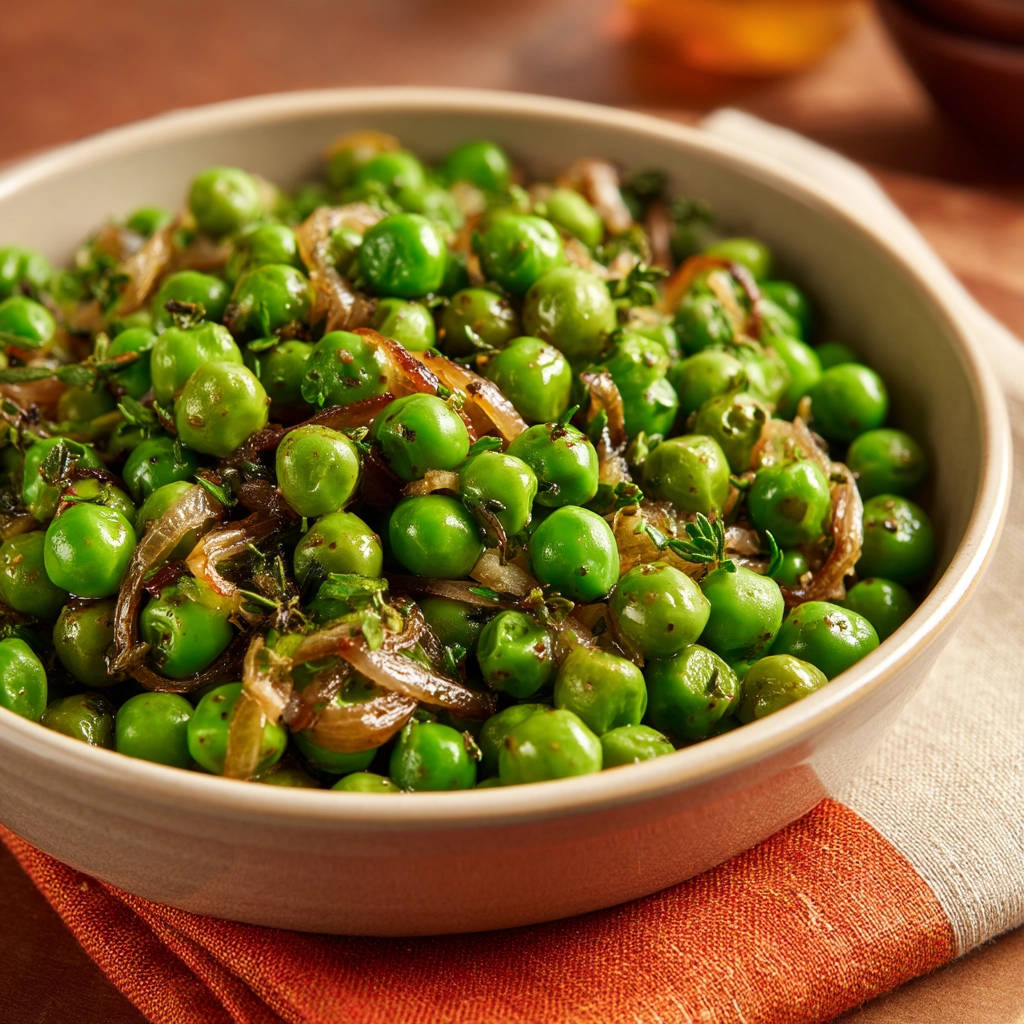
This isn’t your grandma’s mushy pea recipe. Here’s why you’ll be making this again and again:
If you’re enjoying the caramelized onions here, you might also like these balsamic glazed pearl onions.
- No More Mush: The quick sauté ensures the peas stay tender-crisp, not mushy.
- Flavor Explosion: Caramelized onions add a deep, sweet, and savory flavor base.
- Quick & Easy: Ready in under 20 minutes, it’s perfect for busy weeknights.
- Versatile: Pairs well with almost any main course.
- Fresh & Vibrant: The bright green peas and fresh herbs make this dish visually appealing and bursting with freshness.
Gathering Your Ingredients for Sautéed Peas with Caramelized Onions
The beauty of this recipe lies in its simplicity, using just a few key ingredients to create a delightful side dish. The star, of course, is the pea itself, complemented by the sweetness of caramelized onions and a touch of fresh herbs. This simple combination ensures that each bite is a burst of flavor and texture.

- Green Peas: You’ll need 2 cups of either fresh or frozen green peas. Fresh peas are wonderful when in season, offering a slightly sweeter and more delicate flavor. However, frozen peas are a fantastic and convenient alternative, providing consistent quality and availability year-round. Just make sure not to thaw them beforehand – they go straight from the freezer to the skillet.
- Yellow Onion: One medium yellow onion is the foundation of our flavor. Yellow onions caramelize beautifully, developing a rich, sweet flavor that perfectly complements the peas. Slice it thinly and evenly for uniform cooking.
- Unsalted Butter or Olive Oil: Two tablespoons of either unsalted butter or olive oil will provide the fat needed to sauté the onions and peas. Butter adds a richer, more decadent flavor, while olive oil offers a lighter, slightly fruity note. Choose whichever you prefer based on your taste preferences.
- Fresh Herbs: Two tablespoons of chopped fresh herbs, such as parsley or thyme, add a touch of brightness and freshness to the dish. Parsley provides a clean, slightly peppery flavor, while thyme offers a more earthy and aromatic note. Feel free to experiment with other herbs like mint or chives as well.
- Salt and Black Pepper: To taste. These are essential for seasoning and enhancing the natural flavors of the ingredients. Don’t be shy with the seasoning – it makes a big difference!
Crafting Your Sautéed Peas: Step-by-Step
Making perfectly sautéed peas is all about technique and timing. By following these simple steps, you’ll avoid the dreaded mushy peas and create a vibrant, flavorful side dish that everyone will love. The key is to caramelize the onions properly and then quickly sauté the peas just until they are tender-crisp.
- Sauté the Onions: In a large skillet, melt the butter or heat the olive oil over medium heat. This provides the foundation for the entire dish. The fat will help to evenly cook the onions and prevent them from sticking to the pan.
- Caramelize the Onions: Add the thinly sliced onion to the skillet and cook, stirring occasionally, until softened and lightly caramelized, about 8 to 10 minutes. This is the most important step for building flavor. The onions should be golden brown and sweet-smelling. Don’t rush this step – the caramelized onions are what make this dish so special. Stir occasionally to prevent burning, adjusting the heat if necessary.
- Add the Peas: Increase the heat slightly and add the green peas (either fresh or frozen) to the skillet with the cooked onions. Increasing the heat helps to quickly cook the peas without making them mushy.
- Sauté the Peas: Cook, stirring frequently, just until the peas are heated through and bright green. This will take about 2 to 4 minutes for fresh peas or 3 to 5 minutes for frozen peas (check package directions for specific timing). The key to avoiding mushy peas is not to overcook them. They need just enough time to become tender, not soft. Keep a close eye on them and stir frequently to ensure even cooking. The perfect pea should have a slight “pop” when you bite into it.
- Add Herbs and Season: Remove from heat and stir in the chopped fresh herbs. Then, season generously with salt and black pepper to taste. Adding the herbs at the end preserves their fresh flavor and vibrant color. Seasoning is crucial for bringing out the best in all the ingredients.
- Serve Immediately: Serve the sautéed peas immediately while they are still hot and tender-crisp. This dish is best enjoyed fresh.
Tips for Perfect Sautéed Peas Every Time
Want to guarantee perfect sautéed peas every single time? Here are a few pro tips to keep in mind:
- Don’t Overcrowd the Pan: If you’re using a smaller skillet, cook the peas in batches to avoid overcrowding. Overcrowding will lower the temperature of the pan and cause the peas to steam instead of sauté, resulting in a mushy texture.
- Use High-Quality Ingredients: The better the ingredients, the better the flavor. Opt for fresh, high-quality peas when in season, and use a good-quality butter or olive oil.
- Adjust Seasoning to Taste: Taste the peas after cooking and adjust the seasoning as needed. Some people prefer more salt, while others prefer more pepper.
- Experiment with Herbs: Feel free to experiment with different herbs to create your own unique flavor combination. Mint, chives, and dill are all great options.
What to Serve With Sautéed Peas
Sautéed peas with caramelized onions are incredibly versatile and pair well with a variety of main courses. They make a wonderful side dish for roasted chicken, grilled fish, or seared steak. For a vegetarian meal, try serving them alongside a hearty lentil loaf or a creamy polenta. You could even try adding some of these peas to a flavorful vegetable rice pilaf. They also add a touch of freshness to richer dishes like cheesy potatoes. The possibilities are endless!
For a similar experience highlighting those sweet, savory notes, try this green bean salad.
Your Sautéed Peas Questions Answered (FAQ)
Can I use canned peas for this recipe?
While you can use canned peas, I don’t recommend it. Canned peas tend to be much softer and can easily become mushy when sautéed. Fresh or frozen peas will give you a much better texture and flavor.
Can I make this recipe ahead of time?
Sautéed peas are best enjoyed fresh. If you need to make them ahead of time, cook them only until they are slightly underdone, then quickly chill them in an ice bath. When ready to serve, reheat them in a skillet with a little butter or olive oil until heated through.
Can I add other vegetables to this recipe?
Absolutely! Feel free to add other vegetables like carrots, asparagus, or mushrooms to the skillet along with the peas. Just be sure to adjust the cooking time accordingly.
What if my onions are burning before they caramelize?
If your onions are starting to burn, reduce the heat to low and add a tablespoon or two of water or broth to the skillet. This will help to deglaze the pan and prevent the onions from burning. Continue cooking, stirring frequently, until the onions are caramelized.
Looking for another flavorful side dish? Consider trying these creamy spiced potatoes!
What to Serve Alongside
Consider these dishes to round out your meal, especially if you enjoyed the fresh peas and sweet onions.
- For a hearty main, try this Egg-Stuffed Meatloaf with Gravy, Mash & Peas, which also features peas.
- If you’re leaning towards a robust, slow-cooked option, explore the depths of this savory beef stew.
Enjoy Your Homemade Sautéed Peas!
There you have it – perfectly sautéed peas with caramelized onions that are anything but mushy! This simple yet flavorful side dish is a game-changer and will quickly become a family favorite. So, ditch the canned peas and give this recipe a try. I guarantee you’ll never look at peas the same way again. Don’t forget to leave a comment below and let me know how yours turned out! And if you loved this recipe, please share it with your friends and family!


